Changing Brakes in a Miata
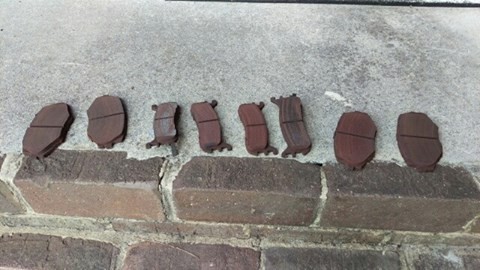
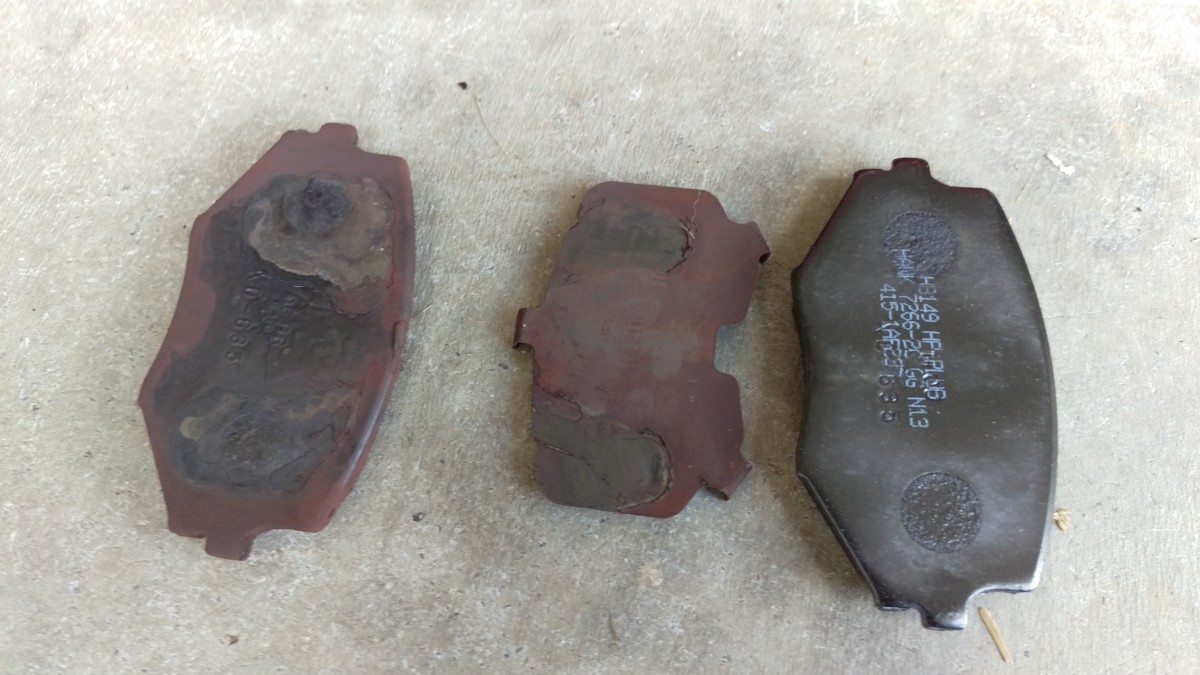
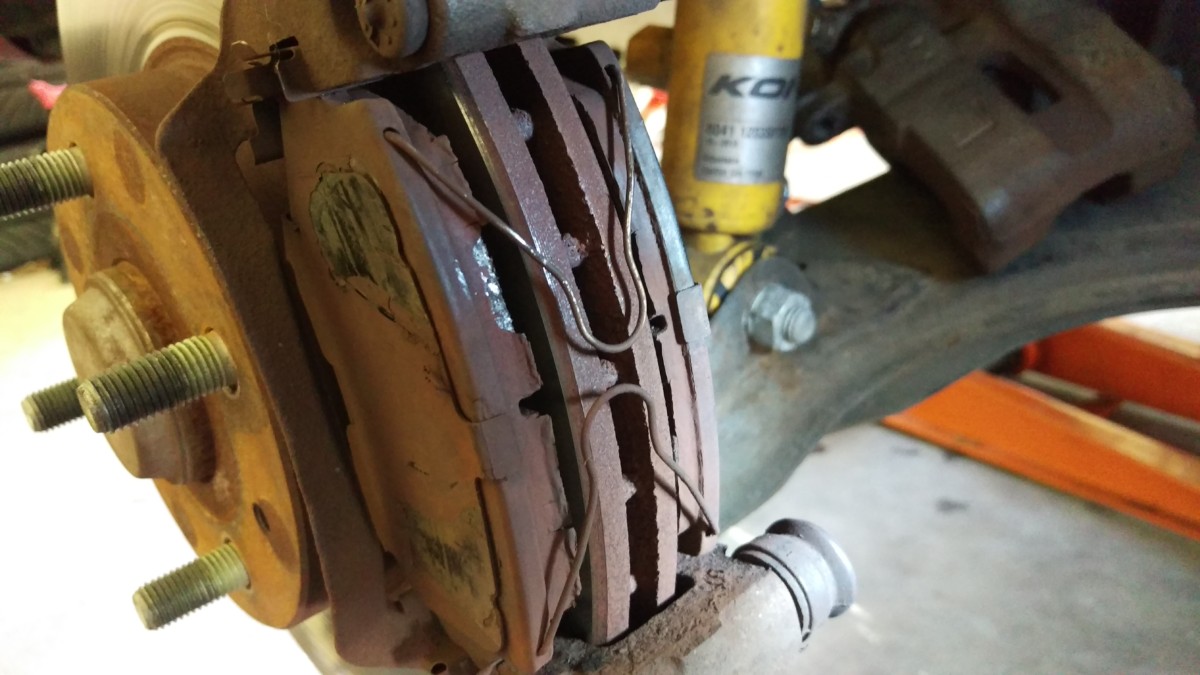
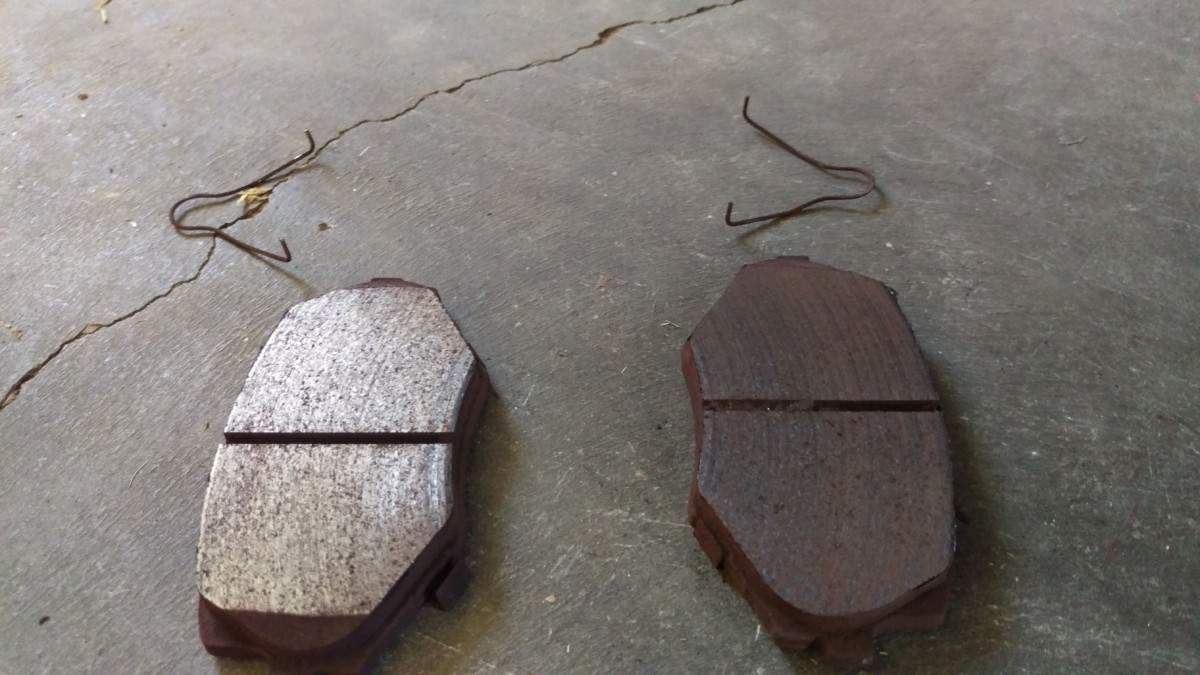
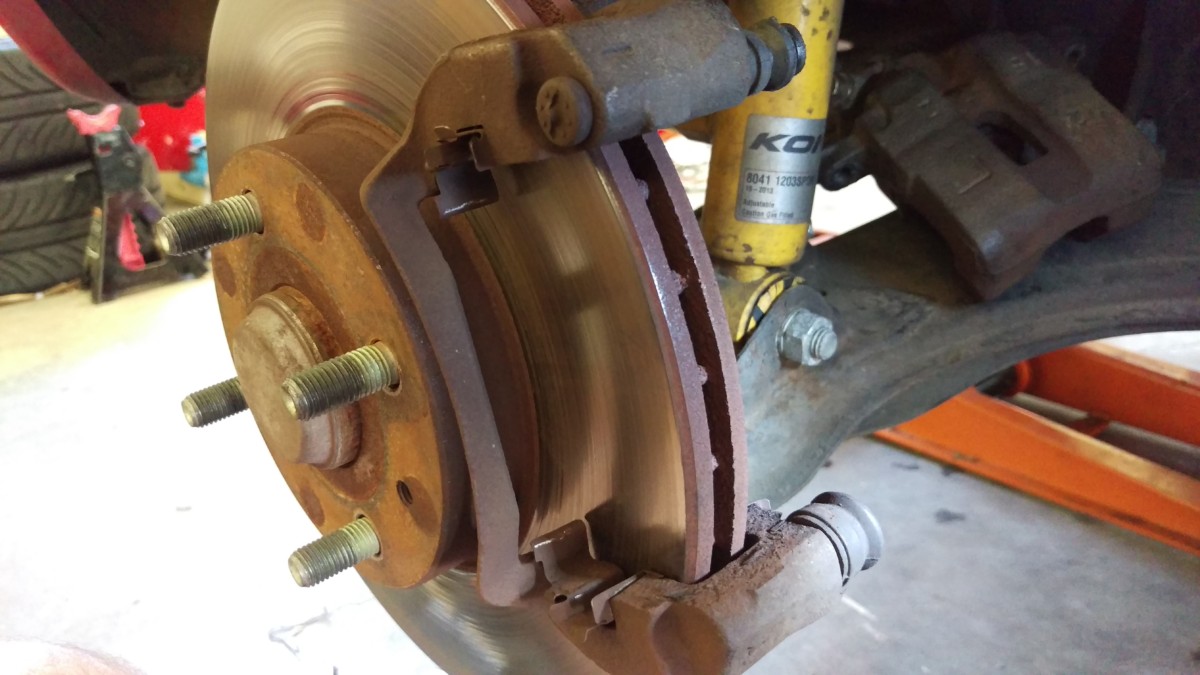
My old pads still had pad left, but were totally glazed and ruined
About three track days ago, I had put a fresh set of Hawk HPS pads and new NAPA brake rotors in my car. While I think the HPS is a fine street pad, I can’t say I recommend it for track use. Even as a fairly novice driver, I still cooked them to the point that they really weren’t gripping right by the third track day. They still had plenty of meat left on the pad, but they were badly glazed, even though it’s hard to see in the picture. I decided to put fresh pads on the car for my upcoming track day, and do a writeup. Changing brakes in a miatais very easy, as they have disc brakes all around and are a simple car to work on.
As with any of this, follow these instructions at your own risk. In this circumstance especially, do not do your own brakes if you don’t feel comfortable.
Shopping List
Note, you should really research which brake pads you want. There’s a lot of nuance with pad selection, unless you just want to stick Autozone pads on a daily driver and call it a day, which is perfectly acceptable for that usage. My next set of brake pads will probably be G-Loc pads.
Also, on rotor selection, I’m under belief that there’s no point in spending money on drilled, slotted, etc. The extra airflow and outgassing ventilation this supposedly gives you has never been shown to have much benefit, but there are very real cases where rotors have cracked. I just buy generic blank rotors like I link to below. You can get them off the shelf at NAPA or rockauto as well.
For pads and rotor changes:
- A set of front brake pads, like Hawk HPS
for street driving or Hawk DTC-60
for pure track use
- A set of rear brake pads, (Hawk HPS
and Hawk DTC-60
are options, again)
- Fresh rotors – You need two front rotors
and two rear rotors
- Some kind of brake grease for slider pins, Syl-Glide
works pretty well for daily driving, Amsoil Dominator for track use

You may also want:
- DOT4 brake fluid
if swapping calipers or bleeding brakes
- If you’re tracking the car, you may want even higher-temperature brake fluid like Motul RBF600
- Replacement calipers if necessary (Reman from NAPA/Autozone/etc)

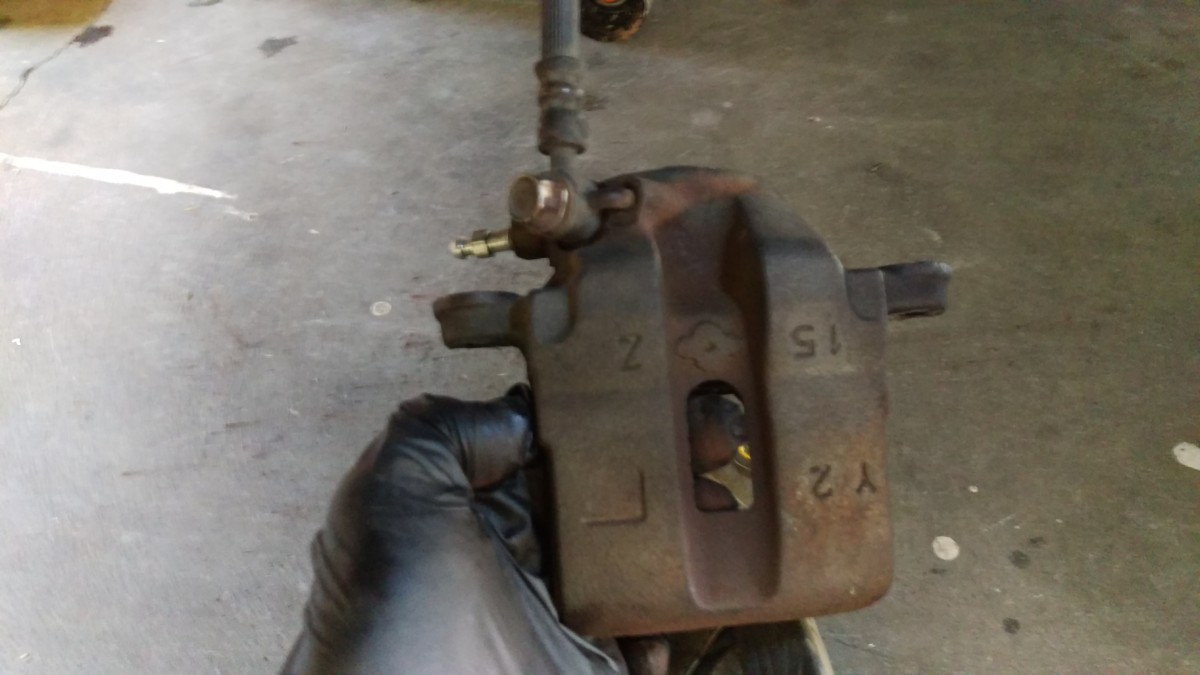
Removing the Rear Pads
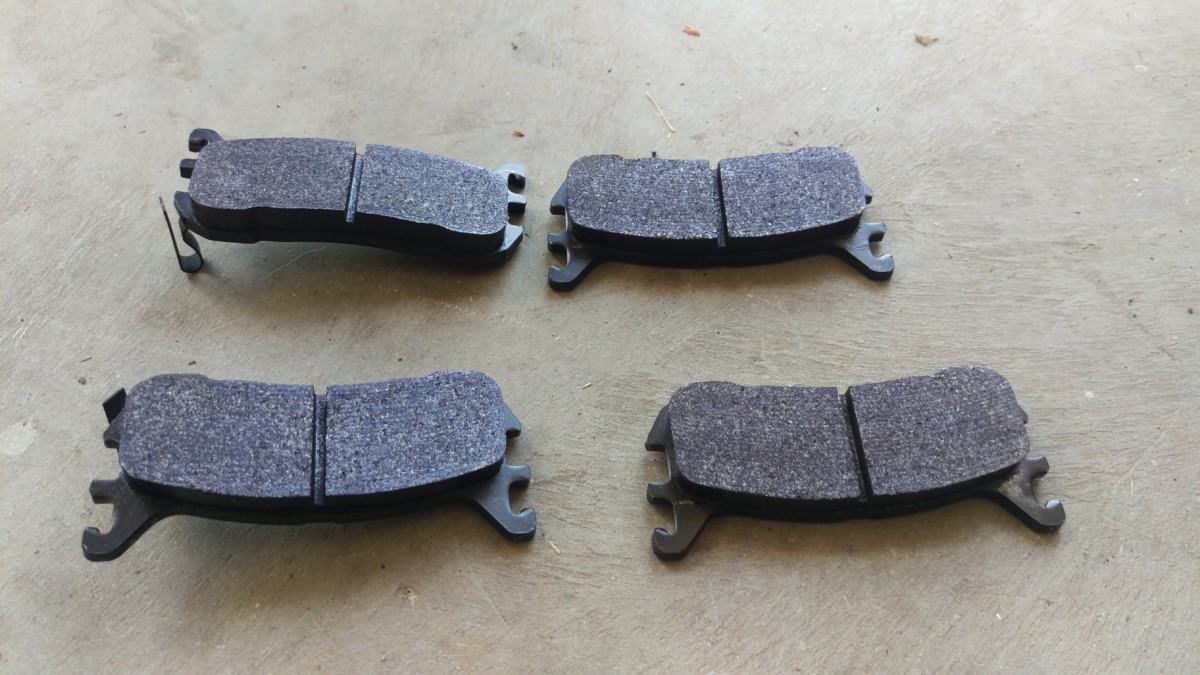
Fresh set of Hawk HP+ Pads
Here’s what the rear brake pads look like in a Miata. These are Hawk HP+ brakes, which are supposed to be a dual-duty track and street pad. Truthfully, they’re not the best track pad in the world; Hawk DTC-60, CarboTech XP8 or XP10, G-Loc R8 or R10, and a bunch of other pads have more heat capacity and better modulation. Additionally, the HP+ pads dust heavily, and the dust is very corrosive to your wheels. However, their transfer layer is compatible with HPS pads, and they’re cheap, so I put these on until I redo all of my brakes and rotors with G-Loc’s next year.
For street use, none of these pads are really suitable. The HPS pads I had previously weren’t bad for pure street driving.

Get the back of the car on jack stands, and remove the wheels
I started with the rear because I was bleeding the brakes as I go, which I’ll explain in the next section. Get the rear of the car securely on jack stands and remove both wheels.
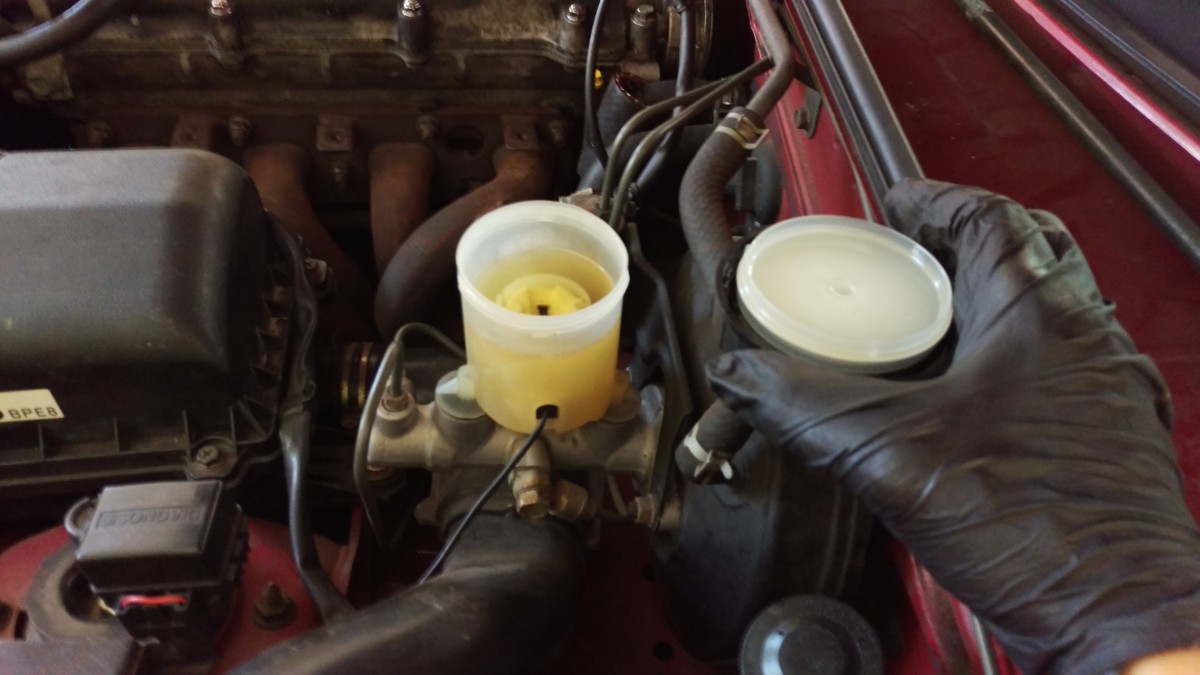
Uncap the master cylinder
You can go ahead and take the cap off the master cylinder. As you retract the rear brakes, the fluid level will rise. Keep an eye on it to make sure it doesn’t overflow. You’ll leave the cap off for most of these steps.

Remove the cap from the rear brake adjuster
Cap after removal
The rear brake calipers have an allen key-headed parking brake adjustment built in. There’s a cap on it in the location shown, go ahead and take the cap off with a wrench, I believe 14mm.

Allen key in brake adjustment screw

Another view of the hole
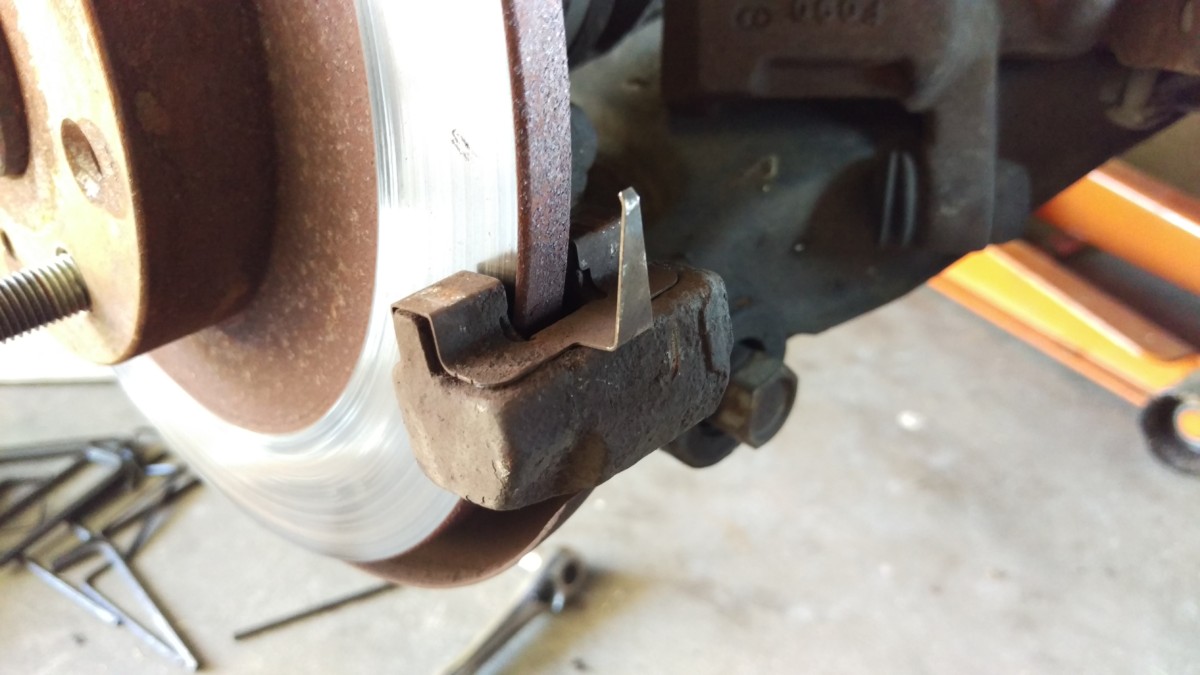
With the cap off, you can retract the rear caliper by putting an allen key in the now-exposed screw, as shown, and turning it counter-clockwise as you’re looking at it. (Lefty loosey.) Pro tip: Make sure you release the parking brake before doing this, or it will not turn. You must retract the rear calipers this way or else they may get damaged.
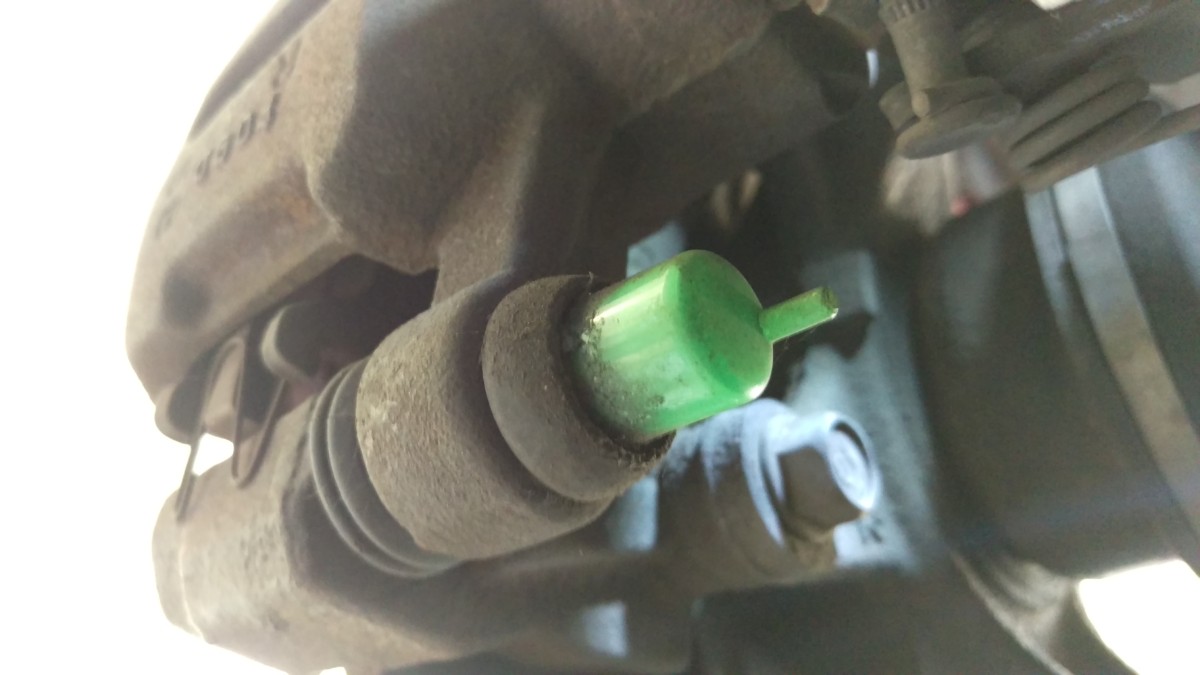
Remove the dust cap, this one is green but they’re usually black
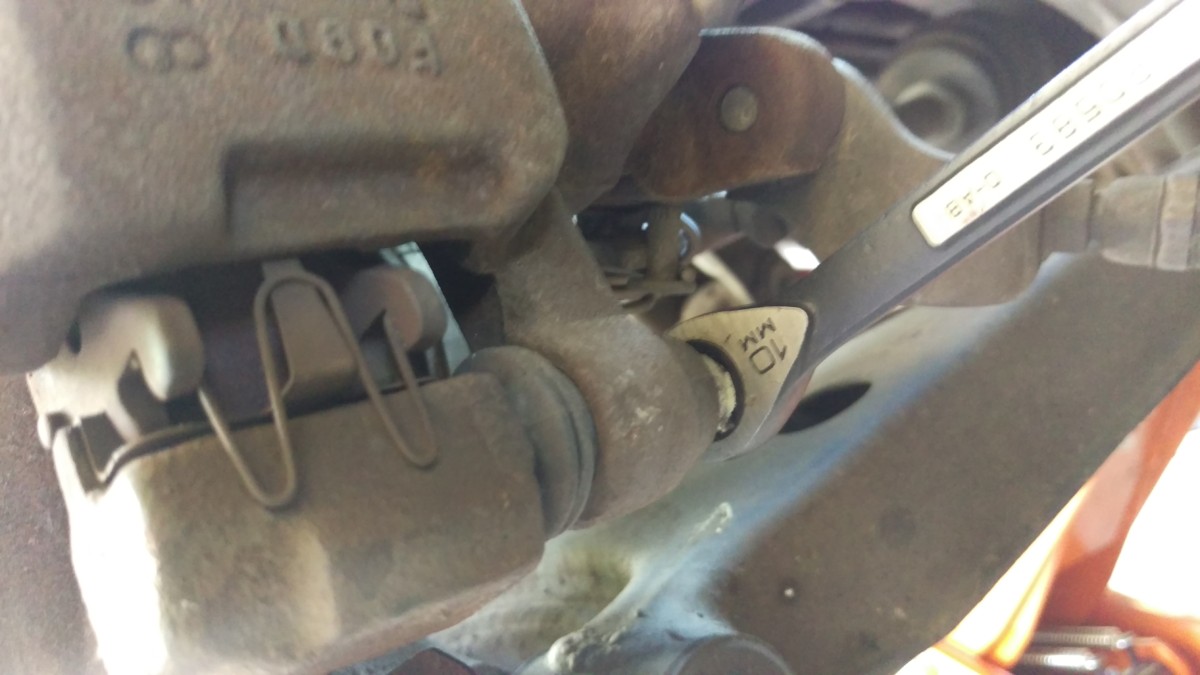
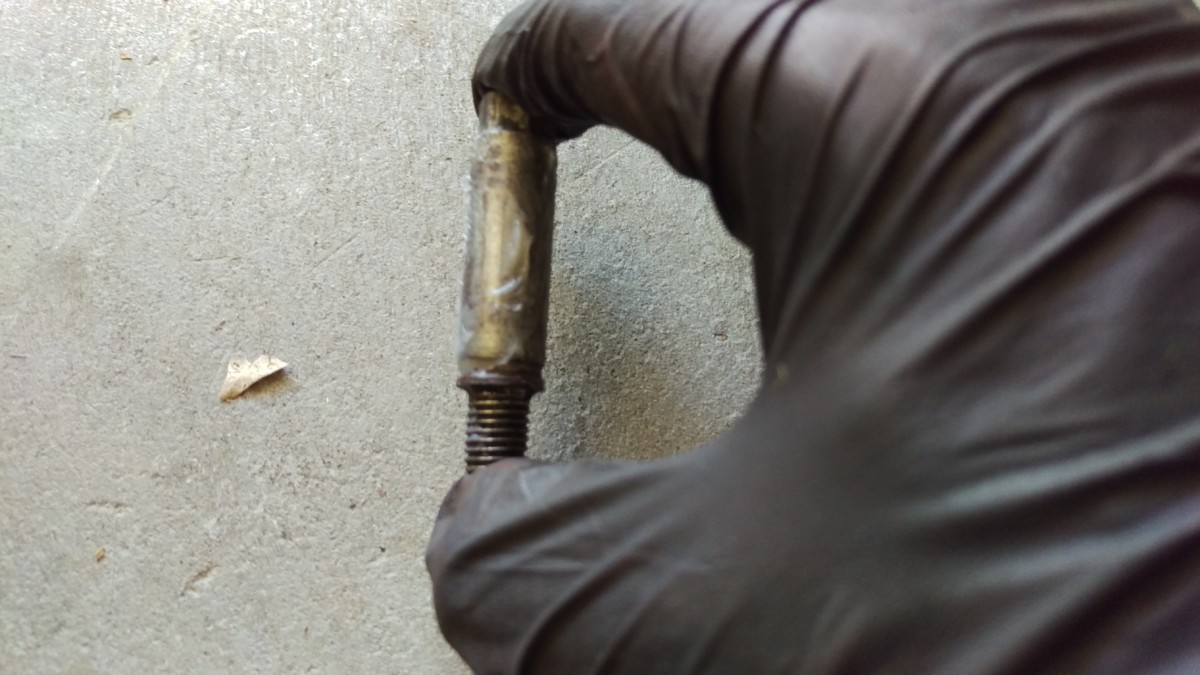
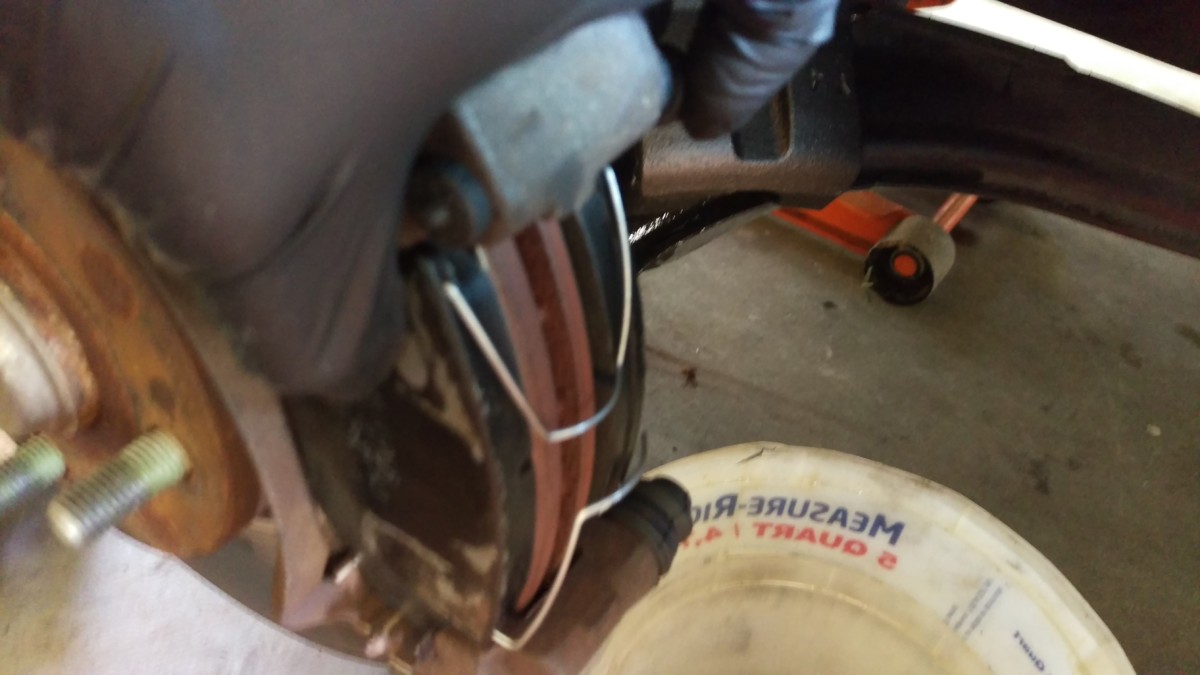
Undo the slider pin with a wrench – a ratcheting box wrench is really helpful here
Now that the caliper is retracted, we can remove the bottom slider pin and pull it off. To do this, first remove the dust cap on the lower slider pin, the green thing pictured. They are typically black; this one was in an aftermarket parts kit. Then, use a 10mm wrench to loosen the lower slider pin and remove it. You can use a socket wrench, but there’s not much clearance between the pin and the parking brake bracket, so it’s a good place to have a ratcheting wrench as pictured.

Lift the caliper up, it will pivot on the upper slider pin

Once lifted up, it can slide off the top pin
With the lower slider pin out and the caliper retracted from earlier, you should be able to pivot the caliper up as shown. It will swing on the upper slider pin. You can then push it towards the car to get it off the upper pin. Once removed, don’t let the caliper hang by the brake line! I usually just set it on the upper control arm.
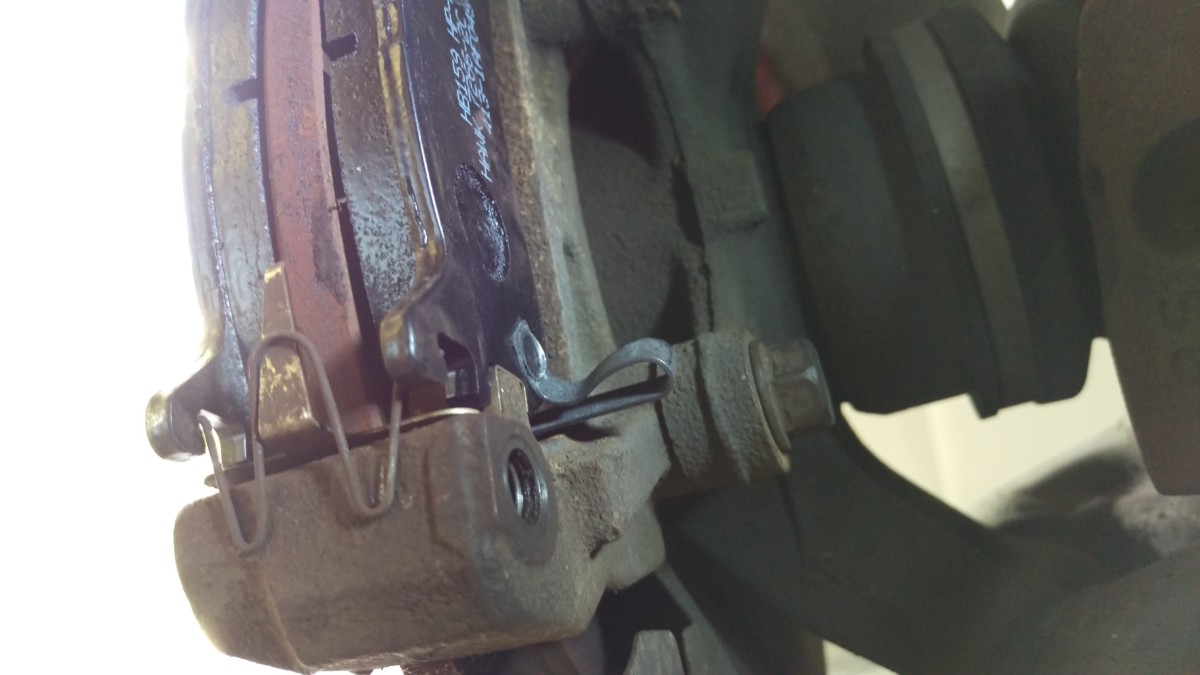
Lower clip
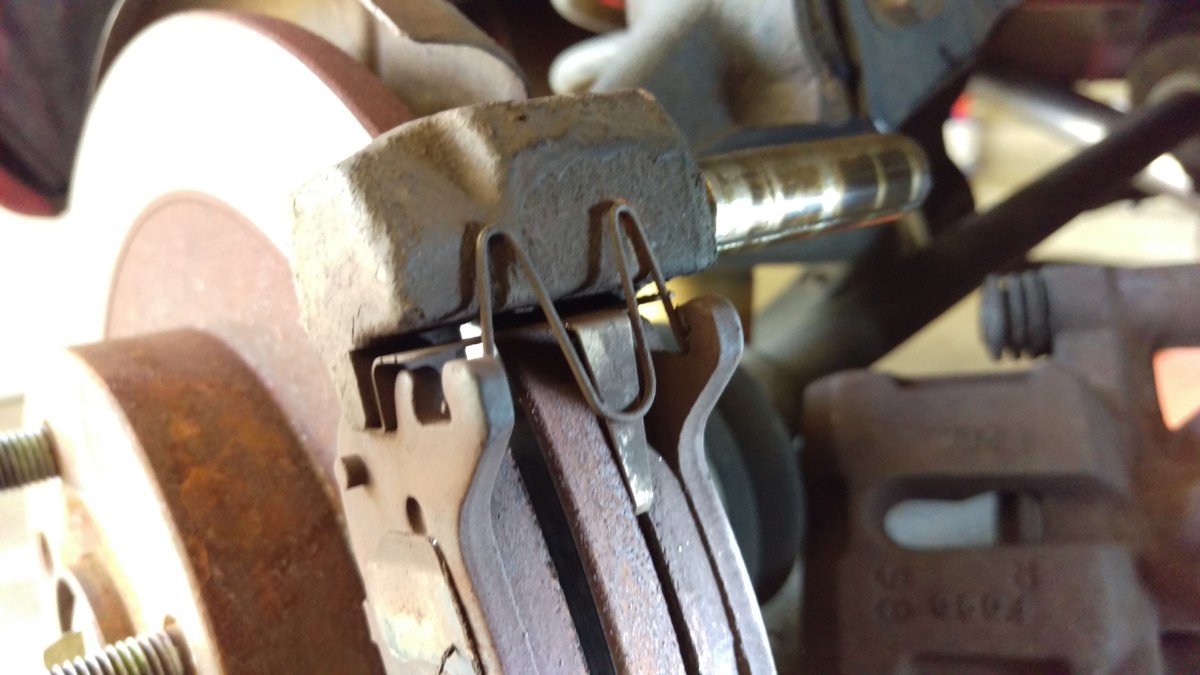
Upper clip
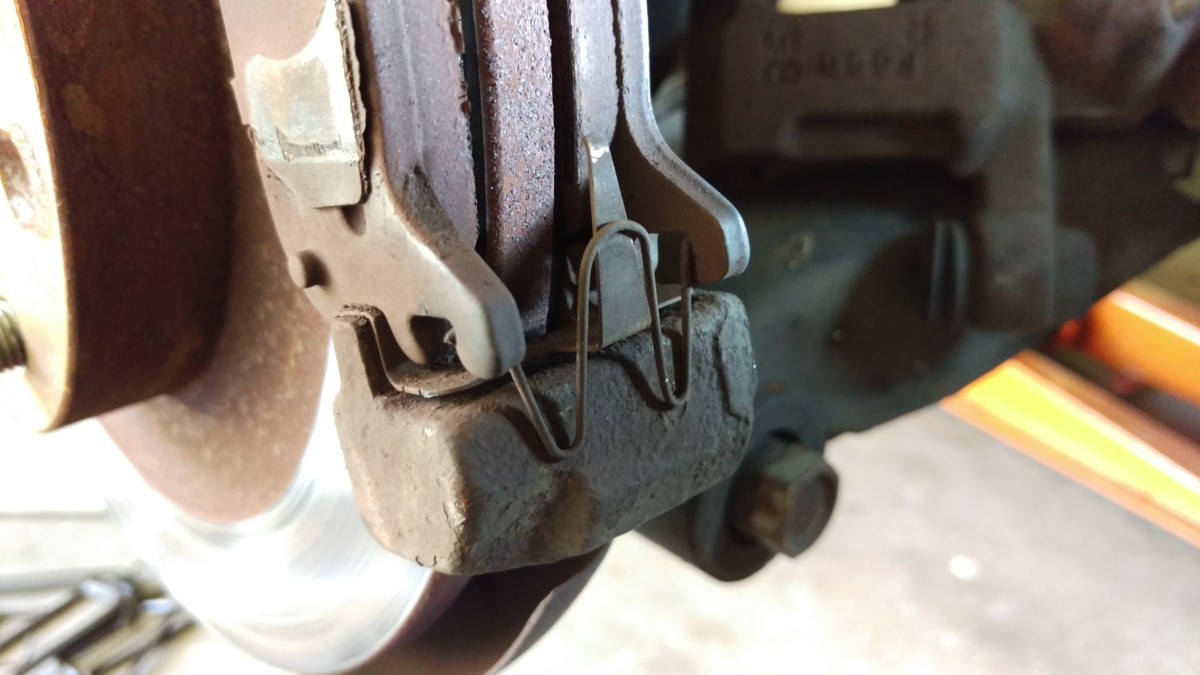
You’re now ready to pull out the pads. The first thing is to remove these little M-shaped clips that keep the pads from rubbing the rotor when you’re not braking. I use a small set of pliers.
Bracket on bottom – there’s on on top, too, that falls out
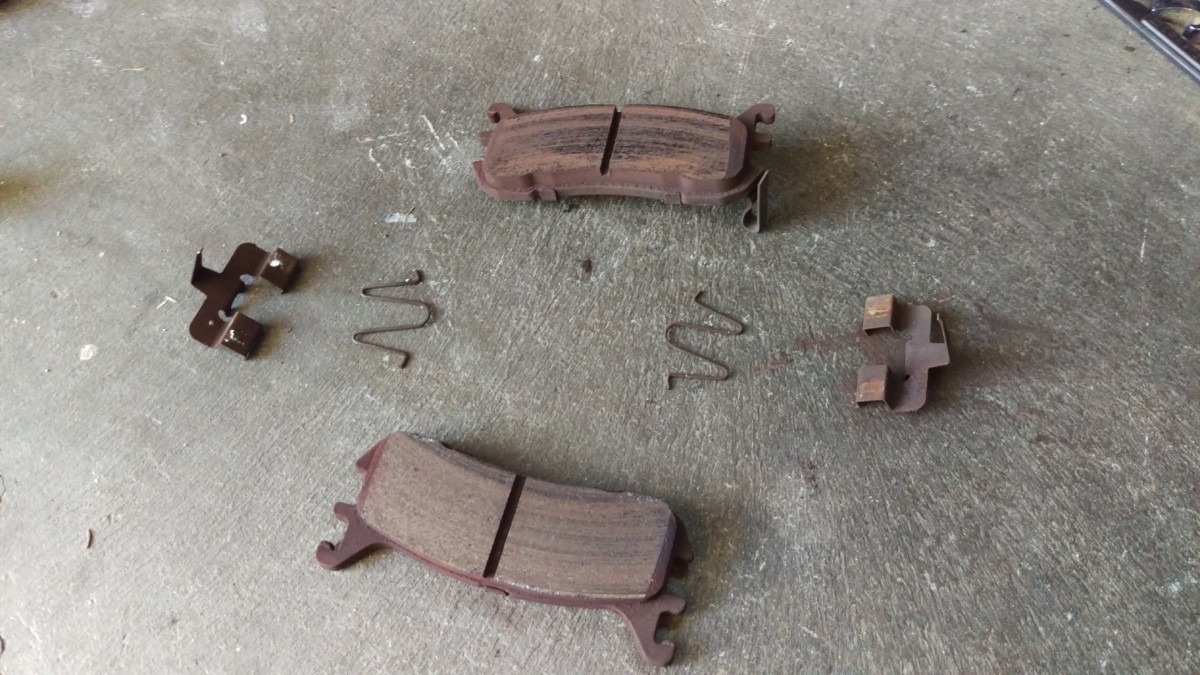
Pads and hardware
Once the clips are out, you can pull the pads off. There are also some metal brackets at the top and bottom of the pads. The top one will probably fall out when the pads come off; go ahead and pull the bottom one (pictured) off as well if you’re doing rotors. When you install your new pads, you really want to be sure to have all of this hardware. If some pieces are missing or damaged, Autozone and the like sell cheap little kits with all of these pieces included.
Replacing the rear rotors
If you’re just doing pads like I was, you can skip this step. However, most of the time, you really should also remove the rotors and either replace them or get them turned. Turning means they’re put on a lathe and resurfaced flush. On a Miata, it doesn’t usually make sense to do this, because replacement rotors are so cheap. NAPA has them off the shelf for $15-$20, and rockauto has them even cheaper.
Two caliper bracket bolts
Rotor removed
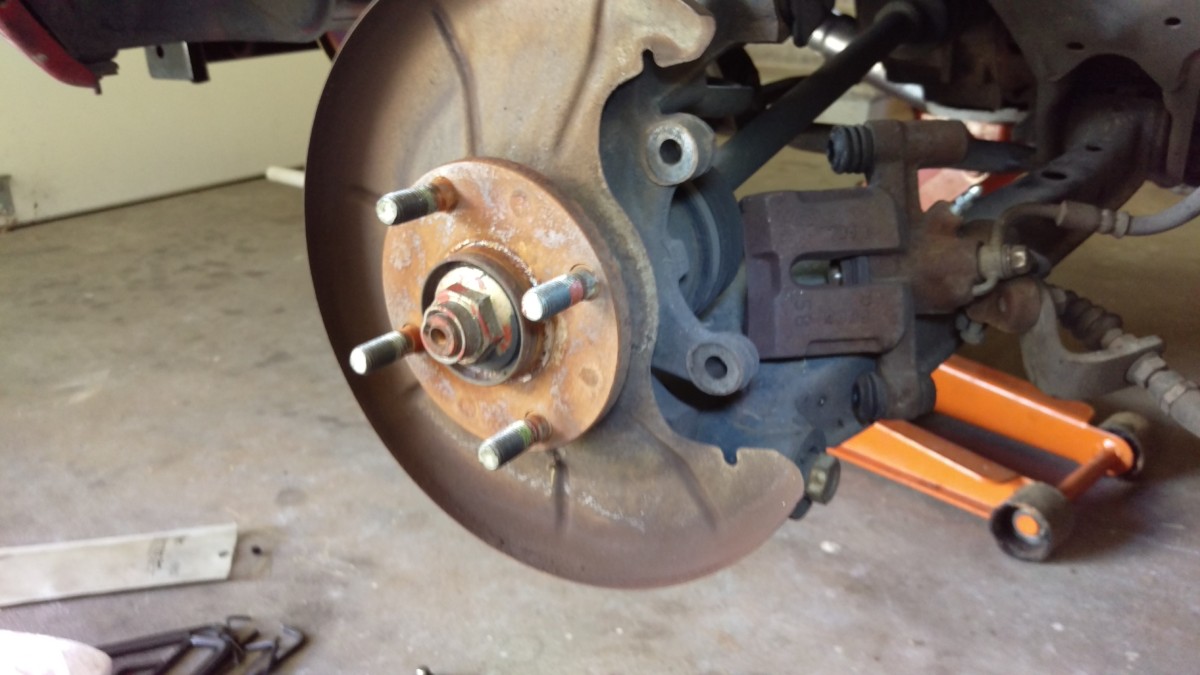
Removing the rotor is really easy. The only thing holding it on at this point is the caliper mounting bracket. The two bolts in the picture hold that on. Simply remove them and lift the bracket off. Then, the rotor will just slide off the hub.
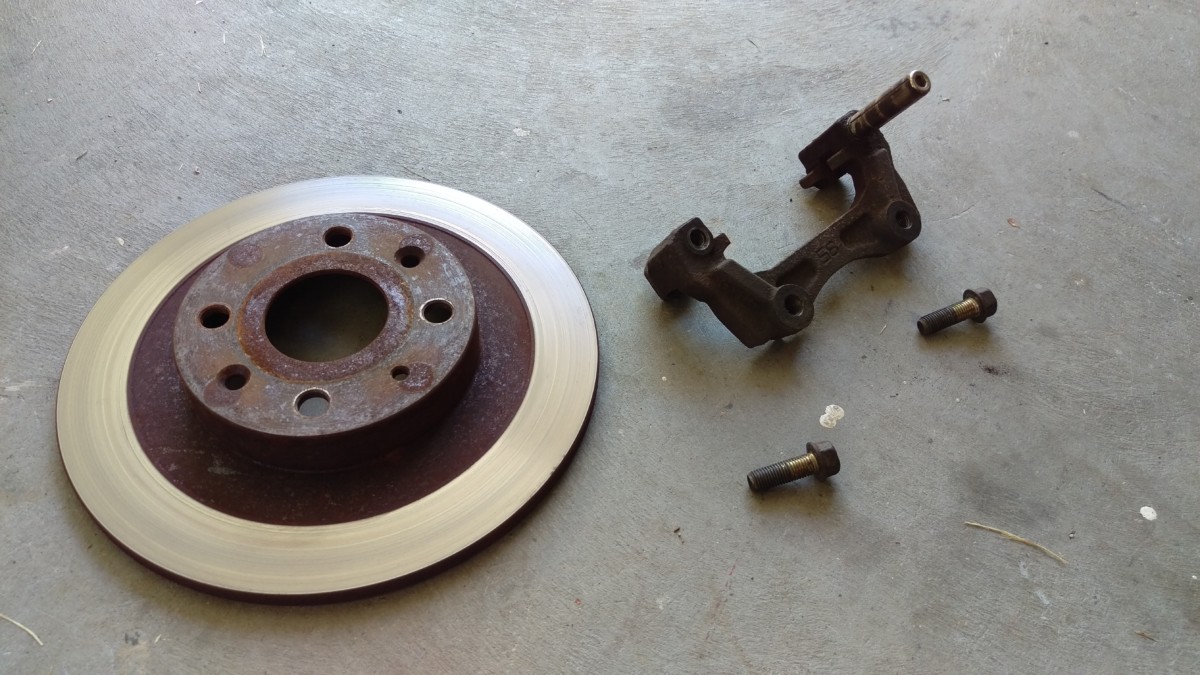
Rotor and bracket
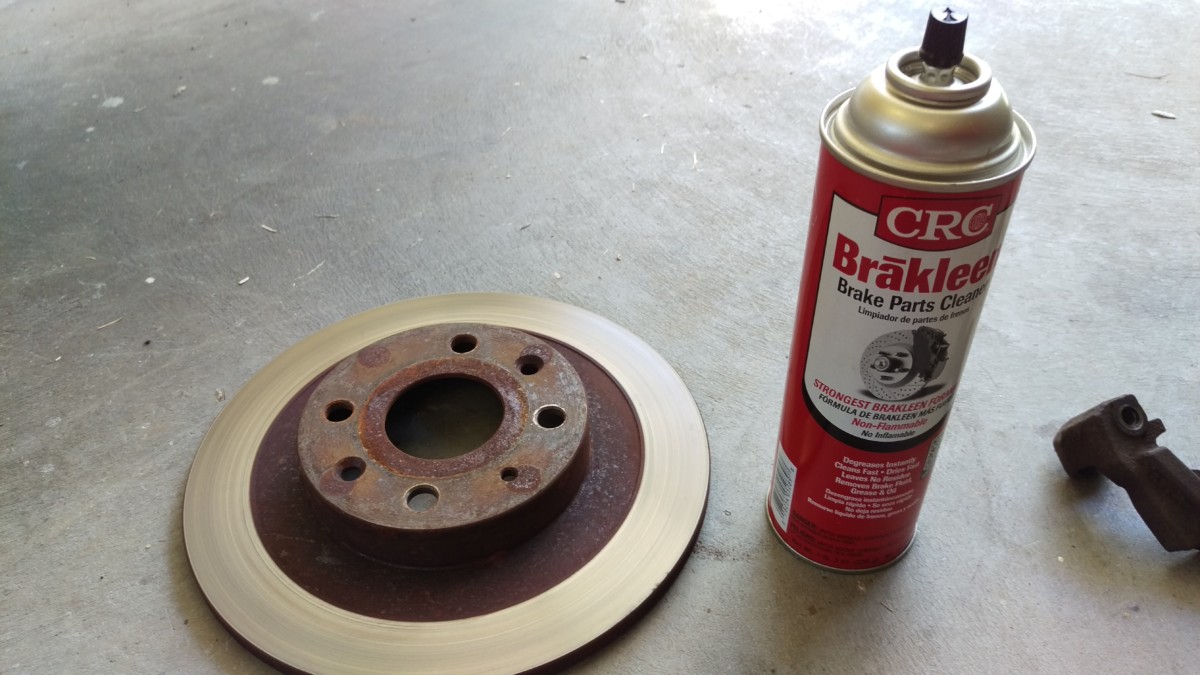
Cleaning with brake cleaner
Here’s the rotor, caliper bracket, and hardware. Be sure to thoroughly clean the rotor with brake cleaner while you’re here. Brake cleaner specifically is used because it will evaporate, where other cleaners could remain on the rotor and ruin the brake pads. If you get a new set of rotors, be sure to clean the factory grease off thoroughly before installing. The grease is there to prevent rust during shipping; the rotor should never be installed in the car with grease on it.
A note on shims and anti-squeal
Shims
Factory Miata pads have these metal shims on the back of the pad. You’re supposed to attach it with some sort of anti-squeal compound. This is apparently to help keep noise down. I had attached these last time, but since I cooked my pads at track day, I noticed that not only was any remaining compound long gone, but the shims themselves were rusting and falling apart. I’ve read enough about these failing and getting caught in the rotor that I decided to not install them again. I haven’t had any problems since throwing them away.
That said, your mileage may vary. This car sees dual duty track and daily use; I’d rather have fewer problems on the track than worry about noise. For a pure street car, you should probably keep your pads.
Reinstalling the rear pads
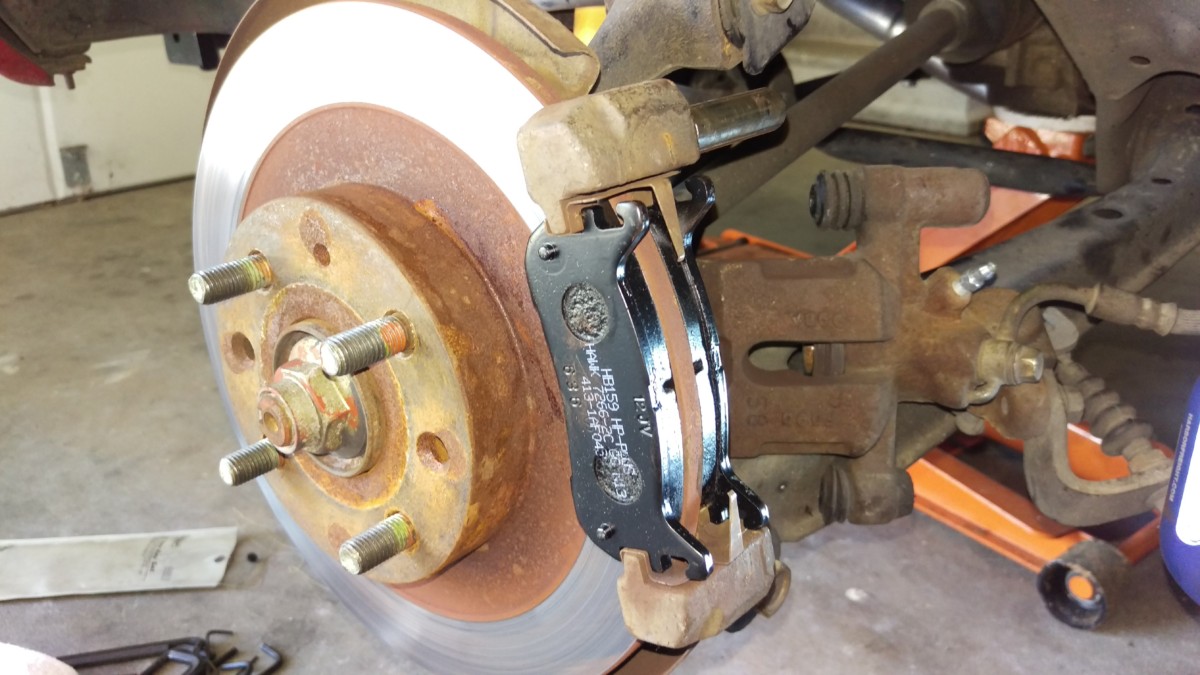
New pads
Put the rotor and caliper mounting bracket back on. Then, you can put the top and bottom metal brackets in and slide the pads on. Make sure you’ve shimmed and anti-squealed your pads (or not, depending) per the information above. I chose to leave the shims off and haven’t noticed any issues.
Put the clips back in
With the pads on, you can put the clips back in.
Grease the slider pins thoroughly
Second pin
The slider pins we removed earlier need to be cleaned and greased before reinstallation. The caliper slides on these pins, so keeping them lubricated is important to keep the brakes moving smoothly. You don’t want to overdo it, as it’ll all just wipe off and overpack the seals, but you do want a good coating. For a street car, any over-the-counter brake grease is probably fine, like Sil-Glyde. For track use, I noticed I was burning up this “high-temp” grease though, and switched to Amsoil Dominator. It’s a bit more spendy, but you can use it all over the car and it lasts against temperature much much better. I still try to regularly grease the pins when I’m tracking the car.
At this point, you can go ahead and put the pins in and tighten them down. Note that you may have to retract the rear caliper further if it won’t fit over the pads, since your new, fresh pads are probably thicker than the ones you’re replacing.
Adjusting the rear brakes
Once you get the caliper back together and bolted down, you have to readjust the parking brake. Simply spin the wheel and tighten the allen screw until the pads make contact and the wheel stops spinning. Then, back it off a third of a turn. Reinstall the cap on the allen screw, and you’re done. Don’t forget to put on your parking brake again before putting the rear tires on the ground.
Removing the front calipers

Lower pin, 17mm head
Upper pin, 14mm head
The front calipers are very similar to the rear, except that they don’t have the adjustment screw. Start the same as before: get the front wheels in the air and take the wheels off. Unlike the rear, the front calipers have two screw-in slider pins. Using a 17mm wrench on the lower one and a 14mm on the upper, remove both slider pins entirely.
Front caliper removed
Front caliper sitting on the upper control arm
Once the pins are out, you can pull the caliper off and set it aside. I simply stick it on the upper control arm, like the rear. Again, don’t let it hang by the brake line.
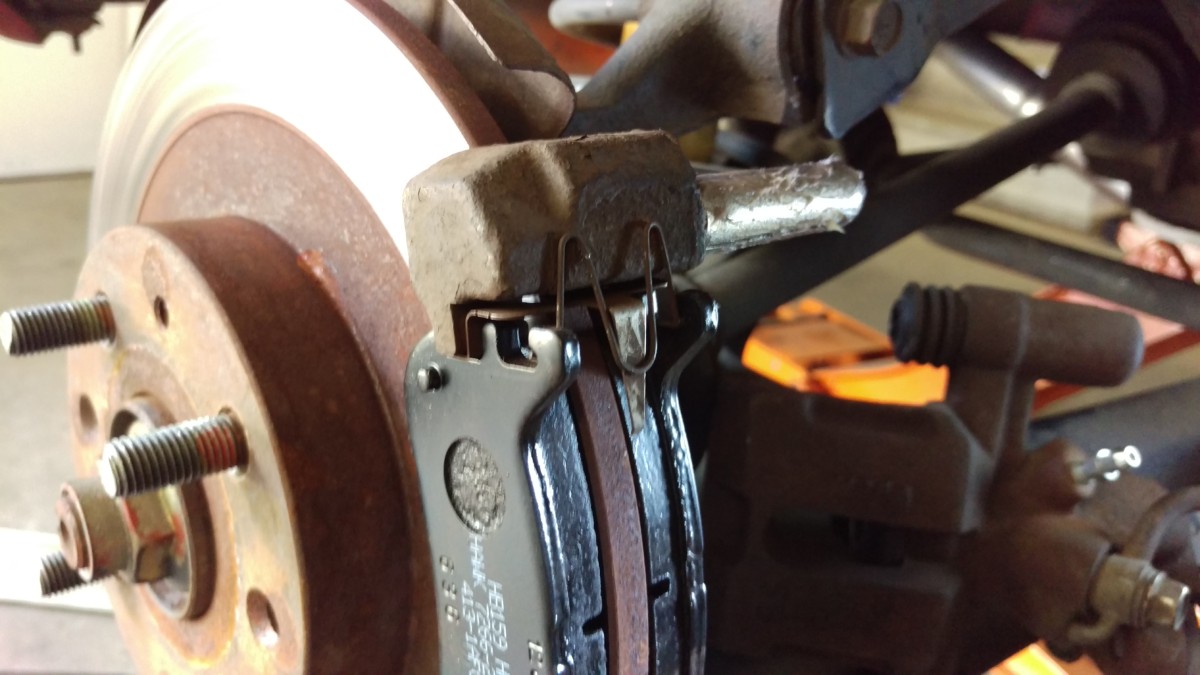
The front has slightly different hardware
Front pad hardware
The pads come off similar to the rear, just with slightly different hardware. The V-shaped clips are removed, and then the pads pull off. There are 4 little metal brackets this time, 2 per side, and they generally stay in better than in the rear.
Caliper mounting bracket
At this point, you can unbolt the caliper mounting bracket with 2 bolts, just like the rear, and swap the rotors as well.
Reinstalling the front brake pads

Use a clamp to compress the piston
Full disclosure: I probably should have put a block of wood or something over the caliper piston, but I didn’t have one handy. The front calipers still need to be retracted to put them back on. There’s no adjustment screw, unlike the rear. Instead, use a clamp, preferably with a block of wood to protect the piston, to force the piston back into its bore. Once retracted, you can remove the clamp to reinstall it. Just like the rears, grease the slider pins before reinstallation.
Replacing the front calipers
This is only necessary if you’re actually having issues. After a brake change, I noticed my front driver’s side brake was dragging. Not horribly, but badly enough. I suspected that the calipers were the originals from 1997, so I was planning to replace them eventually anyway, even if they weren’t leaking.
A sticky piston won’t move easily in the bore. The car will generally still brake, as the piston is under a lot of pressure in that situation. However, when you let off the pedal, there may not be enough force for the piston to pull back, and the brake will be stuck engaged. This can quickly devolve into overheating and ruining pads and rotors or even starting a fire. You can test if this is a problem by raising the car in the air and trying to spin a wheel. It should be noticeably harder to turn if you have a dragging caliper.
It’s also possible that a delaminating and collapsing brake line is to blame here. In that situation, the smaller-than-spec’d-diameter line allows fluid through to press the brake under pressure, but then doesn’t retract. It acts basically as a check valve. You can try retracting the piston with a clamp and then doing it again with the bleeder valve slightly cracked. If it works better with the bleeder cracked, the brake line may be restricting fluid flow. Wear gloves and eye protection to do this test, of course, as brake fluid will come out the bleeder.
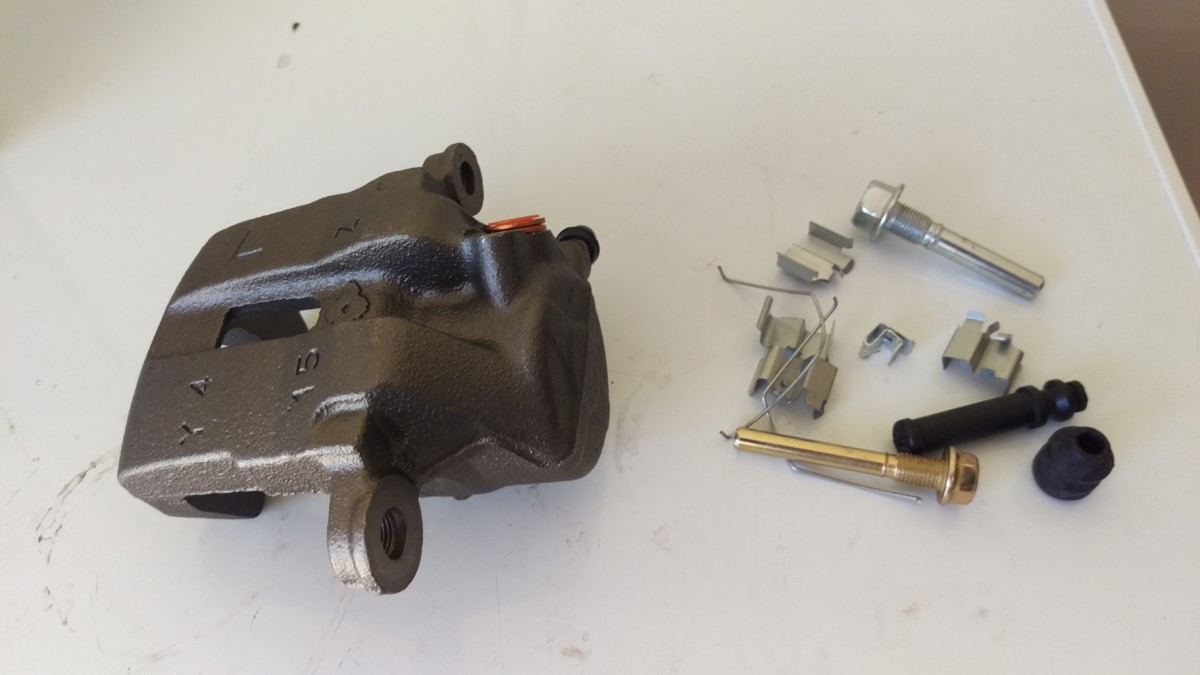
Remanufactured Caliper
You can rebuild calipers yourself fairly easily, but with a track day days away, I didn’t have time to bother, so I went with a remanufactured unit from the nearest parts store that could get me one quickly. I went ahead and did both sides to be safe, even though the problem was only on one side. The unit I got also came with new seals, clips, etc, which was nice.
Front caliper removed
Obviously, we’re going to start with the caliper removed from the wheel. Follow the previous steps above to get to this point.

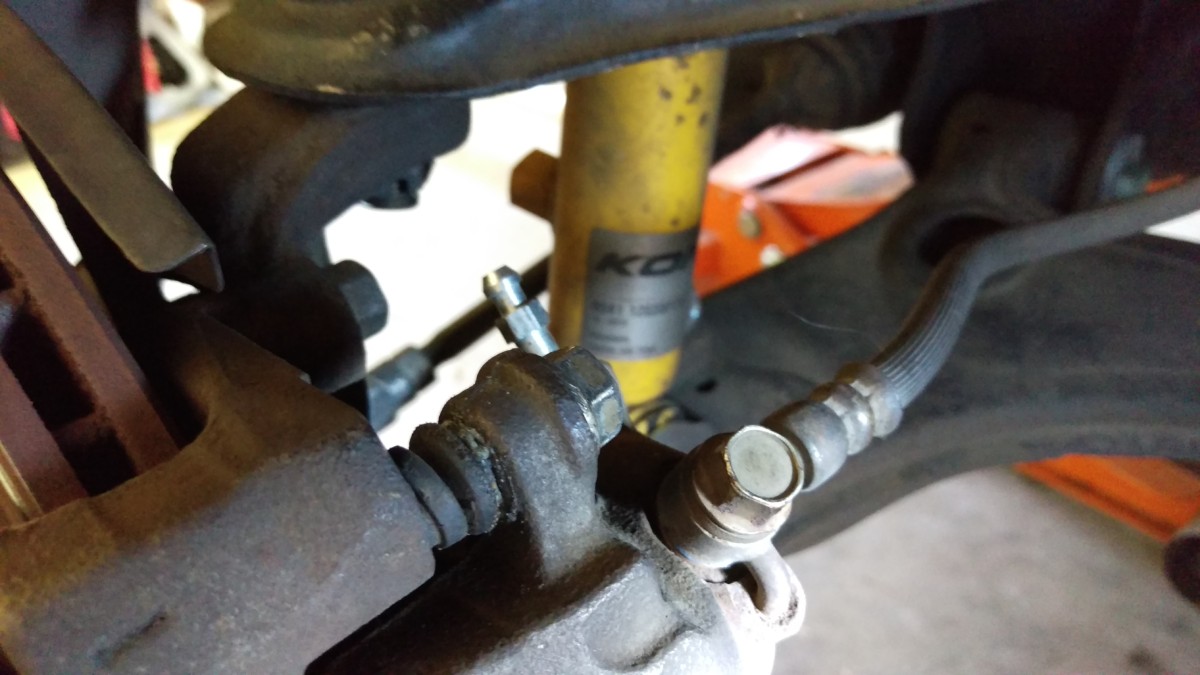
Brake line fitting
Before doing this, be sure you are wearing gloves and eye protection. I wear nitrile disposables for brake work. Also have paper towels or rags on hand to catch spillage. Brake fluid will go all over the place, and it is very bad for your skin and eats paint, so don’t let it get on your body work either. Have some brake cleaner handy to clean up, as well. And lastly, be sure to have a bucket of some kind sitting under the caliper ready to catch the drips.
Before you loosen the pictured fitting, also have your new caliper ready. You want to swap it over as fast as possible, to lose as little fluid as you can. It also helps to hold the caliper higher than the other end of the brake line, to help limit how much drips out. The fitting pictured is the one to remove.
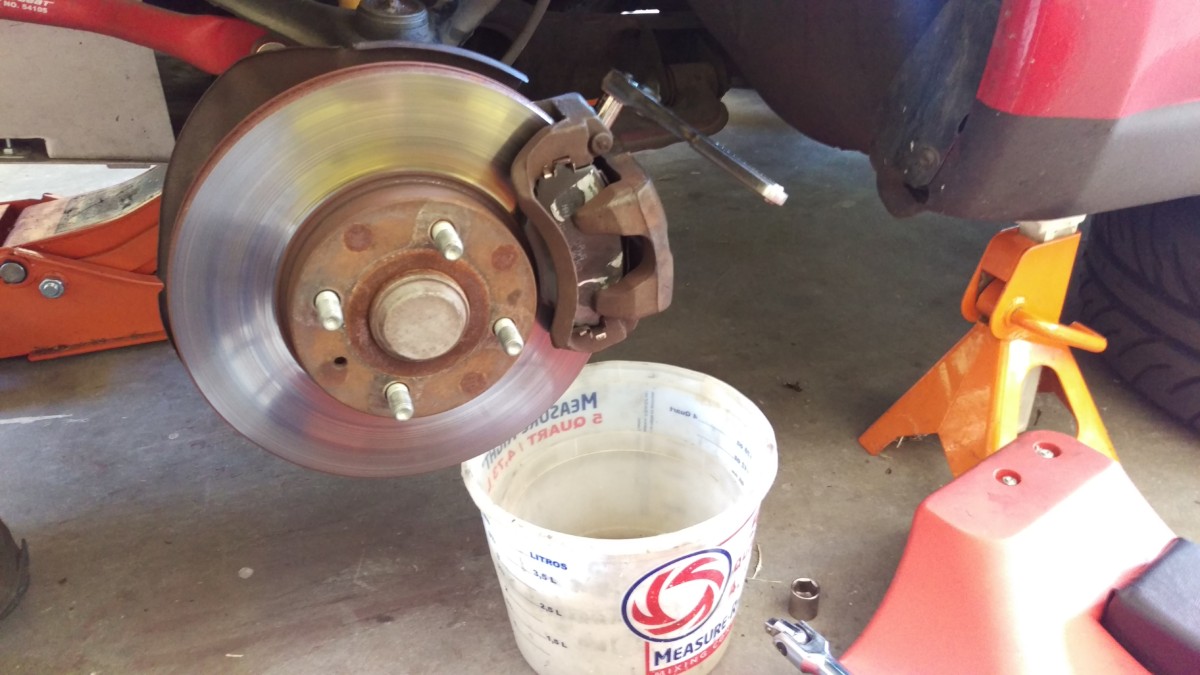
With a bucket ready, I’m just cracking the bolt loose
With a bucket ready, you can sit the caliper back on the wheel to just crack the brake line fitting bolt loose. I didn’t actually remove it yet, I just loosened the bolt slightly so it will come out easily in a second.

Crush washer order
The new caliper should have new crush washers. These aren’t decorative. You want one between the bolt and the fitting, and the other between the fitting and the caliper. With all that said, go ahead and swap real fast. I couldn’t get a picture because I wasn’t going to sit there playing camera while brake fluid went everywhere. Ideally, you want to try to minimize fluid loss and air getting into the brake lines to make bleeding easier later.
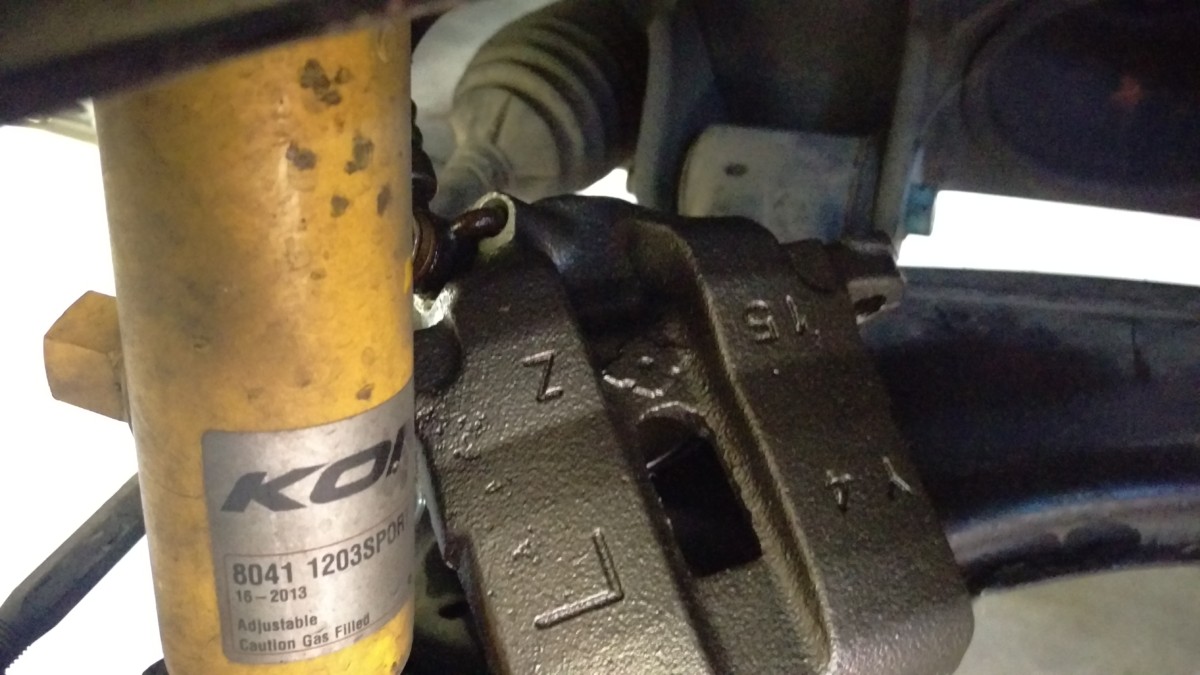
Done
When that’s all done, you’ll have your shiny new caliper mounted up and ready to reinstall.
Using the new hardware
I replaced any of the little clips and seals that looked rusty or worn with the new stuff from the caliper kit. I saved the rest in a ziploc. The new clips specifically had a lot more power than my old ones. I actually had to hold the pads together with one hand putting the caliper on, or else they would fly apart. I also actually put the squealer clip back in; my original ones had gone missing years earlier.
And with that, you’re ready to put the caliper back together like in the “reinstalling the front pads” section above. You absolutely must bleed the brakes after changing calipers.
Bleeding the brakes
If you change the calipers or brake lines, you must get air out of the lines by bleeding the brakes afterwards. Otherwise, you’ll have a very squish brake pedal. I also try to bleed before every couple of track days, as brake fluid breaks down with heat. You know you need fresh fluid when your brake pedal gets soft. Fortunately, miatas bleed very quickly compared to other cars. For instructions on bleeding your brakes, check out my related article.
Conclusions
Brake work can be very expensive if you pay a mechanic. Disc brakes are really very easy to work on, so it’s a great way to save money on maintaining your car and ensure it is done right. Of course, brakes are a safety critical component, so do not do this work if you don’t feel comfortable with it.
great write up. thank you for sharing. 🙂
What year/model is this miata? I have a 2001 LS with sports suspension and can’t seem to get the parts right.
Hi Lily, this was a 97 miata with standard 1.8L brakes. If you have sport brakes, you need slightly different rotors and pads, so the parts referenced here will be incorrect.
Thank you! Pictures and descriptions are awesome
My 1991 stops on a dime now 🙂
Could it be that the pads were glazed because they were not bedded correctly? Did you put them on and go straight to the track, or did you do the break in procedure and then track the car?
No, they were bedded in. There is a mostly-deserted road with a 55mph speed limit near my house with great visibility. Went out and braked from 60 to 10 several times until they were good and hot, then babied it back to my house trying to not touch the brakes.
HPSes are fine for street, but they simply aren’t up to track duty. If I’m being honest, the HP+’s I replaced them with aren’t either. For track use, I’d go G-Loc or Carbotech 100% (or maybe a dtc60 or something if you really want to stick with Hawks)