Miata Timing Belt Water Pump and Seals
Tools for Seals
I basically went nuts at Flyin Miata and got all of their crank and cam seal tools. This includes some nifty devices that you can put over a seal and then tighten down a bolt to place it perfectly. In general, they worked great. I used the cam, front crank, rear main seal installers all to great success. The crank holder tool also worked pretty well, although I think that would have been easy enough to make my own version of in retrospect.
I can’t say I recommend the cam gear ninja tool as highly. As I describe below, I had more success lining up the crank and cam gears using the marks and counting on the belt than trying to worry about holding the cam gears in place while doing the rest of the job.
Cleaning the Motor
The grime
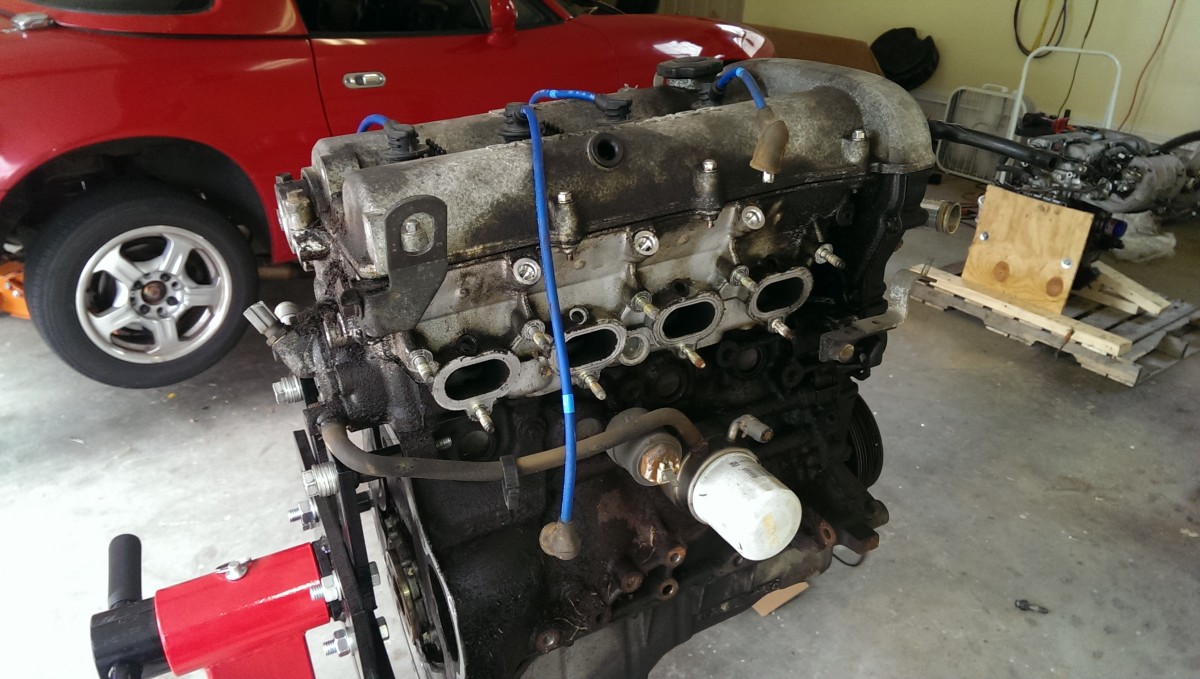
I acquired a used engine out of a 1994 Miata with 104,000 miles on it to replace the one that spun its rod bearings. The motor itself was in great shape on the inside, but incredibly grimy on the outside. It also didn’t come with intake, exhaust, or sensors, so I had to swap those over. As such, I decided it was a good time to clean it as best I could.
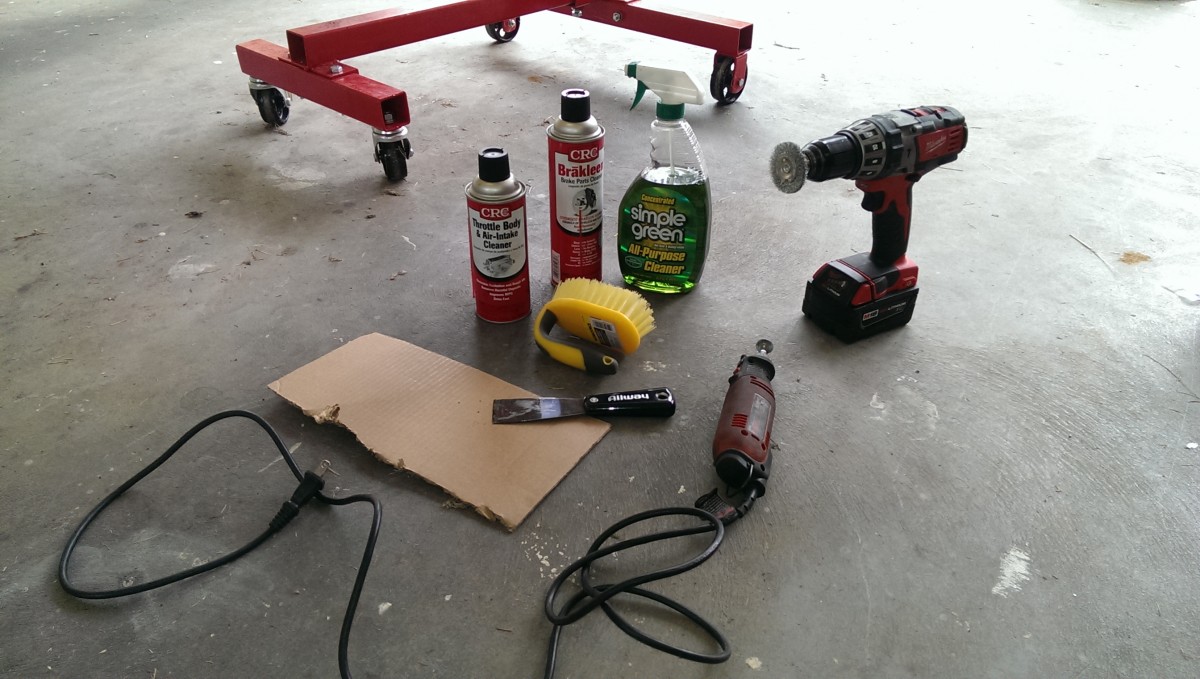
Cleaning tools
Since the new engine was already on a stand with no manifolds, it was a great time to do this. Everything was opened up and very easily accessible. I used a bunch of throttle body cleaner for the intake area and anywhere I needed to spray crap off but didn’t want to get junk in the motor itself. The carb cleaner worked well for other areas with built-up grease and oil where this wasn’t a danger. Lastly, the wire wheels on the dremel and drill were invaluable for knocking off some of the shit before using the cleaners. Simple green was also somewhat effective as a degreaser, although it’s hard to beat carb cleaner. Of course, a decent scraper helps as well.
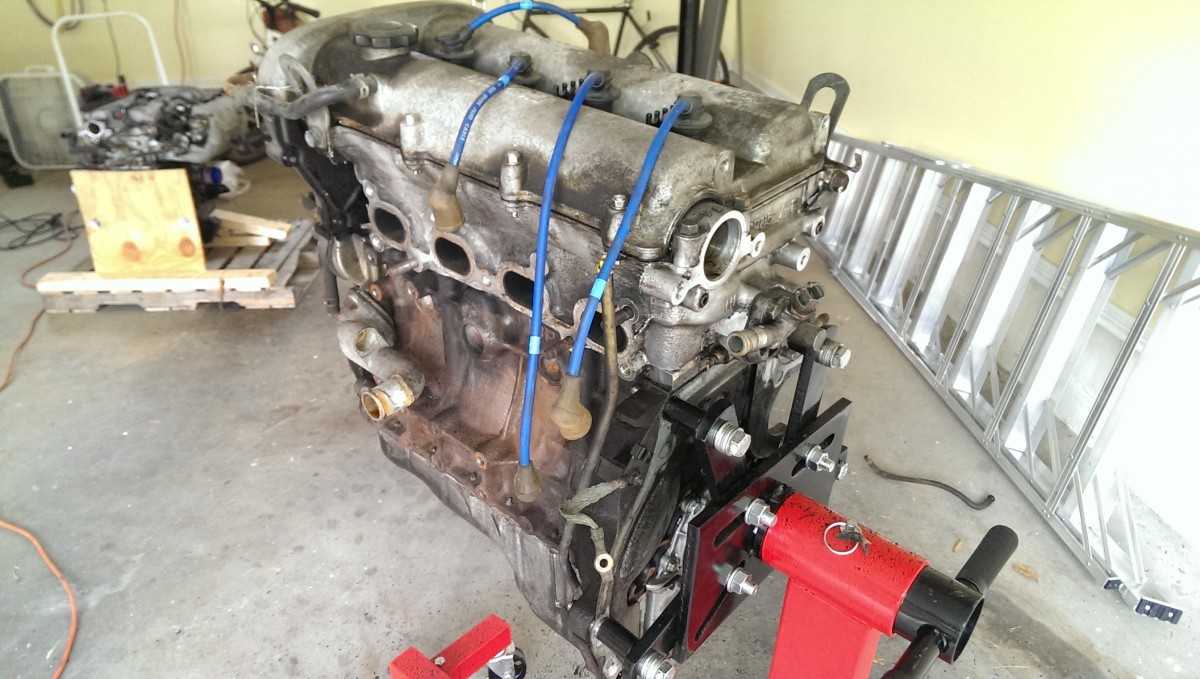
This is improvement, I promise
The degreasing did a good job taking the outside of the block from completely nasty into something still dirty-looking, but where you wouldn’t need a new hand after touching it. There’s still a bunch of surface rust there, but as I said, the engine itself had great compression numbers and so on, so I let it go. If I ever do a rebuild of this motor, I would probably get the block hot tanked and cleaned up.
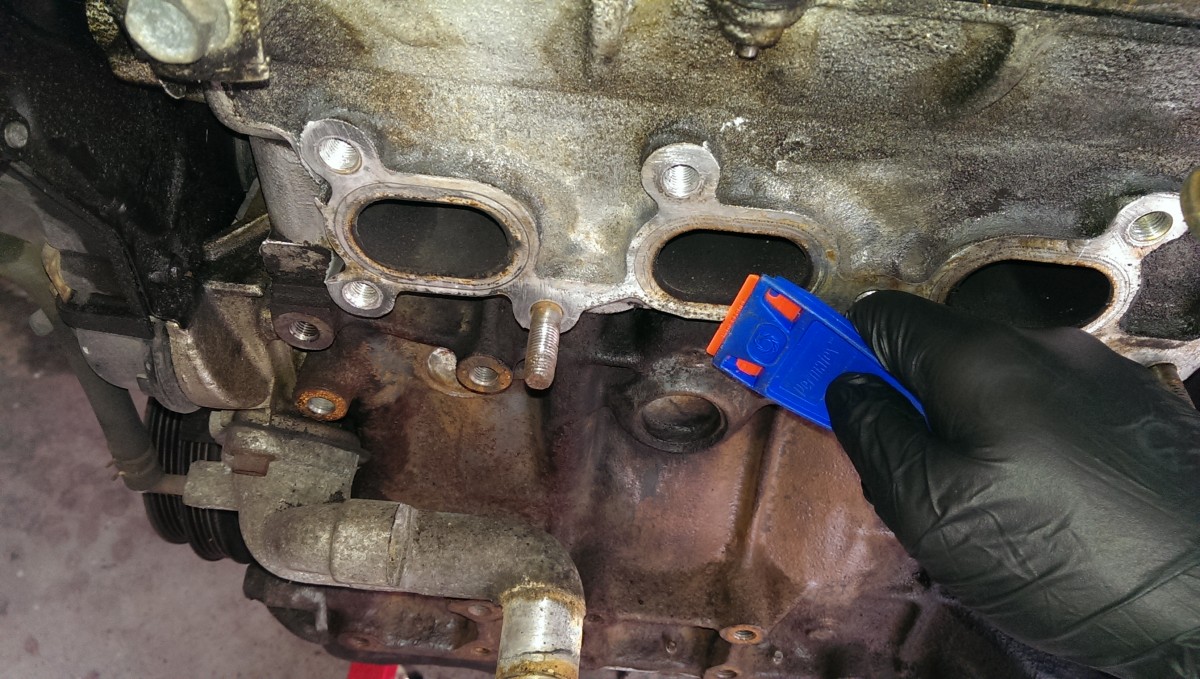
Plastic scraper prevents gouging
I also used one of these plastic scrapers in a lot of places. It is basically a plastic razorblade intended for surfaces like this. If you’re like me and any time you have a steel or aluminum scraper, you gouge the shit out of whatever surface you’re trying to clean up, these work great. They’re not quite as able to get certain stuff off, but they stop me from scratching up the surface and keeping it from sealing properly.
Valve Cover Removal
Removing the valve cover by undoing all of these small bolts
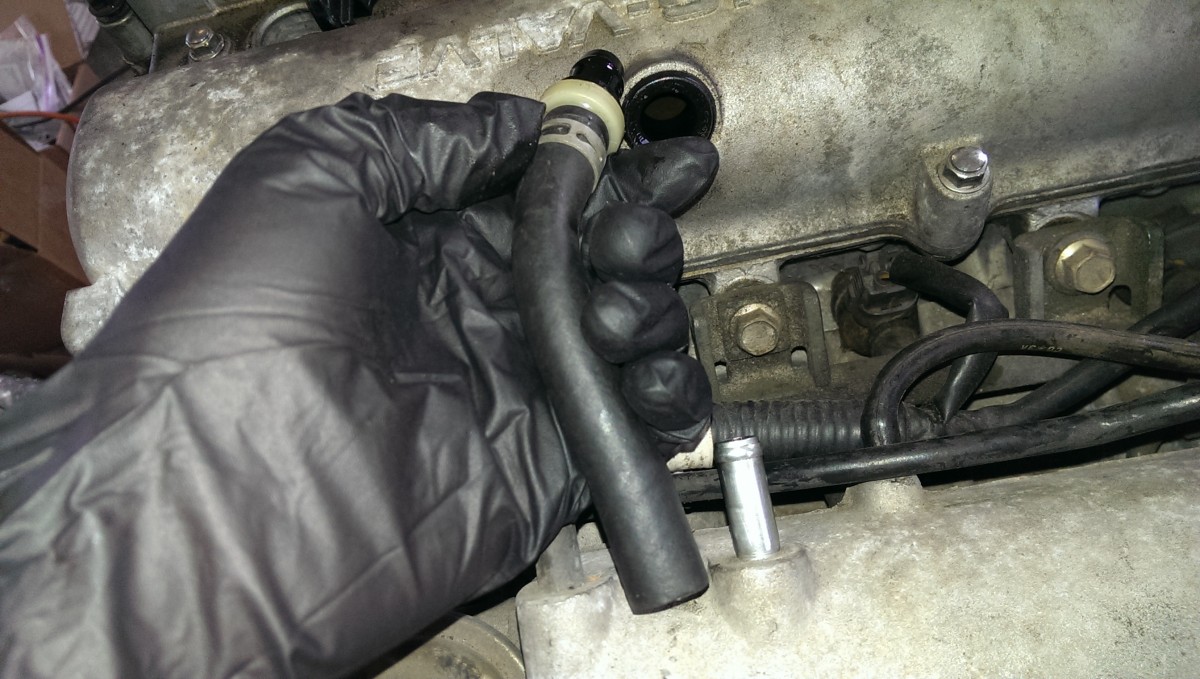
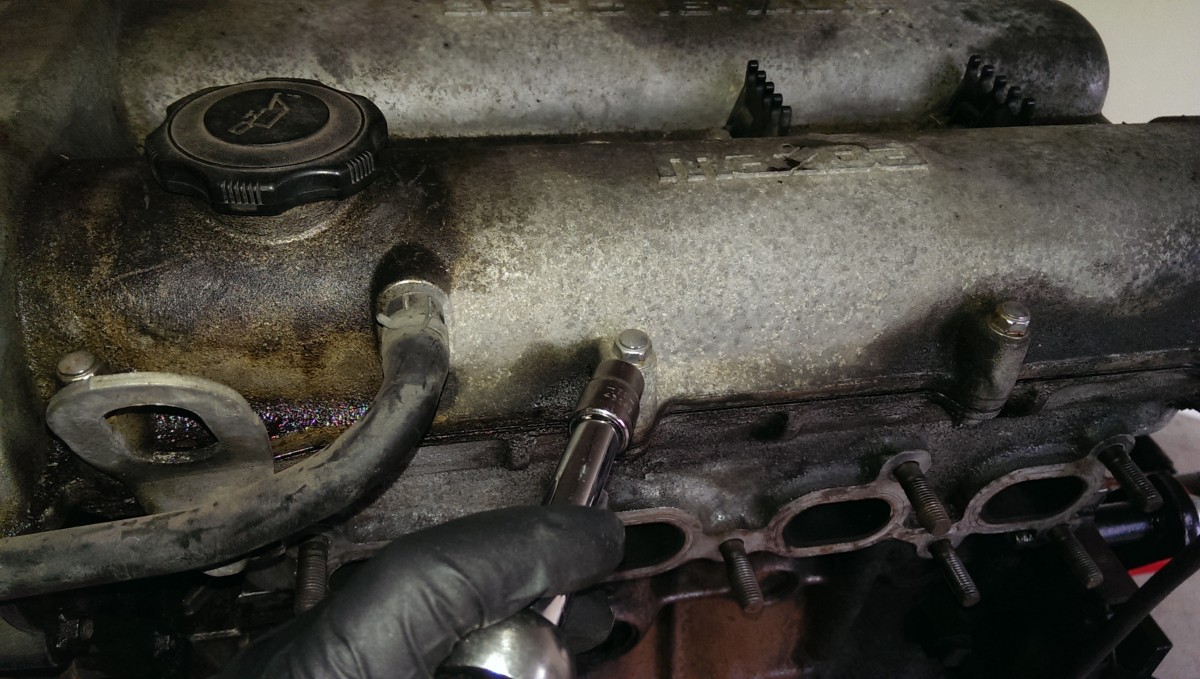
PCV valve removal
I was going to go ahead and refresh all of the seals with the motor out. As such, rather than trying to clean this dirty valve cover, I went ahead and painted it. Step one is to remove it, which is easy enough – simply remove all 13 or so of these little screws. There are also two vacuum tubes (well, PCV valve and another vent that goes into the intake) that need to be unplugged. They simply pull out.
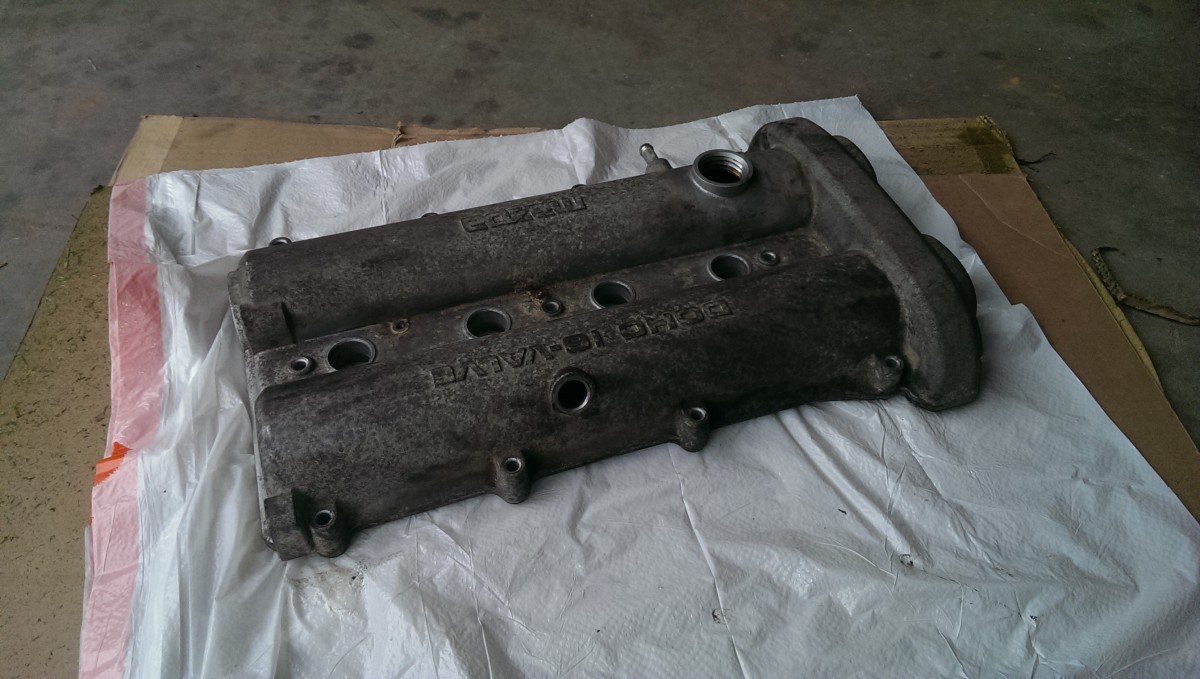
This is my pre-cleaning: if you do this, definitely sand, which I didn’t. This isn’t clean enough.
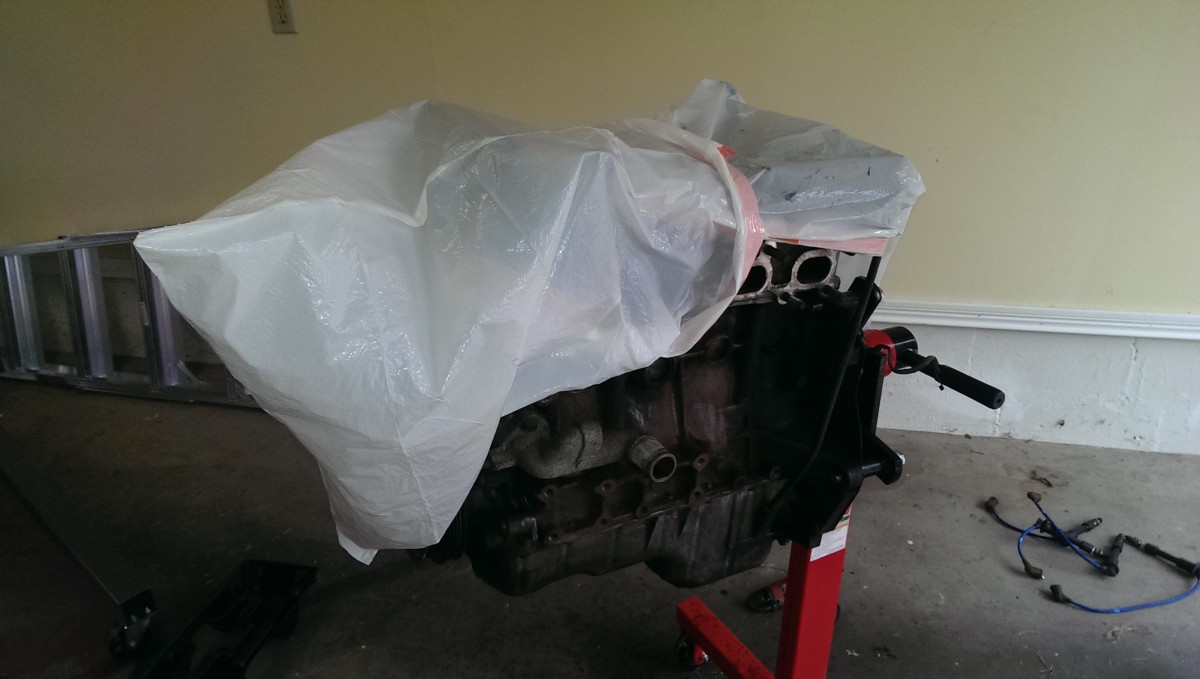
You don’t want crap getting in the head while the paint dries

Barbecue paint from home depot can handle engine temperatures
The actual process is pretty easy once the valve cover is off. I cleaned with the wire wheel, throttle body cleaner, and simple green. What I SHOULD have done afterwards is sand, but I got lazy. The paint is still sticking pretty well a year or so later, but it would have looked nicer if I had taken some 200 grit to it. Learn from my fail.
While the paint dries, I threw a trash bag over the head. You don’t really want bugs and crap getting into your engine in the mean time. You could maybe get away with skipping this step, but it was easy and cheap.
At this point, I was ready to move on and do the front crank and cam seals plus water pump.
Getting to the Cams/Water Pump
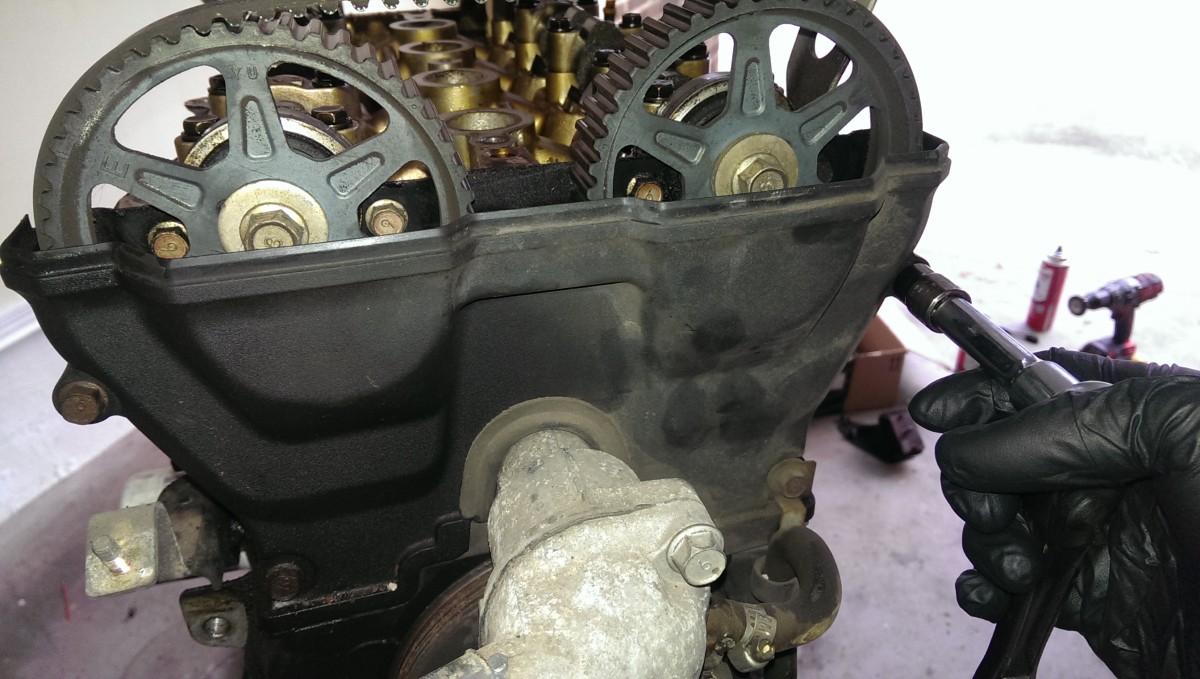
Front covers blocking the cams and water pump
There are usually some plastic covers over the cams and water pump as pictured. These unbolt very easily. They consist of three pieces of plastic layered on top of each other. The top piece should come right out with the valve cover off.

The water pump pulley comes out with these three bolts
The water pump pulley itself comes off very easily to get to the rest of the covers. You can hold it in place and use a wrench or just use an impact to zip these three bolts out. I ended up buying replacements at Ace Hardware, because these were rusty and fell apart very easily. It’s something like an M8 bolt, but you can find a match no problem. The engine of course had no belts on at this point, since it was on a stand. If it is still in the car, the alternator and power steering belts need to come out first.
The mid covers just take a few bolts with the pulley removed
With the pulley removed, the final two covers come right out.
Removing the Crank Pulley
4 bolts for the crank pulley
The crank pulley itself can come off with the 4 small bolts pictured. You can undo those, and the pulley and some washers will slide off over the nose of the crank. Or they should, anyway – they pulley and plates behind it are always stuck together for me, and it seems easier if I get the crank bolt off. If this happens to you, you can just go ahead and also remove the crank bolt right now.
There’s an issue with removing the crank bolt, namely that turning it will turn the engine. If you use a breaker bar on it while the engine is on a stand or in the car with the car in neutral, it’ll just spin. If the engine is in the car and the car is in gear, it will actually turn the wheels.
You have three ways to remove it. If it’s still in the car, you can put the transmission in fifth gear, put the parking brake on, and use a regular breaker bar to loosen it up. It’s important that you be careful doing this, and I’ll note that I didn’t officially tell anyone to do it, because you can launch your car off of the stands it is on if you aren’t careful. Disclaimer, I am not saying to do this.
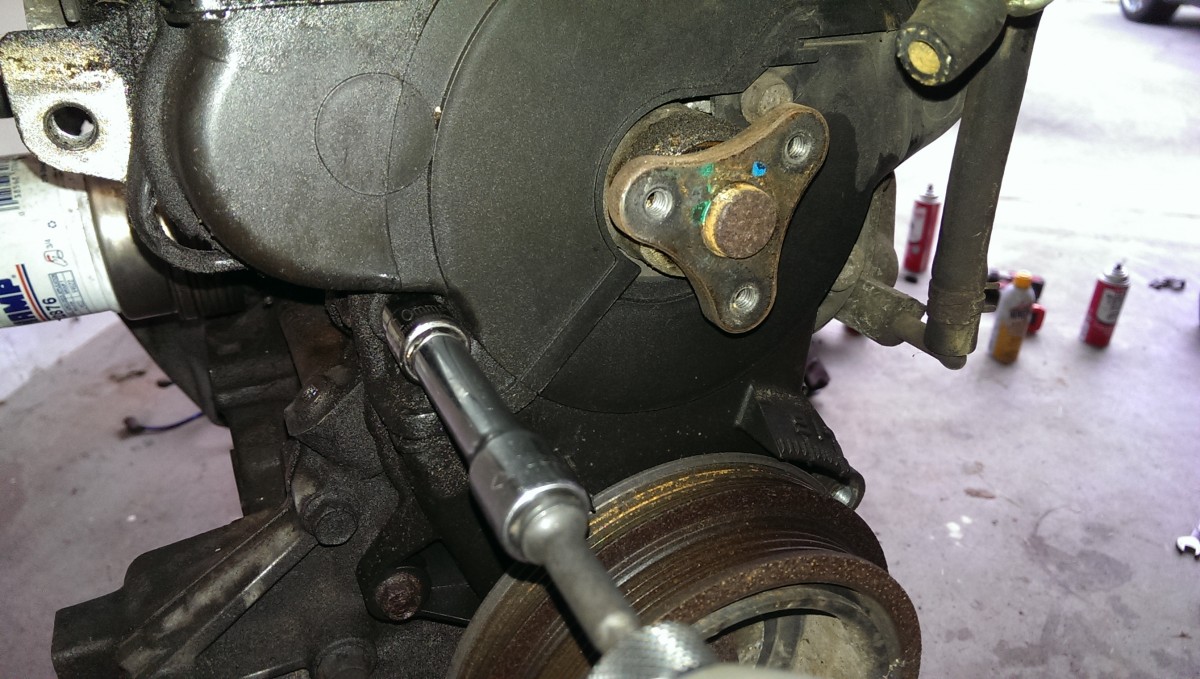
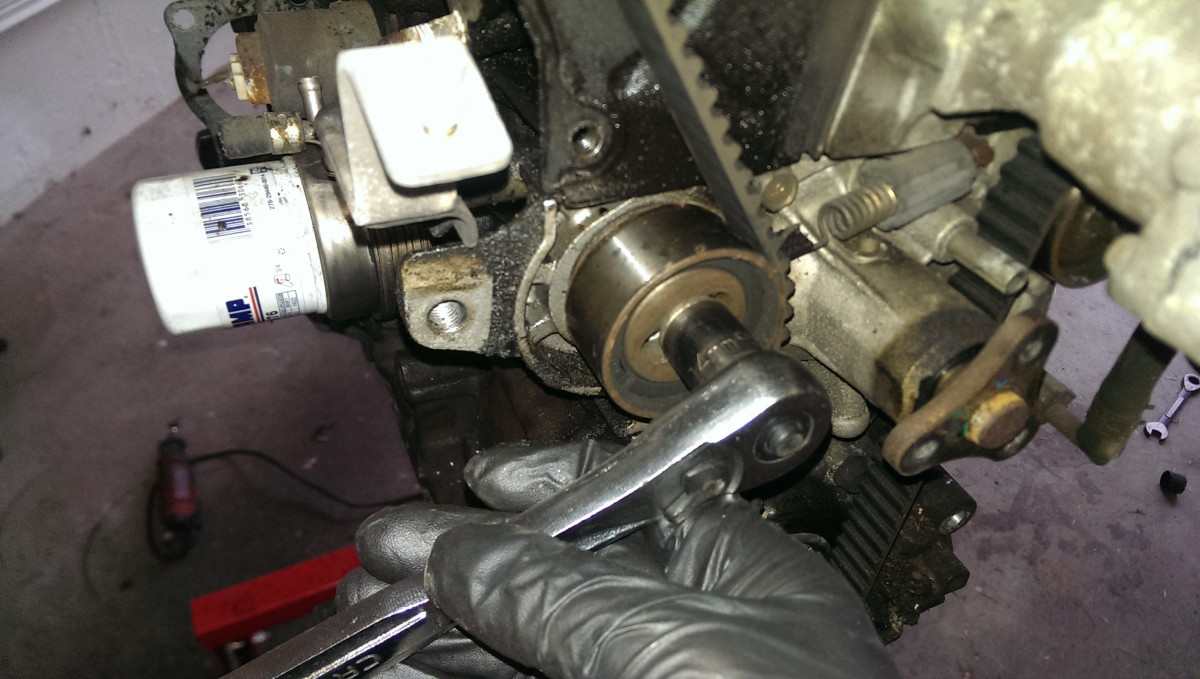
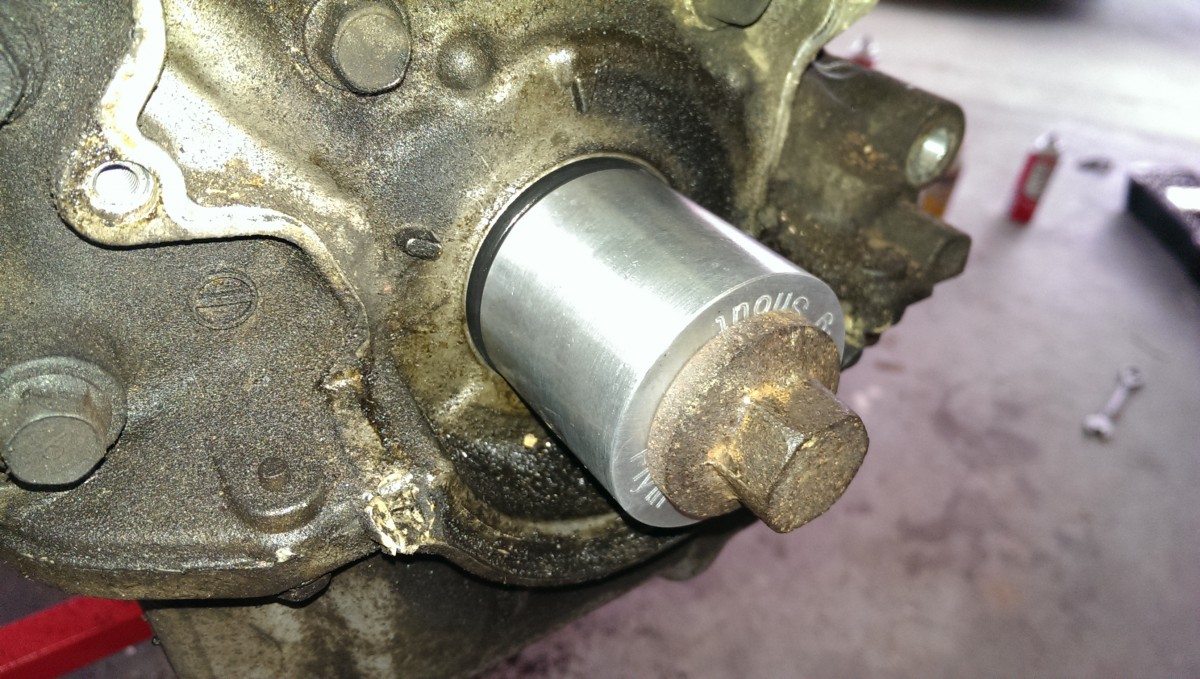
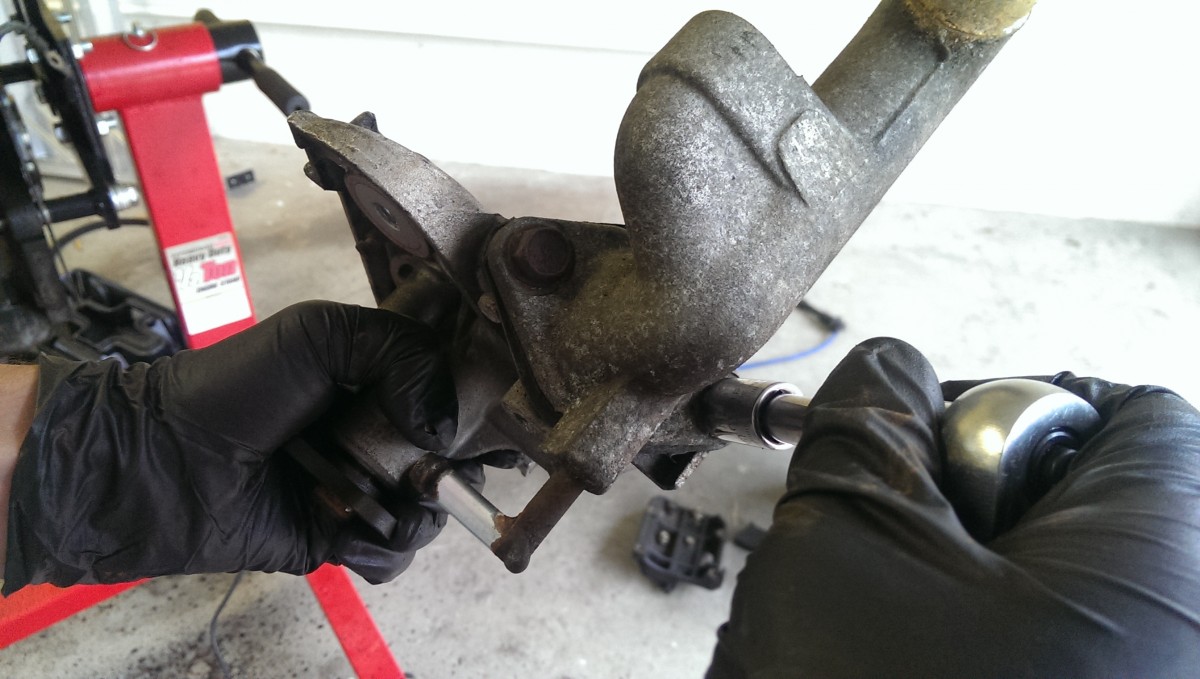
Crank bolt tool bolts to the plate, the other end smacks into the water pump.
If you can get the pulley off without removing the crank bolt, you can use the tool pictured from Flyin Miata. In the picture, I was actually torquing the bolt – you’d turn it around to loosen it. The principle is the same though, it braces the pulley against the water pump neck.

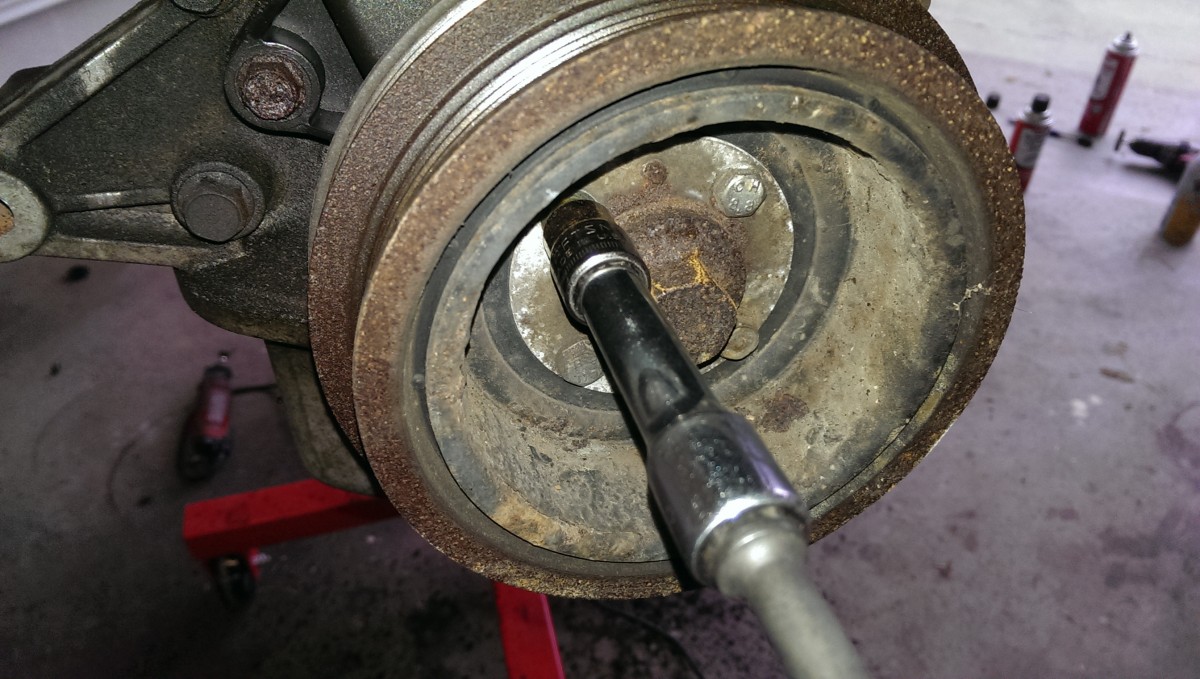
Impact on the crank
If it’s on a stand (or the radiator is out), the best way is an impact wrench with the transmission on a stand or the car in neutral. The impact can spin the bolt fast enough to break it free despite the engine turning. It will get even a stubborn bolt out, it won’t risk damaging the water pump or launching the car off of the stands, and it’s extremely fast and easy. I use a Kobalt corded impact I got from Lowes for $150. It does 350lb-ft or so, and it has been absolutely worth the money for all kinds of other things.
There’s one final way I won’t even give the courtesy of discussing for more than a minute: if the engine is in the car, you could wedge a breaker bar against the ground and touch off the starter for a second. The force of the engine turning over will crack it loose probably. This is a horrible idea, do not do this.
Crank pulley post removal
Once you get that bolt off, the pulley assembly should come off too, and you’re left with direct access to the timing belt and the final cover for the water pump.
Prepping and Removing the Timing Belt
Before doing anything else, READ THIS PART. Not that I want to scare anyone. This part isn’t hard, just important. The timing belt goes between the two cam gears at the top and the timing gear at the bottom. This controls ensuring your cams turn in sync with the engine turning over. If you goof up the alignment between these three things, your engine will not run.
There are two major ways to go about this. Option 1 is to try to keep everything held together while you do the work. Option 2 is to do a little bit of counting.

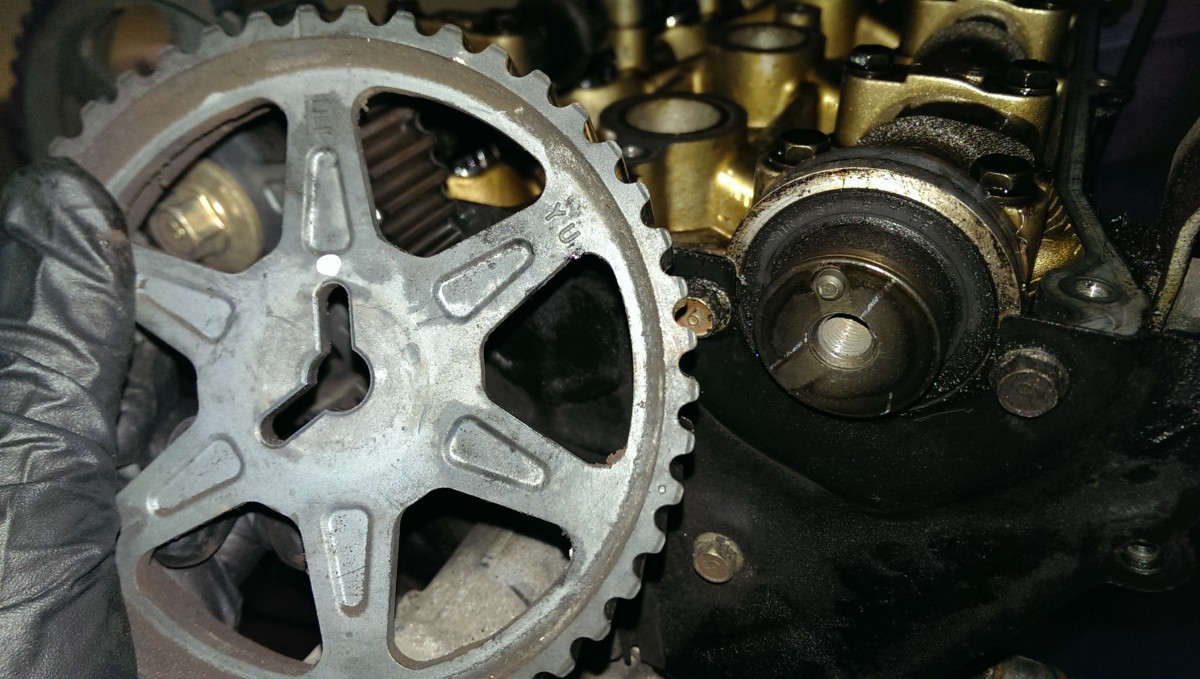
Mark on timing gear
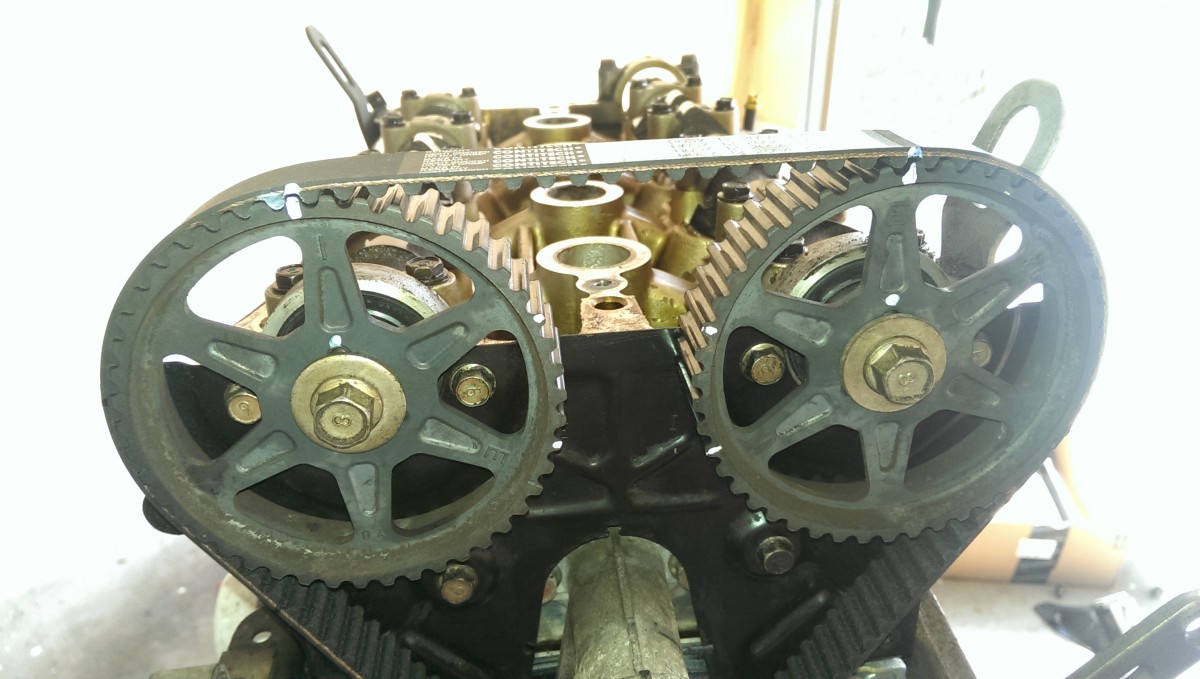
Marks on cam gears
For option 1, you can simply mark the belt and all three gears with some white paint. If you can hold the cam gears locked in place and line everything up when you put it back together AND your engine started out aligned properly, this should work. Miata.net has a nice picture of using two wrenches plus a vice grip to lock the cam gears together.
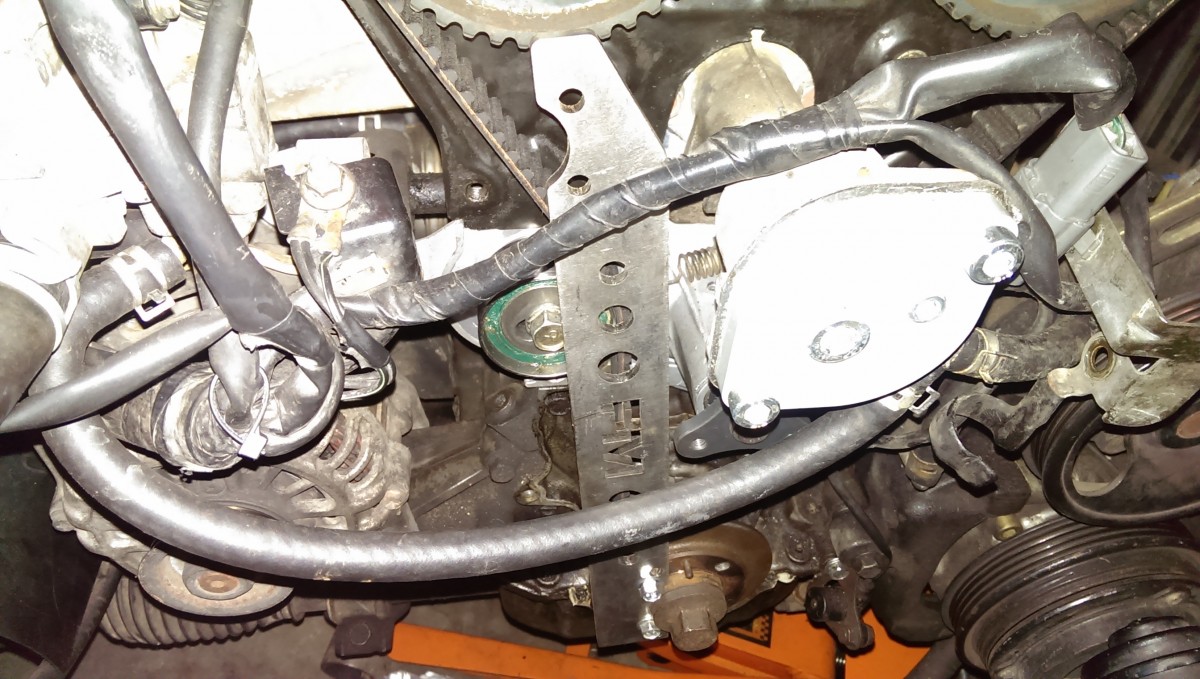
Flyin Miata tool
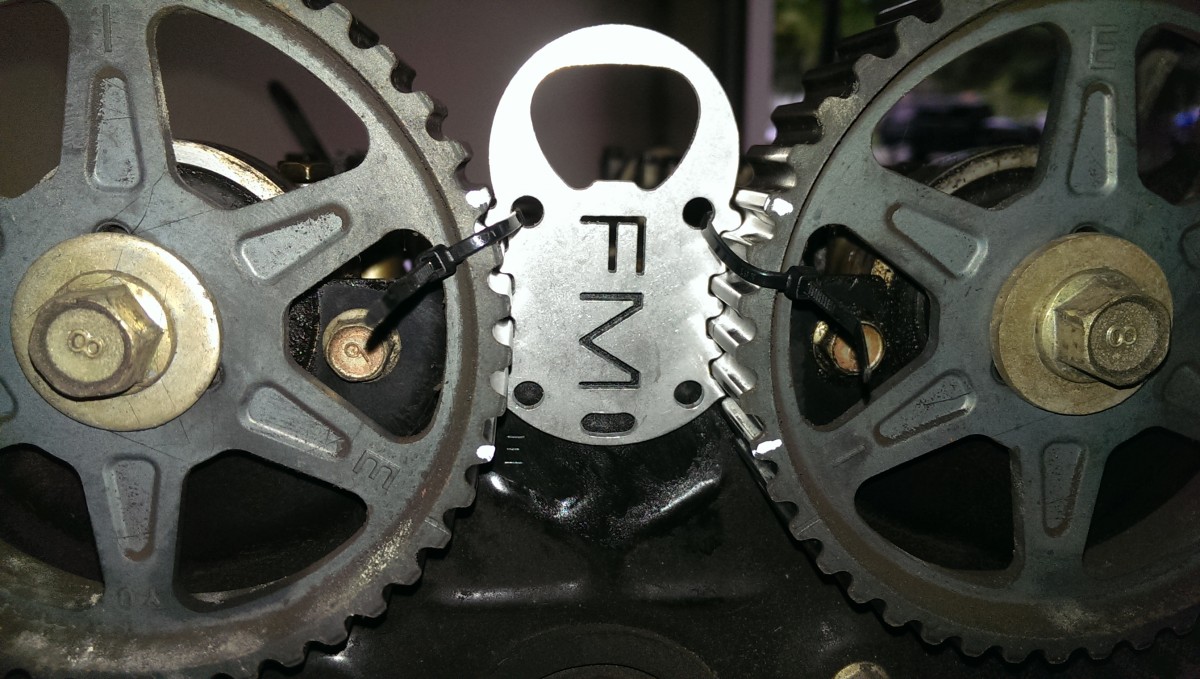
Tool ziptied in
Flyin Miata also sells the above tool, which can do the same thing. They also claim you can use it to brace the cam gears for removal. If your engine, like mine, previously had a cam gear with a bolt torqued by the owner’s pet gorilla, this will not work and you will bend the tool. Ask me how I know. Also ask if you want to buy a completely worthless bent FM cam gear tool.
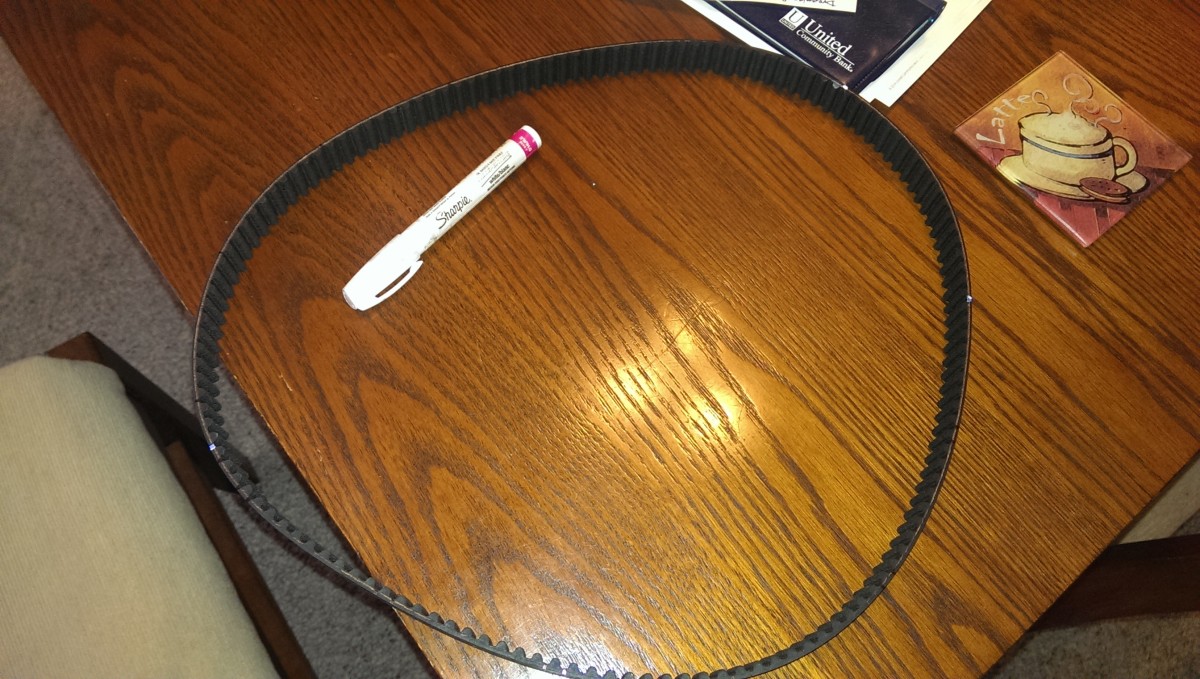
Marking the new timing belt
If you screwed up option 1 or just don’t want to keep all that in sync, option 2 comes to your rescue, fear not. Option 2 requires no preparation – you can simply cut that old belt off, and it doesn’t matter. I got this from a video here: Youtube Link. You can skip and come back to this part if you need it later when you’re ready to put on the new belt.
In a nutshell, mark the new belt on one valley between teeth, call that mark A. Then, count over 19 teeth, and mark that valley, call it B. Then, count 63 teeth, mark that valley, call it C. From the first mark, mark A, count 63 teeth the other direction, and mark that valley, D. If you counted right, C and D should actually be the same valley. In other words, you should have 3 marks, 2 of them should be 19 teeth from each other, and the last one should be exactly 63 teeth from each of the other two. The picture shows mine all marked up if that helps. It sounds more complicated than it is.
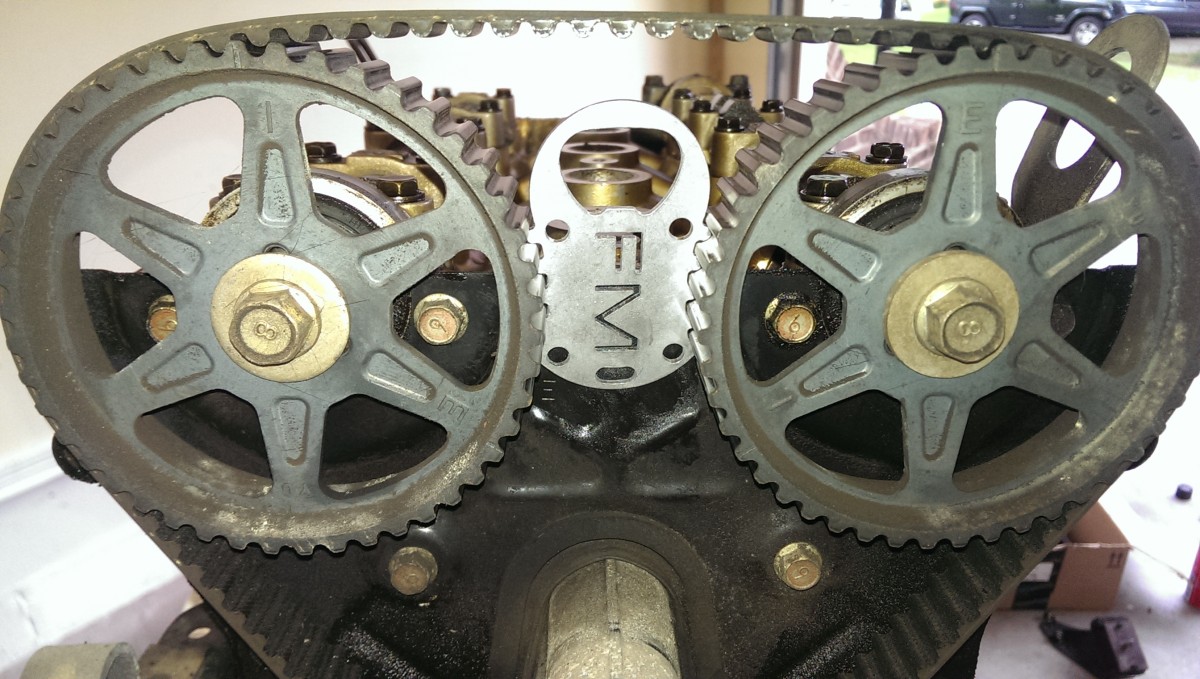
Mark on timing gear
Marks on cam gears
Once you’ve got that, you can always set the timing belt 100% correctly. All you have to do is rotate the gears until they match the picture above, which I copied from earlier. That is from when I used this method on a new belt to set my timing. Basically if you line up the intake and exhaust notches, plus the U on the bottom of the timing gear, it will be in sync. The U on my timing gear was exactly across from the top dead center notch on the other side. The aforementioned video, as well as miata.net’s article, were also helpful resources.
This was still my preferred method to set it, because it removed all of the guesswork. Either way, once you know what you’re doing, you can do the actual removal. You can loosen the tensioner (one of the two pulleys) and pull the belt off if you want to try to save it. However, if you’re doing a water pump job and down this far, don’t be cheap, just replace it. Since I was replacing it, I just cut the old belt off, which was much faster.
Unbolting timing belt pulley

Timing belt pulley bolt removed
The miata timing belt needs to go in a Y-shape. To force it to bend that way, there are two pulleys that the outside (non-tooth part) of the belt rides on. If you’re going to try to remove the belt and keep it intact, the leftmost pulley is the tensioner. You can simply unbolt it and it will spring back and release some tension on the belt.
Front Crank Seal Replacement

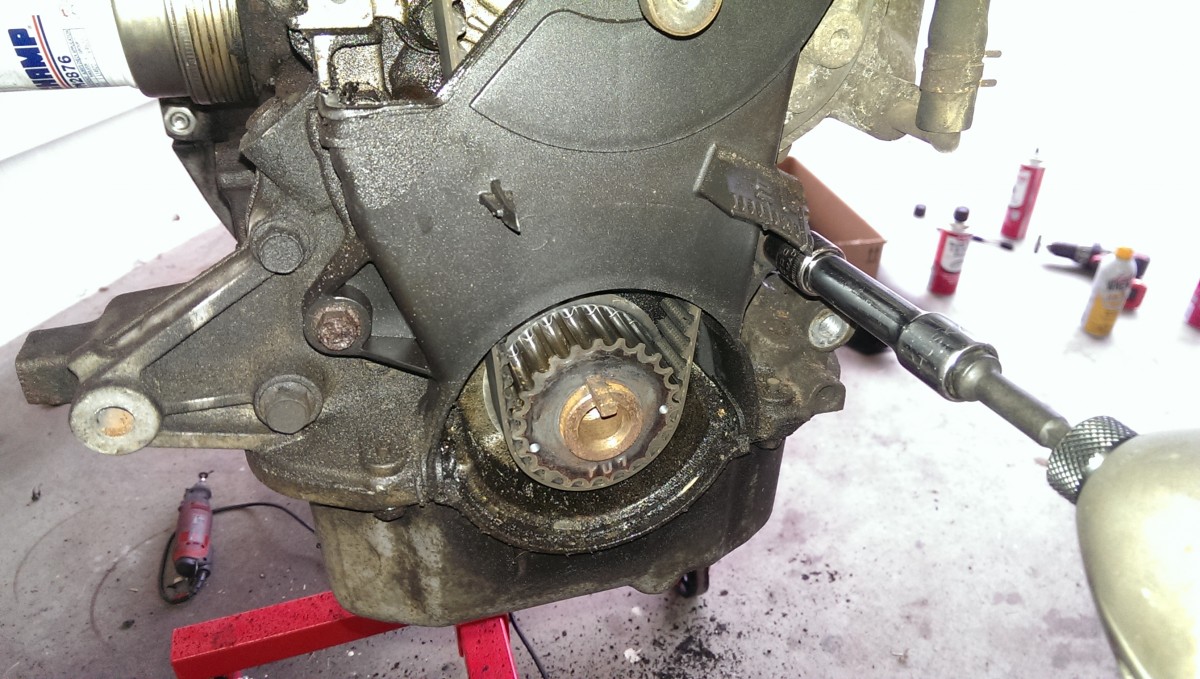
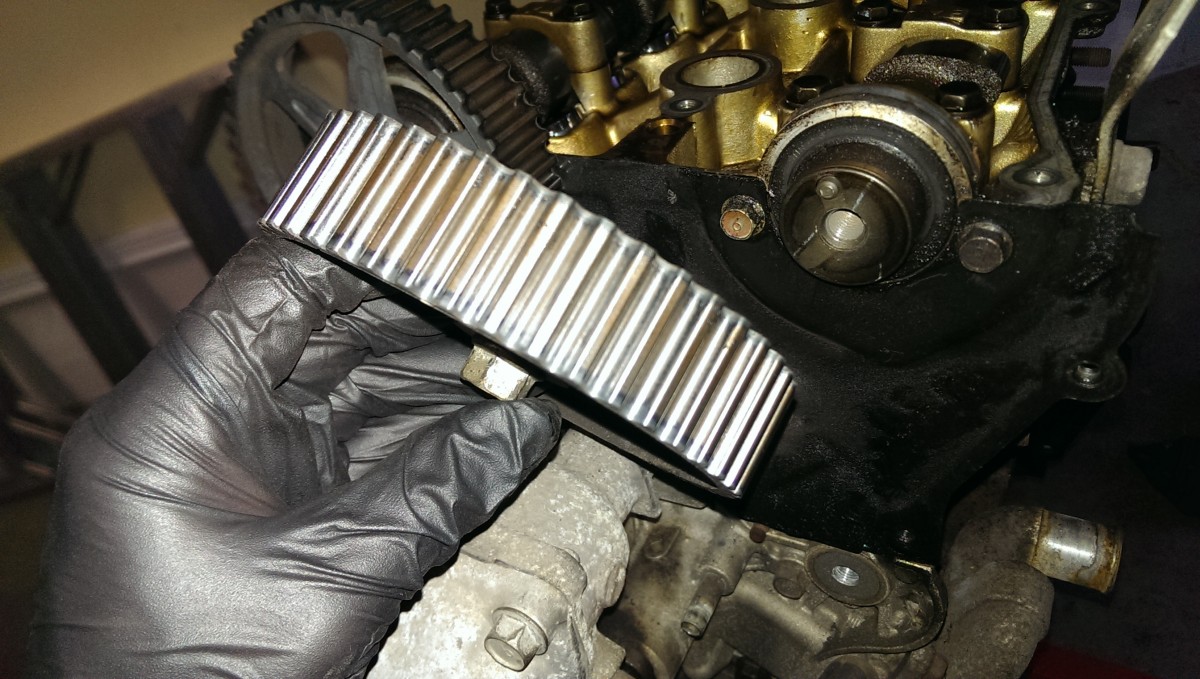
Prying off the timing gear

New woodruff key on the right
Getting to the front crank seal, once the timing belt is off, simply requires removing the timing gear. The metal chunk there at the top is the woodruff key. It is simply a piece of metal that sits in that slot and wedges the timing gear in place, keying it so it is oriented correctly. If you can remove the key, the timing gear slides off pretty easily. I wasn’t able to do that, so I used a screwdriver and a paint can opener on opposite sides to wiggle it off; it can be on there pretty tight. If you significantly mar the surface of the woodruff key like I did, or if you just want to be 100% thorough while doing this job, you can get a new woodruff key for a couple of bucks from Mazda.
If you get a new Woodruff key, it may well be shorter than the one you removed. This is OK per Mazda. They made it out of a single rectangular bar and got rid of the slanted portion in the picture. The key only exists to keep everything aligned while you torque down the crank bolt. Using the shorter key won’t hurt anything, and my engine is still running great a year later.
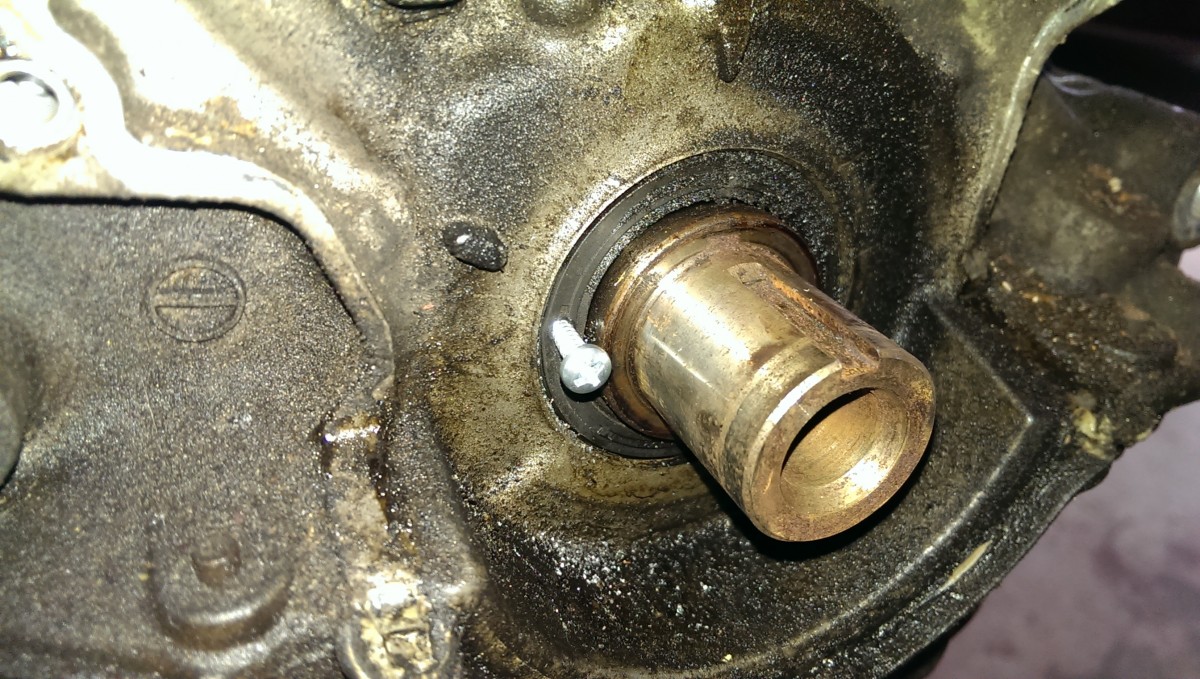
Crank seal screw
Crank seal after removal
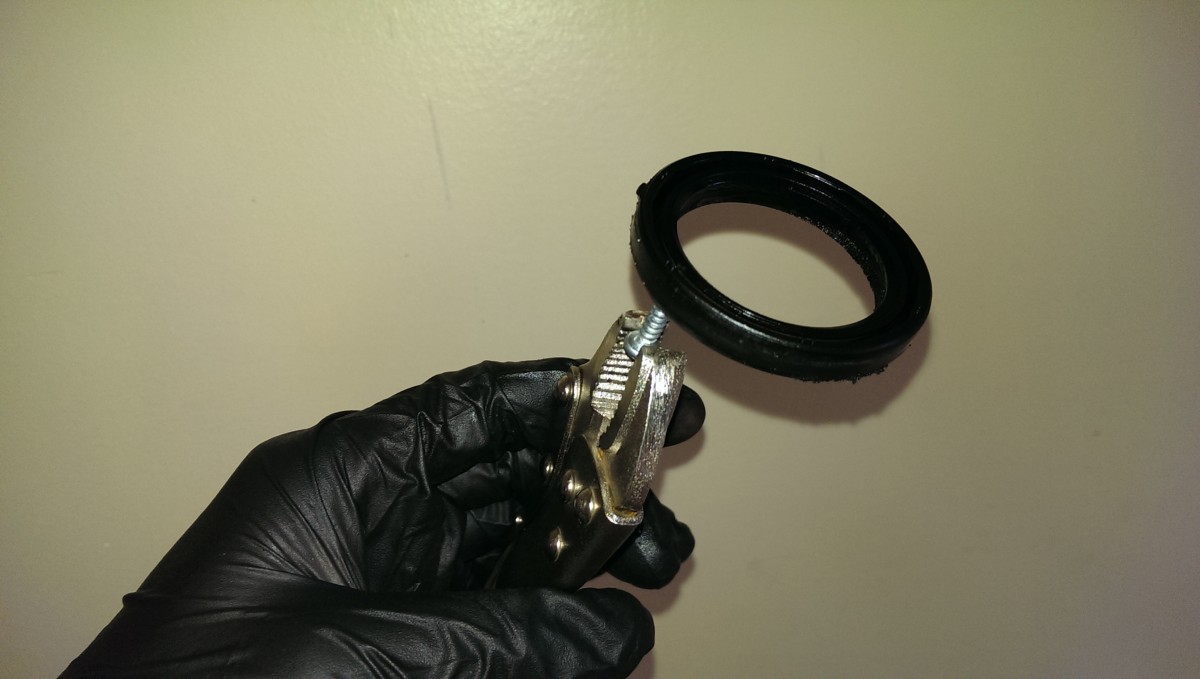
Once you get the gear off, the seal will be right in front of you. A lot of people try to pry this seal out, but you can very easily scratch the block or the crank. If that happens, you’re going to leak oil, not good. The method I saw online that worked great was to drill a very small hole through the seal, and use a screwdriver to thread in a small screw for a few turns.
You can then just grab the screw with some vise grips and yank that sucker out. Be careful not to drill very far, obviously – some electrical tape around the shank of the drill bit where you want to stop drilling works great. If you’re careful, you can remove the seal with no scratches. If you’re not careful, you can do a lot of damage.
Flyin Miata front crank seal tool
You want to make sure everything is very clean before putting the new seal in, or it can leak too. Specifically, feel around with your fingernail to see if you can catch any scratches. If you can feel them with your fingernail, they’re deep enough to leak. When I first did this, I had a leak. I ended up using some 850 grit sandpaper from Walmart (I couldn’t find emery cloth, but that’s even better) to lightly sand the crank and the inside of the block where the seal sits. Then, I cleaned it with some carb cleaner and a clean rag. This got the surfaces very clean before reinstallation, no more leaks.
I used the flyin miata crank seal installation tool, and it worked very well. I used some motor oil to grease the seal a little bit first on the inside. I also ended up putting some Permatex ultra black RTV on the outside as well, where it meets the block, for extra insurance. Then, you simply line the seal up, put the tool on, put the crank bolt through it, and tighten it down.
Cam Seals Replacement
Removing a cam gear
Cam gear alignment marks
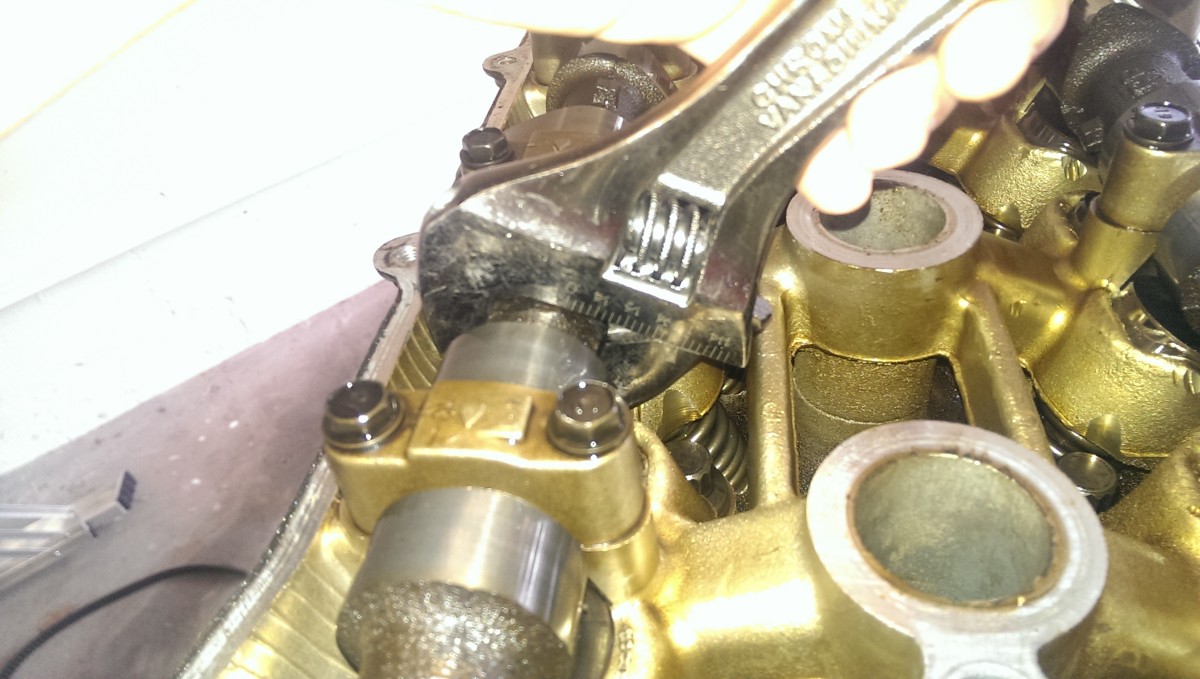
Wrench holding cam still
To replace the cam seals, the gears must now come off. Before doing this, be sure to mark the position of the cam gears relative to the head. They have a little bump to help align them, just make sure you know which slot on each gear corresponds to that bump. They each simply bolt to the cam behind them. The one on the left is the intake cam, and the one on the right is the exhaust. You don’t want to just put a wrench on and turn, because you’ll force them to rotate backwards, and apparently people have sheared valves before. There are flat spots on the cams where you can put a wrench, as pictured, to hold the cam still while you remove the bolt.
Be very careful not to smack the inside of the head with that wrench, though. If you score up the walls, the valve cover may not seal anymore.
They are only supposed to be torqued to around 30 lb-ft, so it shouldn’t be a big deal to remove them. The exhaust side for me wasn’t a problem. However, the intake side was on there way tighter than I could get using this method. I can’t say I recommend this, but I went ahead and used an impact on it, which spun it off very easily (of course). I was concerned about damaging the valves, but the engine is still running great. I think if I were to do it over again, I’d still use an impact – I would have had to lean so hard on the breaker bar, I doubt I could have prevented that wrench on the cam from banging around and damaging the engine.
Tl;dr: Try the wrench on the cam and carefully loosening the bolt. If that doesn’t work, an impact worked for me.

Final water pump cover
Then this final plastic cover can come straight out.
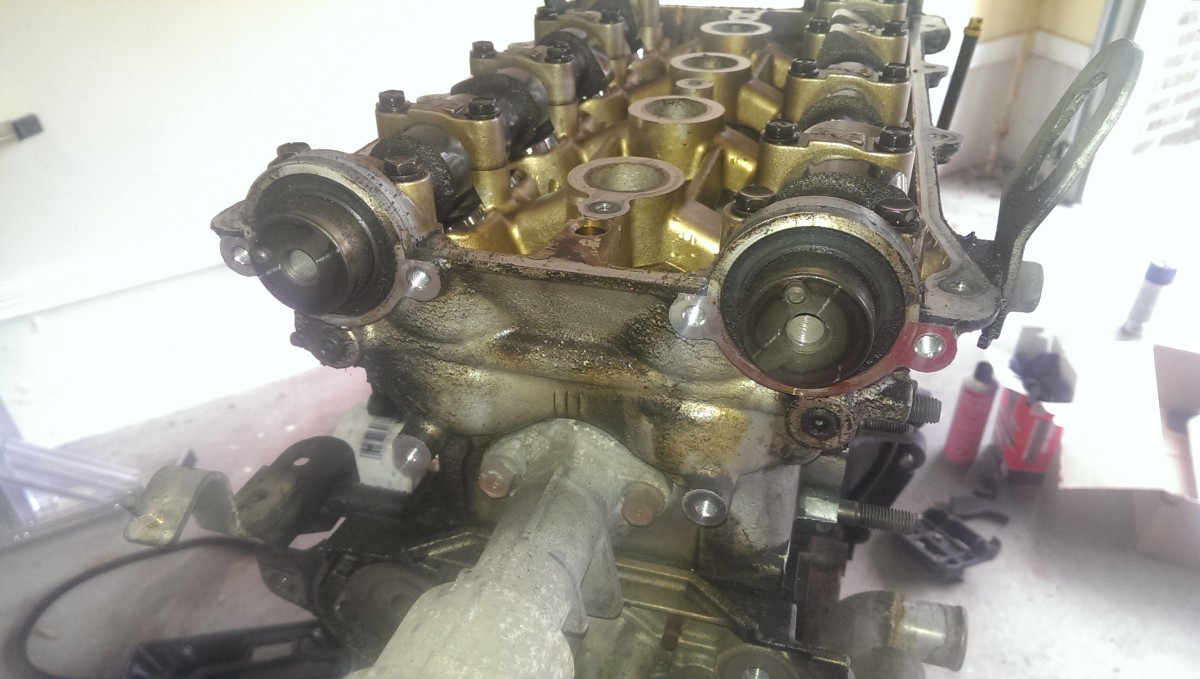
Exposed cam seals
At this point, the cam seals should be exposed and ready for removal. There are two schools of thought on this: you can either try to pry them out, or you can remove the caps. If you remove the caps, you have to make sure you seal them properly afterwards. With the caps off (two bolts each), the seal just slides out. I didn’t do it this way, so I’m not much help on this method. It is safer in the sense that you don’t run as much risk of scratching up the surfaces around the seal.
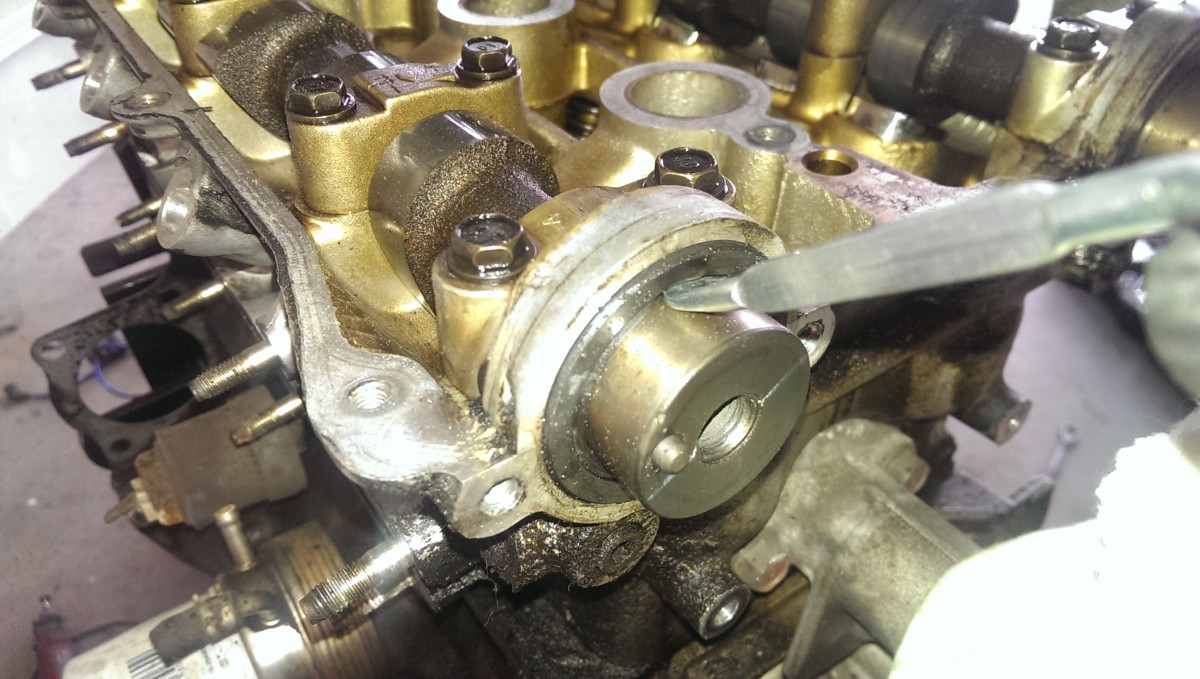
Removing cam seal with taped up paint opener
I ended up instead using a paint can opener with some electrical tape around it. The tape was to minimize scratching. I also went for the top so a small scratch would cause fewer leaks, hopefully. I used the Flyin Miata cam seal installer tool, which works exactly like the one for the crank, and put the new seals on there. I didn’t end up sanding in this case, and don’t appear to have any leaks, but again, it’s worth running a fingernail over the surfaces to see if there are any deep scratches.
Water Pump Replacement
Water pump easily unbolts
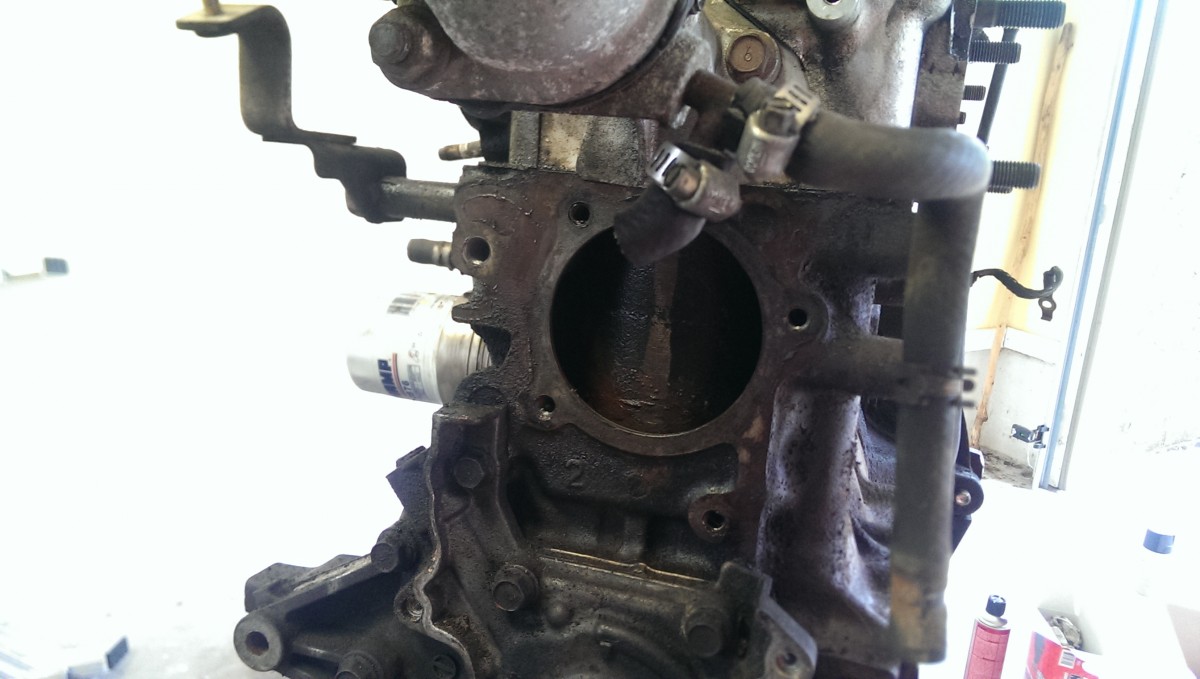
Water pump now removed
Once everything is exposed, replacing the water pump is pretty easy. It only takes a few bolts, and it will pull off from teh engine completely, leaving the hole shown. This was a junkyard engine, and it had a bunch of sludge and crap that had collected behind the old water pump, so I scooped as much as I could out with a gloved hand, and then flushed it as best as I could with a hose. If you have an engine that’s actually been in use and not sitting out, it won’t be a problem.
Removing remaining lines from water pump
You are almost certainly reusing the inlet pipe, so pull it off of the old water pump. It comes off with two bolts.
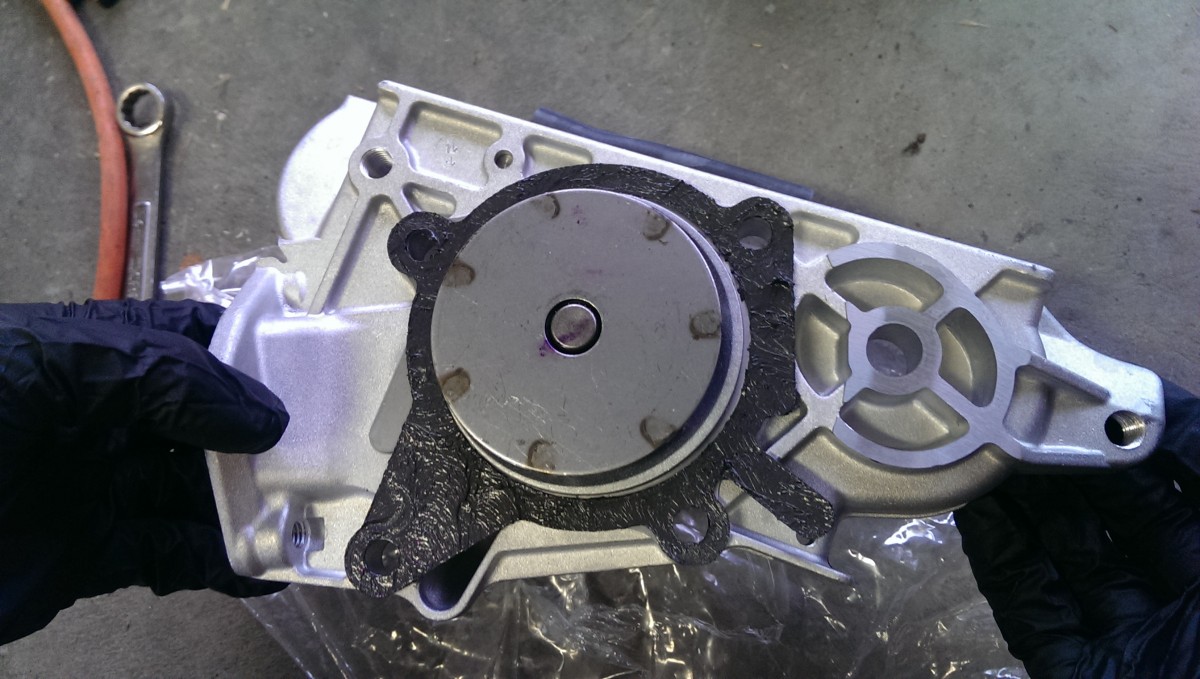
RTV on gasket for new pump

New pump installed
I use Permatex ultra black or ultra grey on literally every water-related seal. I have tried red and no RTV in the past, and even though both of those things are supposed to work, in my experience they do not. With some ultra black or grey, I get a perfect seal every time and no leaks. Just my 2 cents.
Your new water pump should come with a gasket. With the gasket prepped however you like, it just bolts on where the old one came off. I don’t know if this is necessary, but I torqued the new one in incrementally (as in, get all the bolts to 5 ft-lbs, then 10, then 15, etc until I get to spec). That way, it clamps the seal down evenly. If you just go whole hog on one side, and then the other, you may well introduce leaks.
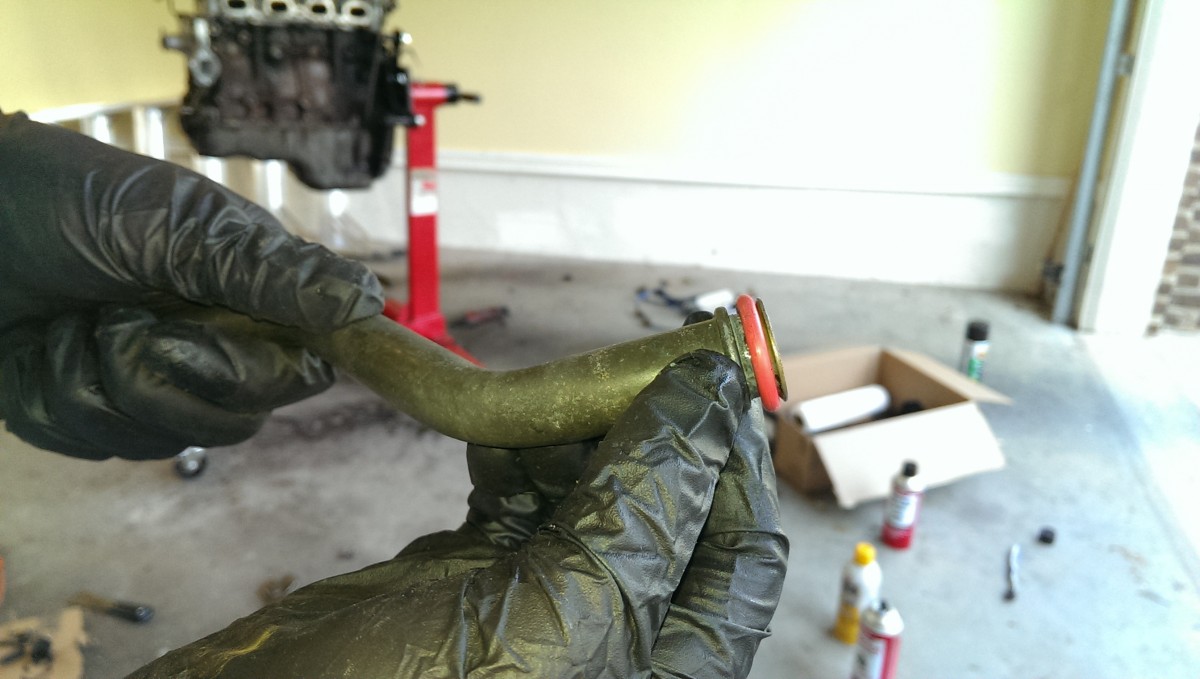
New o-ring on one of the lines to the pump
The kit from FM also included a new o-ring for this pipe. I went ahead and greased it with a little silicone grease (may not be strictly necessary) like you’d use for regular plumbing, and slapped it in. Probably a good thing, since the old one was pretty grimy.

Water pump inlet line reinstalled

O-ring for inlet pipe, I put RTV on afterwards
There is no gasket, but an o-ring for this connection. My kit again came with the right size. I also put a liberal amount of rtv on the mating surfaces as extra insurance Again, I used liberal RTV and tightened the two bolts down incrementally (both to 5 lbs, then 10, etc) to evenly tighten the connection up. I had no leaks.
Reinstalling Timing Belt, Covers, Gears, Valve Cover
Mark on timing gear
Marks on cam gears
The Haynes manual at this point would say “reinstallation is the reverse of removal.” Once the water pump is back in and all the seals are done, it’s time to move to reinstalling. The belt absolutely must be in sync between the three gears and also the gears must be turned to be in alignment with each other for the engine to run correctly. If you followed one of the two methods above, you’ve got some marks that you can line up to make sure this happens. (If your marks are on the old belt, hold it up to the new one and transcribe them over.)
Before starting, be sure to reattach the cam gears and covers in the reverse order that you removed them. The cam gears can be retorqued with a wrench on the cam as pictured earlier. Be sure they’re lined up properly, as they were when you removed them.
This is also the time to bolt new (or reused) pulleys to the water pump. I would probably replace them while you’re at this job. Don’t bother tightening down the left one with the spring, it will have to be moved around during the next part.

New pulleys tensioned
Now comes a minor puzzle. I folded some cardboard and wedged it under the crank gear as shown to hold the belt in place, more or less, while I slipped it over the cam gears up top. Basically, you just need to finagle it so that your marks from the earlier removal all line up properly, the belt is in the right teeth on all the gears, and the belt runs on the inside of each pulley.
You will have to have the left pulley loose to do this, because you’ll have to force it against the spring to slip the belt on, and then let go. The spring will tension the belt up, and you can then tighten that pulley down.
Putting the Crank/Accessory Pulleys Back On
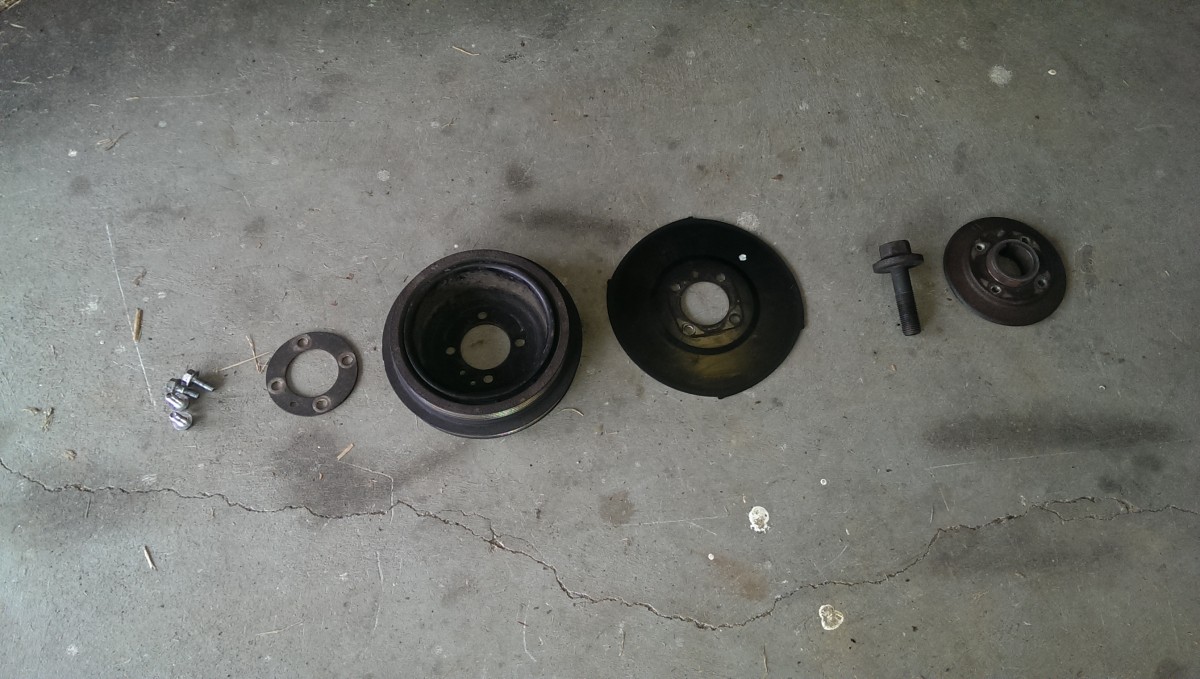
Order of the plates on a 97, they get stacked in the orientation shown
Once that’s all done, you can move on to putting the rest of the covers and pulleys back on. The picture shows the order and orientation that everything goes on – just start sliding / installing it from right to left. The black plate should only apply to 96-97 engines, it drives the crankshaft position sensor that those motors have. If you have a prior engine, you won’t have it. Also, I replaced the original left 4 bolts with some from the hardware store, because I had issues with them cracking while torquing. I did the same thing for the water pump pulley bolts as well. They are a standard metric size (M6? Don’t quote me on that.)
Crank bolt tool bolts to the plate, the other end smacks into the water pump.
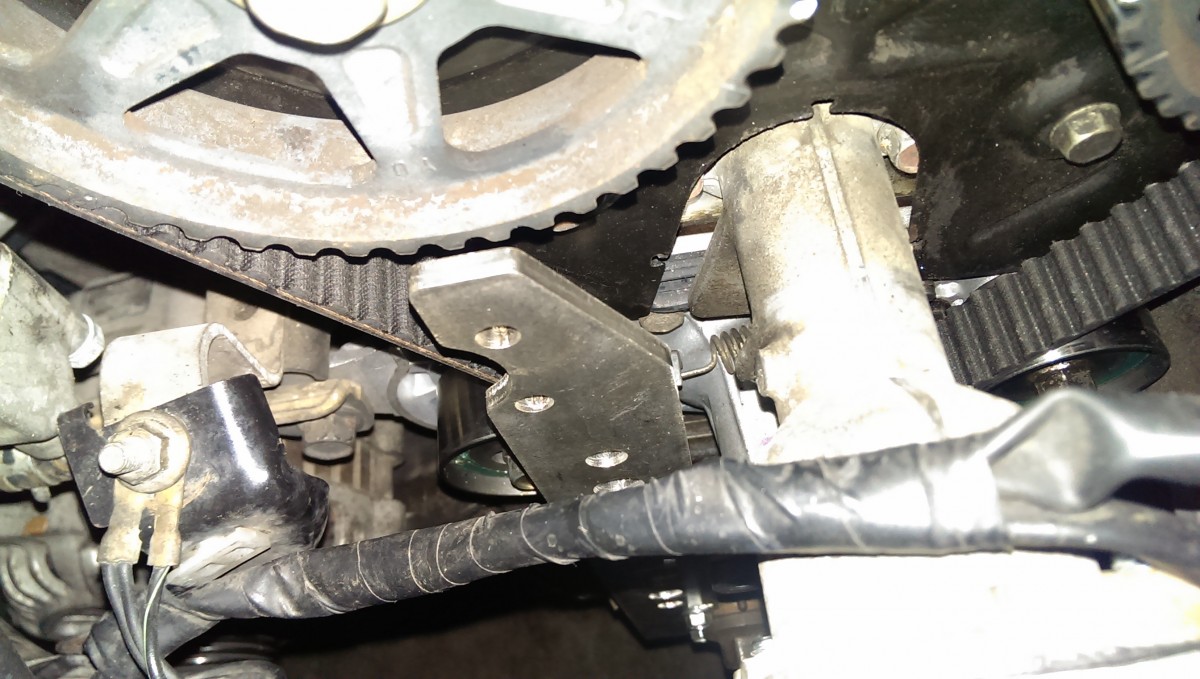
Where crankbolt tool engages water pump neck
For torquing it down, I really recommend Flyin Miata’s tool or grabbing some steel bar and making one with a grinder and a drill real quick. It uses two of the crank pulley bolts on one end, and just swings and hits the water pump neck on the other. This holds the crank still long enough to torque it. I was a little wary of putting 105 lb-ft (I think thats the spec, double-check) on the water pump neck, but I didn’t have any issues, and a lot of people have done it this way.
Reinstalling the Valve Cover
I didn’t really take pictures, but the valve cover goes on as it came off, with some exceptions. First, you have to make sure to clean the surface pretty thoroughly to ensure a good seal. In particular, you have to put a dot of RTV in 6 places, 1 at each side of the 3 humps in the valve cover. There should be old RTV in these locations that needs removal before proceeding. Then, torquing it down has a specific order.
Also, don’t forget to reinstall the PCV valve and vent hose. If you haven’t done this before, miata.net has a great tutorial.
Installing the Crankshaft Position Sensor (CKP)

CKP sensor removed from old engine
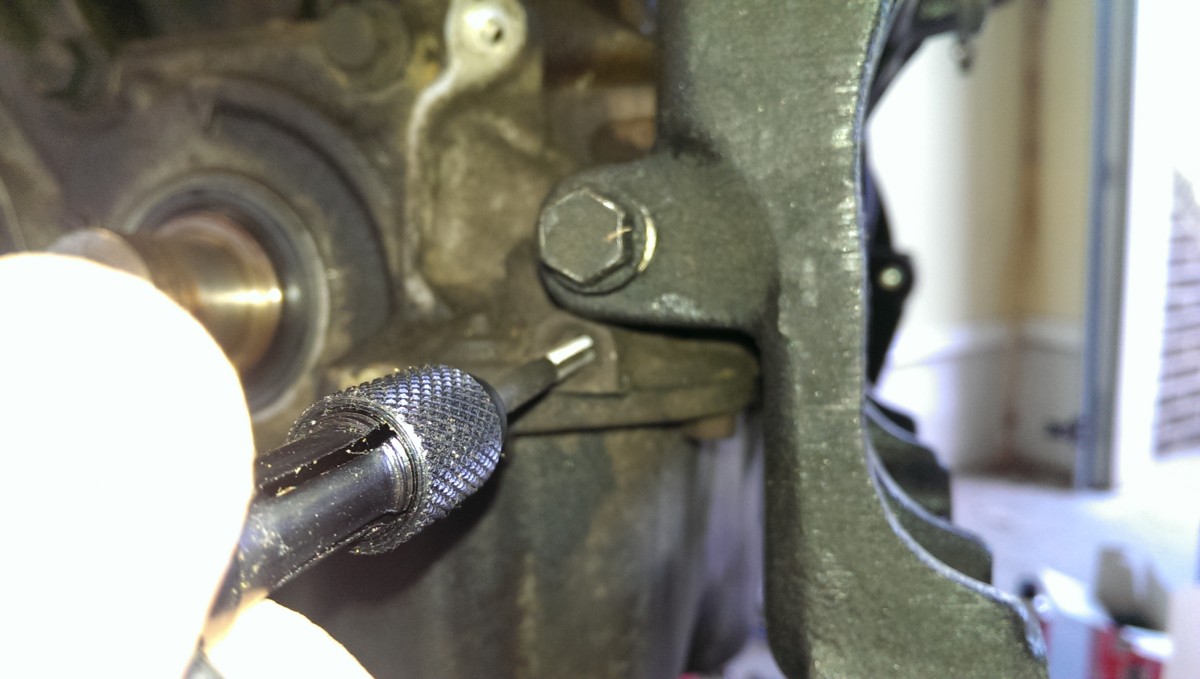
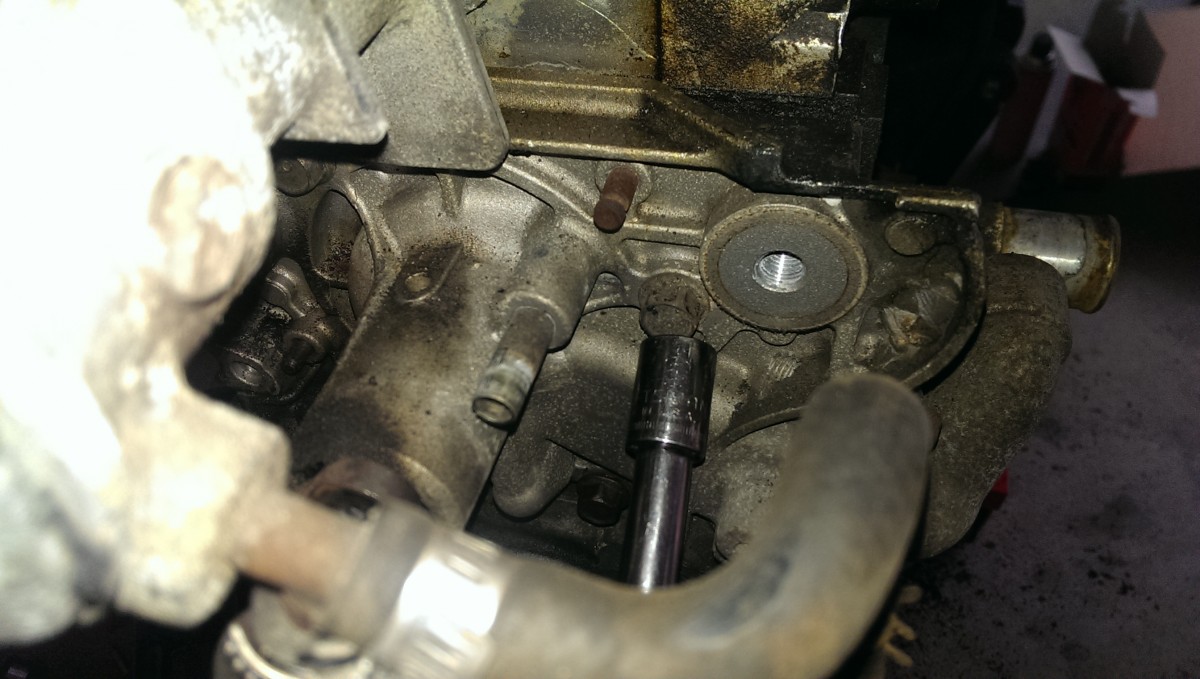
Tapping appropriate hole for sensor mount
If you have a 96-97 engine, you have an extra sensor to install if you’re dropping a 94-95 engine in your newer car. That trigger wheel above works by spinning just a hair away from an electromagnet that tells the 96-97 computer how much the engine has turned.
The first picture shows the sensor itself. Basically it runs down the right front side of the engine, and mounts just next to the pulley. All Miata engines have the hole for this sensor, but the 94-95 1.8’s don’t have it tapped, it’s just a straight hole. To start, spray some lubricating oil in the hole and use an appropriately sized tap to put threads in the hole. I don’t remember what size it is, but you can use a thread measurer at the hardware store on the old bolt if you have it. If you don’t, you can really use any size. On my engine, I actually went up a metric size for the bolt because this engine had threads, but they were in really poor shape, so I just tapped them out a little larger.
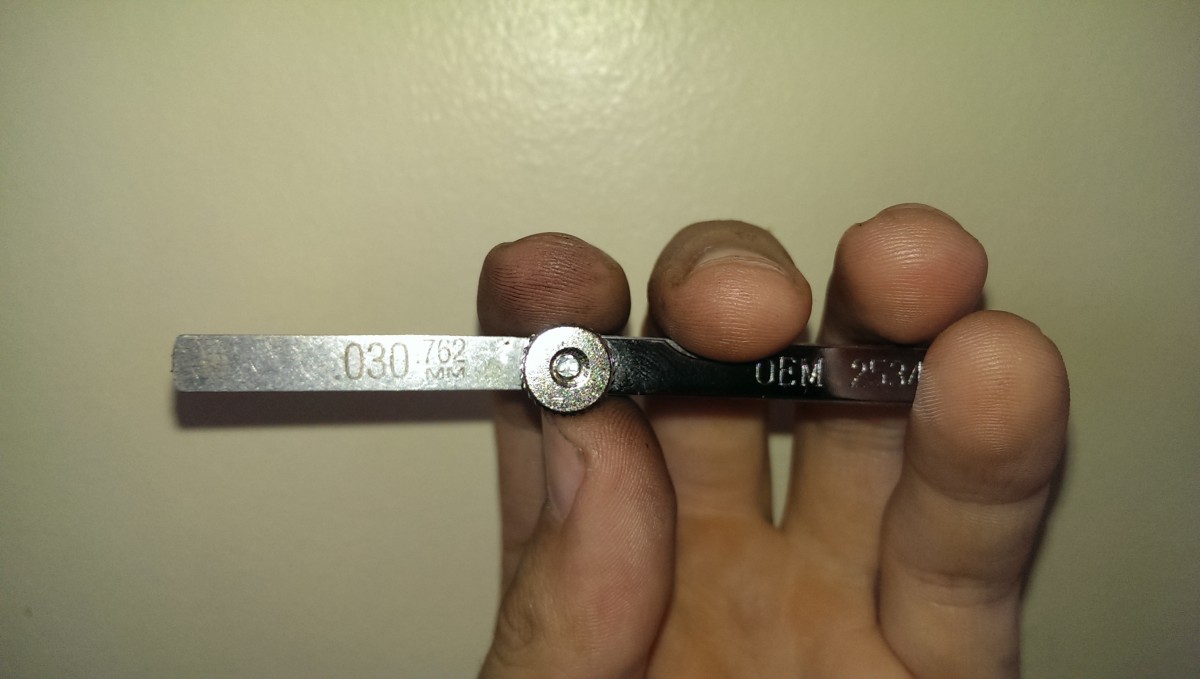
Feeler gauge to set the sensor

Sensor set up and ready
Then, you either need a set of feeler gauges or a credit card. I prefer to do things right, so I went with a feeler gauge. Basically, when you bolt the sensor in, you need to get it within a certain distance from the teeth on the wheel, or the computer won’t pick up the ticks as the motor spins. The range is pretty wide, so a credit card does work, but I used a gauge at .03″. If none of the teeth are near the sensor, you can use a wrench on the crank bolt to just turn the engine to the right position. If the engine is in the car, be sure to put it in neutral first.
And that should be all for that. The 96-97 wiring harness will have a plug for the sensor. On the right side just under the valve cover, one of the plastic cover bolts can be removed and reinstalled to hold the wire out of the way.
Related Articles
Removing a Miata Engine
Miata Clutch, Transmission, and Rear Crank Seals
[…] Miata Timing Belt, Water Pump, and Seals […]
All good words. Just done the water-pump and cam-belt in the car. DONT disconnect the battery on a 1990 Mx5. The ECU looses its idle information and has to be taught to work again – which is a pain. Also if the car has a chuttering sound from the cam-belt, run it for 100km plus – it sorts itself out.
I feel like mazda shouldn’t have put the weird flap on the neck of the thermostat pipe that requires removal of the cam plate to take the water pump off. Had they left it off it would have made removal of the pump a lot easier.