Installing a Racing Seat and Harness in a Miata
I was starting to get serious enough into track days to want a racing seat and harness setup in my car. Before proceeding, a few notes here. First, in addition to the disclaimer always present on this site, this project especially should only be undertaken if you know what you’re doing. You should get a professional to check out your setup before driving it. This is an account of what I did; I am not endorsing this installation or recommending anyone copy it.
With that out the way, some other things to consider. Safety functions as a system, not independently. You can’t toss a seat and harness into a stock Miata with nothing else and be safer. You must absolutely have a roll bar in place before adding racing seats and harnesses, particularly the harnesses. If you roll your car with a factory belt and seat, your body can move and bend, potentially preventing injury. A seat and harness will hold you rigidly upright in a rollover, though, and so if you don’t have appropriate roll protection, you’ll be in a more dangerous position than with the factory protection.
I would not recommend a setup like this for street driving, for two reasons. One is practicality: proper racing seats really grip you and there are more belts to adjust when you get in the car. As a result, hopping in and out of a racing seat + 5 point harness to run to the store is a massive pain. Additionally, racing seats are designed to hold you in place, not for comfort. You can’t move around much in your seat, and this is very tiring on long trips. It’s also harder to look behind you. The second reason is safety. If you have a proper roll bar, racing seat, and harness setup, you should also have a helmet and HANS device. In an accident, the helmet protects your noggin from the roll bar, and the HANS protects your neck.
Another reason for a lot of people is fitment. For track work, you need to pass the “broomstick test”, where the top of the rollbar clears your head with a helmet on it by 2″. I’m only 5’9, so with a stock seat with the padding removed, and the seat adjusted properly, I can actually pull this off. Taller guys have more of an issue. In this case, a racing seat can get you lower, but only if you cut out the humps in the rear of the car and bolt the seat straight to the floor pan. This removes the ability to mount a stock seat, though, so I didn’t do it. Doing this is outside the scope of this writeup.
However, if you have a roll bar, hans, and helmet, a good racing seat and harness setup is really beneficial. The first reason is obviously safety: you’re held securely and better-protected with the proper gear than without. There’s a reason professional race car drivers aren’t in 3-points and bucket seats. The second reason is performance. If you’ve done track work with a car with factory seats, you find yourself sliding around and bracing yourself against the car in turns. A good harness and seat will grip you and hold you tight, so you can focus on driving and take the turns faster than before, with better control.
For all of these reasons, I wanted to have a seat setup where I can go back to stock for street duty. Installing a racing seat and harness in a Miata takes me about 10 minutes once I’ve gotten everything sorted out, so it’s no big deal for me to bolt in this setup to go to track day, and then revert when I get home.
Brief aside on roll bars and harnesses

Hard dog roll bar
I had mentioned that roll bars are critical for roll protection. It’s also important to point out that most of the designs for a Miata provide another feature: an integral harness bar. The horizontal bar at the bottom in this picture is where I will wrap my shoulder belts. If you’re buying a roll bar, make sure it includes this. You could go back later and add a harness bar specifically for this purpose, but it’s easier to simply make it available the first time.
Choosing seats
There are a few seat choices. Unfortunately, Miatas have a very narrow seat area, so they can’t accommodate very many seat options. A lot of people go with aluminum seats, such as a Kirkey or Ultrashield. These are the lowest-sitting and cheapest, although also the least comfortable. Additionally, aluminum seats require a back brace for safety. Lots of people skip this step at their own risk.

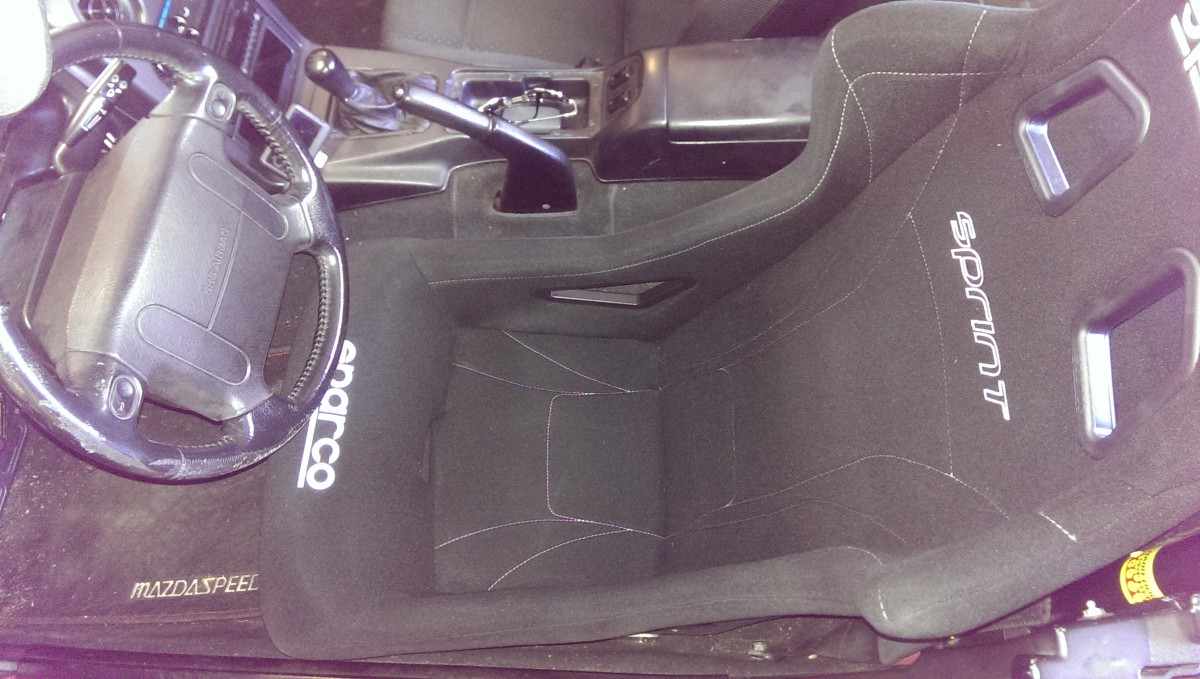
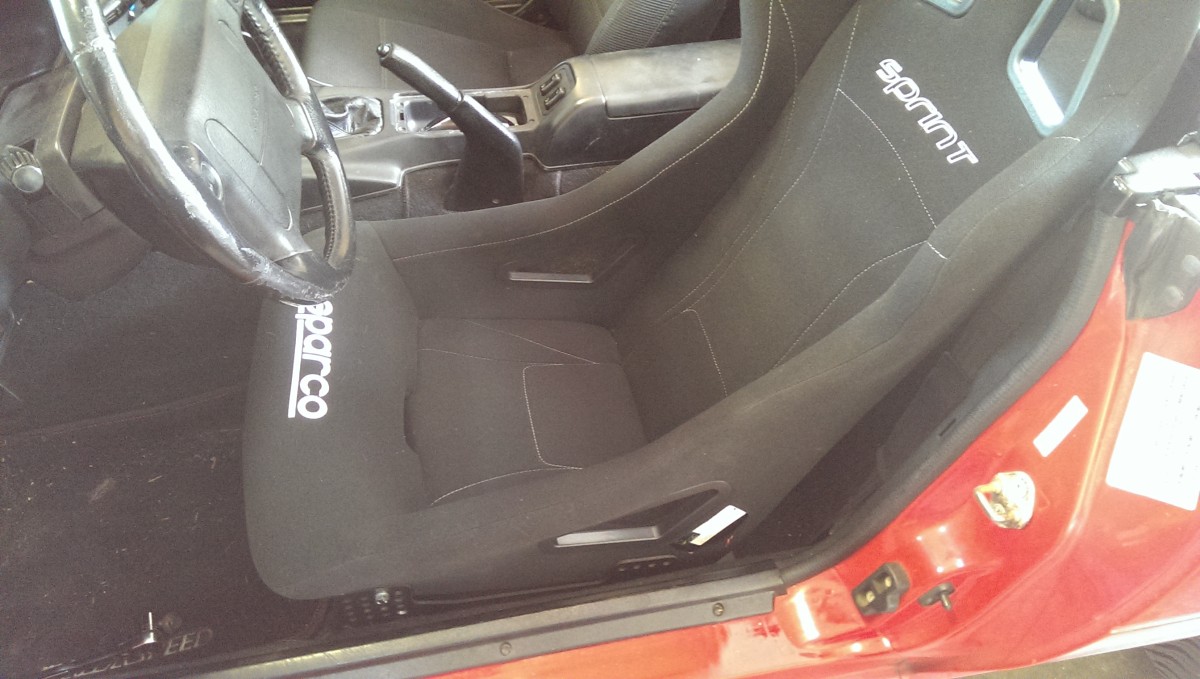
Sparco Sprint
I went with a homologated FIA certified Sparco Sprint seat, shown. These are integrally braced, so they don’t require a back brace like the aluminum seats. They also have a bit more padding, so I find them more comfortable. They’re pretty narrow though, so wider guys might not fit. It’s important to try to sit in a seat before you buy it, if possible.
Choosing how to mount the seat
There are a couple of ways to handle the mounts, also. As stated, some folks cut off the two humps at the rear of the floor pan and bolt a seat straight to the floor. That is obviously incompatible with swapping back to a stock seat, so I didn’t want to do that. It does provide the lowest possible seating.
Other people grab some 1/8″ or 3/16″ steel bar, bend it into place around the floor, and drill holes to bolt the bar to the seat and to the floor. This works as well. The main issue is that it lacks adjustability: the seat can’t be moved up and down except by placing shims between the bar and the seat.
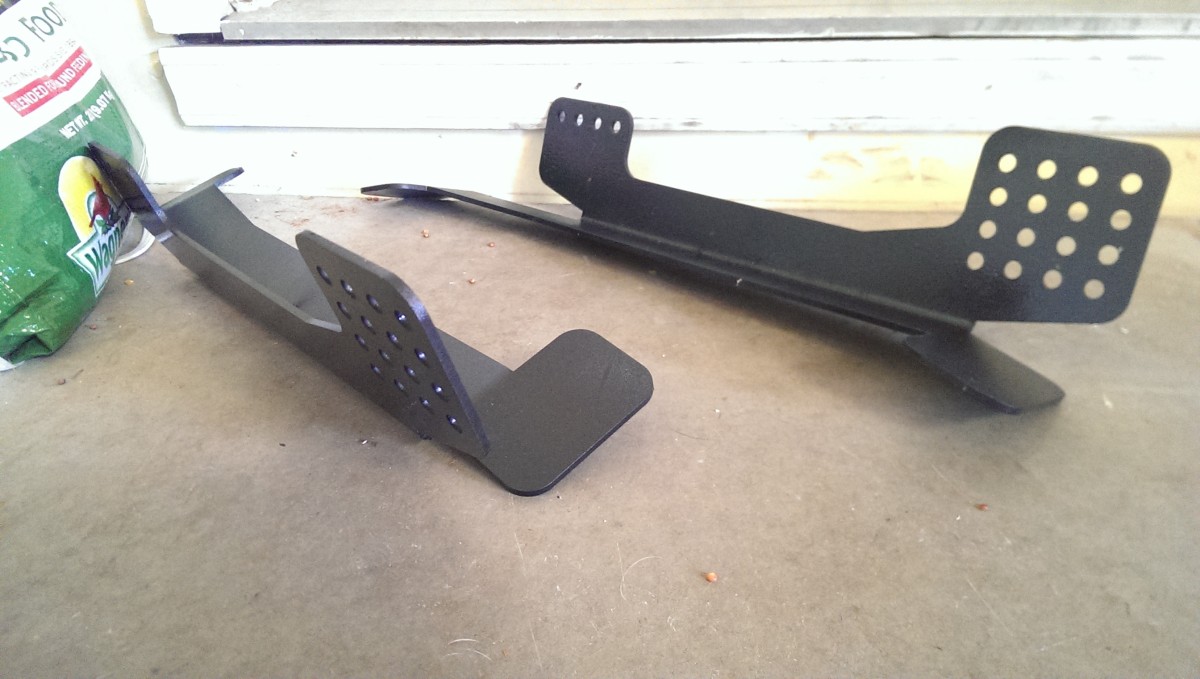
Seat mount brackets made by CNC
I went instead with an adjustable style seat mount. This only works for seats with mounting holes in the side, such as the Sparco Sprint. These allowed me to get my seat as low as I could while retaining the stock floor pan setup; this setup may not be low enough for taller drivers. Another benefit is adjustability; it’s not as good as sliders, but it’s relatively easy to move the seat forward and backward and adjust the tilt.
These style mounts are available commercially, albeit they’re a bit expensive: http://www.pci-racing.com/shop/seat-mounts/one-piece-mounts/89-05-mazda-mx-5-2/ Another option is to make your own. kerozen in this forum thread has provided schematics for getting a machine shop to create these mounts: http://forum.miata.net/vb/showthread.php?t=414229 I am not going to directly provide these schematics because they don’t belong to me, and they come with no warranty or guarantee. However, I have a friend who knows plenty of machinists, and he was able to get them made for me for some beer, so that’s what I did.
Choosing harnesses
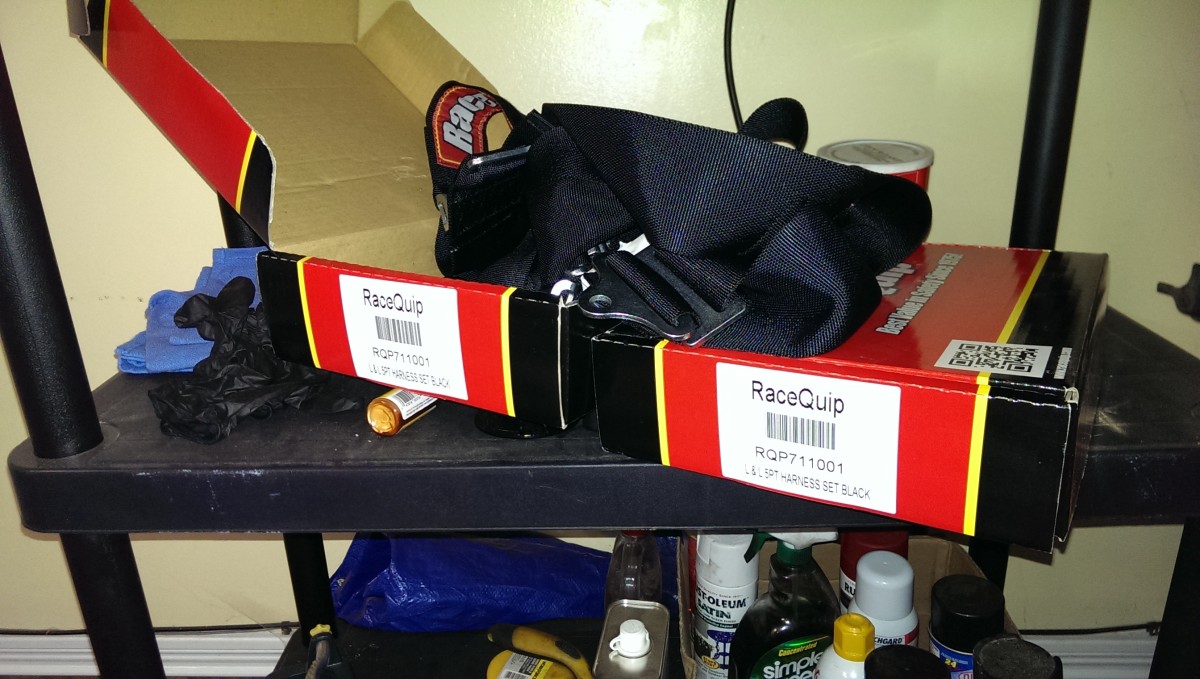
Racequip 5-point harness
You also need to decide what mounting option to use. This should either be 5- or 6-point, meaning it attaches to the car in 5 or 6 places. A 5-point harness attaches at two points near your lap, one over each shoulder, and one through the floor through the seat bottom. This last belt is called an anti-submarine belt (or crotch belt, depending on how cultured you are). It’s purpose is to prevent you from sliding under the belt system in an accident. 4-point harnesses do not have an anti-submarine belt at all and should not be used.
A 6-point harness adds a second anti-submarine belt to distribute force over a rather sensitive area, and are even better than a 5-point. Unfortunately, the Sparco Sprints I have only feature one anti-submarine belt hole in the seat, and so I didn’t imagine I’d really get a benefit out of 6-points. I skipped them.
You also can choose whether to buy cam locks or latch-link. Latch link is the older design, and many people will shame you for buying latch-link belts. There is no safety difference between the two as far as I know, cam locks are simply supposed to be easier to operate. In both cases, one of the lap belts for the harness is permanently attached to a central restraint unit.
With cam locks, the 4 or 5 other belts click into a central hub with a mechanism similar to a standard seatbelt. To remove, there is usually a single lever that can be twisted to release all of the belts.
Latch link belts have a piece of steel with a large lever on it permanently attached to one lap belt. The other lap belt slides into this, where a hook catches and holds it. The shoulder and anti-submarine belts sit inbetween the two pieces, held in place.
To be honest, I haven’t found much of a difference in getting in or out of either type of harness, so I went with latch link. Everybody has an opinion on this, so you should research and decide for yourself. Most racing teams likely use cam locks these days. One notable exception is dirt track racers, who are required to use latch link; the idea is that dirt could clog the cam lock mechanism.
Removing the stock seat
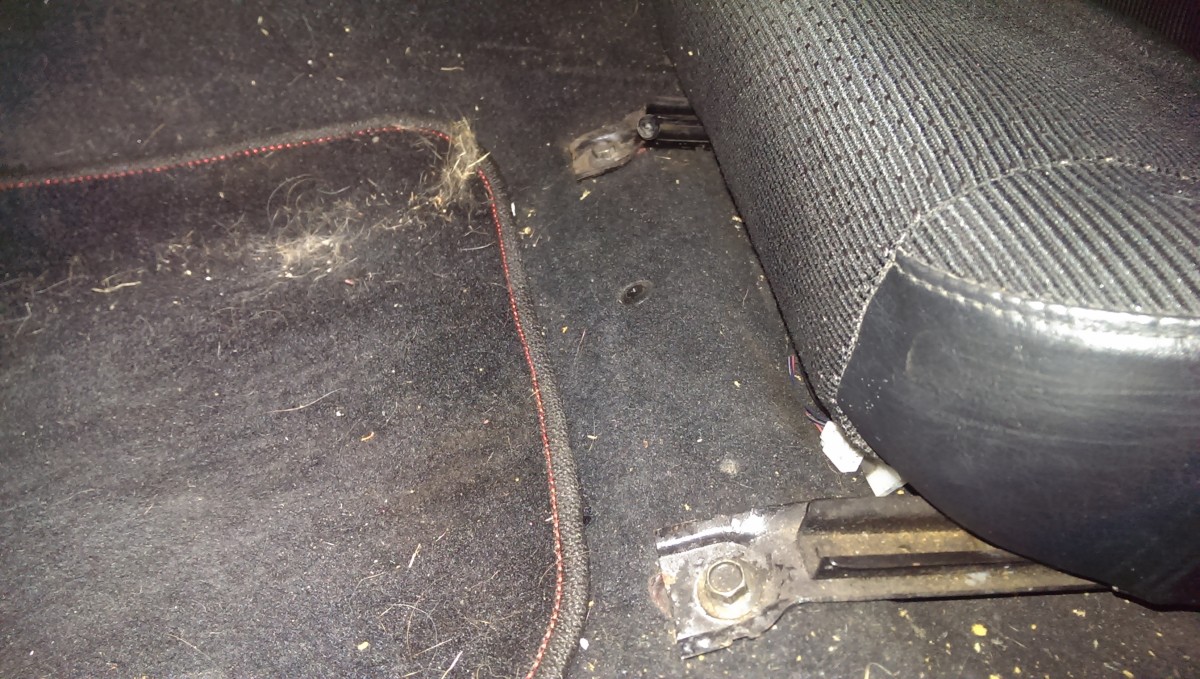
Front two seat bolts
Finally, enough theory. I’ve made my picks, so it’s time to get this in the car. The first step is to pull the stock seat. If you slide the seat all the way back, you’ll see two bolts with 14mm heads. Go ahead and remove each of these. I find a battery-powered impact driver with an extension and a 14mm socket is the fastest way to do this.
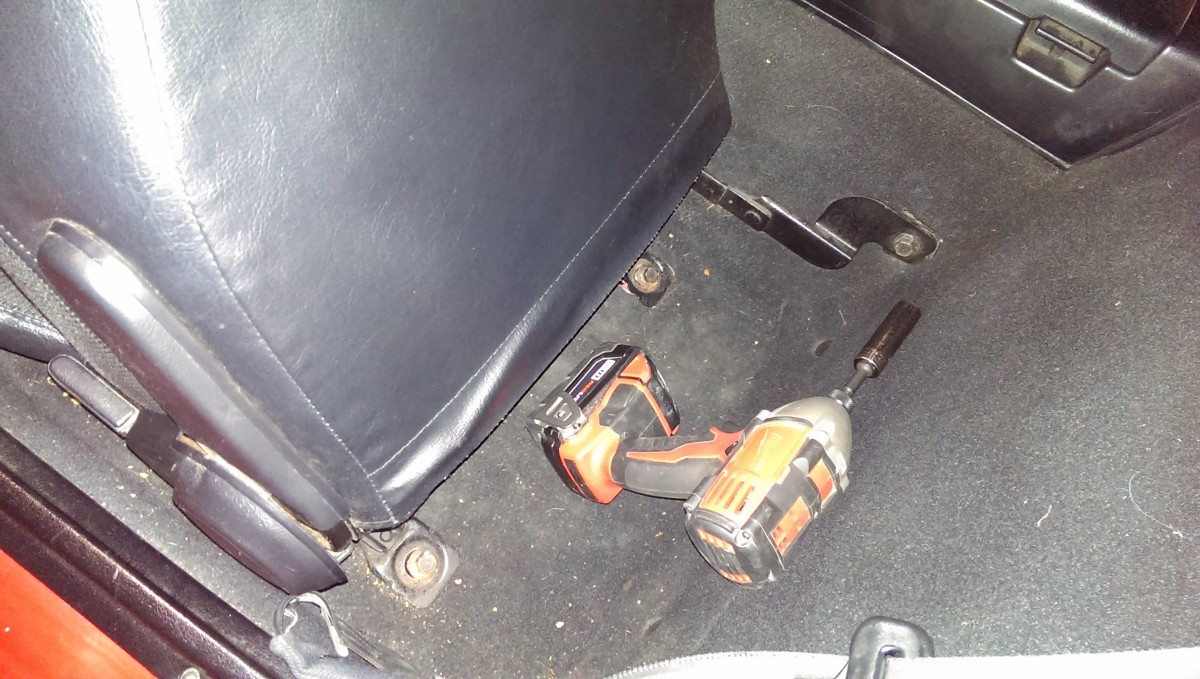
Two bolts plus seatbelt bolt
Next, slide the seat up and fold the back forward, exposing the three other bolts. The two on the floor hold the seat in place, just like the previous two. The one on the transmission tunnel is for the seatbelt. My car is a 97, so the seatbelt holder is attached to the seat. Other year Miatas have this separated, so this bolt may not need to be removed at this stage.

Seat removed
And with that, you can lift the seat and pull it out. Having the top down makes this really easy.
Test fitting the seat

Sitting seat in car
Tight against trans tunnel
My next step was to just sit everything in the car and get a rough idea of what we were working with. As mentioned earlier, the trans tunnel makes it difficult to put an aftermarket seat in straight in these cars. The narrower the seat, the easier this is, but it can still be difficult.

Tight spot pictured just below e-brake
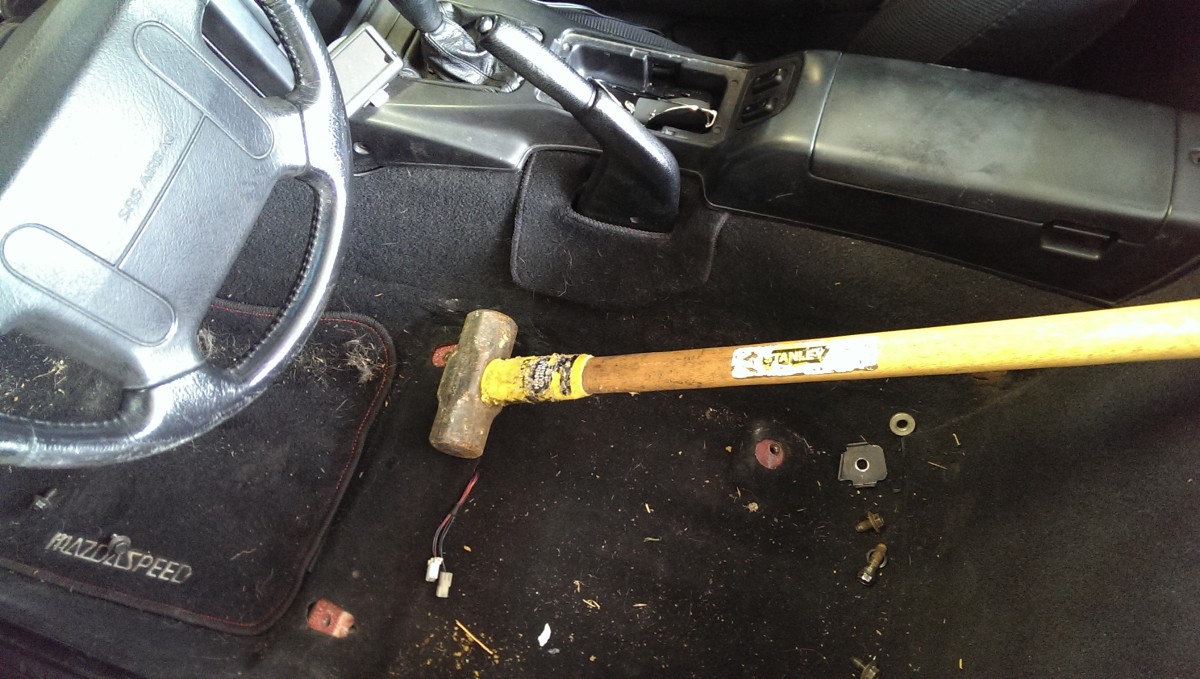
Area to hammer – put down padding to not tear carpet
As you can see, the problem area was right below the e-brake, where the tunnel flares out. Fortunately, there is a bit of room under the car between the trans tunnel and the transmission. The sheet metal isn’t very thick here either. A decent sledge hammer in the pictured location can persuade the tunnel to give you more clearance. Put something under the hammer to prevent tearing up your carpet. I also pulled out some of the padding under the carpet in this area.
If you also put in a passenger seat, as I did, this step isn’t as critical on the other side. The reason to use the hammer here is to make sure the seat is relatively straight and centered to the steering wheel. On the passenger side, it’s probably OK if the seat is slightly slanted or off-center. The passenger isn’t trying to grab any controls and won’t notice.
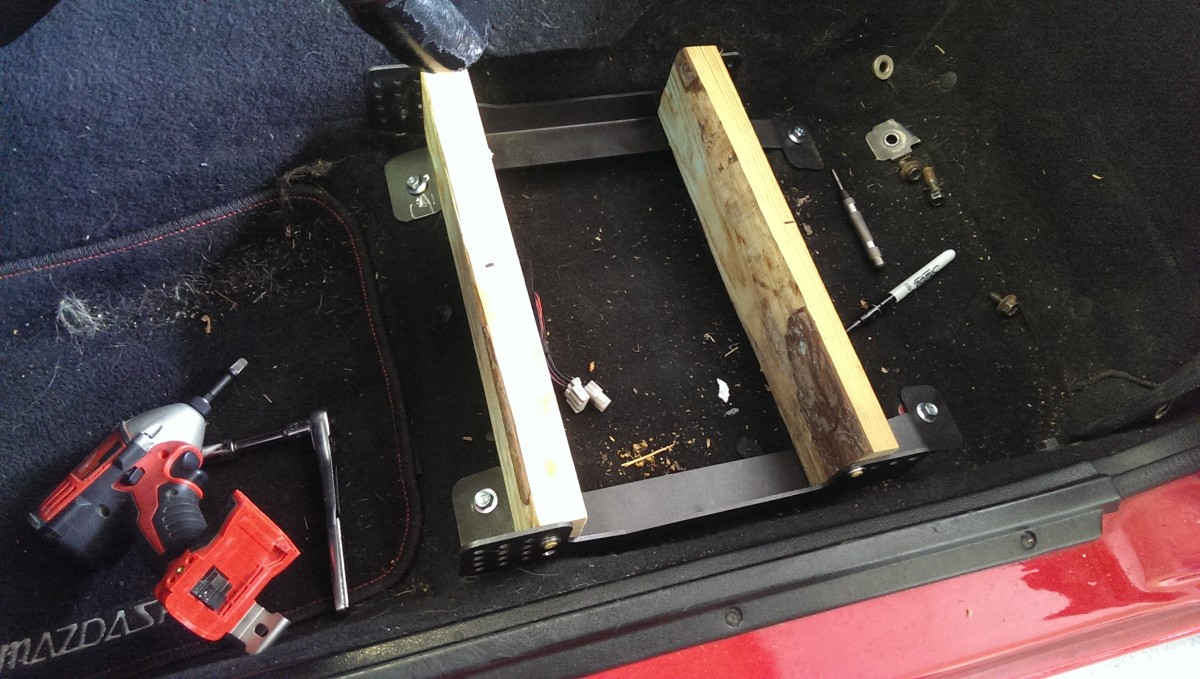
Drilling the mount
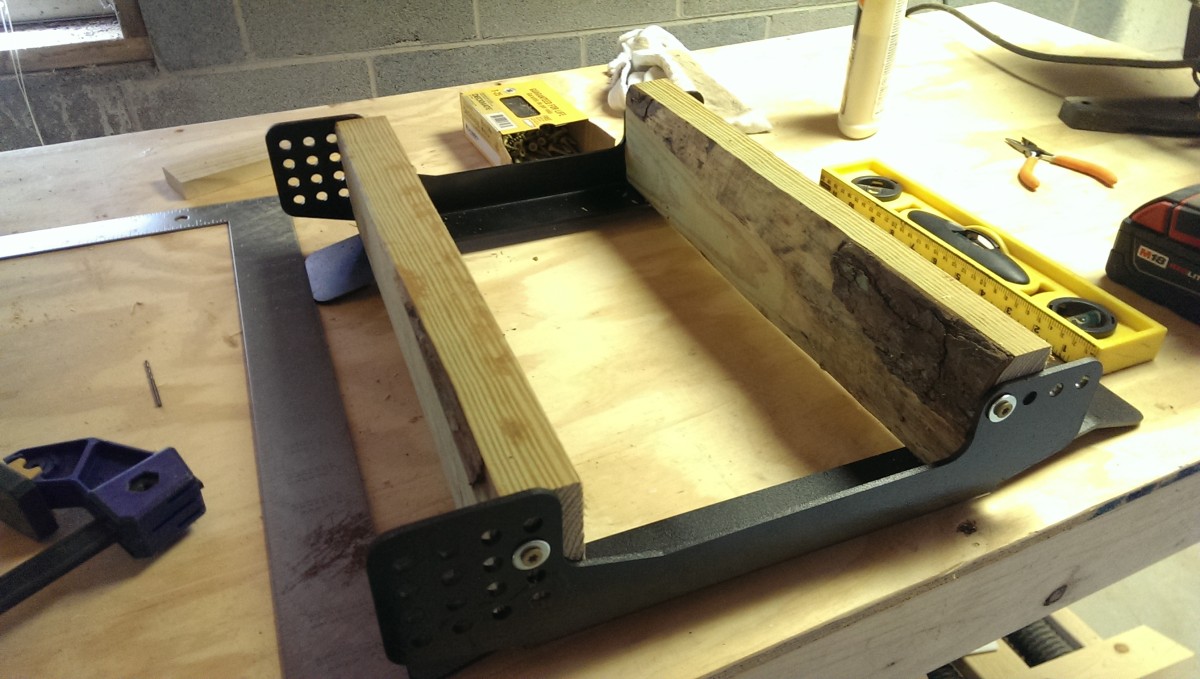
Cutting guides in the shop (2×4), attaching with screw and washer
2×4 seat guides
I don’t know about the commercial mounts, but the ones I had made up need four holes drilled for the bolts to mount them to the car. These holes go in the same place as the 14mm bolts that were removed with the seat. They’re not pre-drilled to allow fine tuning during installation.
I tried a few different ways to do this, but here’s what I found easiest. If you bolt the mounts to the seat, the seat itself gets in the way of marking and drilling. Instead, I chopped two pieces of 2×4 to the same width as the seat, and used some deck screws and washers to hold it in place as shown. This gave me the right dimensions while freeing up room to drill.
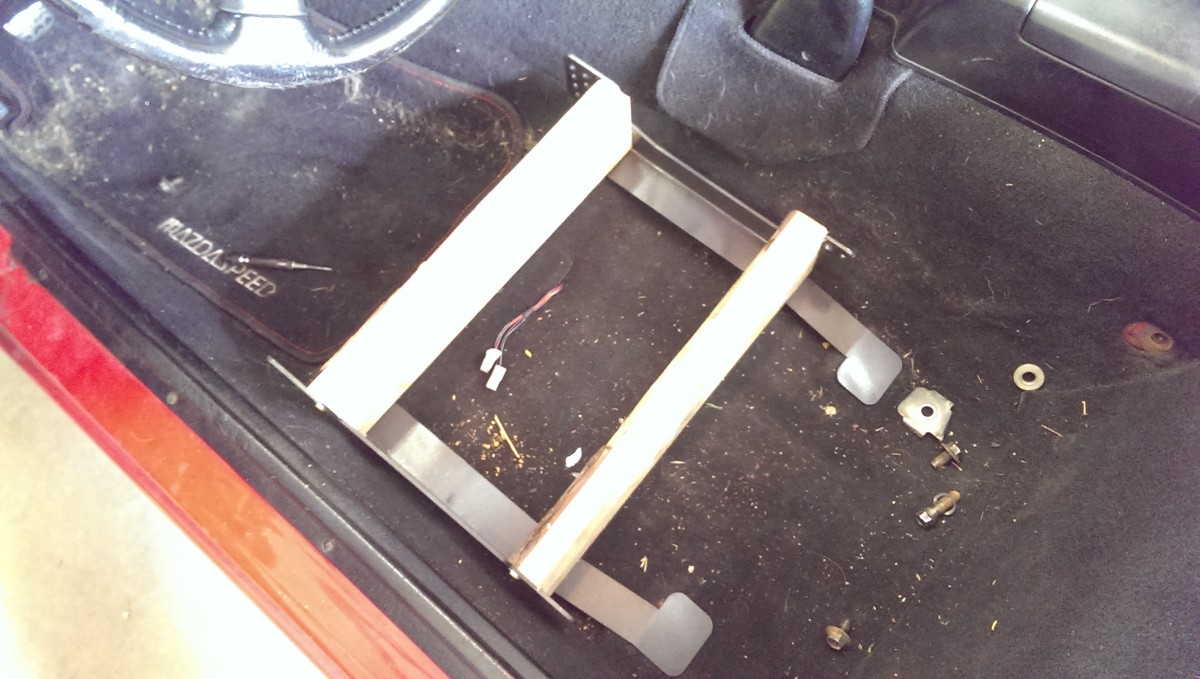
Drilling seat mounts
Then it’s just a matter of marking as close to centered on the hole as possible and drilling it out. If you have a drill press, that’s preferable, but it can be done with a hand drill. Use some lubricating oil on the steel while you drill it to keep it cooled down and go slowly. I drilled each hole in sequence, double-checking that I could bolt it in as I went. I used the smallest size bit possible to match the hole, but enlarged it a size in one or two cases when I went a little bit off.
Mounted seat
Once you mount the brackets, you can simply screw them into the seat at your desired setting and angle. Test fit and this is done. I’ll note here that I used all grade 10.9+ bolts. I bought M8 bolts and washers for the Sparco seat itself. I also bought replacement bolts to put into the floor; I may have been able to reuse the factory bolts, but since my seat mount is thicker than the factory bracket, I wanted to get slightly longer bolts to ensure I had enough thread engagement.
Tips on bolting the seats in
The seat itself gets in the way a lot during installation. I have found a method that works for me. First, I use ratcheting wrenches for most of the bolts, especially between the seat and trans tunnel; in my case these are 13mm and 11mm.
I loosely thread the bracket into the seat outside of the car, first. Just enough turns to seat the bolt, while still having everything extremely loose. These are pretty tough to start with the seat in the car, especially on the right side, because the transmission tunnel is in the way.
Next, I put the seat and mount in the car, and start to thread in the bolts to the floor. I get those started a good several of turns. I then take my ratcheting wrench and fully tighten the seat bolts. The floor bolts are still loose, so I can be sure that the seat to bracket bolts get seated nicely, no pun intended. Finally, I go back and tighten down the seat to the floor. I haven’t found a way to use a torque wrench in this setup, so I simply go tight.
Harness anti-submarine belt installation
Once the seat is situated, it’s time to install the anti-submarine belt. It needs to be bolted through the floor of the car. Guidelines for its placement should be described in the instructions that come with the harness. The summary is that the harness is designed for a certain angle and distance between the mounting point and the hole in the seat, so be sure to follow this.
A backing plate is required for this installation. Simply putting a bolt though the floor does not sufficiently anchor it! You should use a hefty chunk of steel that meets FIA spec for the backing plate. You could source some steel on your own, or just order a plate from Jegs for about $3. I went with the latter, because I’m lazy.
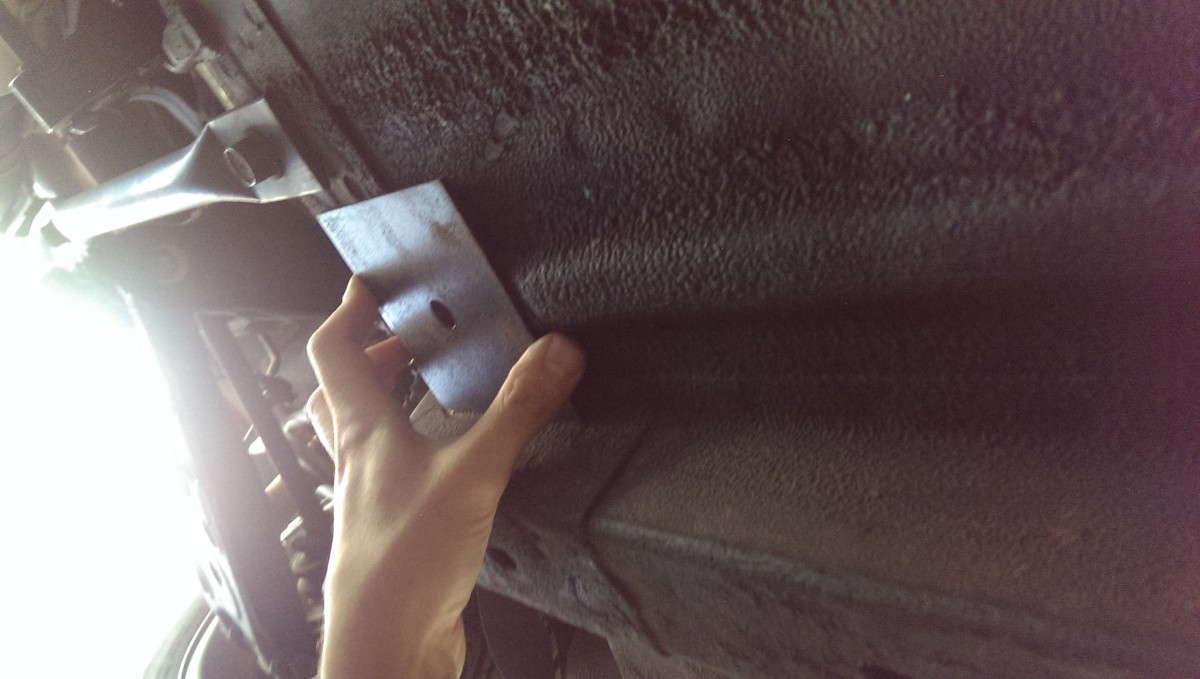
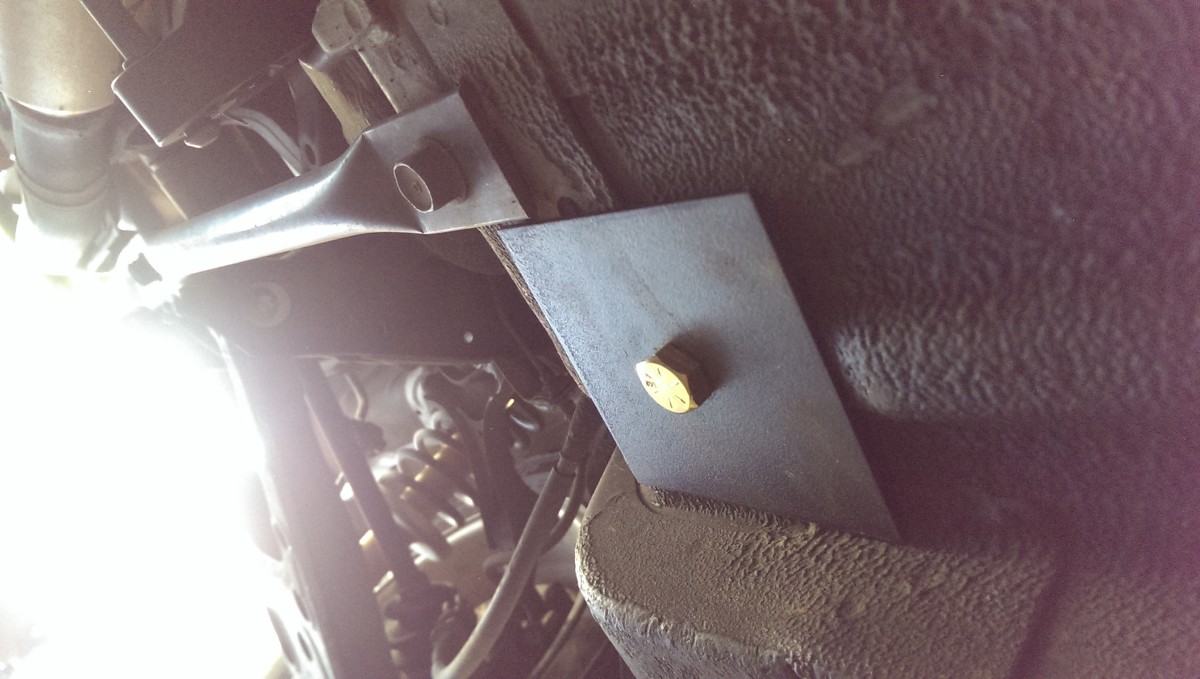
Locating under car
I determined a workable spot for the plate that also matched up to a flush surface under the car, as pictured. The plate should rest flat against the surface it is installed against. Once I knew where it was going, I used my hand drill to drill up through the floor of the car. I didn’t worry about removing the carpet, I simply drilled straight through it.

Drill hole in carpet
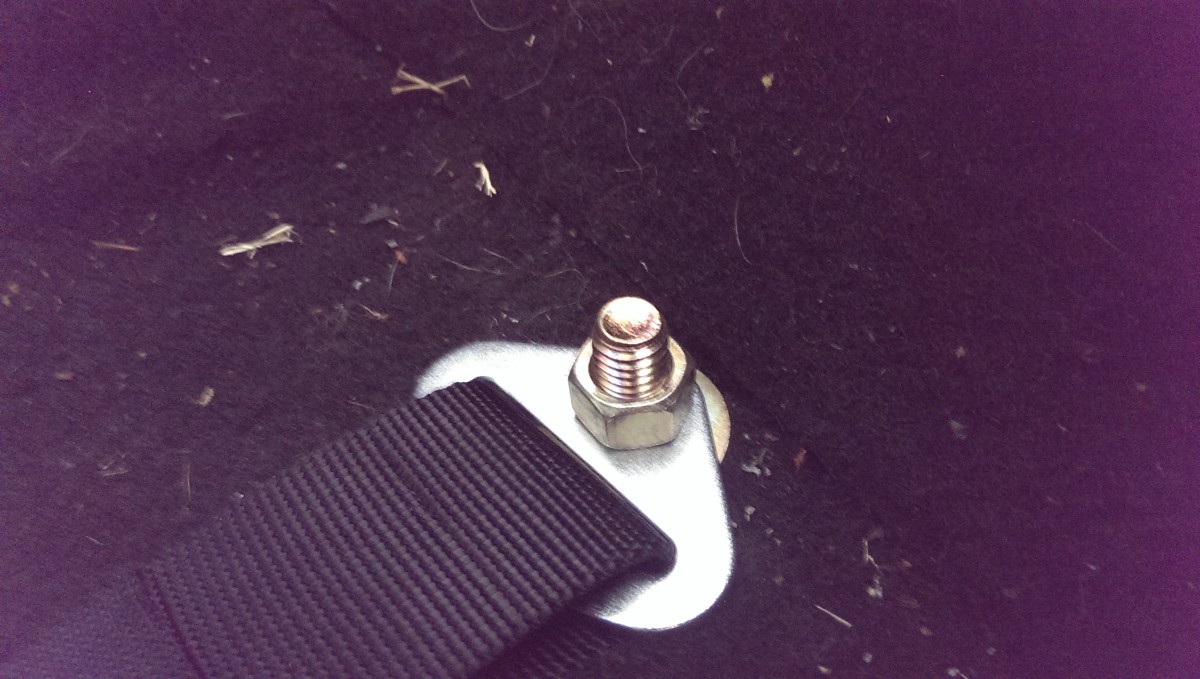
You can see where it came out in the seat area. At this point, I was able to simply feed the bolt through and complete the installation. I used a grade 8 standard bolt for this job matched to the diameter of the backing plate and my anti-submarine belt.
Installed – top
Installed – bottom
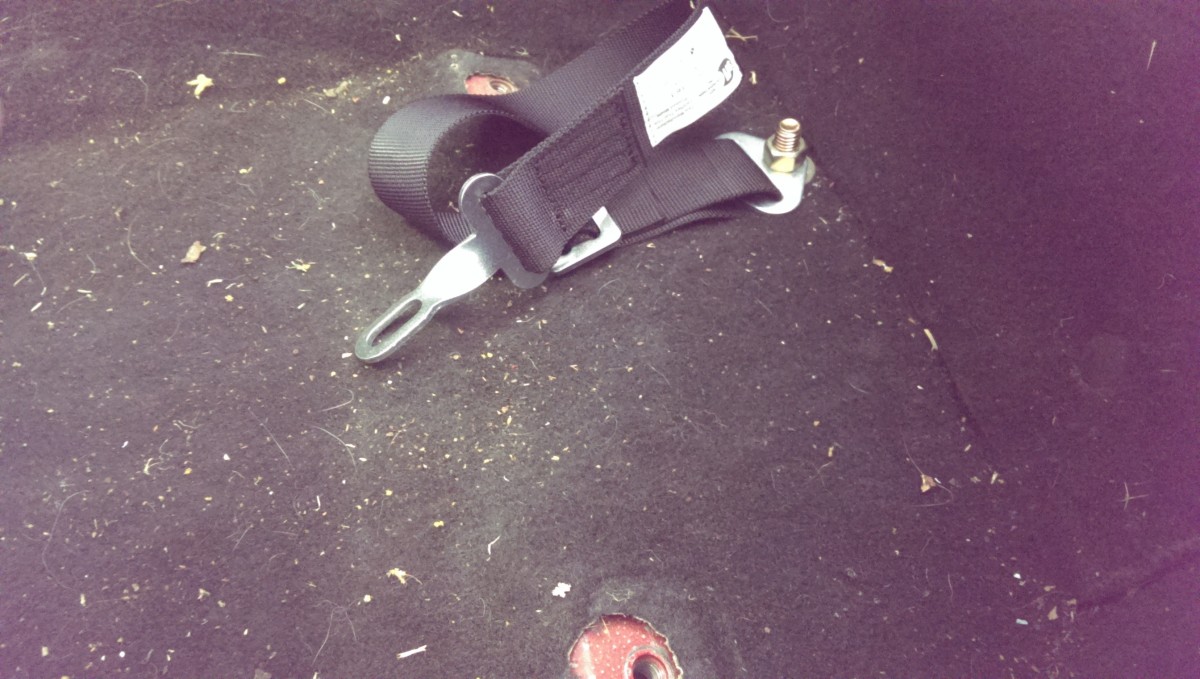
Another view
I threaded the bolt up from the bottom so that I wouldn’t have bolt threads sticking out into the under carriage, potentially hanging up on something and getting exposed to the elements. After doing this, it’s important to double-check that the mounting point meets the guidelines for the harness as far as angle and position compared to where the seat is when installed.
Wrapping up

Seat and belts in car
The lap and shoulder belts are much easier to install. I simply install the lap belts using the factory bolts in the factory seatbelt locations. The shoulder belts wrap around the harness bar using the included installation hardware. Both should be threaded through the seat as documented in the installation guide. Like the anti-submarine belt, you should verify that the angles and distances match the specification for the harness.
I can switch back and forth from this seat to stock in a matter of minutes. I leave the anti-submarine belt permanently installed, however. When I put the stock seat in, I simply coil it up underneath. With this setup, even after using the hammer, the seat is shifted just slightly to the left vs the steering wheel. It’s slightly noticeable at first, but I found that I get used to it fairly quickly.
With the seat installed, I find that I have much better control over the car and am a lot less fatigued after track day. The added safety is a bonus. I ended up buying the same set up for the passenger side, so that friends or instructors are as protected as I am.
As mentioned at the beginning, this writeup is simply my experience installing a racing seat and harness in what I believe is an appropriate manner. I am not telling you to do what I did or providing any kind of warranty or guarantee with this writeup. Follow this guide at your own risk. Get a professional to check out your setup if you install a seat and harness.
hey, i’m a tall guy, how is getting in and out of the seat ?
You have to kind of swing in, but otherwise it’s not bad. I’m only 5’9-5’10, so it isn’t a problem for me, but my taller friends end up getting removable steering wheels.
If you’re tall and want to pass the broomstick test, though, you may have to shave down the rear seat humps and bolt the seat directly to the floor.
Tip: unless you’re a very tall driver, I found that with my Sparco Sprint the best way to mount the crotch strap was to use a 6 point setup and put the two eyebolts IN FRONT of the cross brace (the area the front seat bolts to). This way the crotch belt has a straight unimpeded direct path to the floor from your crotch, in line with your should belt angle. Also, 6pt and not 5pt because you need to mount on two sides of the frame rail which is right in the middle and you’d need to offest a single 5pt strap to either side which isn’t ideal. ALSO, make sure to get a good 6pth harness. The miata is so small that there is no good options so you want the one that’s smoothest to use. The pull-down G-force ones are terrible. I used a racequip 5pt camlock that’s pull-up, and it’s better, but it’s still hard to get tight unless you have someone to help you strap in.
ALSO, with a sparco sprint or other tube frame seat, if you ever use the car on the street, you need to add some head protection because if someone rear-ends you, your head is going to smack that tube at the top of the seat pretty hard and could cause injury. My solution was to cut a roughly 12×10 section from this material (https://www.amazon.com/Ergodyne-380-Multi-Functional-Kneeling-Cushions/dp/B002BDTWB2/ref=sr_1_8?dchild=1&keywords=kneeling+pad+rubber&qid=1592843981&sr=8-8) and add velcro to stick to the seat. Try putting this pad on the concrete and punch it as hard as you can, no problem, and should be relatively safe. Note I also have the hard-dog brand FIA foam on the front of my roll bar, just in case.
ALSO, I can talk all day on this having owned 3 miatas, DON’T use the stock NB seatbelts around town if you’ve removed your airbag. Use the 5pt, OR, replace with an NA seat belt. NB seatbelts are SRS belts and stretch up to 12 inches in case of an accident since they’re designed to work in conjunction with an airbag. You’ll get hurt if you have a momo wheel etc. Here’s a primer to get started: https://forum.miata.net/vb/showthread.php?t=378073 I forget which belt I retrofited with but I think it’s a 97, and you need to modify the webbing. ALSO, do this before you add a hard dog roll bar, otherwise you can’t get to it and need to take the rollbar out completely. Ask me how I know lol
Cheers