Replacing an F-150 Blend Door Actuator for HVAC (2009-2014)
A Ford F-150’s blend door is the device that controls how much heat or AC comes through the HVAC system. For the last 20 or 30 years in these trucks, they have been prone to failure. I love my truck, but I wish Ford had fixed this problem by now. On the plus side, where older generations required disassembling the dash to fix, the 2009-2014 generation’s most common problem can be fixed with the dash left in place. Truthfully, the work isn’t really that bad. The replacement actuator, available here online
Diagnosis
You’ll know you need to perform this procedure if you hear a loud, persistent POP noise whenever you switch your HVAC to “full cold”. If you switch it towards heat a little bit, and the noise stops, your F-150 blend door actuator has gone out. A common issue in these trucks is the failure of the potentiometer that senses when the actuator has turned fully. The truck effectively doesn’t “know” how far to turn the door. The popping noise is the actuator trying to turn further than it is able to.
Fortunately, this job isn’t nearly as bad as in older generations of F-150s. It can be done in < 30 minutes and only requires a $30 part. If you get a mechanic to do it, it generally costs an hour or two of labor.
Tools required
You need an 8mm box wrench, along with a 7mm or equivalent SAE socket and socket wrench. I used a paint can opener to help pull the plastic off.
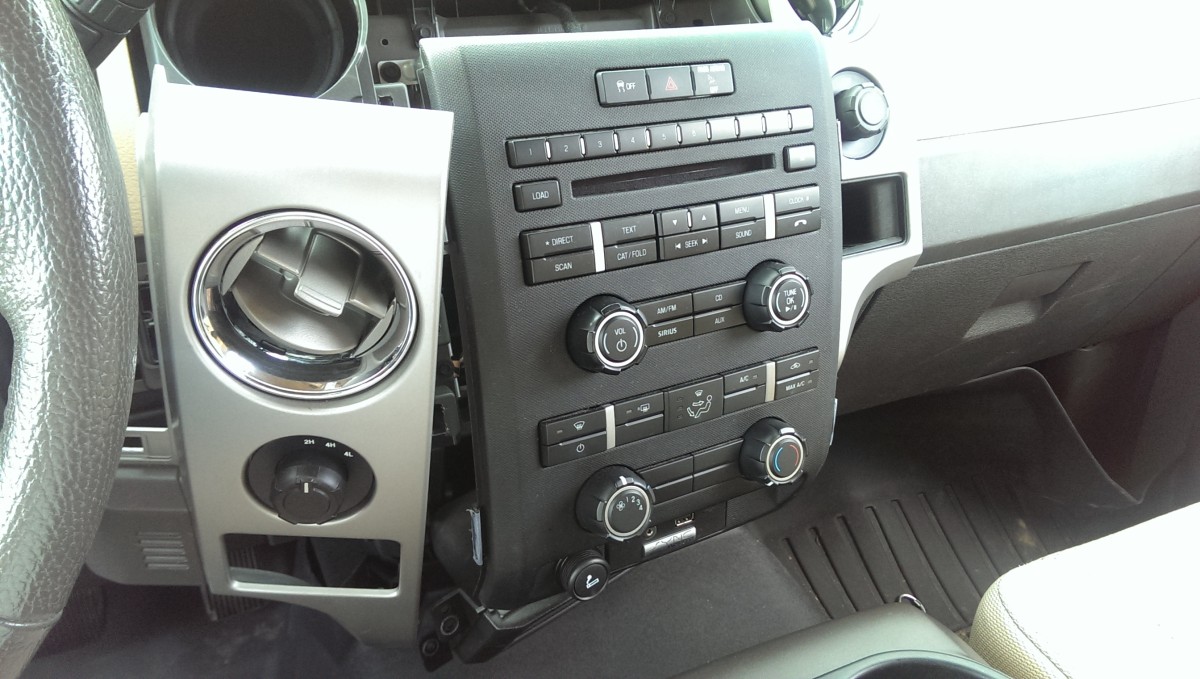
Removing the plastic trim and stereo
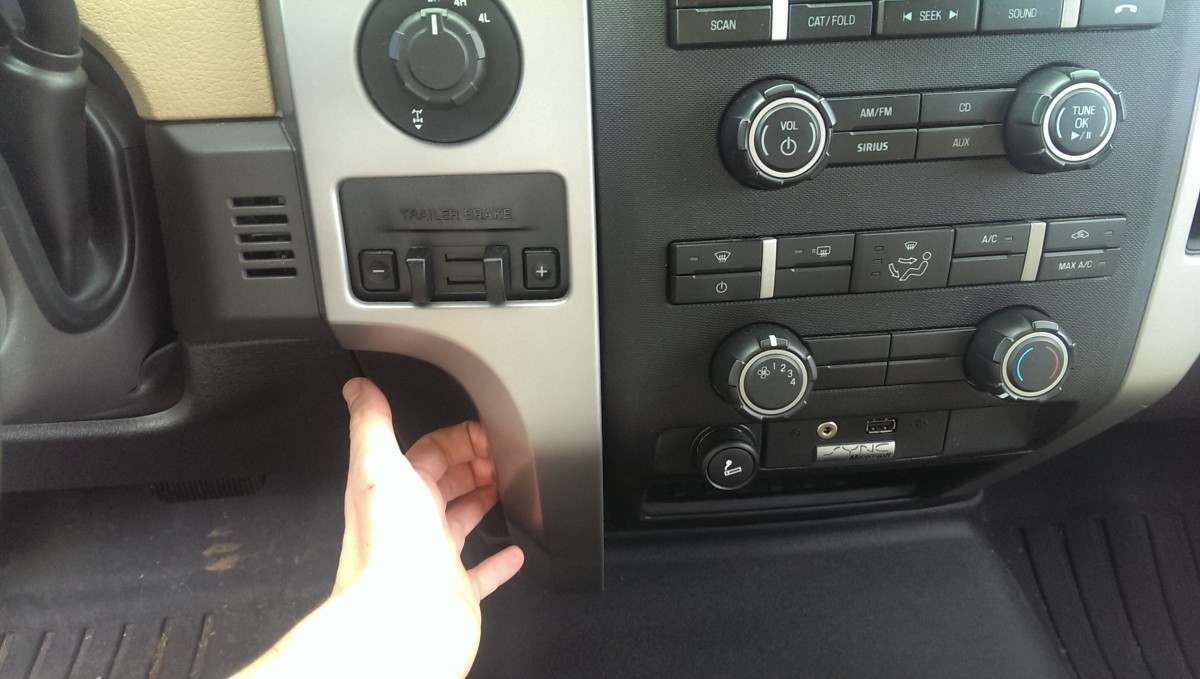
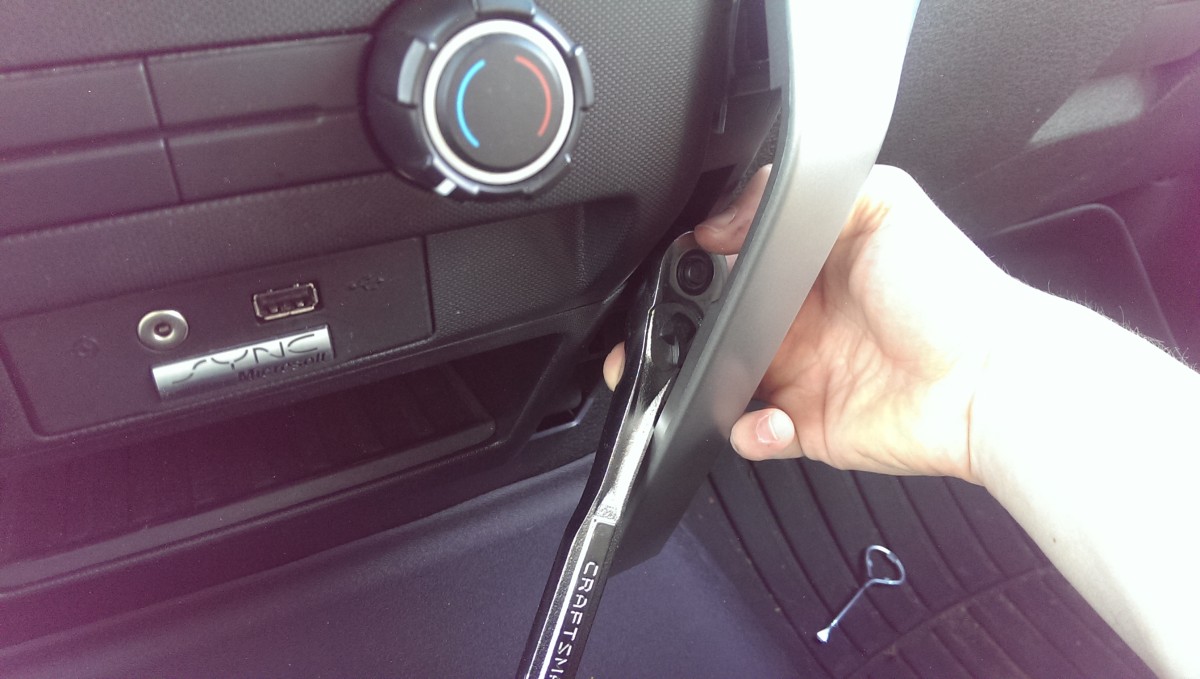
This trim panel pulls straight out
The blend door is actually behind the radio, so the first step is to get the radio out. The silver panels on each side of the radio simply pull straight out as pictured.

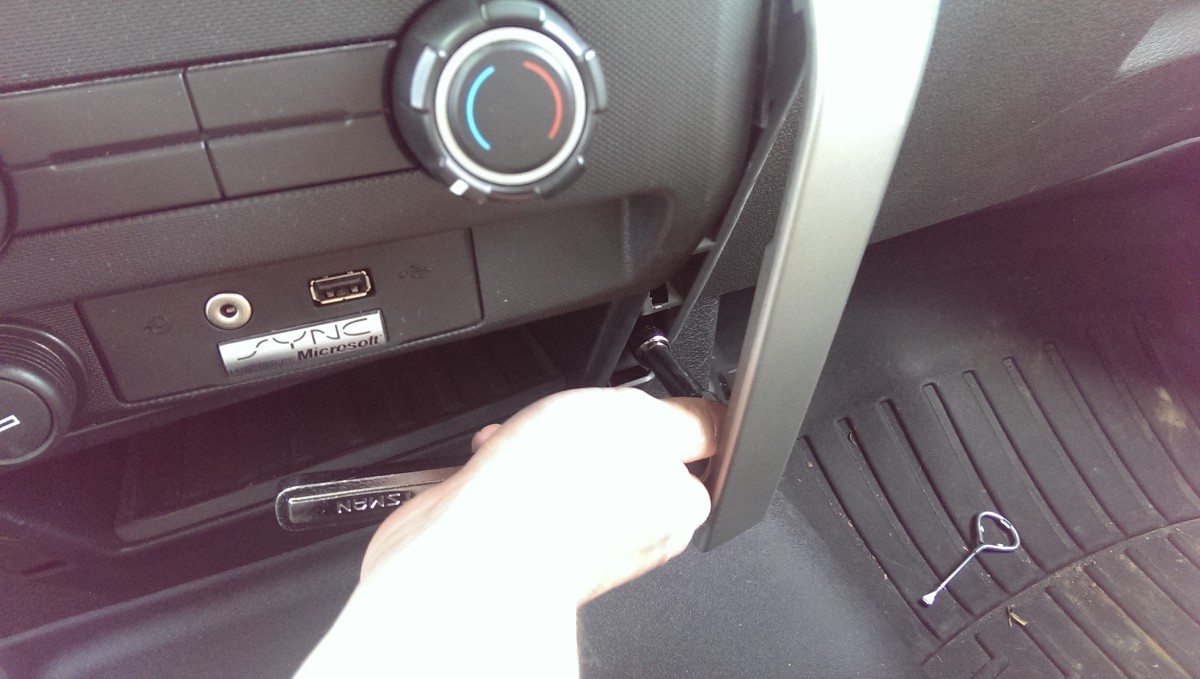
Pulled off, not necessary to disconnect
This panel will pull entirely out, if you lift up just slightly on the other paneling it is caught behind. You don’t have to pull it out all the way like this, you can instead just pull it out an inch or so to get to the radio, as I do with the panel on the right in the next step.
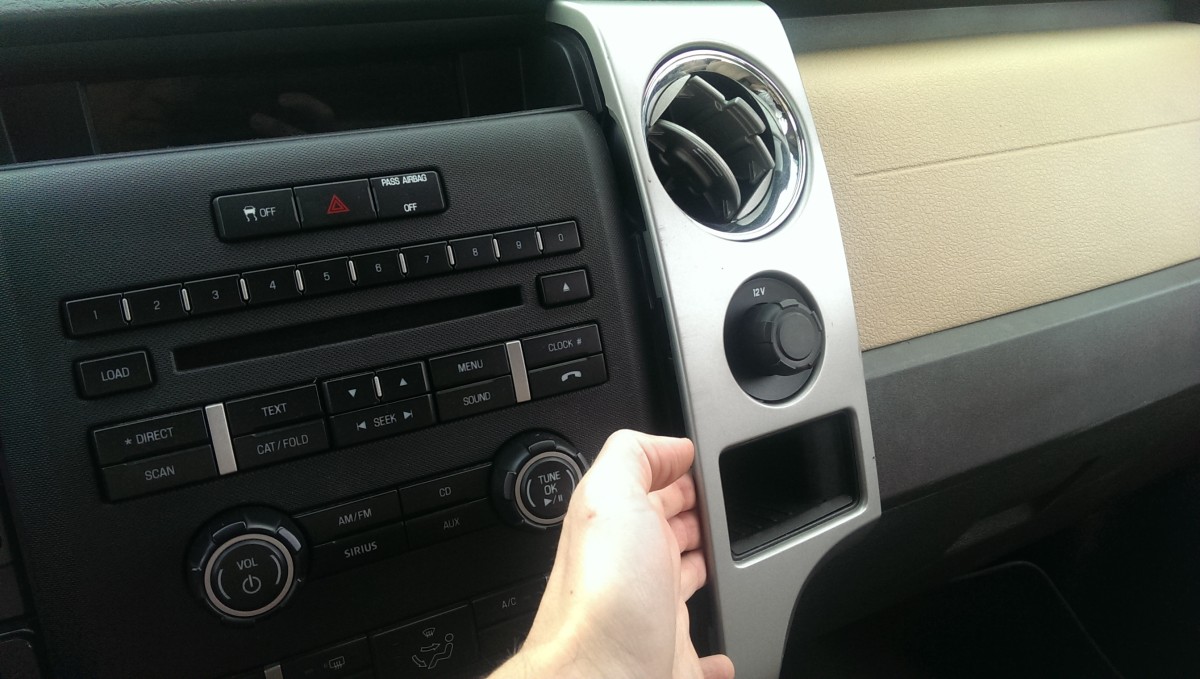
This panel can hang here – You can do the same thing with both panels, really
The panel on the right side comes out the same way. This one is a bit more of a pain to fully remove, so I just left it as pictured. This is enough to get access, so you can do this on both sides if you prefer.
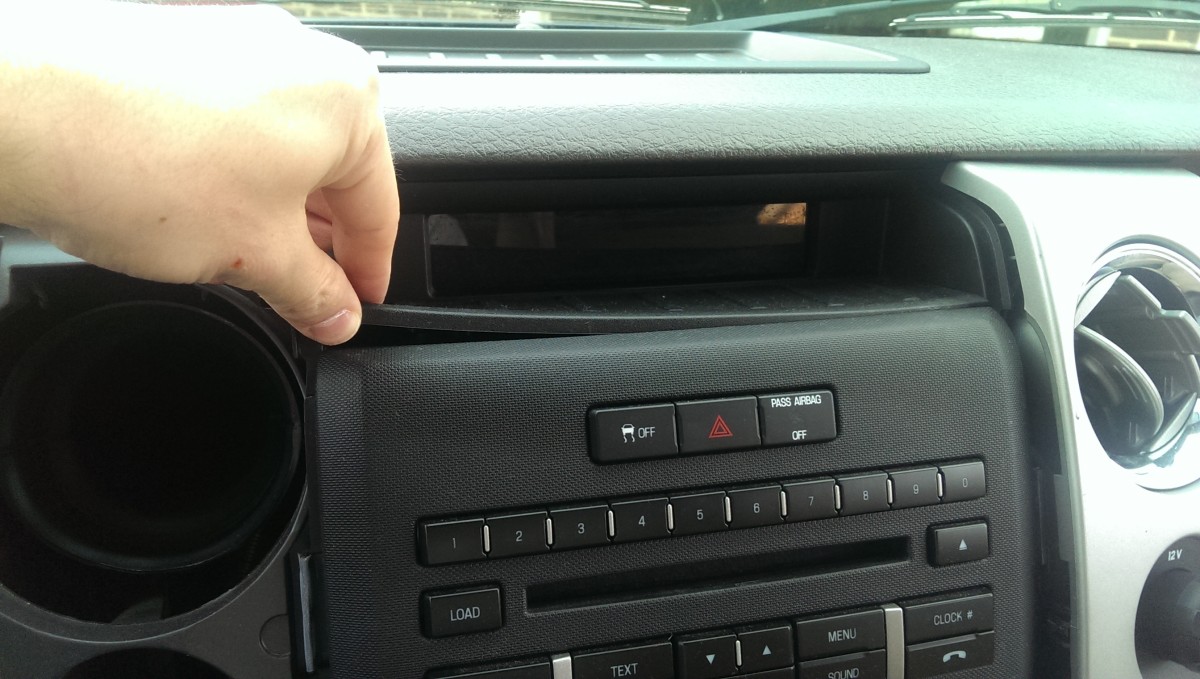
Remove the trim on top of the radio
The radio has a piece of rubber trim hiding two of the bolts that need to come out. You can simply pry this up and pull it out. It doesn’t really lock in place or anything, it just sits there inside of a groove.
I used a 7mm socket to remove both bolts
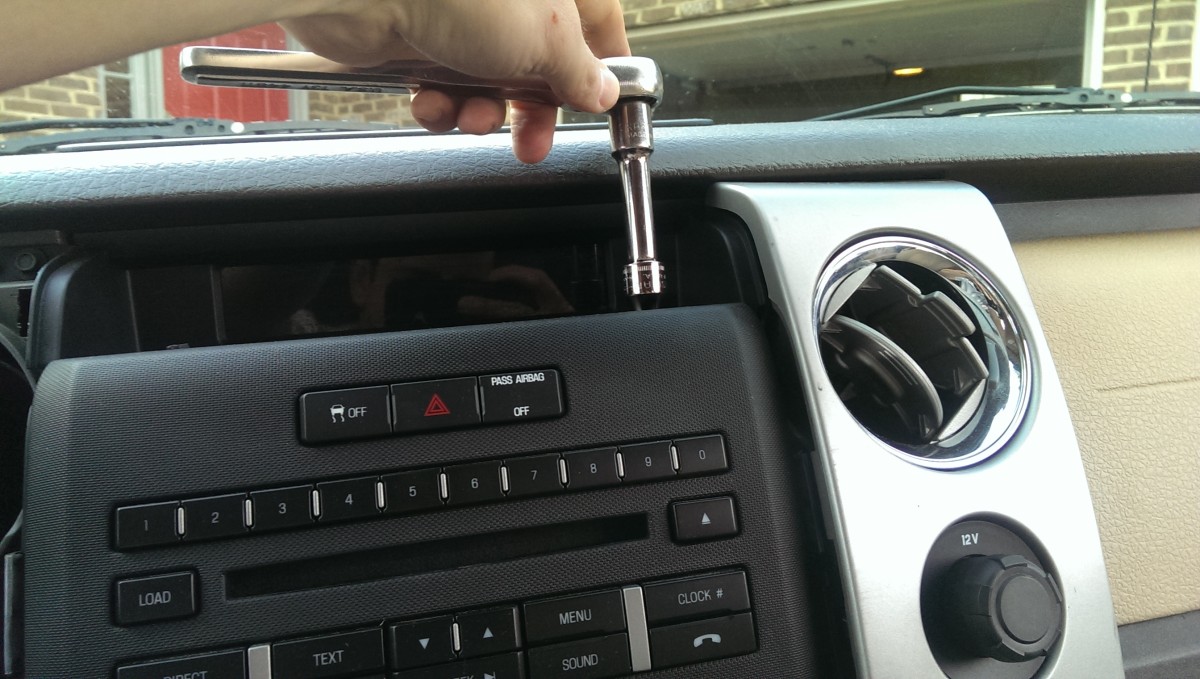
A 3″ extension helps
There are two screws underneath the rubber trim that need to come out. I used a 7mm socket, which fit fine. I assume an SAE equivalent could work as well.
4 more bolts
4 more bolts

4 more bolts
4 more bolts
There are also 4 more bolts on either side of the radio, as pictured. They are removed with the same socket. On my truck, the radio and the HVAC controls were connected together, so I had to remove them both as a unit. If your truck has a separate radio, you may be able to leave some of these bolts in place.

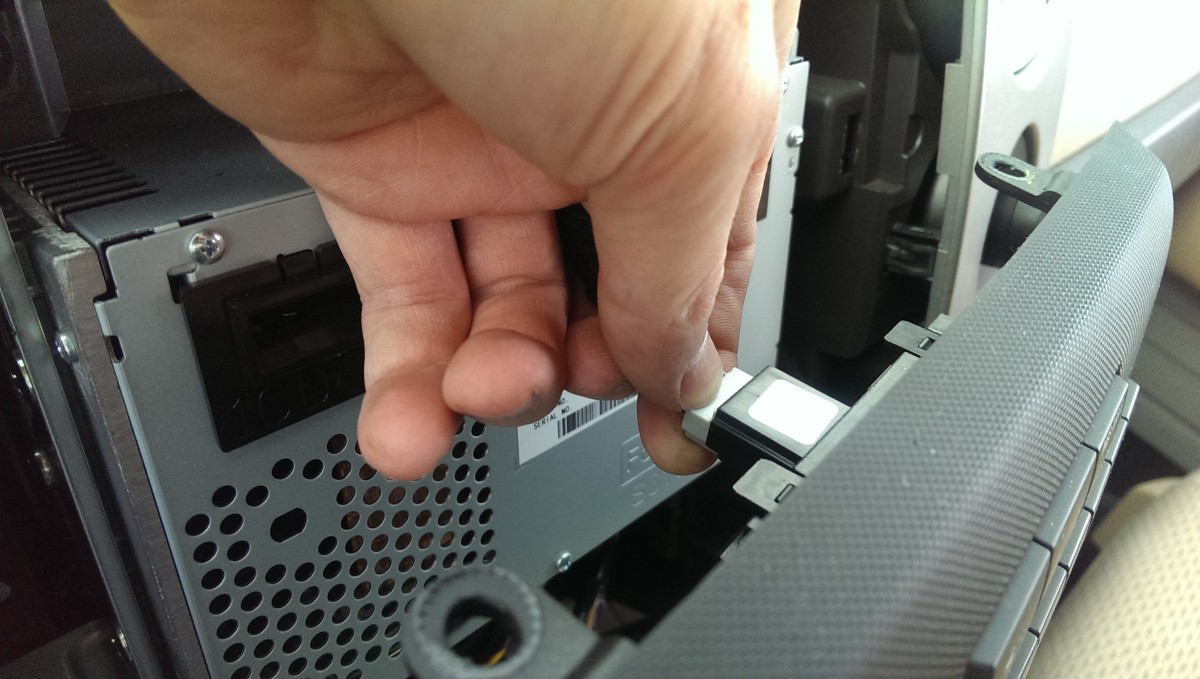
Pull on the radio
Pulls straight out
Then, the radio panel itself simply pulls straight out. I started prying from the top. The radio and HVAC controls came out as a unit.
First clip
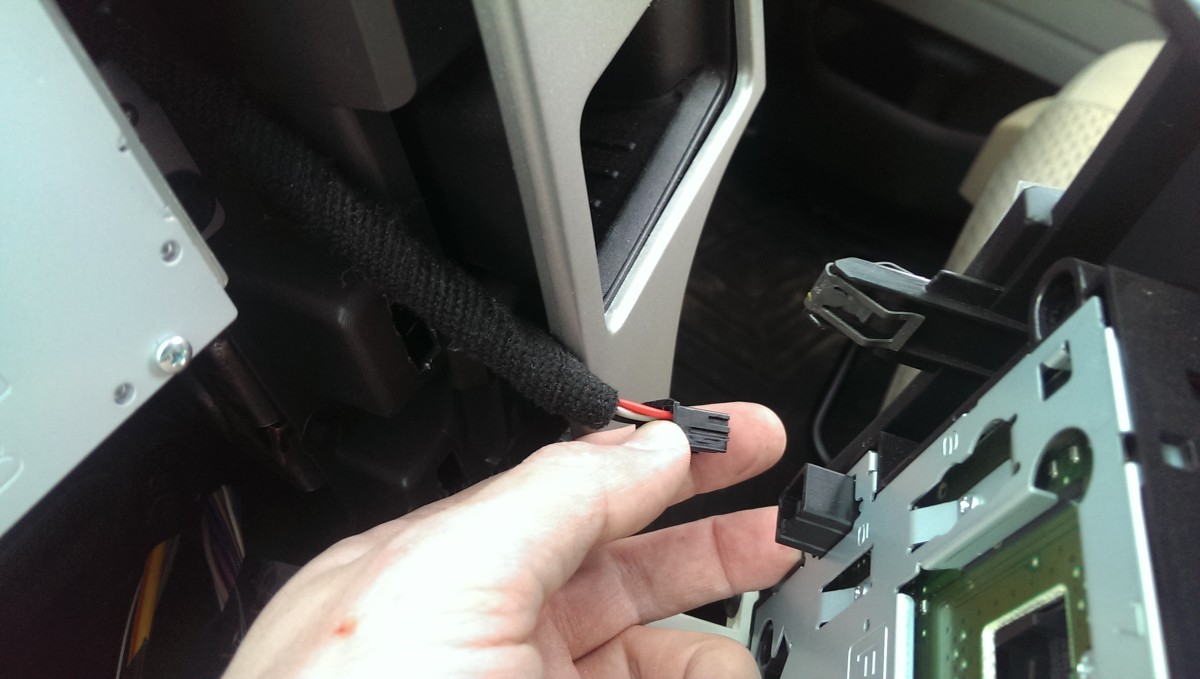
Second clip
More clips
I unclipped enough of the connectors to the radio front panel so that it could comfortably hang out of the way. This was primarily the top two.
Radio has 4 screws
The radio itself has 4 screws, once the panel is off.

Pulled out
I removed all of the radio’s connectors
With the 4 screws removed, the radio just pulls straight out. I unclipped all the connectors, 4 I think, and tossed the radio on the floor of the cab for the time being.
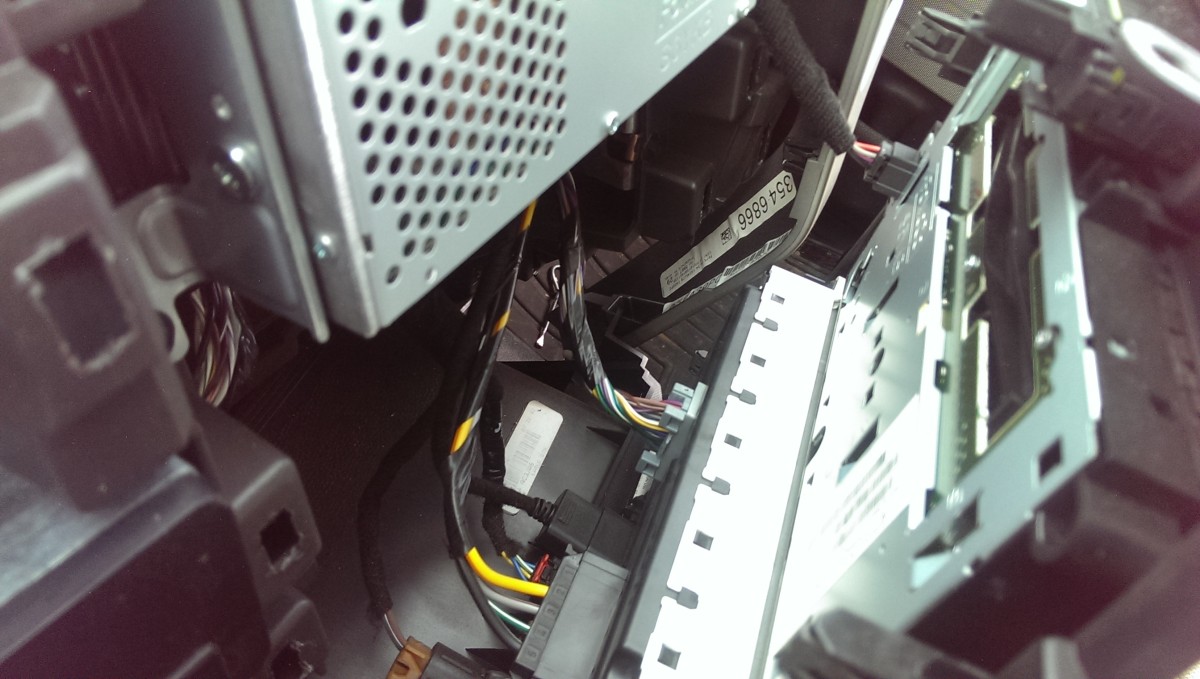
Removing the old actuator
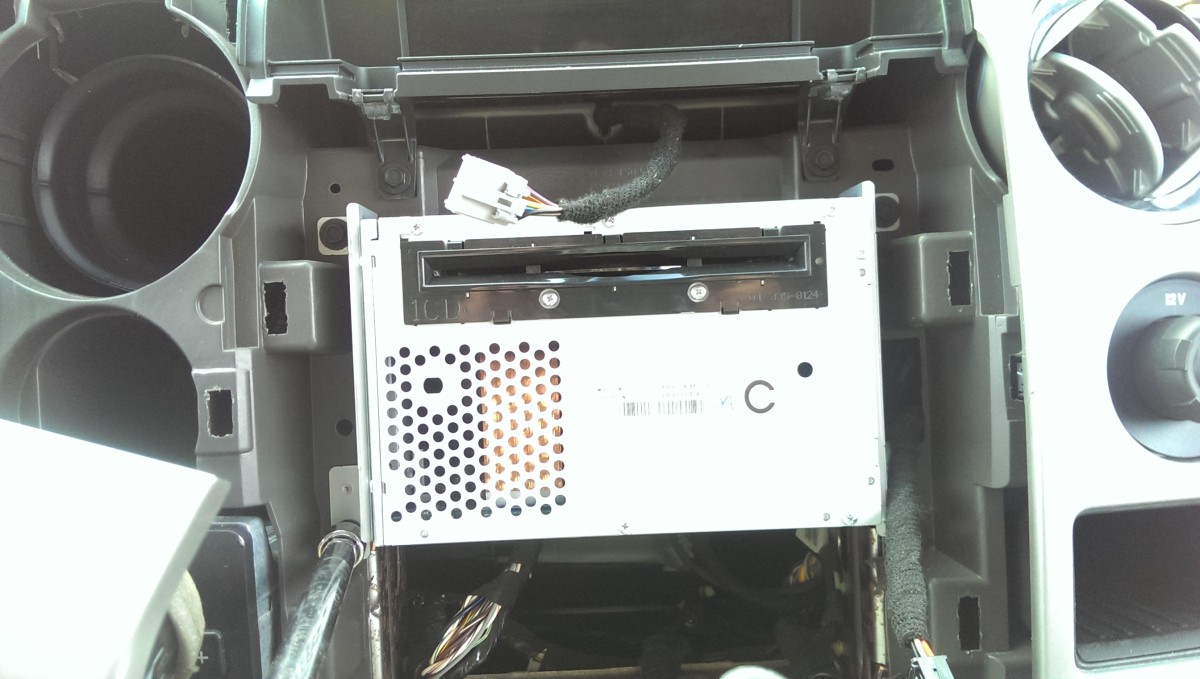
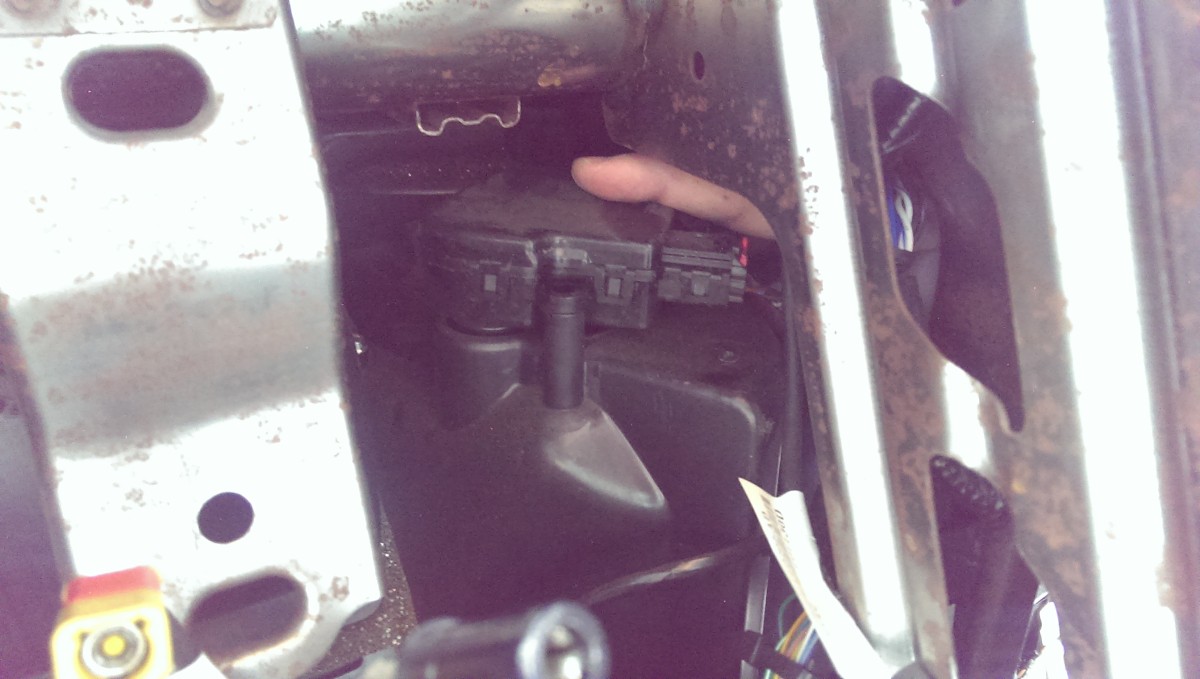
The actuator is the black box on the right
Once the radio is out, you can see the actuator. It is the black box on the right. It is held down by two screws, both of which have 8mm heads.

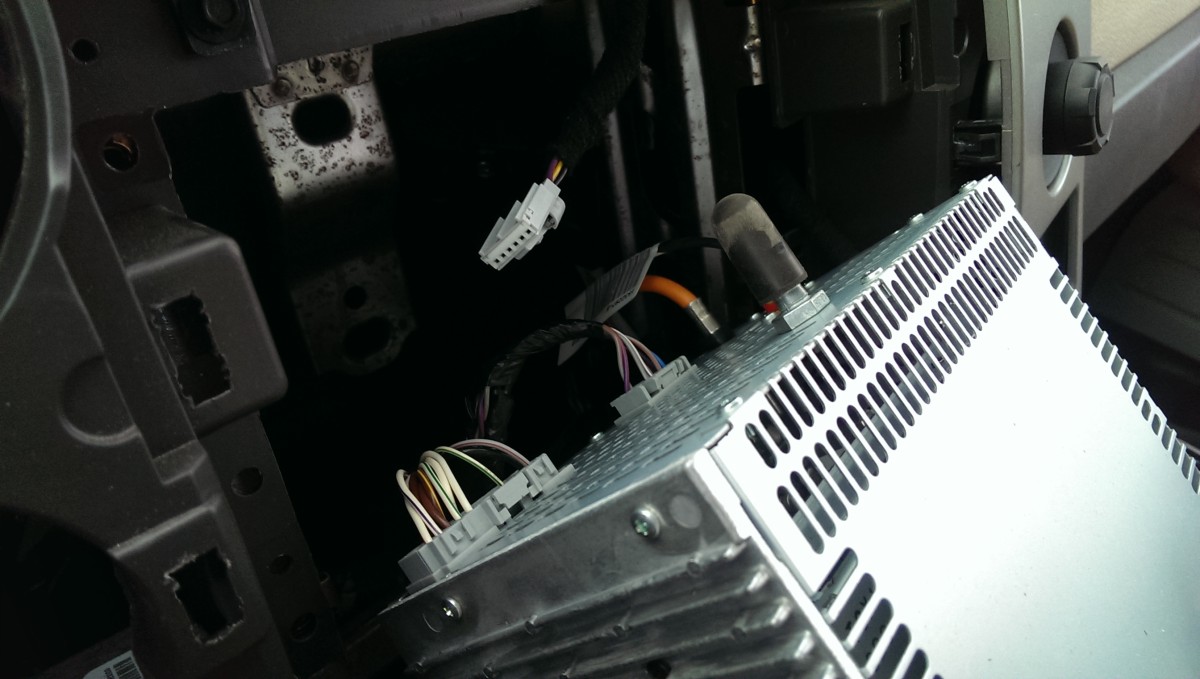
First screw is easy
The first screw is easy to remove. It’s sitting right in front, easily accessible. The rear screw requires going through the glove box.
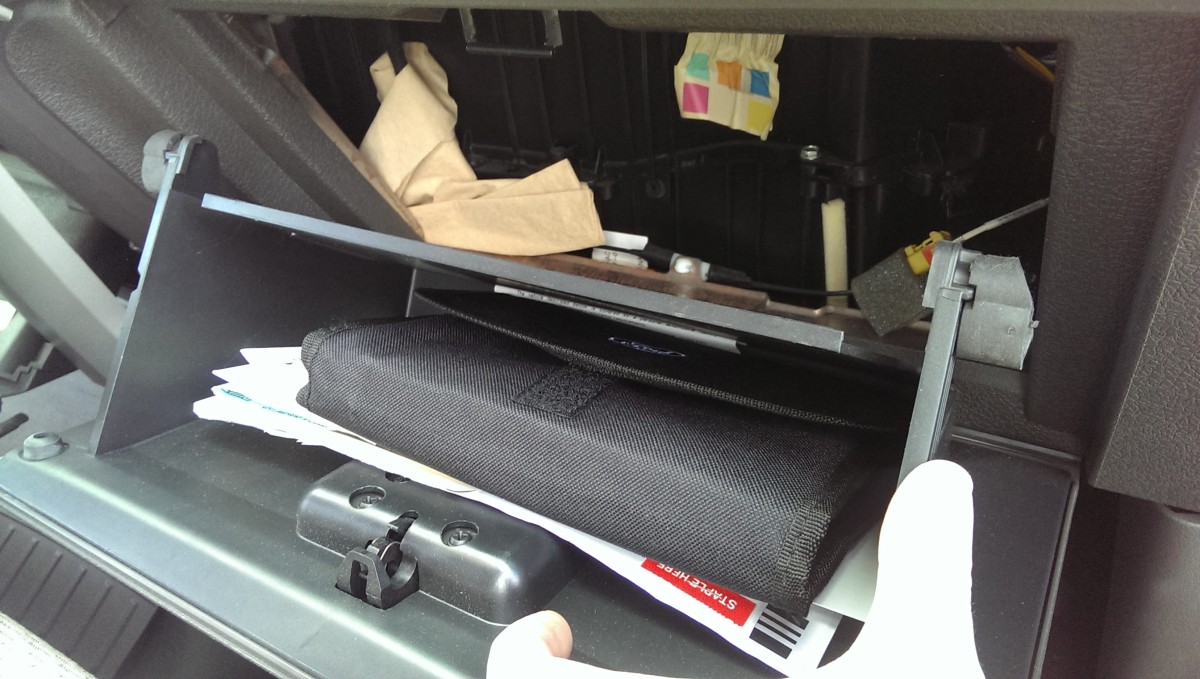
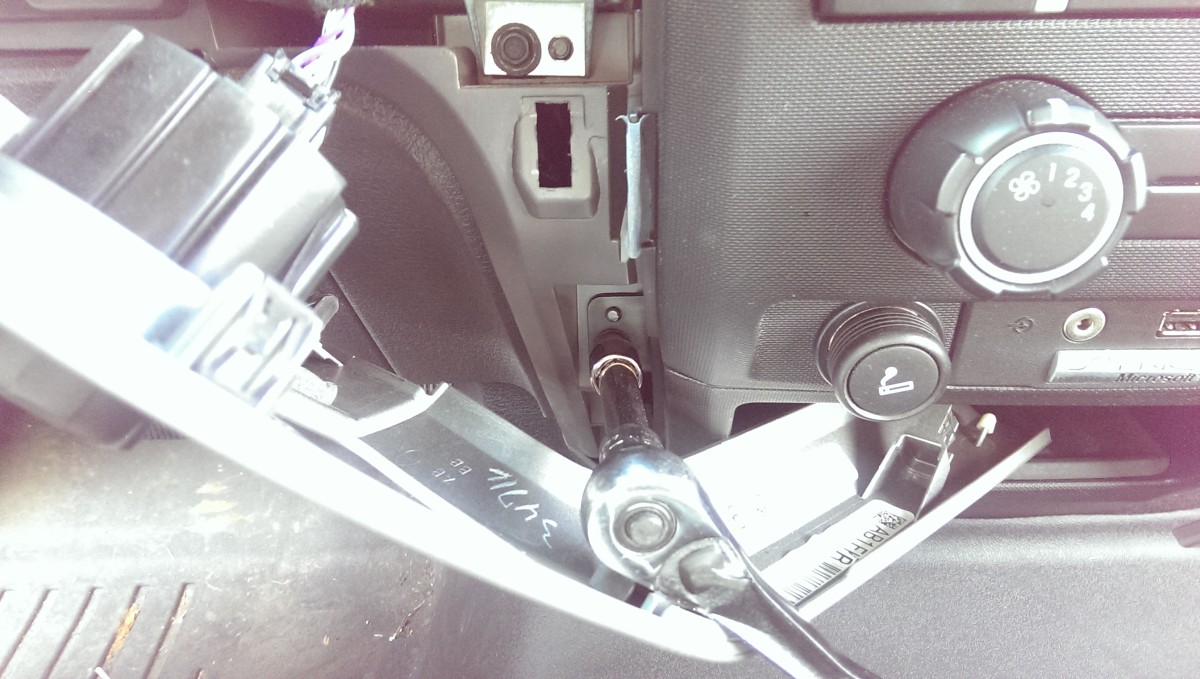
The glove box will fully drop if you open it, pinch the sides, and lower it further
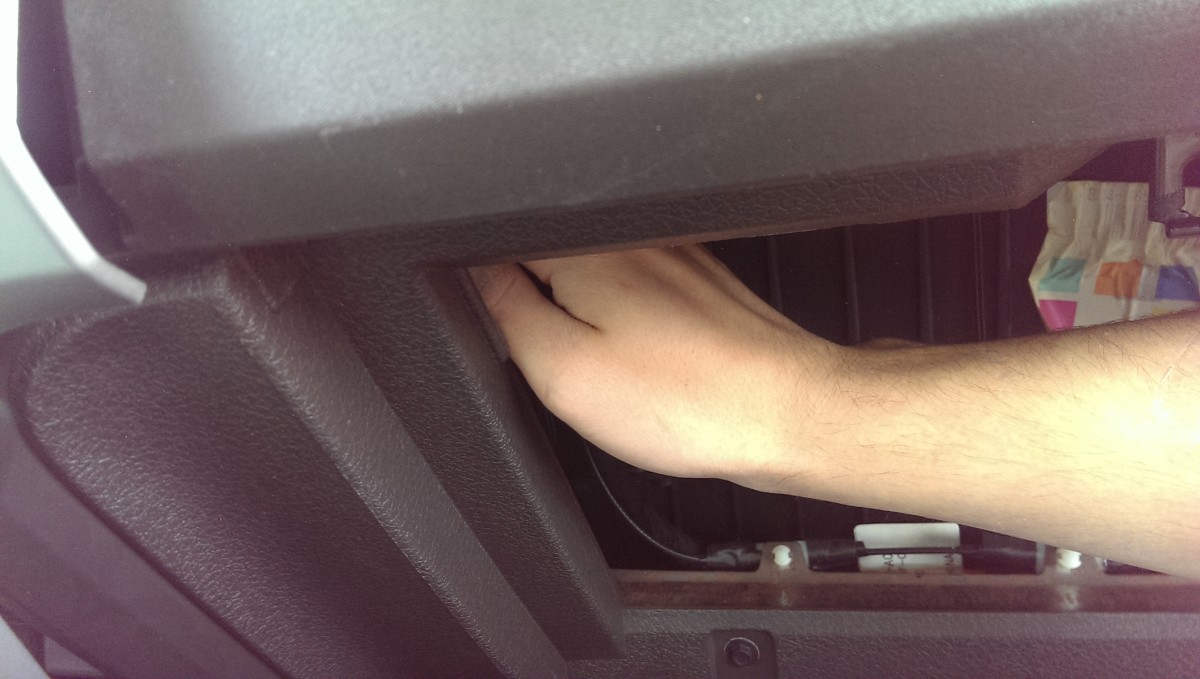
Reach up through the glove box
Not much room to work, helps if you have little girl hands like me
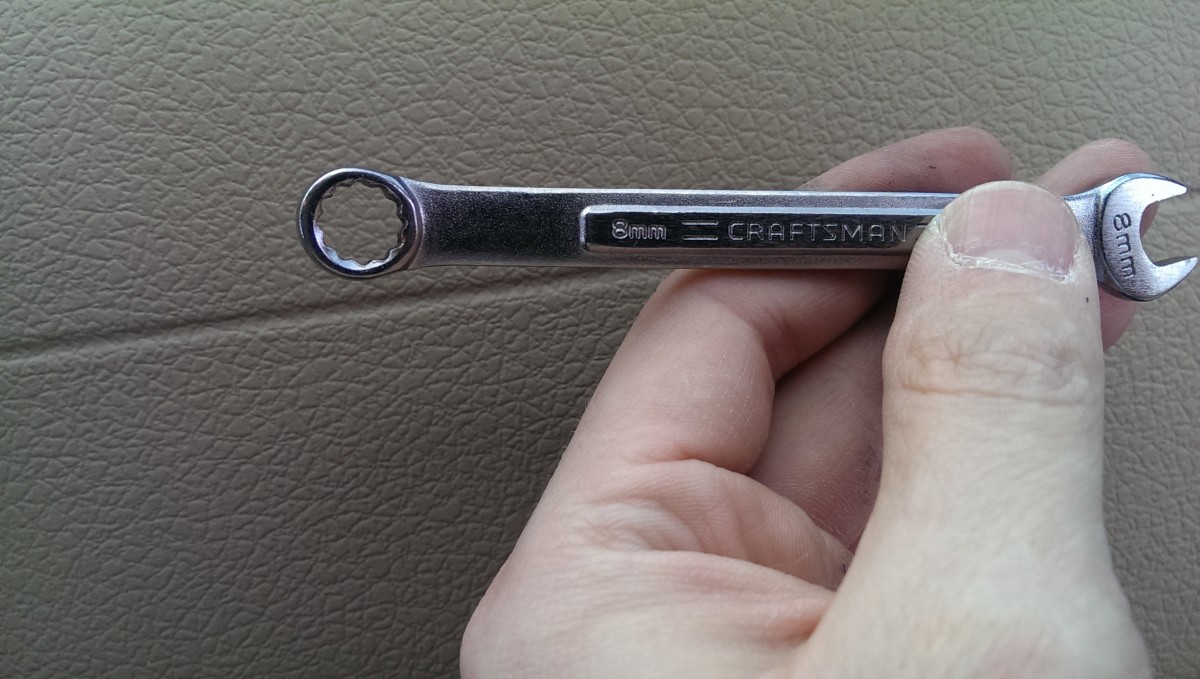
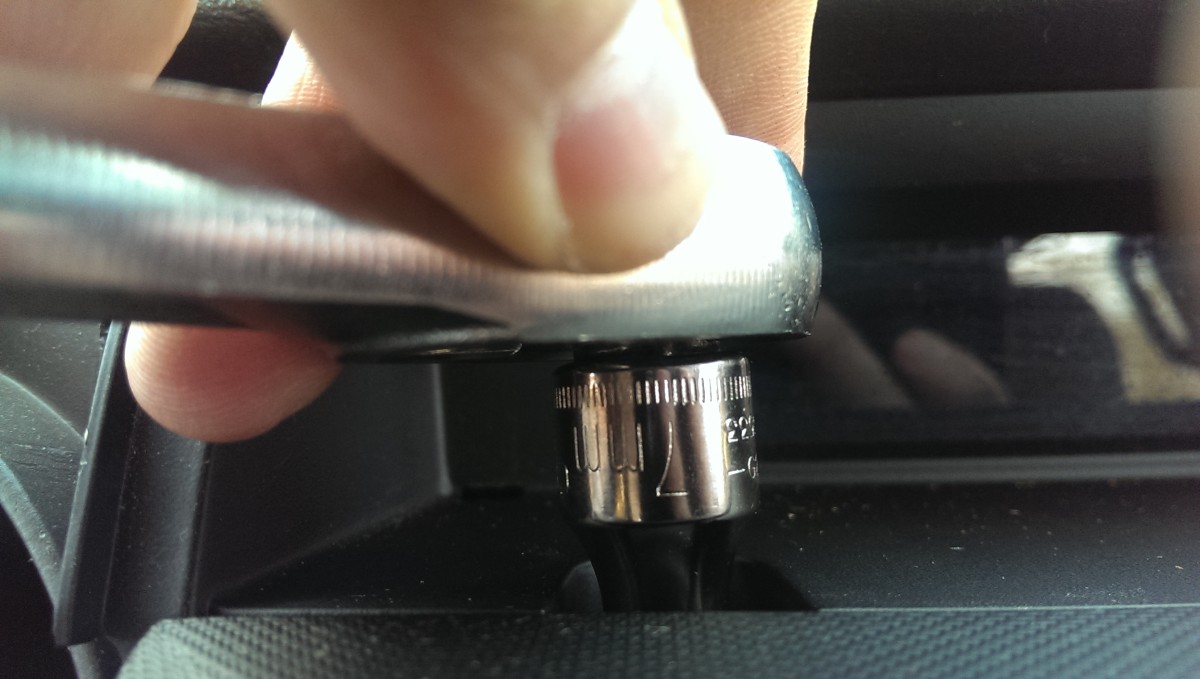
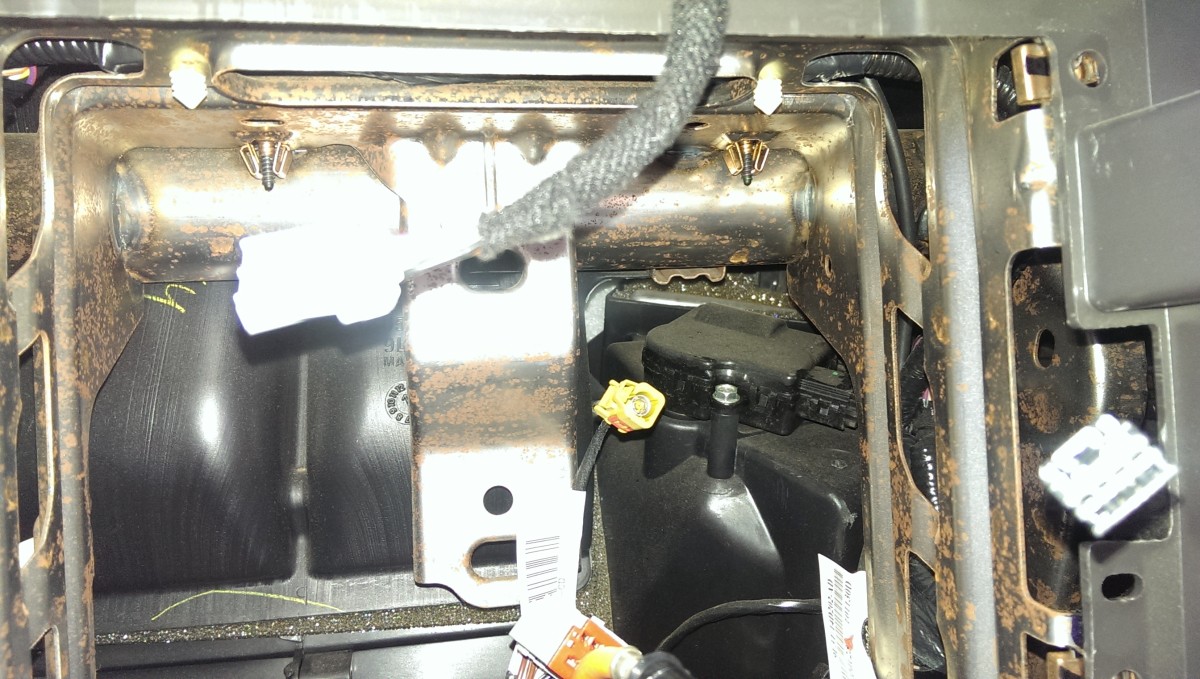
You want an 8mm box wrench for this job
To get to the rear screw, you lower the glove box, pinch the sides, and then lower it further. That keeps it nice and out of the way. Then, you can reach up through the glove box to the actuator area. You’ll need to use an 8mm box wrench. I used my left hand to keep the wrench on the screw, while I unscrewed with my right. It’s a little uncomfortable, but certainly doable.
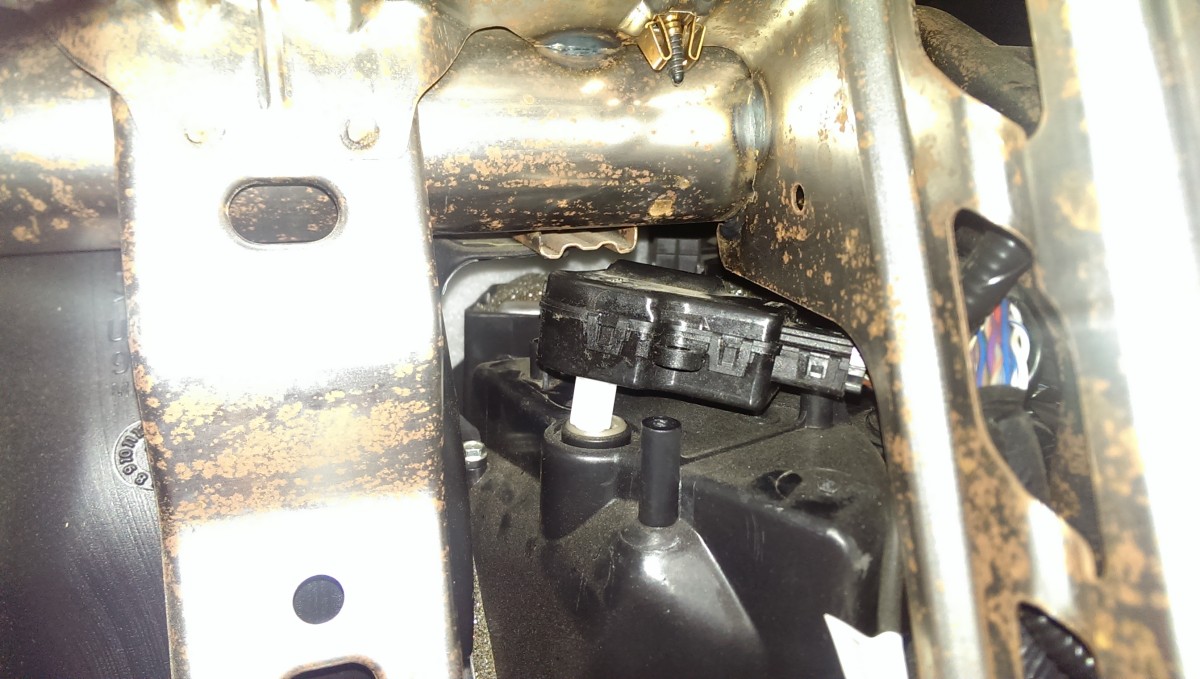
Actuator just lifts off
The actuator itself just lifts off. There is a small plastic gear on the bottom, so it needs to come straight up.
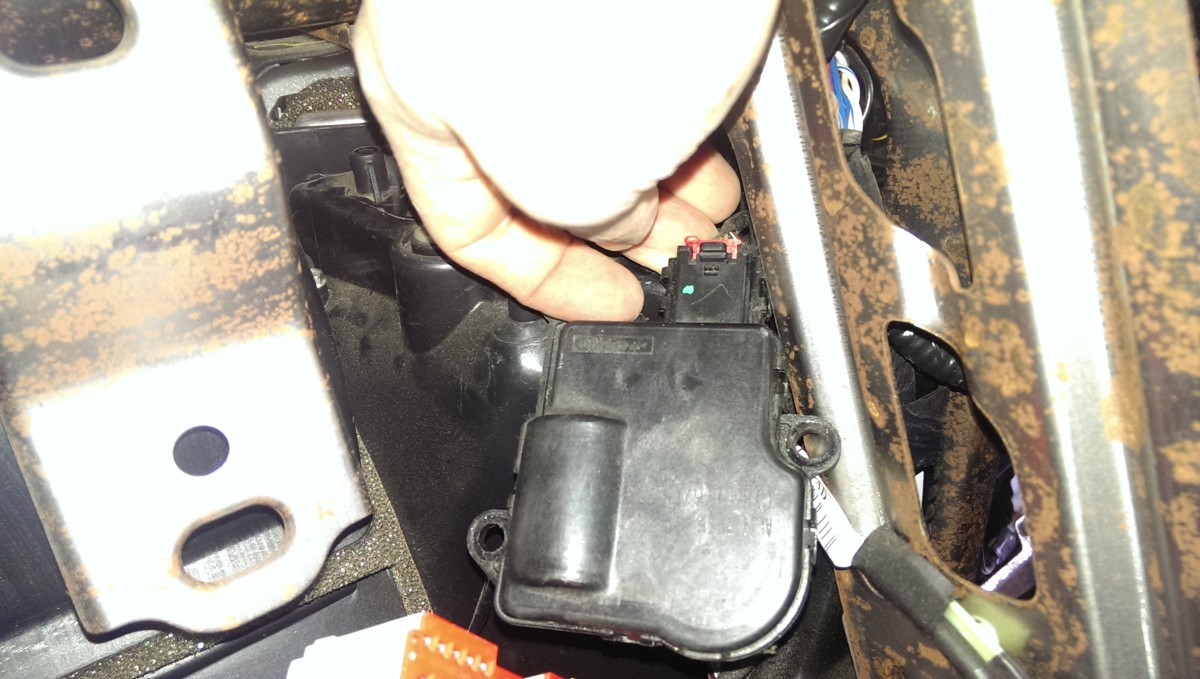
Wiring connector
There is one wiring connector on it to disconnect. You simply push the red tab back to unlock it, then pull it off.
New Actuator

Dorman part – DOES NOT WORK
Now obviously you need a new actuator to put in. I first got the cheapest Autozone replacement – a Dorman part. This DOES NOT work. The connections to the truck are right, but as you can see, it has a thicker profile than the Ford original. The top of it hits a brace in the dash when you try to install it, and makes it nearly impossible.
A commenter below mentioned that Autozone gave me the wrong actuator, and it should have been Dorman 604-252. I haven’t tried it myself, but you may have better success. Another commenter below noted that this Dorman part is still slightly thicker than the TechSmart / OEM versions, and so may be harder to install. YMMV. If you want to be safe, you can order the one I used from Amazon
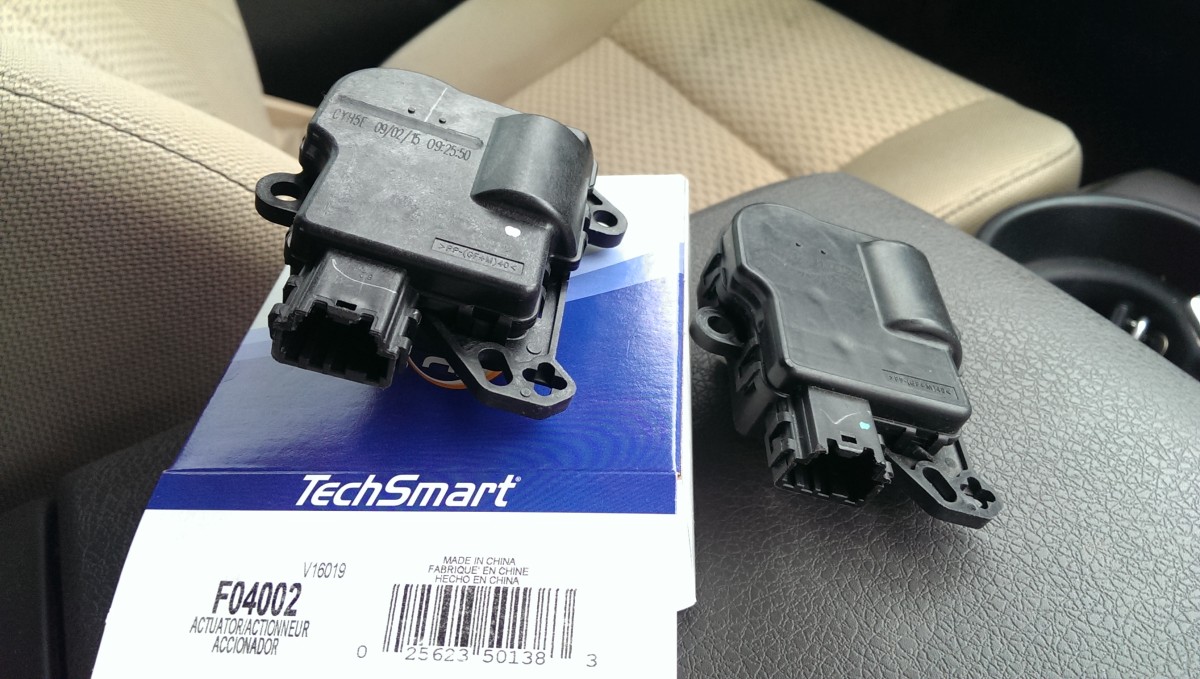
TechSmart Actuator – this DOES work
I went back and got the slightly-more-expensive ($28?) TechSmart version of the actuator. Model is TechSmart F04002. This one much more closely matches the original, and goes in fine.
Re-installation is the exact reverse of removal. It’s pretty easy to do, just don’t force the actuator in. There is a missing tooth on the actuator’s gear to key it to the door. You have to wiggle it around a little bit, but as soon as it meshes properly, it will slide right in.
Resetting the HVAC settings
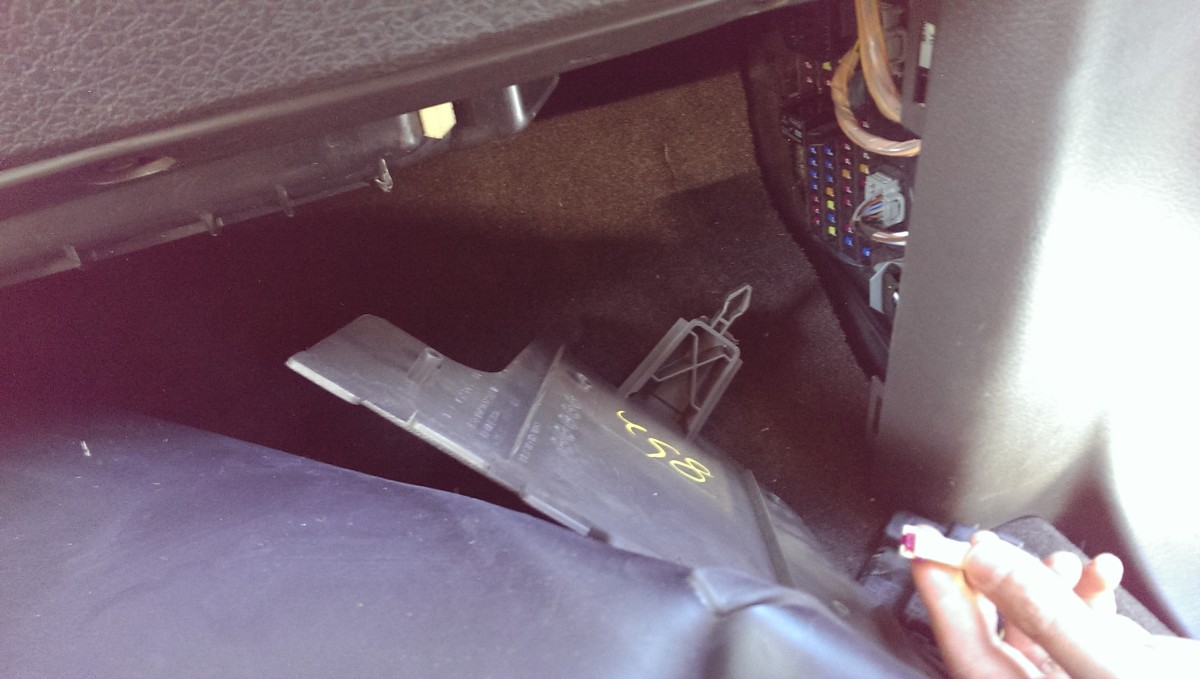
Passenger kick panel fuse box
I don’t know if this is strictly required, but it is part of the procedure for a new actuator. The following procedure will let the HVAC module recalibrate the actuator positions. Pull the HVAC control fuse in the box in the passenger kick panel (pictured) for a minute with the engine off and key removed. This fuse is #15 on older trucks, but was #42 on mine. Check your manual for the right one, the manual labels it “climate control”. Then, re-insert, turn the truck on, and don’t touch the HVAC for 30 seconds.
If you did everything correctly, your popping noise should be gone regardless of how cold or hot you turn the HVAC.
Note for “Flow-Through” Consoles
The higher-trim F-150’s have what’s referred to as a flow-through console. Rather than having the standard center console or jump seat, the console looks like it is one piece from radio to console. The shifter, rather than being mounted to the wheel, is on the center console next to the cupholders. While I haven’t done this job on a truck with that type of console, I believe the procedure is the same.
The only difference I see is that you would have to remove the trim next to the shifter first, in order to be able to get to the trim near the HVAC panel. This is covered in the first few minutes of this youtube video: https://www.youtube.com/watch?v=Yx2pETbNhCY
If anyone has this truck and tries it, please let me know in the comments how it worked out for you.
I have a similar problem but for me the air just blows on my feet regardless of the setting, defrost and dash vents dont work.
There are a few of these hvac motors, I think four. You may need a new “floor mode door actuator”. I’m not sure which one it is, but it could be that the motor controlling the floor vent flap is stuck open.
There are a few of these hvac motors, I think four. You may need a new “floor mode door actuator”. I’m not sure which one it is, but it could be that the motor controlling the floor vent flap is stuck open.
Do you know if this issue has been fixed in the newer F150s. I have this issue with my 2010 for the drivers side and the noise on the passenger side. I’m told it’s an 8 hr job and $1300. I decided with some other issues developing it was better to part ways with the truck and get a new 2016. Pick it up next week. I had the same issue in my 1996 Explorer as well. You would think Ford would do something to address this very annoying problem that has existed for 20 years. I hope it has been fixed, or at least easier in the new models, but i doubt it.
I’m honestly not sure. I wouldn’t be surprised if it isn’t fixed, but I don’t know if anyone has had one long enough to know.
Fortunately if it’s an issue on your new truck, it’s not too bad of a diy job honestly.
The blend door actuator that broke on my truck was on the drivers side, behind the lower console. Everything I read it wasn’t accessible to replace without pulling the dash.
Ohh, understood. Fortunately I think the blend door in the article is more prone to failure, so you probably have a good chance of not seeing that again.
I had the same problem with my 1999 Expedition EB and 2003 Expedition EB. Maybe a class-action law suite will convince Ford to fix this problem. I don’t understand why they have not. Maybe it’s time to try a Dodge or Chevy. They are cheaper too!
I have a 2013 and mine is doing the same thing and is located in the same spot. Evidently ford hasn’t fixed the issue.
my 09 f 150 has no heat and no ac. blower will not blow on any setting. I replaced the resistor and the blower motor could it be the blend door or am i way off?
I doubt it’s the blend door. I assume you can’t hear the blower spinning when you turn it on? Blend door failure will just make it blow at your feet instead of at your head or have heat instead of AC – they won’t stop the blower itself from working.
I assume you’ve checked all relevant fuses, both in the fuse box in the engine bay as well as the one in the passenger side kick panel?
I actually just figured it out. The electrical connector that plugs into the resistor has some play in it. If i pull the connector towards the passenger door slightly it blows air on all speeds. now it is only blowing hot air and no a/c
Absolutely, glad you found the problem. The hot air only issue could be related to the blend door actuator, but I bet considering the blower issue, you’ve probably got more wiring problems.
there was a loud clicking from the dash for a couple days and then it stopped. wiring or actuator you think?
I forgot to say thank you in my last post. Thank you for the article and for responding back
I just went out and checked because i didnt before I have heat and a/c from all driver side vents and back seat vents. passenger side front vents is only one i do not have a/c in
Definitely an actuator issue, the only question is whether the actuator itself failed or whether the wiring to drive it is at fault.
Easy fix would be to go ahead and buy the actuator shown in this article, swap it out, and see if it fixes it. If it doesn’t, swap them back and return the new one for a refund.
think that is exactly what i will do. thank you again
I have a 13 with dual climate, I’m only getting cold air out drivers side and it is blowing out good. Which motor is is behind dash or passenger floorboard
Did you figure out where the drivers side actuator is? We have the same issue with our 13.
I have ’14 Lariat with dual, and I have the same issue. Passenger side works normal, driver’s side only cold air.
November 21, 2016. Visited my local Ford dealer with a loud clicking sound coming from my HVAC system ever time I started the truck or tried to adjust temperature. System always blowing ambient air temperature however AC was working fine all summer.Living in Canada I started to require heat as opposed to AC.
Diagnostics run and no fault codes found however the finding were a ” blend door stuck, require dash removal and suggest replace blend door, plenum and motor,evaporator assembly!! estimate with labour $ 1556.55 (crap)
Freaked out came home and hit the internet. Watched a number of u-tube videos on the subject and finally decided this article by James S made the most sense. Bought the part, $ 34 and moved a fire truck out of my hall, F-150 in and spend the best part of the afternoon doing the job. Discounting the time lost when we ran a call in the fire truck I would say it took me less than 2 hours to complete the job. No surprises however just swollen knuckles on my right hand. The entry from the glove box is really tight if you have big hands. I reset the fuse and once engine was restarted I had total control back to my system for less than $40. Feel like going back to the dealership and sharing …… 🙂
ps : if the gears on the door are not lined up perfectly with the new actuator it will be hard to install . I took the old actuator apart and used the white gear and with a wrench was able to align the blend door gear. The actuator then slid into place with the screw holes in perfect alignment.
Thanks James S
Glad you got your truck fixed!
I have a 2010 f-150, no clicking but driver side blows hot like it is set to do but passenger will blow cold but then I can feel it get warm then hot for a sec then back to cold will stay cold but then warm.. hot.. cold then yesterday the first day it happened my wife was driving I messed with it the entire ride home and then we pull in the drive and she puts it in park and the SOB starts blowing hot like it should. Seems like when we are driving maybe something is moving around cause the door to open and shut or open slightly? But, before finding this post or knowing anything about the heater system I said it felt like there was a door somewhere opening and closing letting hot air through then not. Could this be related to that blend actuator? And on a side note, this is the best post I have ever came across that relates to auto issues, two years later and still getting great info. I have a lariat with the flow through console so I will document it as it seems it might be a little different? I also have big hands so it might be time to get my wife in the garage to assist, I will sure try first myself and probably have bloody knuckles lol.
What did you find out about the issue? I have the same problem you described and found the article where you posted this. Haven’t found a resolve to the problem and am going to try the actuator thing as a cheap hopeful fix. But would also like to know if that solved your problem.
Any idea on what other actuator I need to replace. I’ve replaced the one in the center console and the one under the dash. My ac will still not work on the driver side but the passenger will work just fine. I have a 2009 ford f150 lariat
I just did this on my 2012 with flow through console. Was able to replace the actuator completely through the radio access. In my case only the nav screen. Was able to remove center plastic by your methods and the flow through made little difference except the left trim was not removed. With a 1/4″ Snapon ratchet and 8mm socket was able to remove both screws
Thank you for the gelp
Walter
Was it the driver’s side, or passenger side actuator? Or do you have dual controls?
The Dorman part did not work because they sold you the wrong one. it should have been a 604-252
That’s good to know
Got the 604-252 still doesn’t fit
I noticed in your pics your center console doesn’t go all the way to the dash. Can the radio still be removed by your instructions if the console goes al the way to the dash? Almost looks like all one unit.
Sorry, I did reply right after you posted this, but apparently it was marked as spam. I believe you’re referring to the “flow-through” console on the higher-end F-150’s. I made a note in the article with links to more details.
James I want to thank you for posting this, I had the same issue and was quoted from the dealership and various shops around $1800. Bought the part for under $50 and took me a few hours to do from your post. Thanks man
Glad to help! Dealership labor for this job is insane.
I have a 2011 F150. This isn’t the first time I’ve had this problem. The first time my truck was still under warranty so I took it back to the dealership. This time I was able to do it myself. The clicking started when it was all the way on cold but then when I unplugged the battery completely (separate issues) the clicking was on and would not go away. Didn’t matter if the air (hot or cold) was on or off. It was constantly clicking. I followed your steps and everything went smoothly. I purchased the TechSmart acuator from AutoZone for $27. Went in like a glove!! It took me exactly 1hr 30 mins from start to finish. Thank you so much!!!
Glad to help!
James, I have a similar problem but without the knocking noise. The temperature changes on the passenger side but the drivers side remains the same, its cool but not cold like it should be, and wont heat either. Also, the fan only blows at one speed no matter the setting. I am trying to figure out whether its the controls on the console or if i need to replace the blend door actuator as well as the blower motor switch. Any help would be appreciated, thanks
I can’t say for sure, as I haven’t had your issue. The drivers temperature change sounds almost like an actuator, but the fan speed issue definitely wouldn’t be. Have you tried the fuse pulling procedure under “resetting the hvac settings” above?
Otherwise I think I would try to swap another hvac control panel if you know a friend with the same truck.
Sorry I can’t be more help, good luck with figuring it out.
Did you ever figure out the cause to your problem?
I just bought this 2009 f150 XLT and I noticed every once in a while there was a tic tic tic tic…about 10x or so. I found your thread, changed it in under 40 minutes after Ford told me 1.5- 2.75 hours. I did get a small handed friend to get the back screw. If you were local supper would be on me. Thank you so much for the help, it was perfect.
Glad to hear it!
I just did mine. Dorman 604-253 was proper one, I got one online that said was correct one but wasn’t. I don’t have girly hands so I couldn’t get the back screw in. Just using the front. Not sure if that will put added stress on it as it turns but I think it should be fine. If not I’ll get another one and try again. Not a difficult job but that dang back screw……
Thanks for the great info James S. Do you know how many actuators are in these F-150s? Have you encounted a situation where more than one had to be replaced, or is this the one that is most prone to fail?
Glad to help. I believe there are four, but I haven’t taken apart the dash to find out. This actuator is definitely the one that most commonly fails.
Thanks, I very much appreciate the information.
Hi all, i have a 2010 f150 xlt extended cab. I have been experiencing warmer air through the drivers side when on ac. Its not a dual climate control model. Function on temp dial ok and no obvious clicking. When dialled to full ac you can hear a subtle repeated noise like the door trying to move, does it maybe 6-8 times and also on start up if on coldest temp. None of the other vent doors make noise like this they just shif to position then stop. So i changed the actuator out and replaced with dorman 604-252. Not a pleasant job! Have same noise when dialled to full ac and on start up if dialled to coldest setting. Now annoyingly i also have 3-4 single clicks when you change the temp setting from hot to cold. Not sure if its thr blend door or actuator? Also seems like it hasnt improved the drivers side ac flow. Looks like i might change back to the original actuator to see if i can get rid of the clicks. Might also see how the blend door functions when i have the actuator out. Is the subtle repeated noise normal? Any comments or suggestions would be greatly appreciated. Cheers chris
So the 3-4 single clicks when you change the temp setting from hot to cold sounds like your new actuator isn’t working. Did you recalibrate it after you put it in by pulling the fuse with the truck off?
Beyond that, it sounds like maybe the blend door itself on the driver’s side has a problem? Really hard to say, I haven’t experienced this issue before and I haven’t seen it.
Sorry I couldn’t be more help, but good luck with it.
I just checked again it does it also on start up, must be when actuator is working out where it is. Did the recalibration by pulling fuse. I can get hot and cold but annoying clicks. Will reinstall the original one. Maybe the new one is a dodgy actuator? Does yours have the repeated subtle noise when you dial to full cold? 6-8 timed then stops? Cheers chris
Sent via the Samsung Galaxy Express 3, an AT&T 4G LTE smartphone ——– Original message ——–From: Disqus Date: 5/31/17 7:00 AM (GMT-08:00) To: chrissims308@gmail.com Subject: Re: Comment on Replacing an F-150 Blend Door Actuator for HVAC (2009-2014)
“So the 3-4 single clicks when you change the temp setting from hot to cold sounds like your new actuator isn’t working. Did you recalibrate it after you put it in by pulling the fuse with the truck off?
Beyond that, it sounds like maybe the blend door itself on the driver’s side has a problem? Really hard to say, I haven’t experienced this issue before and I haven’t seen it.
Sorry I couldn’t be more help, but good luck with it.”
Settings
A new comment was posted on Did it Myself
James Spadaro
So the 3-4 single clicks when you change the temp setting from hot to cold sounds like your new actuator isn’t working. Did you recalibrate it after you put it in by pulling the fuse with the truck off?Beyond that, it sounds like maybe the blend door itself on the driver’s side has a problem? Really hard to say, I haven’t experienced this issue before and I haven’t seen it.Sorry I couldn’t be more help, but good luck with it.
10 a.m., Wednesday May 31
|
Other comments by James Spadaro
Reply
to James Spadaro
James Spadaro’s comment is in reply to
Chris:
Hi all, i have a 2010 f150 xlt extended cab. I have been experiencing warmer air through the drivers side when on ac. Its not … Read more
You’re receiving this message because you’re signed up to receive notifications about replies to disqus_LG1nPoJrvg.
You can unsubscribe
from emails about replies to disqus_LG1nPoJrvg
by replying to this email with “unsubscribe”
or reduce the rate with which these emails are sent by
adjusting your notification settings.
If recalibration didn’t stop the clicking, then yes, I agree the new one sounds like it’s also bad. No, mine makes no noise at all, no 3-4 clicks or subtle noise when I go full cold.
G’day James
I removed the clicking actuator and tried a dorman 604 234 ( the one you couldn’t fit in). Same subtle noise as the original one so I’m guessing it’s a normal noise? Anyway I fitted the original back in and will leave it at that. The ac issue is not that bad and we seem to be able to cope with it. I’m thinking it is probably something else and it’ll be like chasing a rabbit down a hole to figure it out. Nice post anyway, I’m sure it’s helped lots of people. My suggestion would be to forget the dorman parts as they are slightly thicker in profile as you say. The techsmart ones look the same shape as the OEM actuators and the original I put back was heaps easier fit. That few mm makes all the difference. I could do the back screw up with a ring spanner!
Cheers Chris
That is good to know, I’ll add another note in the article. Thanks! I’m sorry you didn’t find your issue, but presumably you can either live with it or it’ll get worse, making diagnosis easier!
Hi, my 2011 Ford F-150 XLT makes that loud consistent popping noise, but turning the control from cold to heat does NOT stop the popping. Nothing does unless I turn off the air conditioner. I was wondering if replacing the actuator would solve my problem too.
If turning the AC on/off is what fixes the popping, this blend door is unlikely to be your issue, although you could certainly try it and return the actuator to the store if it doesn’t work. (Provided you don’t damage it, of course.)
Did you ever get this fixed? What did it turn out to be. My 2011 is doing a similar thing. I posted above with a video of what it could be. I’m going to give it a shot next week when I have some time.
Hey team, I’ve got the 2011 F150 with flow through console and gps screen so it might be a bit more of a problem getting around the screen? Any help on this would be appreciated. But as to the real problem: When AC on, driver’s side will blow what ever air you set, full range cold to hot, but passenger’s side will only blow 90+ air regardless of temperature control setting. I have no clicking noise or any other indications of the problem. Does this seem like the same blend door device failure to you? Thanks to any who can help, Howie.
I haven’t removed the flow through console, but see my note in the article – I don’t think it’s that much worse. I believe the radio with the screen pulls out like any other radio?
You don’t have the typical symptoms for a blend door actuator, as you said. May be worth giving a shot? I would assume either the actuator has totally gone out so it isn’t moving at all, the blend door itself is stuck, or you’ve got another electrical issue. Unfortunately, I really can’t say from here. Sorry I couldn’t be more help.
I’ve got the same issue in a ’12 F150 that I’m addressing as we speak. I have the glove box removed and checked one of the motors and it was indeed bad. I haven’t put it all back together yet but the new motor is working so I’m thinking that was it. I’ll follow up with what I found out.
That would be great. Let me know how it goes, thanks.
Hey Justin. Did you ever get this fixed? I also have a 2012 F150 with the cold air on driver’s side but hot on passanger’s. I do have the clicking though. Gonna try the actuator this weekend.
I ended up having to replace the center one AND the passenger one. I bought the actuators from the Ford dealer; the parts guy gave me the exploded diagram which helped. I took out the airbag which made install much easier but I haven’t had them flash the ECU to reset it. That made the airbag show a warning on my dash and likely won’t activate in a wreck. I would still pull it again though, made a huge difference. Very true what everyone has been saying about lining up the pins on the actuator. Makes it impossible to install without doing that. If you come up with more questions hit me up.
Howie Have you fixed the issue? If so what was it and did you fix it yourself? My 2011 platinum is doing the exact same thing with the passenger side.
I have the exact same issue with my 12 fx2 with navigation screen. How did you get to the actuator? Was it the same steps described above?
In my 09, I’m experiencing intermittent clicks, similar to a CD sound. Seems like my AC doesn’t cool down as quick too. Could this be the same thing?
Certainly could be – if the actuator is going out, the AC blend door won’t actually move to full cold. Does the clicking go away when you turn it up to warm? If so, then I’d say this is almost definitely it.
The clicking is intermittent. It may happen once or twice in a couple weeks, if that. Is there something I could do to determine exactly what it is? I did hear the clicking in a YouTube video and mine is not that loud. Very light in sound. Would me setting to the coldest setting cause the clicking if it’s bad? Thanks for the reply!
It should only do it at the coldest setting. It’s possible your actuator is simply not that bad, yet, but is going out. If this the issue it will get more consistent over time.
It’s tough to diagnose with it being so intermittent, but you could try leaving it at say 6 notches warmer than full cold for awhile. If you don’t hear any noise, then this is your issue.
Mine was initially intermittent, but in a few months it would pop consistently on the coldest setting.
I’m usually running about 72-73 degrees on my setting. I’ll dial it down to the coldest setting and see what happens.
I also did the reset(pull the climate control fuse, didn’t touch the AC until about a min after reinserting the fuse) seems okay. BTW, I heard the clicks set at 72-73, I was thinking maybe door cycling to maintain temp? Bit like I said not consistent and jot loud at all. I’ll keep you posted. Thanks again!
Ah, OK, I didn’t realize you had a thermostat instead of the manual control like in the pictures. I’m not completely positive what the symptoms will be like in that case, since the thermostat is going to adjust the blend door. I would assume you have a “low” setting or similar when you set it below 65F, which might trigger the problem more consistently?
Sorry I wasn’t more clear. I’ll set to the lowest setting and see if I get anything.
Sounds good. At the end of the day, you could also consider simply gamble the $30 and an hour of your time to change out the actuator, as well. I ordinarily don’t like throwing parts at a problem, but that doesn’t seem like too big of a risk.
Agreed! And since it seems to be a common problem… I’ll buy it today, and change it later after I troubleshoot…
Well, I got a few light clicks this am… Should I notice a temp change between passenger and driver vents? The click is definitely coming from the dash just below the radio.
If it’s coming from the dash below the radio on the passenger side, that’s exactly where this actuator sits. I would just try replacing it. The temperature change isn’t necessarily a reliable indicator – the clicking is the actuator trying to move past its limit, so I imagine the air would still be pretty cold, but maybe not necessarily. The gear is stripping out, so who knows.
Understand
This post was such a life saver! I followed it step by step and it worked like a charm!! James S. I don’t know who you are, but if you are ever in Utah I owe you a steak dinner!
Glad to help!
I changed the blend door behind the radio and now don’t hear the clicking but still don’t have cool air. Compressor kicks on system is charged. Any ideas?
Well, the fact that it fixed the clicking is good news. I know you said the system is charged and the compressor kicks on, I’d still hook up some manifold gauges (so you can see high and low pressure) and make sure the pressures are cycling as they should. (System off, they’ll be about the same, compressor kicks on and the high should rise while the low drops, and then they’ll go back and repeat)
I have a 2009 ford f150. My problem is that I have no clicking sound but when I switch the a/c to max, recirculation and auto the blower will shut down. To get it to run again I have to turn it off and then restart the a/c but it will only run on regular. Could this be the door actuator?
It sounds pretty unlikely. Unfortunately, I think you’ve got a different problem. The blend door actuator will just affect how much heat vs cold air you get, not the operation of the blower.
So my 2011 F150 with dual climate control is clicking just like everyone describes. It started with it just happening for 5-10’clicks when I started the truck. I had to replace the negative battery terminal today and now it clicks all the time and now the AC started blowing through just the defrost vents. When I first crank it it blows through the normal vents but then switches to defrost after a second. The clicking doesn’t decrease with a change in air temp. Do you think this is the same actuator you replaced? I’ve read on some forums there are more than one. Thanks for any help.
Yep, you’re correct. Your symptoms point to a different actuator. So did the fix work?
So i replaced to the actuator for the vent settings and it turned out not to be the issue.(just left the $30 replacement in) It was very easy following the video. Took me 1/2hr and I’m on crutches with a bad ankle right now(I have some pictures of the steps if you want them). But I think there is some kind of short in the system bc after resetting it i could visualize the new actuator moving the door without any stimulus from the AC controls. I also still have clicking. I think it may be the drivers side blend door actuator but I’m not positive. Everyone says the clicking will change or stop when you change the temperature but mine does not. It will also not blow warm air so I think it is that actuator but it may be so far gone that it doesn’t stop with a change in temperature. I found some info on changin the lower actuator but its a much bigger job and I dont want to take everything apart and find out thats not the issue. Do you have any other ideas? I’m not sure why the vent settings change automatically. It starts on upper vents then switches to defrost on its own after about 5 seconds.
Unfortunately, I don’t. Since the fix in the write-up fixed my issue, i haven’t had any reason to investigate further. I’m sorry I can’t be more help.
Did you ever find a fix for this? I have the exact issue. 2011 Ford F-150 lariat. Flow through console. Dual climate. Used to just click a few times or until I raised temp. Tried resetting by pulling fuse 46. Now it pops all the time. Even with climate control off. I can tell that it goes through the blow types on initial start up. Then stays on defrost. Any help is appreciated.
So I have the clicking problem, but it’s only when max heat is turned on. Can it be the same issue as with the AC in your ford or a different issue?
I bet it’s the same issue. The problem is that the motor that swivels the blend door when you switch it from heat to cold tries to go beyond its maximum rotation and clicks. Usually it happens when going to full AC, but I am betting for you it happened to break in the other direction, at full heat. I’d give replacing it a try.
My issue is i had noise in the fan box it was a plastic piece in the squirrel cage it appears to have something to do with actual door movement don’t have max air no big deal but first cold front I have no heater obviously the door needs to be replaced not actuator any suggestions
David…
You and I have the same problem. I had a good chunk of plastic in the blower cage with a star shaped recepticle in it. Since then I can hear a motor cycling behind the dash. I am assuming it is the upper portion of the actuator door. Internet search only comes up with actuator replacement…any updates?
Only problem I have now is door I in closed position which uses only outside air no max so if it’s cold I have to shut unit off until I’m at highway speed before I get any heat no problem with actuator because that piece with the star was the part that turned to open door for inside circulation
Unsubscribe please.
Why
Thanks for the well detailed steps for replacing the actuator. Had same clicking and the TechSmart part you recommended fixed the problem. Only issue now is that I notice the low speed for the blower does not work while settings 2,3,&4 work normal. Could this be related to the actuator replacement or do you think I have another issue now?
I followed your instructions to a tee, but the clicking continues, both on startup, and when putting on max AC. Thoughts?
You pulled the fuse to recablibrate it as well?
Yup, pulled the fuse as well.
If the noise goes away when you turn the temperature up, this actuator probably is the fix. Maybe your new one is a dud? I’d try returning the new one for a replacement.
My 2011 F150 was doing the same thing. I was able to diagnose it and remove the damaged part.
Only had to undo the top 3 clips and 2 lower buf not all of them on the radio face plate to move the it far enough away and let it lay there out of way to get to the radio and pulled that straight out without removing any of the clips it hung out of way just fine. I used the Auto-Zone Doorman 604-252 for 21 bucks, it worked fine it was a little tight but I still had the room needed to get the screws in although it was much easier with 2 people. One person manipulating the back screw through the glove compartment and the other guiding it place using a pair of needle nose pliers then once in place using a small 8mm socket same technique.
Followed the recommendation on reset by removing the fuse #46 on my truck. All together I would recommend anyone with even the most rudimentary knowledge of cars to try this first before spending $1500.00 at the dealer. This took me and a friend about an hour and a half. Some pitfalls to be careful. Make sure you don’t loose that rear screw in their you’ll never fish it out. So I bought a spare at Auto Zone just in case thankfully I did not need it. Removing the clips holding the electric connections was a bit tricky. All the ones I removed had different locking mechanisms. I’m not sure why ford does that seems stupid to me but… This is an easy job following the above instructions. Thank you guys! You saved me $1500.00 which was the dealer estimate.
Did you tell them what you needed at Auto Zone or did you find a screw that was pretty close? I definitely had my rear screw go into the abyss. I’m pretty confident after moving everything it shouldn’t be a big deal but I’d love to get one and put it in anyhow. I definitely should’ve thought about needle nose pliers before attempting that.
Mine doesn’t have e clicking sound. It just blows cold air when the heat is turned all the way up. If i turn the heater off for a few minuets and turn it back on it will blow hot for a few seconds then go back to cold shortly after. Do you think it could be the same heat actuator? Thanks for your help.
2012 FX2
It’s possible. Might as well give it a shot. You can always pull the new actuator out and return it if it doesn’t work, as long as you don’t damage it.
I have a 2011 Ford F-150 my radio & heat & air quit any suggestions plz
Hey devin, I have the same problem with the heat in my truck that you described with yours, did you get it solved if so was it the actuator?
No. Turns out i had a coolant leak. Once i found the hose and refilled the coolant, problem solved.
December 18, 2017. Heater was blowing cold on driver side and had the correct temperature on the passage side. I do have the dual controls. Dealership said it would cost $1300 to fix the binding actuator on the driver side and the passenger side shorted.
Is there a way to change both of these without taking my entire dash out?
I’m not sure. Unfortunately/fortunately, I’ve never had to replace the other actuators.
I have a 2009 Ford F150. I installed the passenger actuator, pulled fuse #15 and reset. The heater on the passenger side has a soft high pitched noise. Any thoughts?
Just did this fix on my 2012 f150 lariat and worked great. My problem was that the passenger side would not blow out any heat, only ambient air which is cold in the winter. There wasn’t any clicking, just no hot air on the passenger side. Reset HVAC after replacement of part and my fuse was 46. Took me about 1 hour and cost me $27. Thanks for the great how to video!
Dan, I have the same 2012 Lariat with the same problem. I have heard no clicking either. So to be certain before I start…when you say you replaced the part, you were referring to the actuator correct?
Thank you for getting back to me.
Just completed my f150fx4 not a bad job. I have the flow through console makes to job a little harder but still not bad just take your time with the trim parts. I used the Dorman part install and tested before putting everything back together still had the clicking noise. Buy the Ford replacement part only $43 and the part has been improved 4 time due to the series on the part number. The first 2 letters on the part number showed this AL——, not its DL. Ford is trying to fix the problem. Great instructions above do this yourself it not bad at all thanks James
Just did this on a 2010 Raptor. It had the flow through console which added a lot of steps but after the console was pulled back everything went like the instructions above. Note if you have a flow through console don’t pull the trim around the radio until the console is pulled back. You only need to pull the console back about 4 inches to expose the bolts holding the base of the trim down. Also you don’t need to totally disconnect the shifter and take it out just unbolt it so the console will move a few inches.
so i am sure your raptor has dual climate, was it the upper blend door that controlled the drivers side
Followed the instructions which I appreciate the author for posting. A few items of note. After trying to get the rear screw out for two hours my son and I came to realize our hands we’re just too big and the friggin 8mm box end of the wrench was a little to thick, it was not seating over the head of the bolt as the bolt head was seated too close to plastic housing of existing actuator. So I took out my dremel and cut part of the top portion of the actuator off. Then I reached in and just snapped it apart as the top portion of the actuator came off. We pulled out part of the actuator guts and the were able to get at the rear screw from the front with out going thru the glovebox. Should have did this earlier, it was off in 2 minutes. Of course then we realized we were in trouble to get the new actuator in place we needed smaller hands, luckily my 15 year old daughter has small hands, she was able to reach in through the glove box and thread in the bolt it and then use the box wrench. She had it snugged in place in less then three minutes and did not even get a scratch on her hand, she made it look effortless. Of note I took my dremal and shaved off a little plastic on the actuator housing so the end of the box wrench would fit over the bolt head with out binding on the plastic prior to installing the new one. Also, I had my daughter reach thru the glove box and thread the bolt into place prior to installing the replacement actuator, a dry run so to say so she could figure out the best way for her to get it into place. When I looked at the pieces from the actuator we noticed on tooth missing from the main gear, it had broken off. So all is well, works great and my daughter and I shared some time together as she reinstalled the rest of the pieces.
I must say that your related post for the replacement for the blend door actuator is spot on. Yesterday my F-150 would only blow red hot air and could not get any cold air (even though the a/c was on) and the temps outside were reaching 90+. After reading this post, I called AutoZone and got the “Techsmart F04002” actuator. Slipped right in (with just a touch of wiggle). I will say the hardest part was the removal and replacement of the blind side screw. I put everything back together, pulled the #46 fuse (that was my climate control fuse), waited a few then replaced, turned the temp control all the way cold, started my truck and low and behold cold air. Turned the control to hot and WOW, hot air. simply Amazing.
thank you again for such a well detailed procedure for what could have been a very expensive garage repair bill
Jim F
is it possible to just remove the actuator by putting your hand trough the glove box and not have to take the radio out?
I just replaced the cold air side and no more clicking. I’d say it would be impossible to replace it without pulling the radio. If clicking occurs on both heat and cold setting I’d say it’s both motors. blind side screw was tough but not impossible.. Took me a little over an hour for a repair the dealership wants to charge 8 hours for. This article and several YouTube vids made it easy.
Hi. Can you tell me what the part number is for the rubber mat that sits in front of the display? My truck does not have this part. Thank you
Thanks for the details. Saved a ton of money. One note, I used a small 1/4″ drive Craftsman Rachet and a short 8mm socket to get the blind screw out. Took a little patience but worked on my 2012 Lariat. I used the Dorman 604-252 with no problem being to thick to install.
Yesterday 17 Oct. 2018, going into work my 2009 Ford F150 KR dual climate control was blowing hot air on passenger side but cold on driver side. It didn’t matter if I used the defrost or front vents, same result. During my troubleshooting today I have tried to listen for unusual noise, no popping noise noted. I removed climate control fuse #15 to recalibrate, no help there.
My Question is which actuator valve I need to go after? I would like to get this on the first shot and tackle this project myself. Also what PN actuator valve do I need? My truck does have the navigation and the shift console on floor.
Thanks, John
Thanks for your post, it was spot on. Just changed the actuator in my 2010 F150 XLT. I found the ‘real’ Motorcraft part on Amazon for ~ $20.
Hey David,
How long did it take you to remove the center stick shift console and radio? Did you remove the dashboard? What Part Number Motorcraft part did you receive from Amazon?
I’m thinking of during this job myself, but not sure which actuator to replace which I have a dual climate control system.
Thanks,
John
2011 F150. AC/heat has been clicking for months. It only blows out cold air. I bought the part he recommended from amazon. Wasn’t easy to get that back screw on and off but i got it after a while. This fixed the issue and i dont have to freeze this winter. Thanks!
Hi everyone …great great article and I have read every single post. So we have an F150 4×4 with the flow through console. So the drivers side blows cold air, while the passenger can regulate beautiful heat up to 90 degrees. We bought the exact same actuator that Ford ” diagnosed ” as the problem …. after 193.00 diagnostic fee … we decided to do it ourselves. Hubby did it this am, and we did the fuse reset as noted …. still blows cold air on the drivers side and beautiful hot air on the passenger side. Would love some divine intervention !
Got the new one installed and it’s working great but now the airbag light came on? Not sure what that’s about any thoughts?
This shouldn’t affect the airbag at all. Did you accidentally remove or blow an airbag fuse when resetting the HVAC fuse maybe? Or damage wiring behind the glove box?
I just got done with this fix. I must say the instruction couldn’t have been laid out any better. Very well done and thank you. I will say the part about needing little girl hands to reach the back bolt were way understated. That thing was a beast. I gave up an took it to a mechanic friend of mine. Two hours an $60 later it was removed the unit was replaced and we decided it really didn’t need the front bolt replaced. I’m gonna put a shim between the cross bar and the unit just to be on the safe side but the front bolt and the back pin should be enough to hold it and if it ever goes out again I won’t have to fight the back one.
Thank you so very much for putting this tutorial out here for us to use.
Thanks for the comments, glad the article was helpful. $60 labor to change that actuator is probably still a whole lot better than what the dealer would have charged!
Thanks for the good directions, Jim. I found them easy to follow. My passenger and rear heat were out on my 2010 F150, though there was no noise coming from the system. I picked up the TechSmart part today from AutoZone for $28. I did the install in about 90 minutes – taking my time and cleaning some as I went. Most of it was getting the rear screw loosened up. I picked up a ratcheting box end wrench, but unfortunately there wasn’t quite enough space for the head – and I used the open end instead.
I dissected the bad actuator to find the root cause of the problem. There is a 12V motor and a set of step down gears to drop the speed and add torque. The small diameter gear on the second to last shaft had broken – looked like the plastic couldn’t handle the torque required. Here are four photos showing the actuator once I opened it up. Note the missing small diameter gear on the shaft where I drew the yellow box!
https://drive.google.com/drive/folders/1tWbn-Lup9x9iljyOh97Kbpmblhkw2xAB?usp=sharing
Passenger heat as well as rear heat are back. And my defrost gets air as it should now. All good things on a subzero Minnesota weekend!
Thanks for the information, that’s pretty interesting. Good to know about the ratcheting wrench, that’s disappointing. I wonder if Ford techs have a special tool or if they just have to suffer lacerated hands like the rest of us.
It’s not too surprising those plastic gears fail. I wonder if every actuator has the same failure mode though – I should have pulled mine apart. It sounds like yours did in fact fail differently, as mine (and those of several other people) would still actuate but whatever it uses for limit detection failed, so it would overrun the “end” of its position and keep trying to move further than it can.
Then again, maybe the limit failure is the same gear partially failing. As in, maybe a few teeth break and it spins “out of position” and messes with the motor’s calibration – motor thinks it’s 95% open and it’s really 100% open, etc. You’re making me regret not taking a look!
I have a 2010 F150 XLT that has some issues as well. All the climate controls work, but can’t get hot air or cold air. I replaced the lower actuator above the gas pedal, still not working. Did I replace the wrong actuator? So tired of the Ford issues. I should have stuck with Dodge. Never had issues with Dodge. Steve T
Thanks for the walk through so I could see what’s going on in there. I had the clicking and all that. They are fixing it at the shop now and charging me $321 because they said the labor is a pain in the butt. I should’ve taken a swing at it after watching this, haha. Thanks, Raquel
Thanks for the post. When I bought the truck used 4 years ago I had this problem. When I made a appointment for the dealership to look at it. It stopped doing it the morning of the appointment and they couldn’t find anything wrong. After that it would be it for about 10 seconds when I turned the truck on. Well this morning I hot in my truck and it would not stop. So then I found this article and bought what I needed and now everything works fine. Thank you again for your post and the simple step by step instructions you saved me a lot of money
1/20/2019
Great instructions. I have a 2011 F150 XLT. The damper failed shortly after going out of warranty. For a couple of years, coming a couple of clicks off the bottom cold position stopped the noise. Once when I replaced the battery, it did it constantly in all positions for about 10 minutes then went back to previous performance. This current winter, failed completely. I had to pull the fuse to get it to stop banging while using the vehicle and waiting for a warm day to fix in the driveway.
I was not able to completely remove the two side panels. On the drivers side it appears to go under the lense to the gauge cluster. On the passenger side it goes under the airbag. I simply pulled them back far enough to remove the screws at the bottom and remove the radio/CD player. I also used a box wrench with a bend offset to install the rear screw of the actuator. This made replacing that bolt not nearly as tough as I expected.
2019. I have the same problem. I did every thing that you recommend, but still have the problem. the noise still there and I don’t get heat on driver side.
thank you
Hi, I’m sorry to hear that. If you’re not getting heat on the driver’s side, it sounds like you have a different issue. When this actuator fails, it usually produces a clicking that stops when you change the temperature from cold to hot, but doesn’t interfere with one side getting heat.
There are at least four of these actuators – it’s possible a different one has failed on your truck. Unfortunately, I don’t know which one.
Thanks so much for this thread. Read it, knew what to do going in did it in about an hour. Much appreciated
2010 F150 Lariat 4wd. I replaced my passenger side motor about 2 years ago. It still didn’t work correctly. Never seen anything about pulling the fuse. that may have saved me some cash if I had. I ended up buying a new control head and it seemed to work for a while but still wasn’t like when I bought the truck. Just recently it started the ominous clicking. So began thinking it was maybe the driver’s side motor this time. I’m still unsure if the original problem 2 years ago was the blend door motor since it never clicked, it just started blowing hot air out of the driver’s side when in AC mode. The other day I smelt something burning and the fan stopped. So I stopped by the local garage. They said it was my fan that burned up. They quoted me over $400 to replace the fan and fan resistor. I then stopped at the auto parts store and they said it was going to cost $150+ for the fan and $80 for the resistor. Next stop Amazon and Ebay. $70 later I had the same cheap Chinese parts on the way. I went ahead and ordered another blend motor actuator while I was on a fixing spree. The question I have is does anyone know if the driver’s side motor and passenger side are the same parts? I find youtube video’s of people replacing both but never in the same video. I replaced the blower and the resistor the other day. Now on to the blend door motors.
I’m 90% sure they’re very similar looking parts, but different enough to not be interchangeable.
I have a 2012 Platinum with the flow through console. Just bought the truck and the passenger side blew cold air like the ac was on no matter what temp setting it was on. I replaced that actuator behind the radio and now it blows a little warmer but not like the drivers side. I’ve tried to reset it but it’s not changing anything. What am I missing? Oh and it never made the clicking sound since I’ve had it.