Removing a Miata Engine
There are one or two existing writeups on removing a miata engine, as well as steps in the Haynes manual and various Miata enthusiast books. However, when I ruined two different engines at track day (radiator separated and then was lower on oil than I thought), I discovered that the existing instructions glossed over a lot. For instance, removing all the wiring and grounds wasn’t fully covered. The Haynes manual, in particular, helpfully says “remove all remaining wires.” As a result, I ended up thoroughly documenting how to do this.
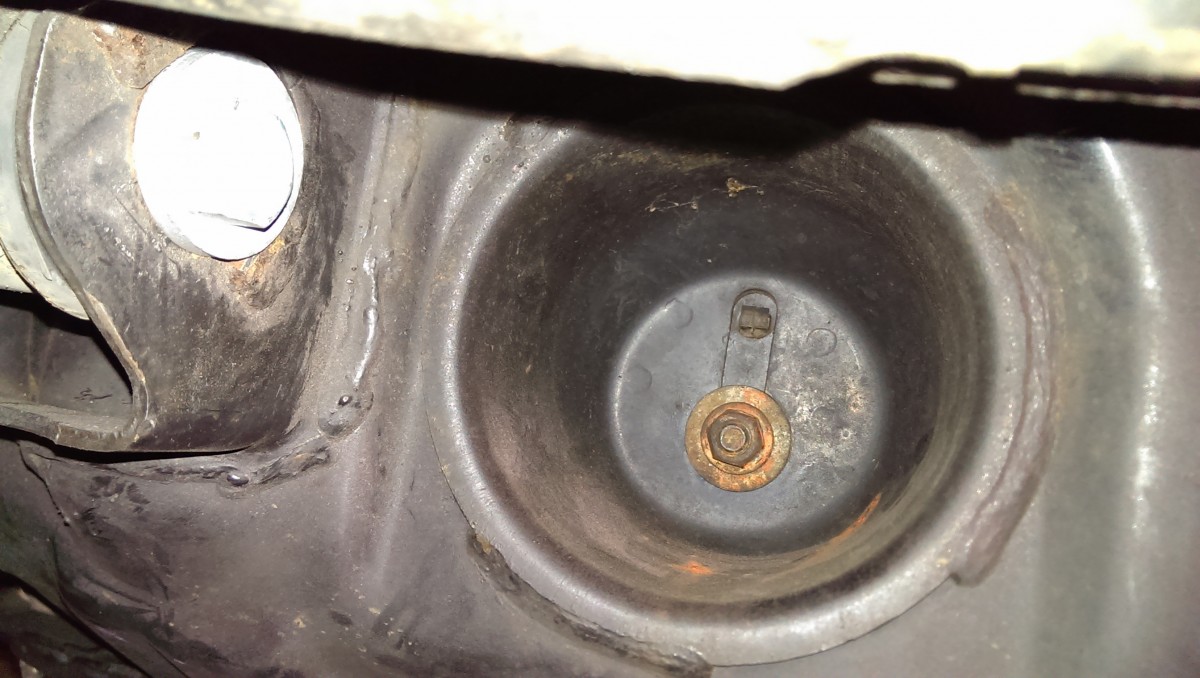
The first time I pulled the engine, it was because my old radiator separated on the track, lost coolant, and overheated the engine. I hoped it would be OK after it cooled down, and I replaced the radiator, but the engine was toast and sounded horrendous. The second time, I unknowingly ran it low on oil thanks to a pretty bad oil leak, and it was all over after a track day pushing the engine a little too hard. Pictures of the rod bearing shavings I found in the oil are below. The third engine so far seems to be the charm, and I’m hoping the previous two were my own fault and thus this one will be fine. The people at MiataTurbo.net were very helpful with the diagnoses.
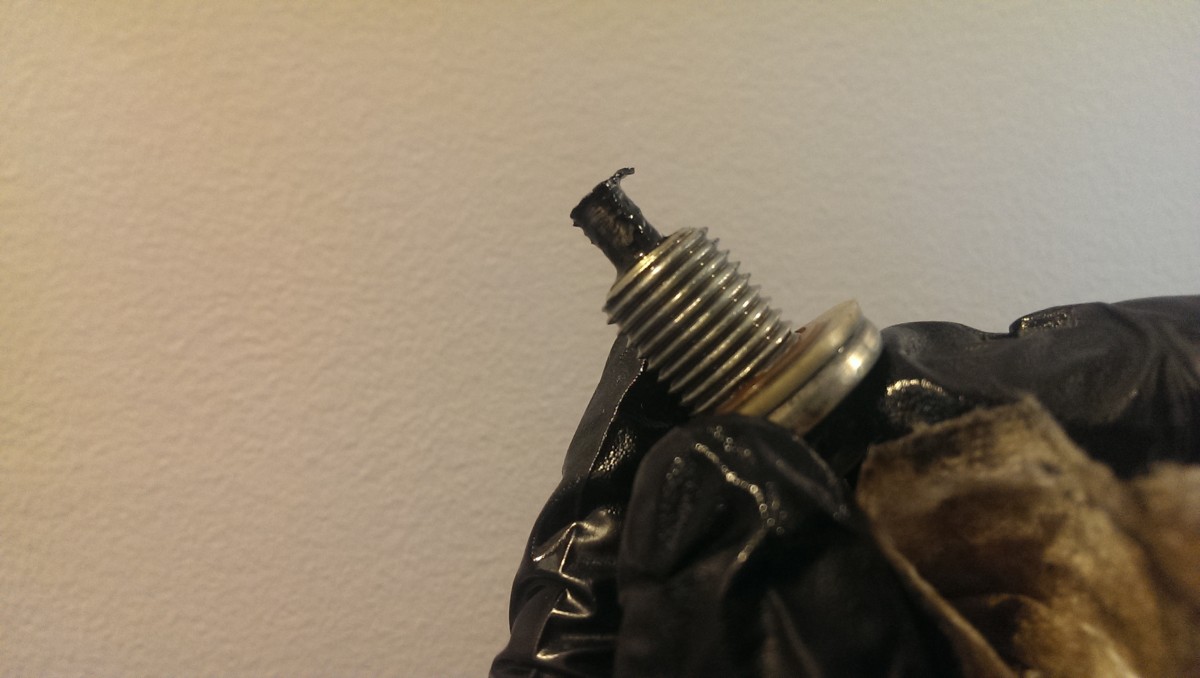
The oil plug was loaded with metal shavings

The oil had chunks of rod bearings in it
Tools You Should Get
Engine replacement sounds very intimidating, but it’s really easy if you’ve ever played with erector sets and have a decent set of tools. You definitely need:
- A good set of metric wrenches
– I recommend the Craftsman 220-piece mechanic sets
when on sale
- A few u-joint sockets
and extensions
– these let you get to those weirdo inaccessible bolts
- Torque Wrench
– Absolute must. ‘merican tight is way too inexact, you are reinstalling enough bolts here that you need to tighten them to the proper torque from the Mazda FSM or the Haynes Manual or the internet. You may also want 1/2″ drive
- Milwaukee Cordless Impact – I used to recommend the cheap corded impact below, and it’s fine to save a bit of money. However, if you’re working on cars frequently at all, the new cordless impacts like this Milwaukee are amazing. All of the torque of an air tool, no hoses or cords to drag around, and they can electronically break a bolt loose and then slow down to spin it off. Extremely handy tool.
- (Cheaper option vs Milwaukee) Corded impact wrench
– (Note – in 2022, I would buy the cordless impact instead) I didn’t get one til I really needed it, when I was nearly done – this makes life WONDERFUL. I got a Kobalt corded electric impact at Lowes for $150; it included 7 of the most useful sizes of impact socket, deep. The one I linked on Amazon looks very similar.
- Jack and Jack Stands – absolute requirement. Having a set of Rhino Ramps and a second set of jack stands is also a good idea
- Engine Hoist and Leveler – Harbor Freight 2-ton works fine, but you don’t want to skip this step. I’ve seen people redneck around this, and it’s not worth the effort. Note that a commenter confirmed that the 1-ton from HF is too short to reach over the bumper.
- Engine Stand – Admittedly just a nice to have, but a cheap one makes life a lot easier
- Buckets and funnels to drain and refill transmission, coolant, etc – You can easily run out to Walmart for this as you go
- Haynes Manual
– It is frustratingly non-descriptive sometimes, but at least it gives you the steps to go off of
- Metric rethread chaser set
– Not the same as thread taps. This is basically a fancy bolt with slots in it to clean up existing threads, which was extremely helpful in preventing transmission mount bolts from snapping. I got this set on Amazon
and have ended up using it fairly often afterwards.
- 9/16″ Double Square Socket
– This is the proper tool for the transmission fill plug
- Replacement heater core lines (Hose #1
and Hose #2
) – If these have never been removed before, you’ll probably need to cut them off
- New Cam Angle Sensor (CAS) O-ring
(Optional) – These tend to wear out and leak oil. If you’re yanking the engine, you’ll have to pull the CAS, so may as well put a new one in

Run Fuel Pump Out of Fuel
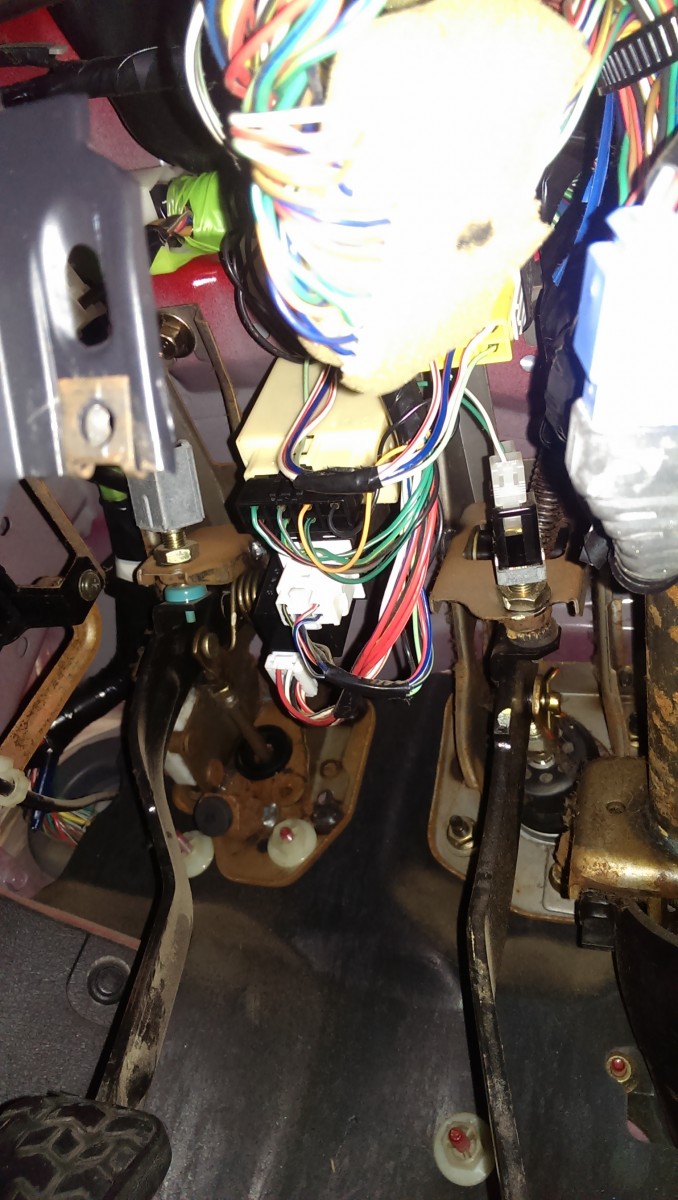
Unplug the barely visible yellow plug square center under the white blog
The very first thing to do while the car still runs is to run the fuel pump out of fuel. You don’t want gas in the lines later on, as it’s a fire hazard. There is a yellow plug underneath the dashboard. I got the best picture I could, but it’s hard to get a camera under the dash. In any case, it’s the only 1″ wide yellow plug under there, as far as I know. Start the car, and with it idling, unplug the connector. The fuel pump will turn off, the engine will use up the remaining fuel in the lines, and the car will die.
Hood Removal
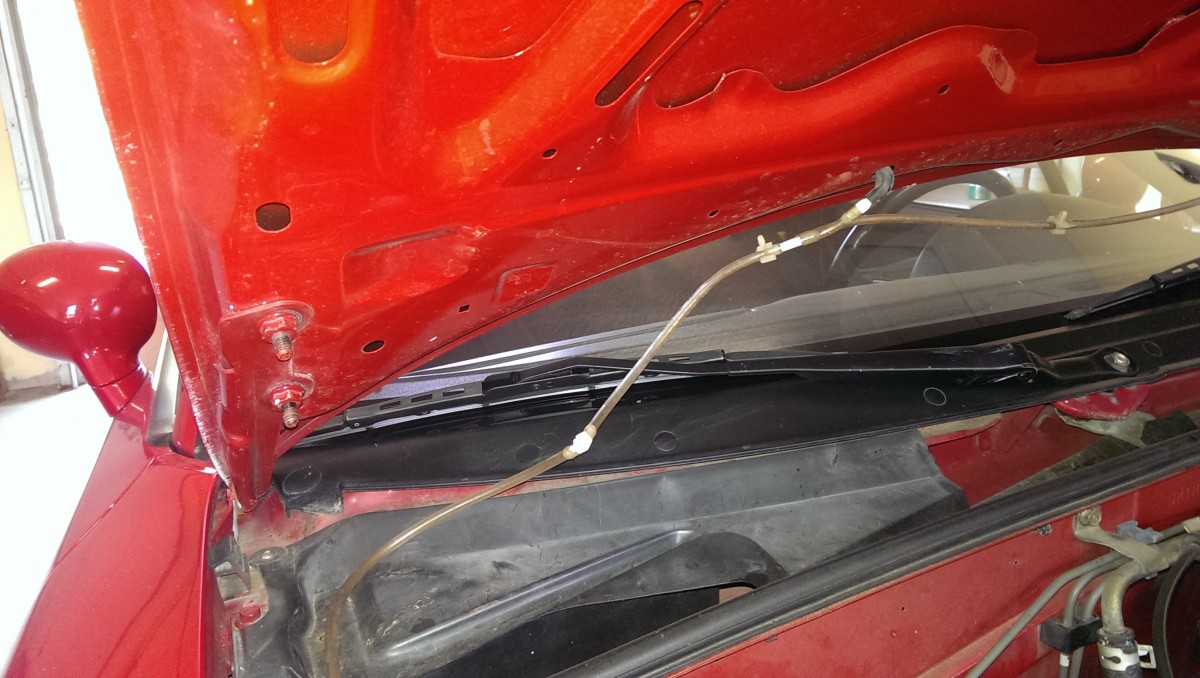
Mark the hood position and unbolt on each side
It’s necessary to remove the hood entirely. The hinge attaches to the hood on each side with two bolts per side. The passenger side is pictured. First, I used a paint pen to mark where the hood lines up, and let that dry a bit. Then, I simply unbolted and lifted the hood off. It’s worth marking where the hood goes, because that determines whether the hood is aligned correctly to the car.

Pinch and remove hood support
Then, the hood support bar itself has to come out. It’s attached to the car as pictured. A pair of pliers is sufficient to undo the plastic tab on the back of the bar and pull the bar out.
Undo the Battery
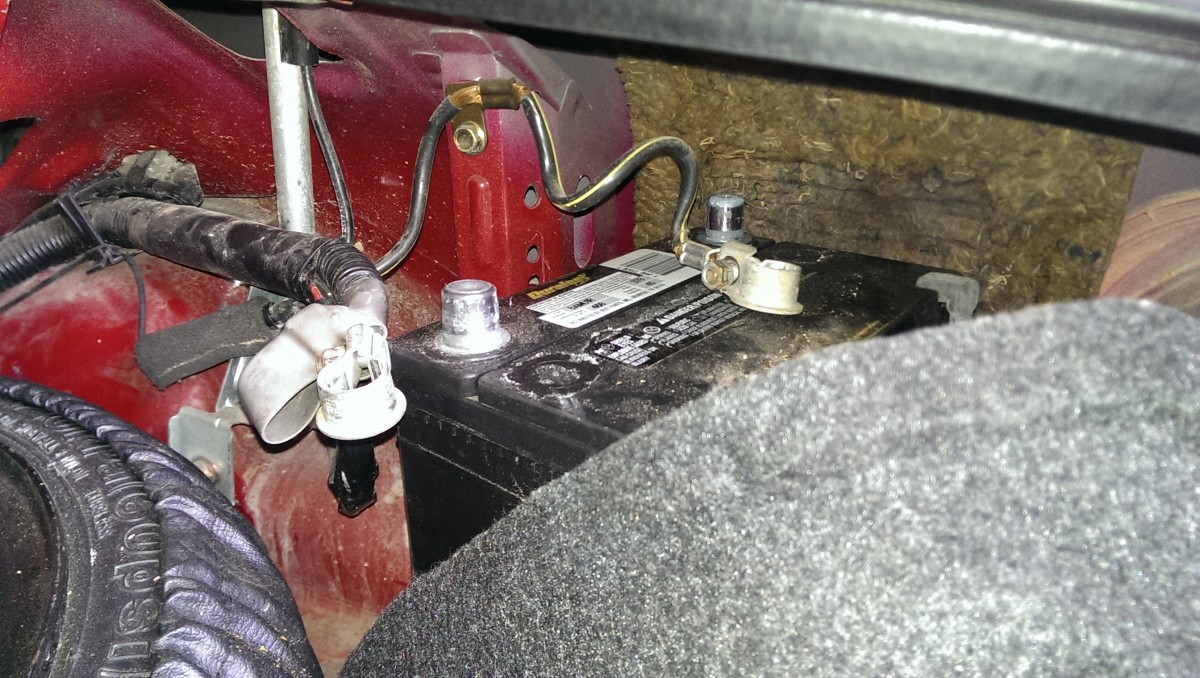
Undo the negative first; miata batteries are in the trunk
The battery needs to be undone before unplugging the wiring, or something could accidentally get shorted out. Miata batteries are on the passenger side of the trunk. I use a 12″ socket extension with gloves on. Unbolt the negative first. I use the socket extension to sort of lift the plug off the battery without having to touch it. Be careful not to inadvertently bridge the positive to the car, it will spark.
If you have a regular battery like me, as opposed to a fancy glass mat battery, it may leak some battery acid while sitting here like this out of the drain vents. If this happens, or if you spill battery acid, dousing the acid in baking soda will neutralize it and allow you to wipe it up.
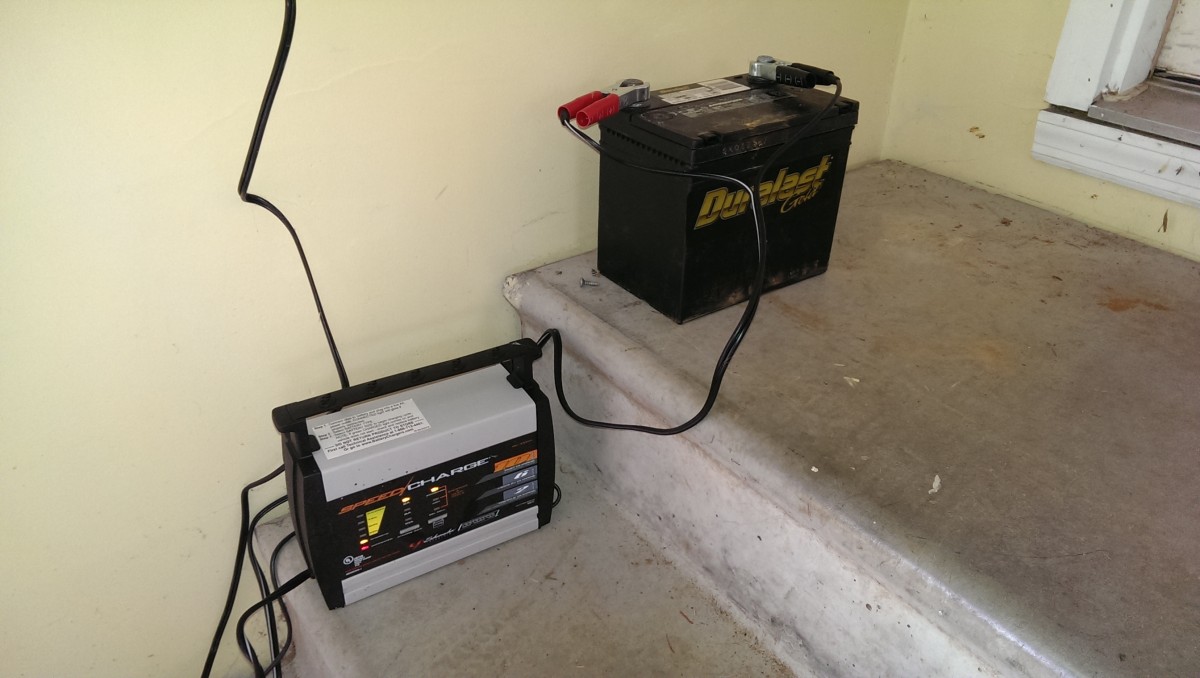
Battery on a trickle charger
The first time I did this, I simply left the battery unplugged without thinking. This killed my already-older battery. This time, I left it on a trickle charger, which keeps it charged up at a very low charge rate. It is a good idea to do one of these if you’re going to let a battery or car sit for more than a couple of days. This particular charger can also do a fast charge to fix a dead battery and was pretty cheap.
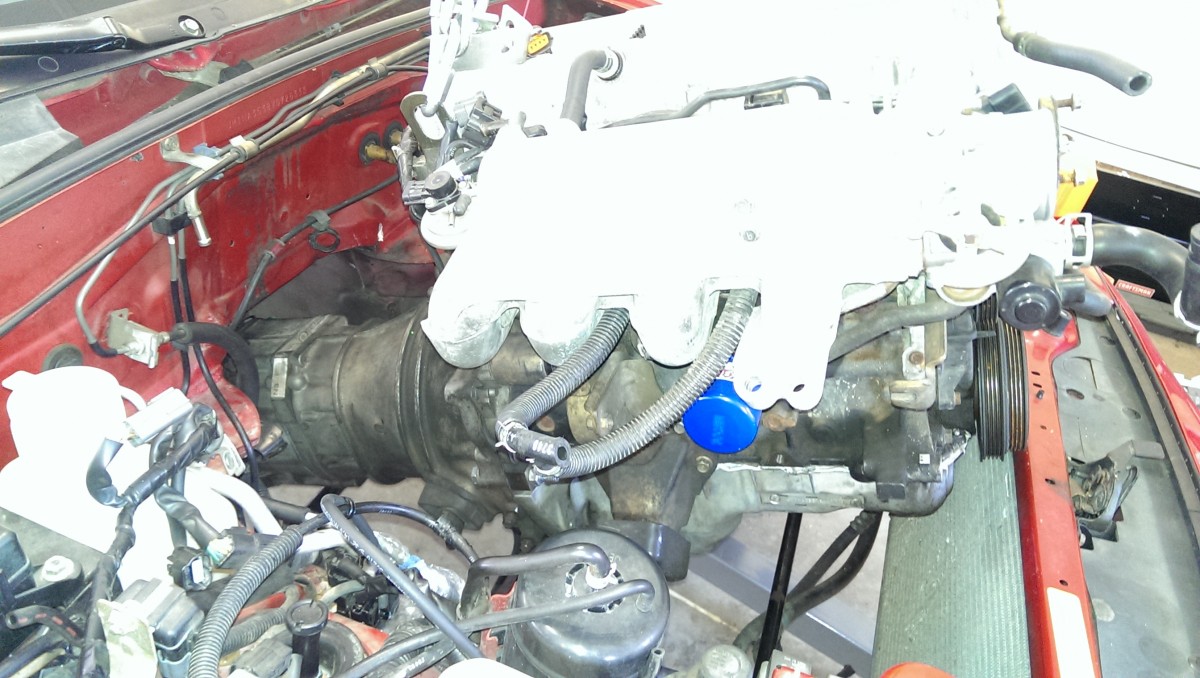
Intake Removal

Intake still on
Two air lines on the passenger side, plus the hose clamp need to come off
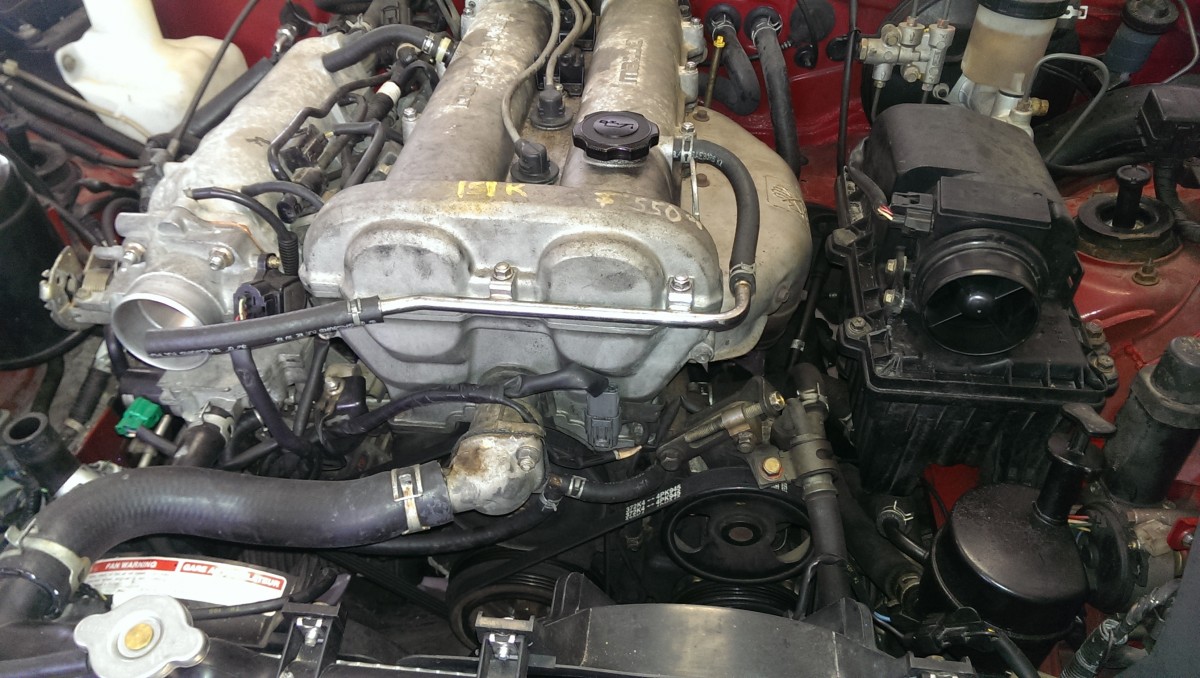
Intake removed
The first part of the intake to remove is the black plastic tube, which hopefully you realize already if you’re doing this job. It needs to come out; there is a hose clamp on either end connecting it to the throttle body and air filter, as well as a couple of large air lines in the zoomed-in picture. Pull it off and set it aside.
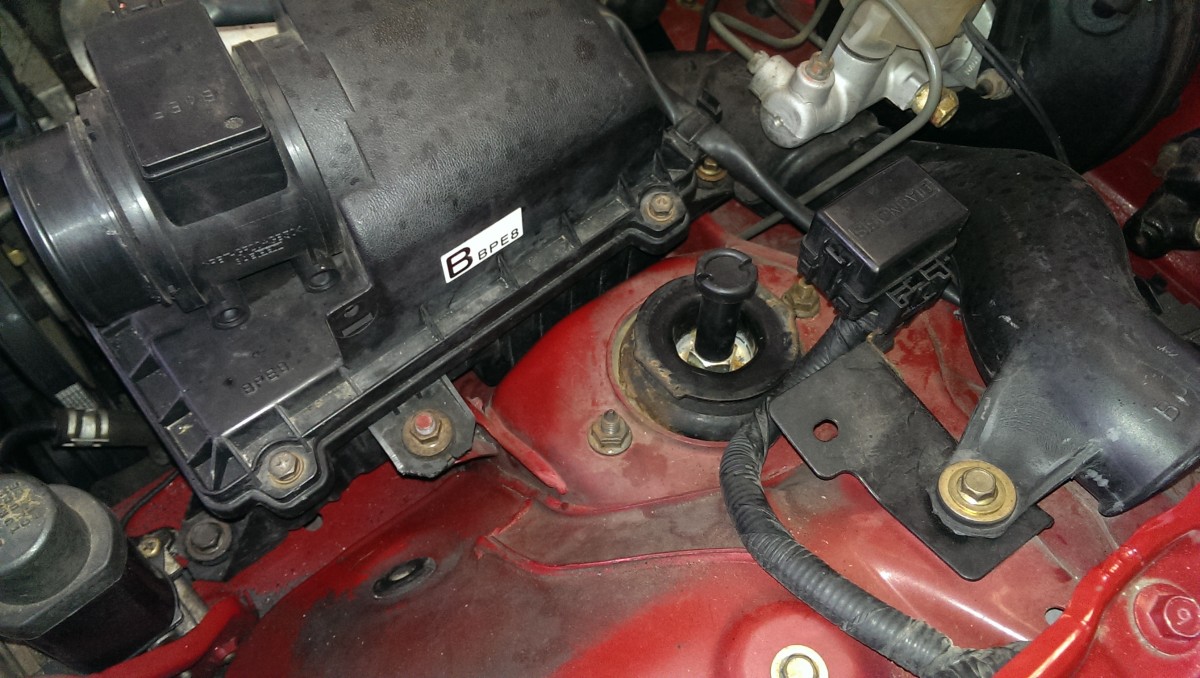
Remainder of intake comes out with these bolts

Intake totally removed
The remainder of the intake is the air box containing the MAF and air filter, plus the tube that sucks air from the fender area. Getting this out is pretty straightforward, simply undo the bolts holding the box and tube to the car, and unclip the MAF wire.
Drain the Radiator
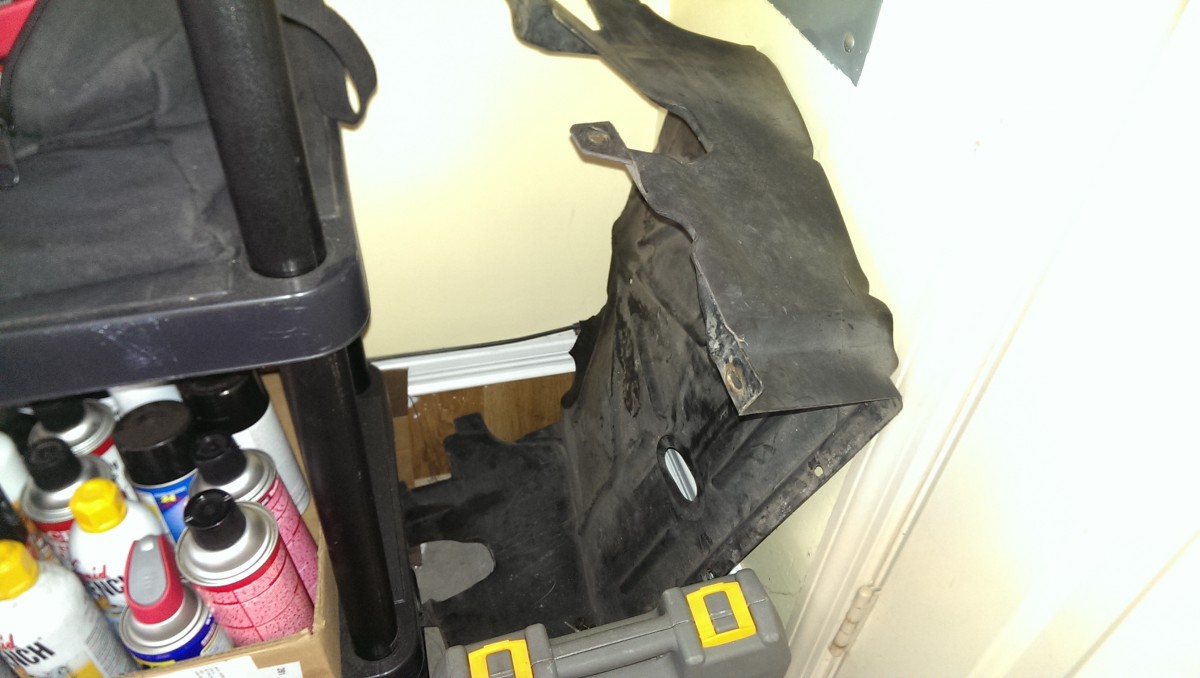
Undertray after removal
Put the car on ramps or jack stands. The undertray might as well come out at this point, as it’s going to have to go anyway. It just has a few small bolts holding it to the car.
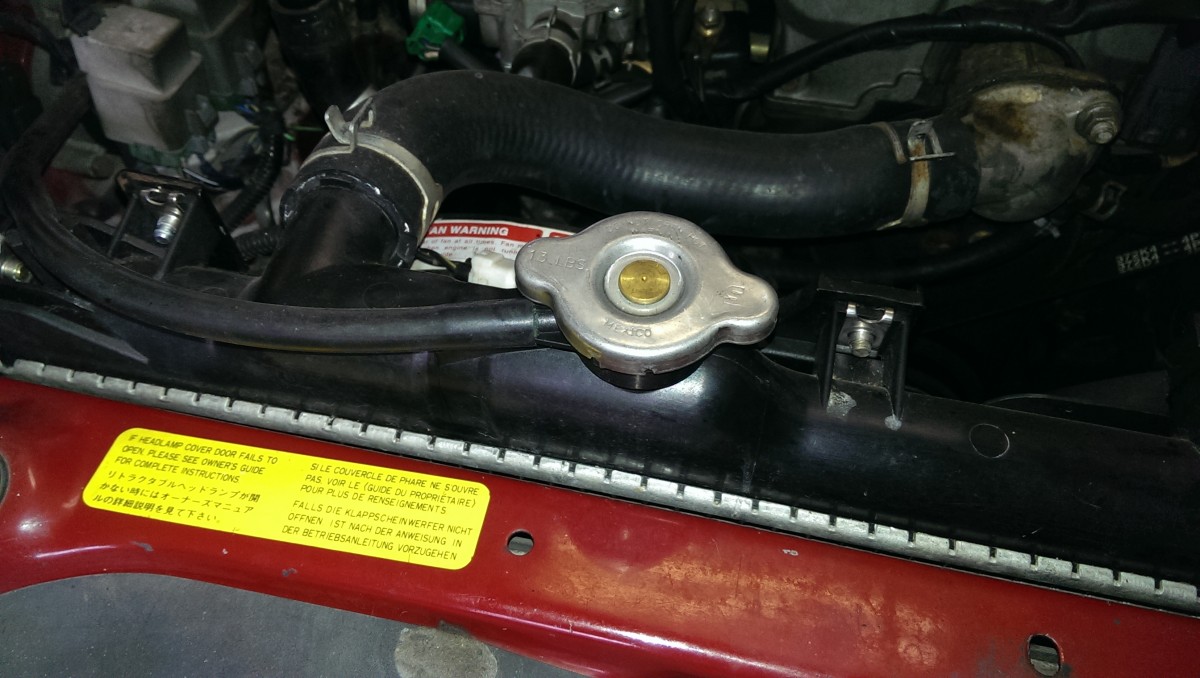
Radiator cap – turn and remove

Radiator cap removed
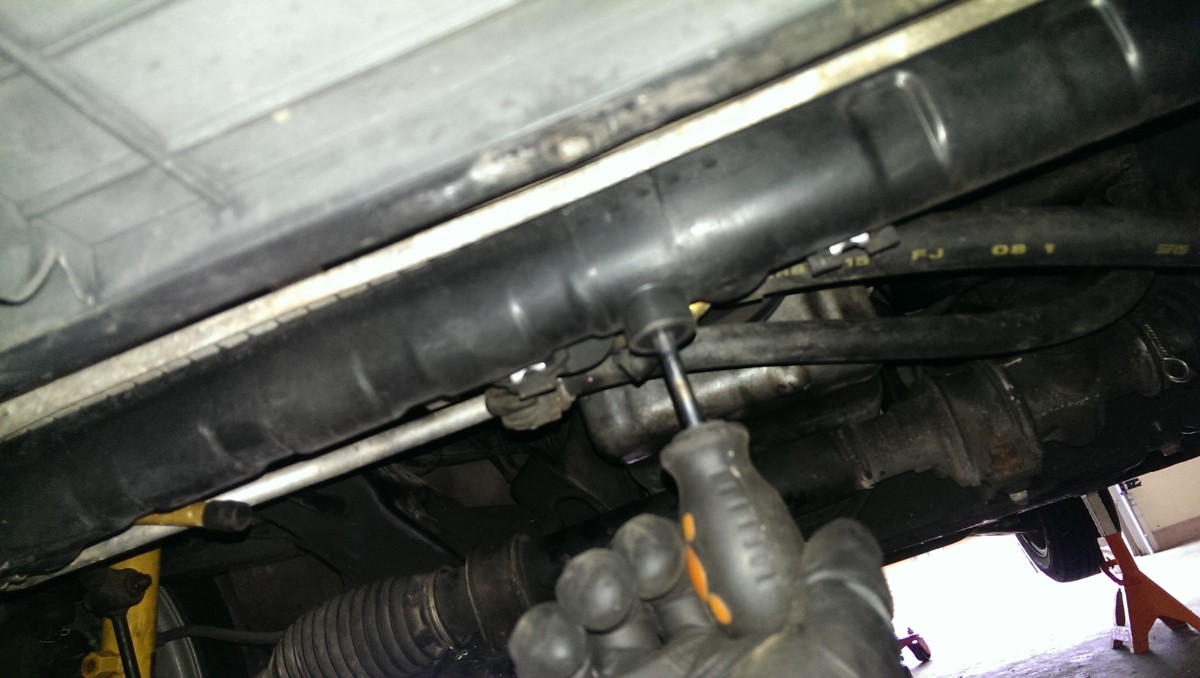
Radiator drain plug – have a bucket ready
Pull off the radiator cap on top of the radiator. This will help coolant drain faster. Then, get a bucket underneath the radiator and use a screwdriver to undo the drain plug. Have gloves on, as well. The coolant will come gushing out, and it has antifreeze in it, which is horrible for you if you were to absorb any of it.
Also, if you do spill antifreeze, be careful to clean it up – it tastes sweet, and animals like to drink it. If you have a sewer system (not a septic tank), you can pour it down the drain in a lot of places. The waste processing bacteria use it as food. Check your local laws, though; some areas require that you bottle it and bring it to a disposal center.
Remove the Radiator
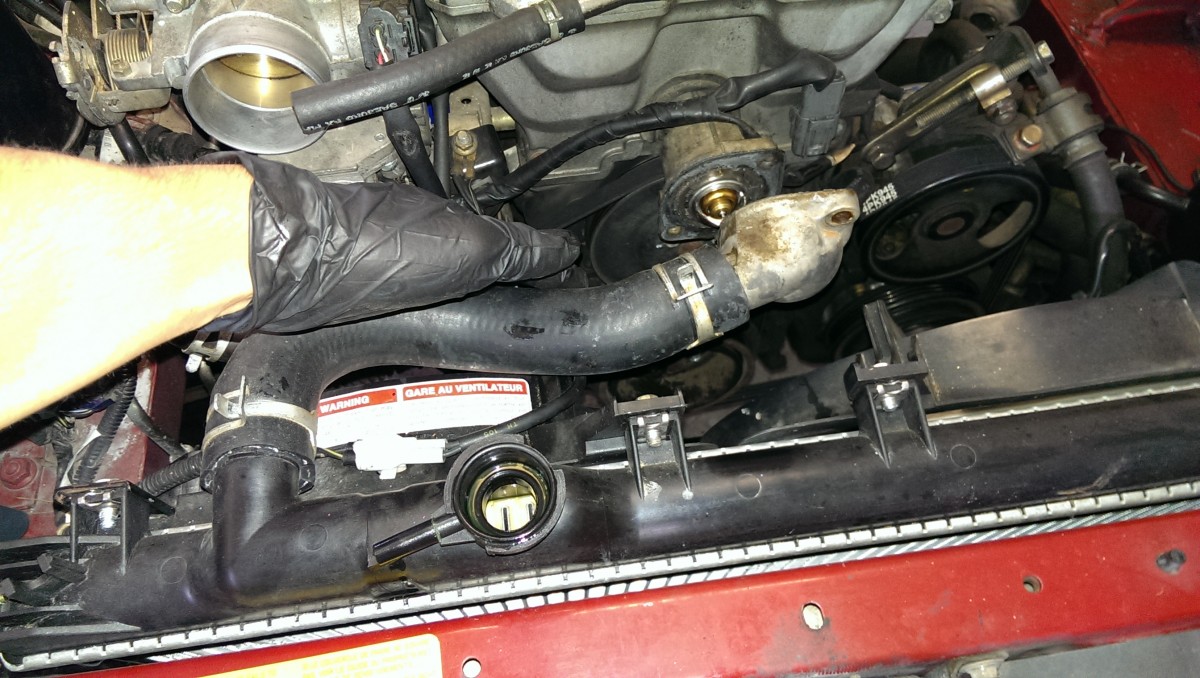
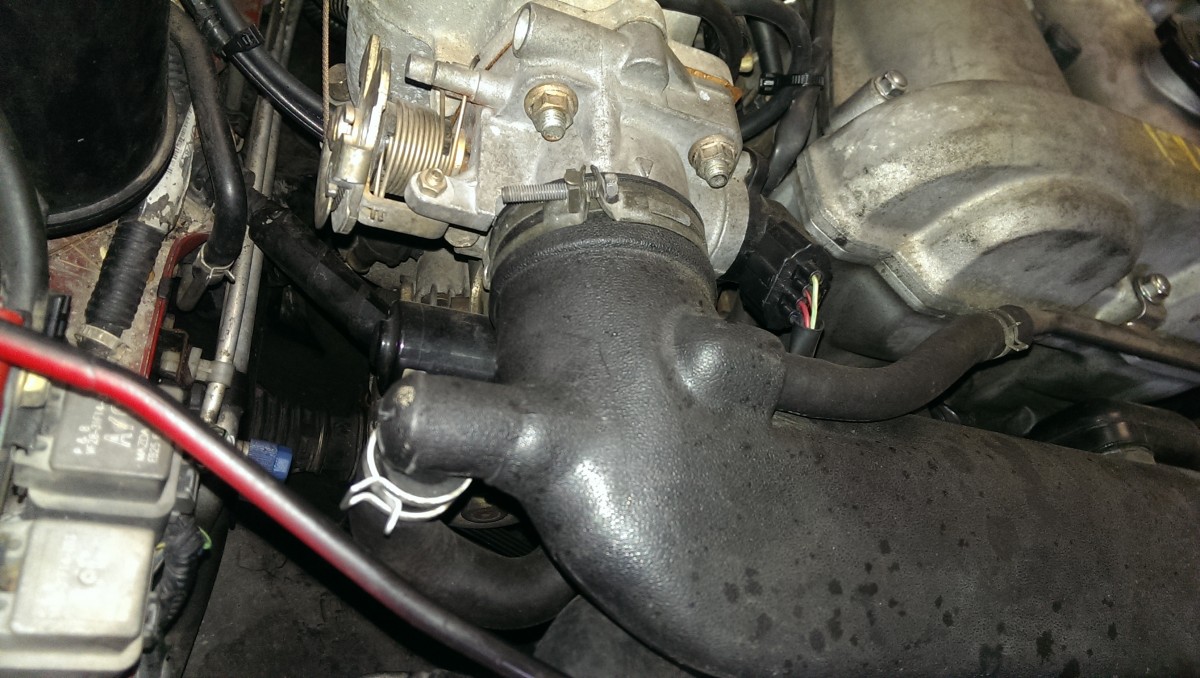
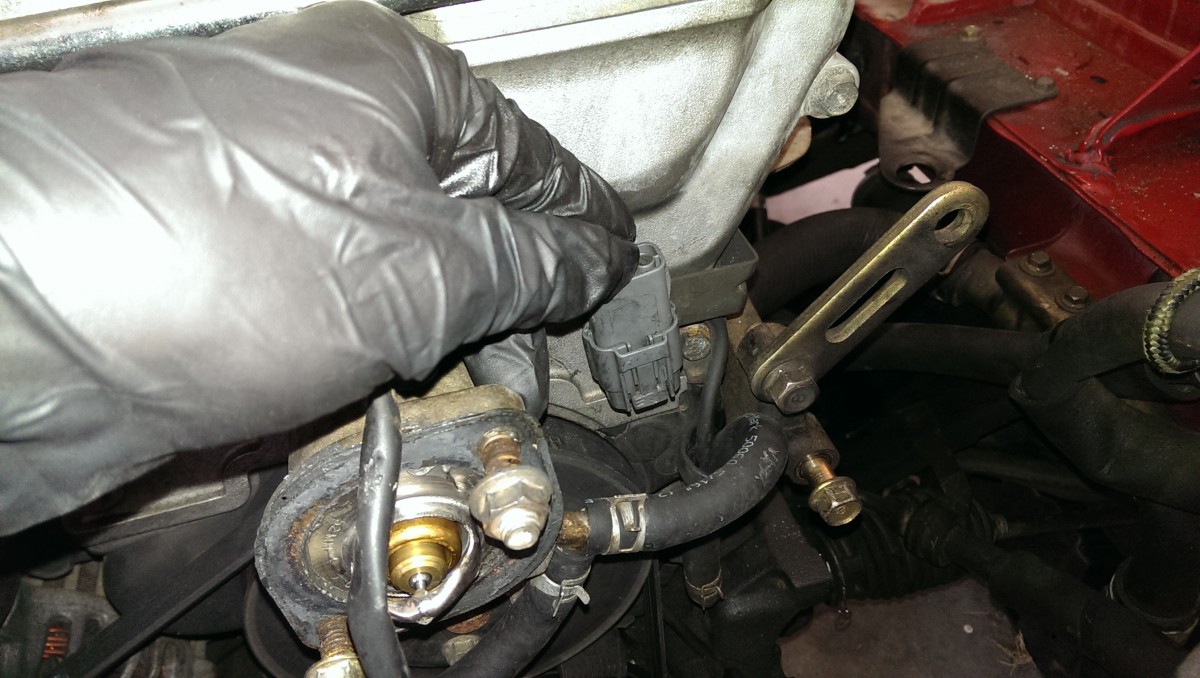
Disconnecting the upper radiator hose from the thermostat and block

Disconnecting lower radiator hose
The upper and lower radiator hoses both need to be disconnected. I found it easiest to disconnect the upper from the thermostat housing, as pictured, by removing two bolts. The lower hose is held on with a hose clamp. Once the hose clamp is off, I found a pair of channel-lock pliers set really wide are very helpful in twisting the hose to break it free, as it will be stuck on fairly well if it’s never been removed.
Radiator bolt on the passenger side

Radiator bolt on the driver side
Lower radiator bolt connecting AC lines
There are two mounting bolts in the radiator. They are on the driver and passenger sides of the radiator near the top, as pictured. In addition, if you have AC, the AC lines bolt to the radiator as well.

Cooling fan plug, driver side
AC fan plug, passenger side
Radiator is now out
Lastly, be sure to unplug both cooling fans. If you don’t have AC, you may only have one plug, I’m not sure. At this point, you should be able to lift the entire radiator and cooling fan assembly as one unit straight up and out of the car.
Power Steering Pump and Belt Removal
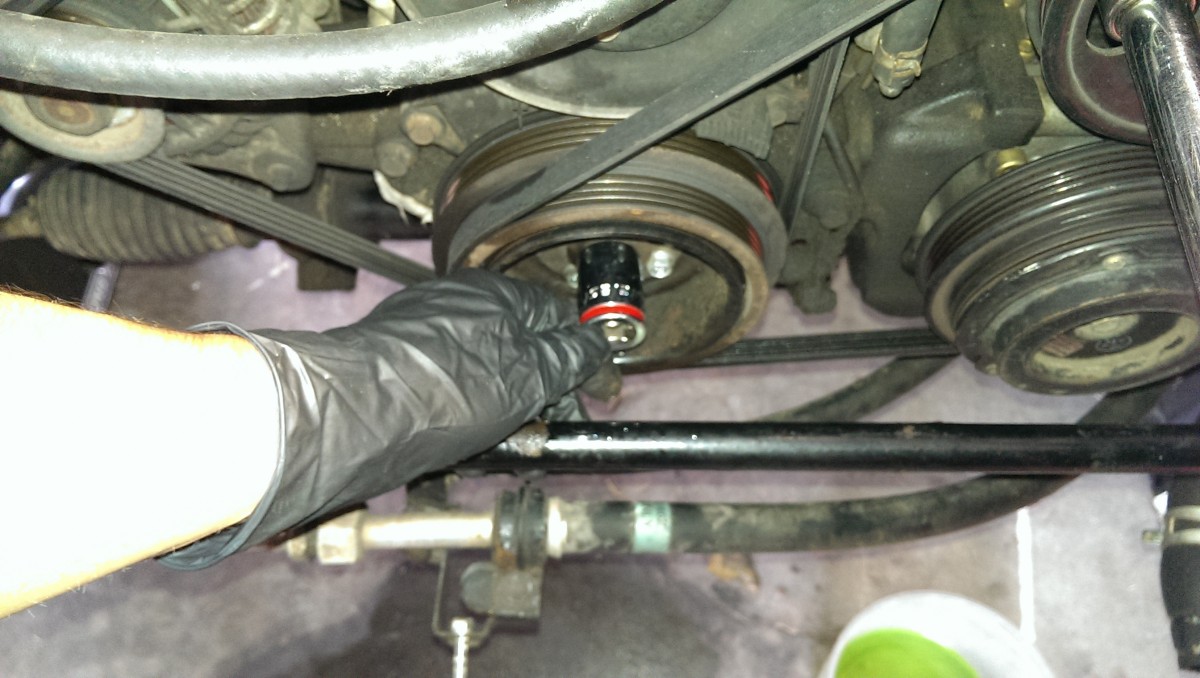
With the car in neutral, you can rotate the crank with a wrench
Rotate until you can get a wrench through the pulley to the mounting bolt
Next, the belts have to come out. The miata has two: one for the alternator and water pump, and one for the power steering and AC if equipped. They both hook to the crank pulley in two different places. The Power Steering/AC belt is on the outside, so it comes first.
The power steering pulley has the tensioner mechanism for this belt. To loosen it, the big mounting bolt that holds the pump to the engine block must be loosened. To do this, the power steering pulley must be rotated until one of the two holes it has line up with the front of the main mounting bolt. I see a lot of instructions to bump the starter until the pulley comes around, which seems like the most irritating and slow way to do it I can imagine. Don’t do that.
Instead, put the car in neutral and make double-sure the parking brake is set. There should be chocks behind the rear wheels, since I’m assuming you put it on jack stands properly earlier on. Put a socket, I believe 22mm but don’t quote me, on the crank bolt as in the picture. Get a good length wrench on there, and turn it clockwise. This actually rotates the engine; if you’re having trouble, you can always remove the spark plugs so you don’t have as much compression to fight, but I didn’t have to. Do this until you can get at the required power steering bolt, and can loosen it as pictured.
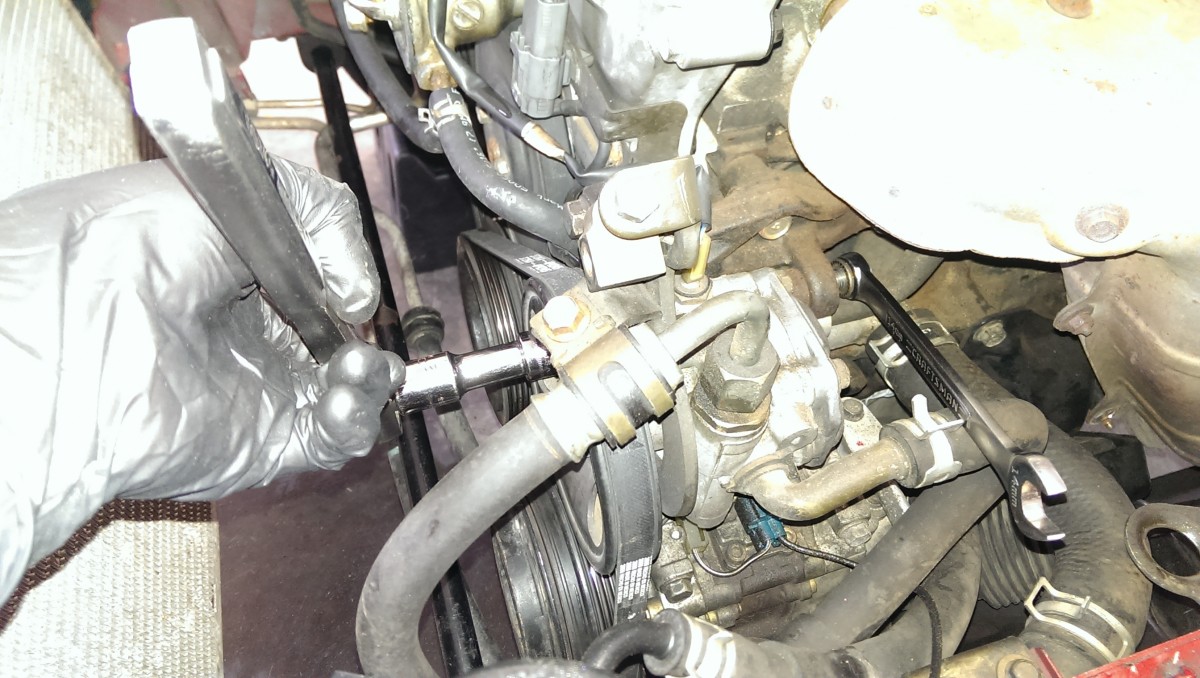
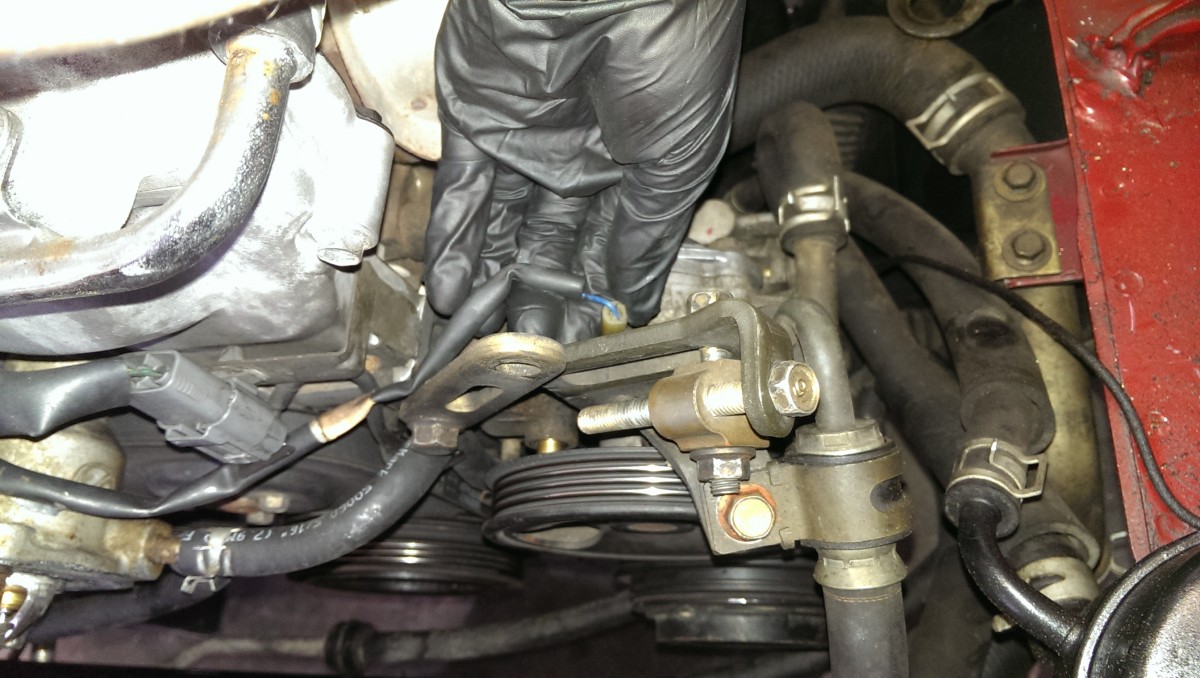
Lock bolt for power steering tensioner
Once that is loosened, you can actually work on the tensioner. This is the goofy bracket above the pulley pictured. The wrench in the picture is on the tensioner lock bolt, which needs to be loosened before the tensioner can slide. After that, you can unscrew the tension bolt, which is the bolt above it, to loosen the belt.
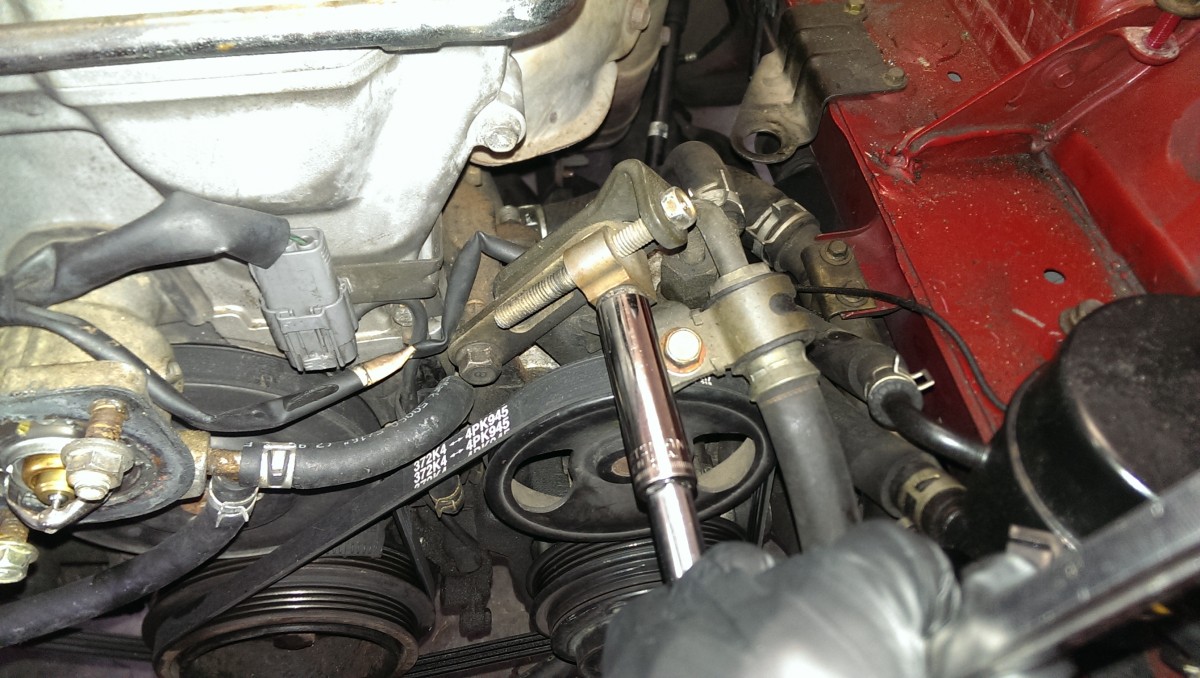
You will probably have to push on the pump to release tension
In all likelihood, the pump has been sitting for years with the same tension, and won’t just flop down. You will probably have to push on it a bit to get it to tilt down and let go of the belt. In the picture, I’ve just pushed down to let the tension loose, and the belt is clearly able to be slipped right off.
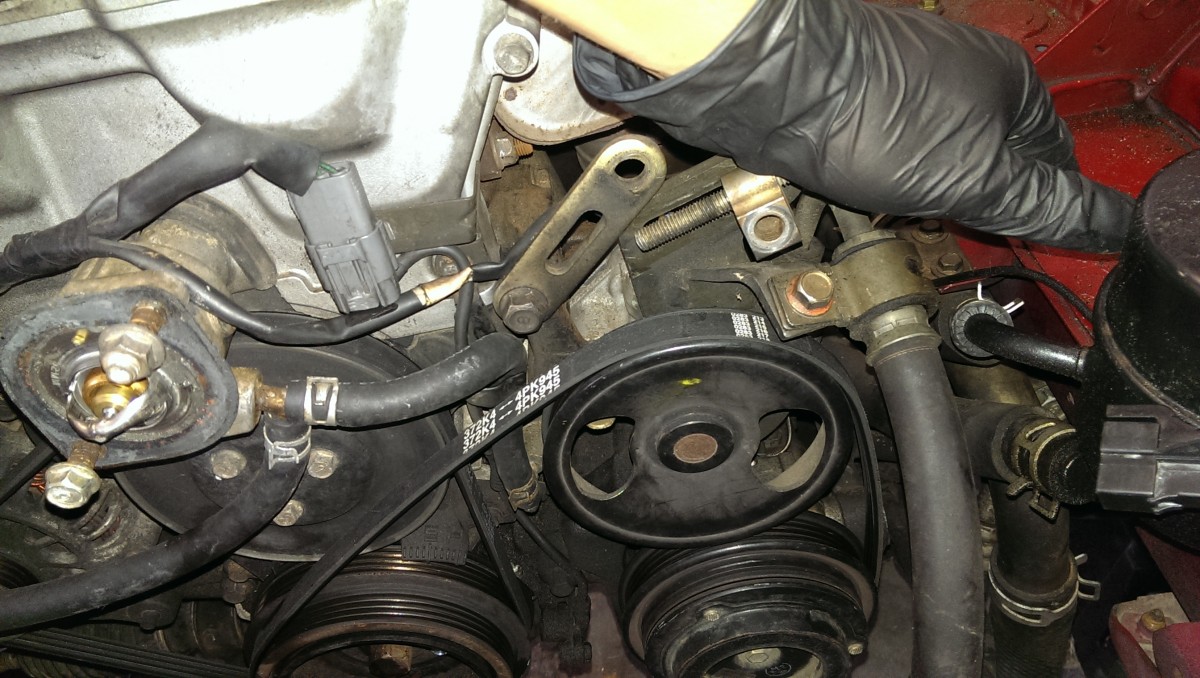
Remove the power steering wire

Power steering pump fully unbolted

Once the pump is out, it’s easiest to tie it out of the way
With the belt off, you can also remove the pump entirely. Be sure to unplug the one wire going to the pump. Then, fully remove the mounting bolts you loosened earlier, and it should simply pull out. I’ve sometimes had to put a pry bar against the mount in the block to sort of lever it out; it can get a little stuck.
Once the pump is unmounted, it’s far easier to simply tie it out of the way as pictured than try to disconnect the lines. The first time I did this, I attempted to undo the lines, but they are a real pain to remove, and then you have to bleed the power steering system afterwards.
AC Compressor Removal
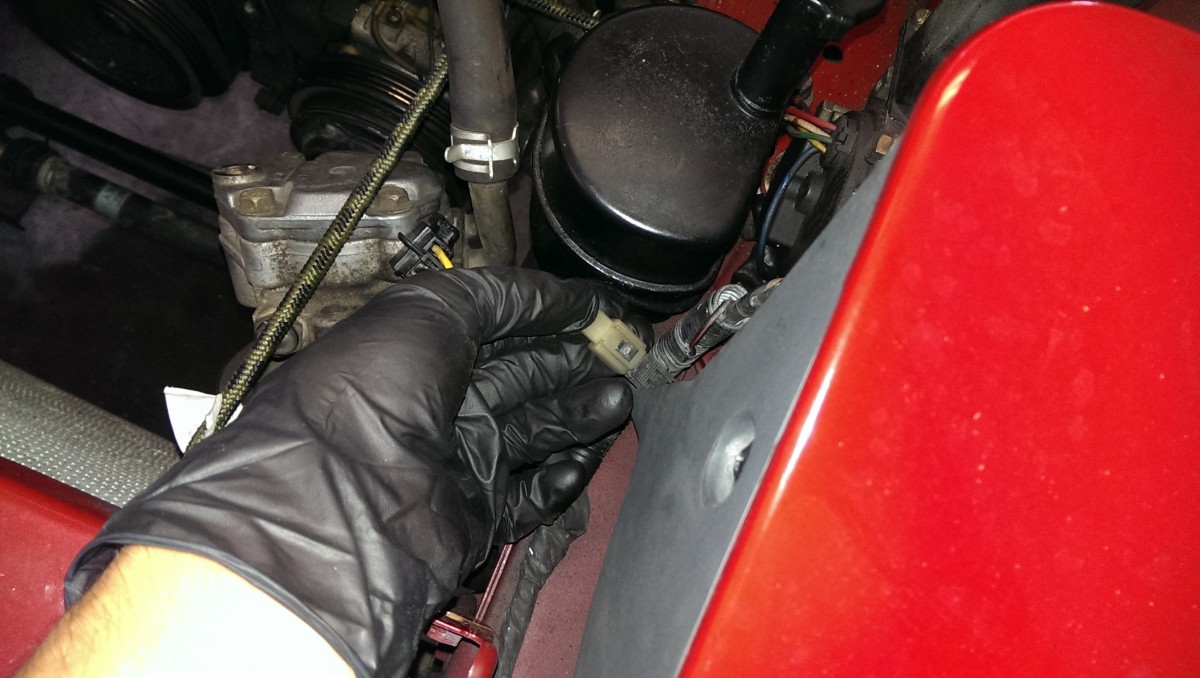
Disconnect this AC compressor wire
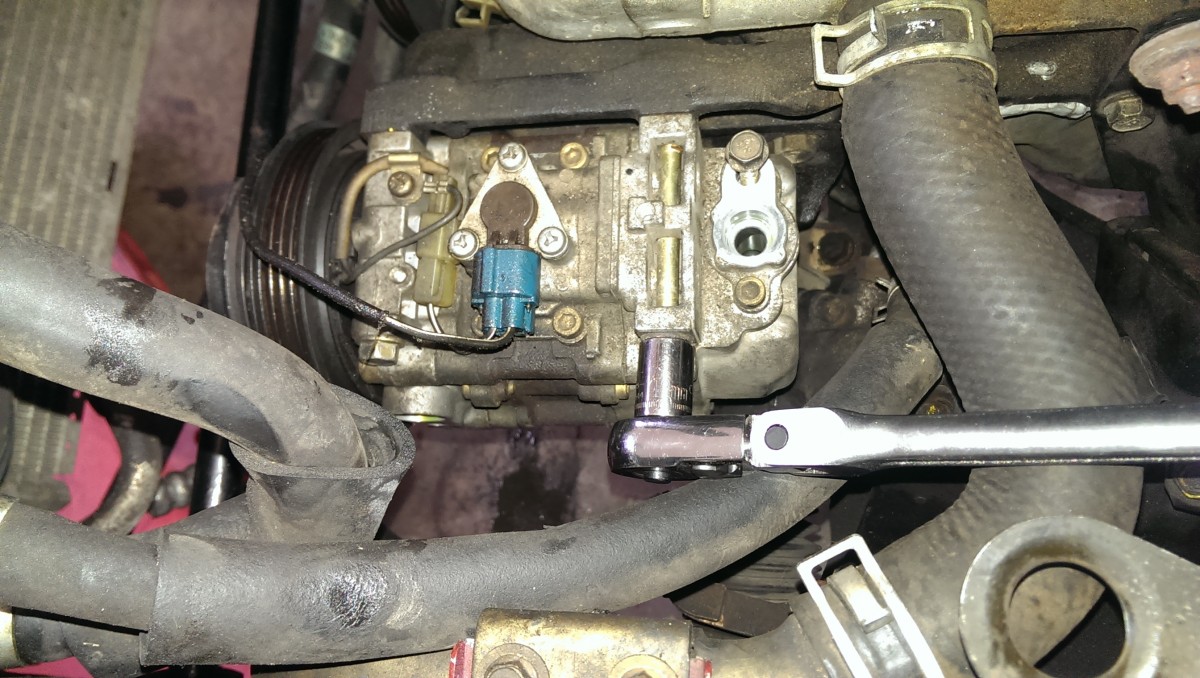
The AC compressor has four mounting bolts, two are pictured

Bottom two mounting bolts
Once the power steering pump and belt are out of the way, you can remove AC if it is equipped. The AC has one activation wire that is plugged in right behind the driver side headlight. In addition to unplugging that, you need to remove the four mounting bolts that hold it to the block. The picture shows two on top, one in the process of being removed. There are also two more in the same layout on the bottom of the compressor.
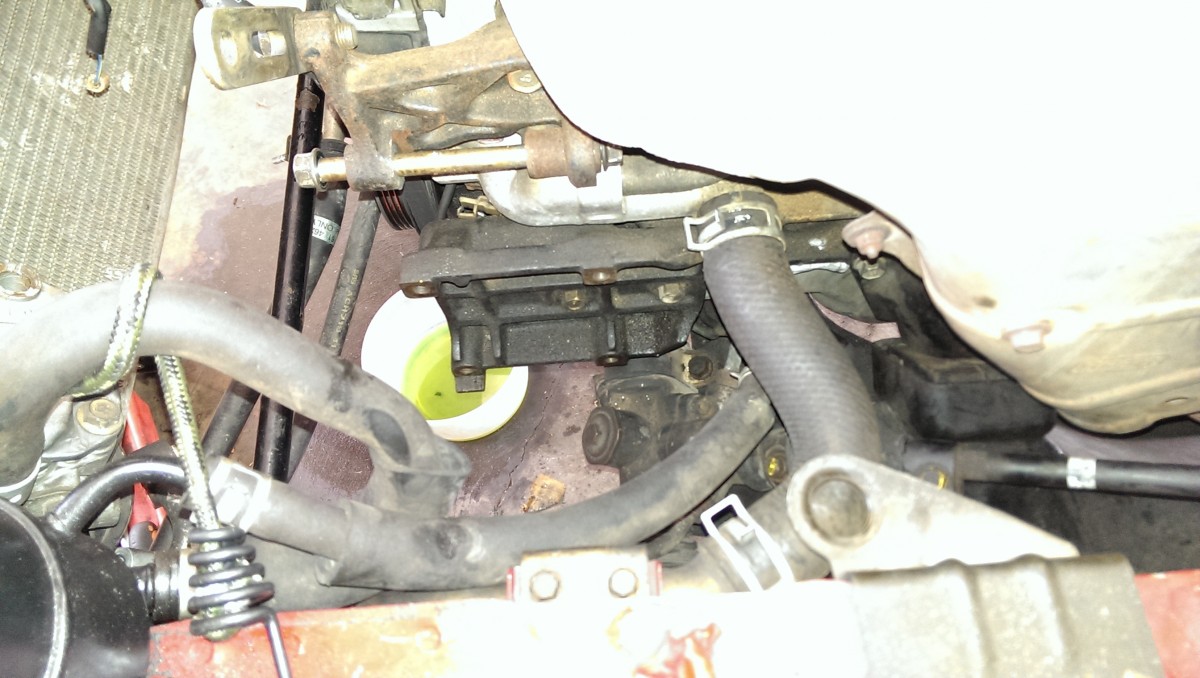
AC compressor location after removal
There are also two refrigerant lines going to the pump. In my case, I had already had an AC system that had no refrigerant in it, so I took the compressor completely out. Do not disconnect the refrigerant lines if the system is charged. It’s under high pressure and is dangerous to you and the environment. If your system is still charged, simply tie it out of the way like you did with the power steering pump.
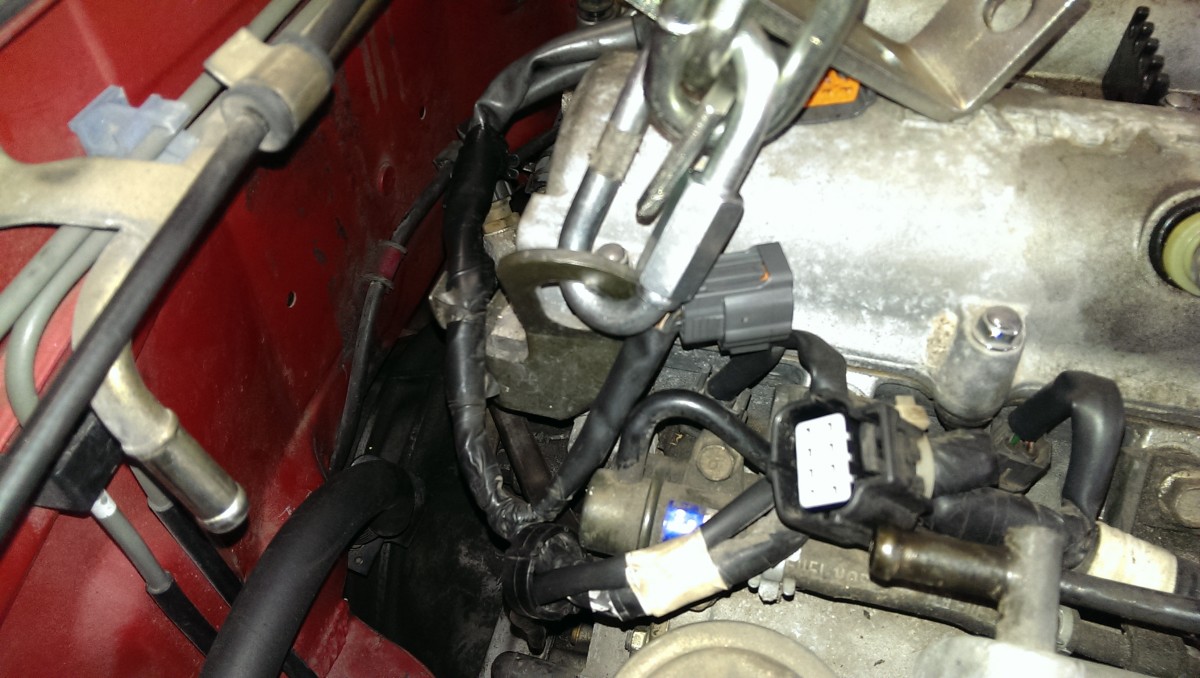
Misc Electric and Vacuum Connection Removal Part 1
This is the part I thought both the Haynes manual and existing writeups glossed over way too much. Hopefully, all of these pictures help:
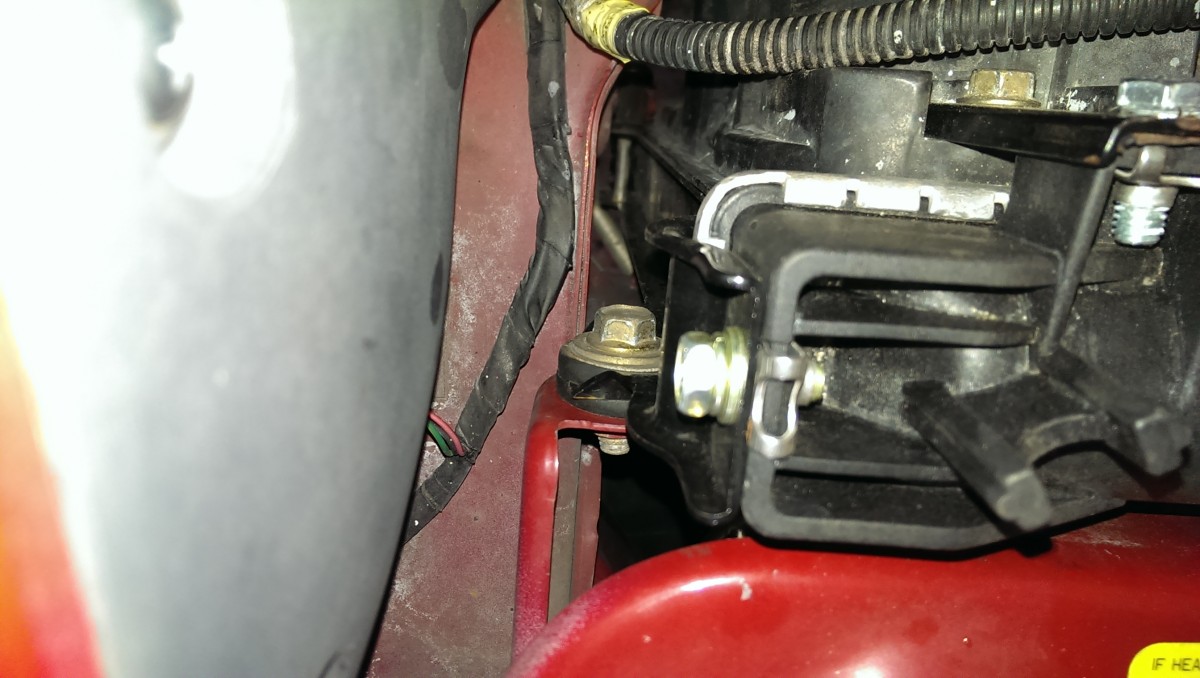
Unplug the crankshaft position sensor, 96-97 only
Undo this ground near the throttle body
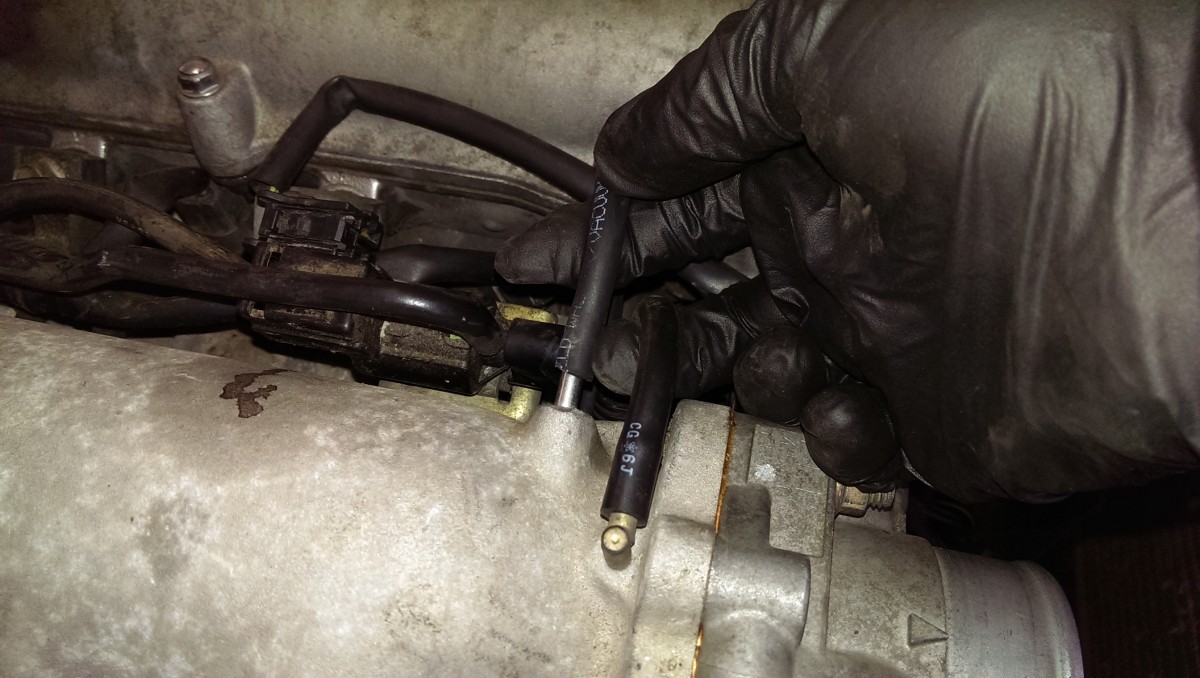
Throttle body vacuum lines – you may have one
These vacuum lines need to be removed. I actually rerouted one of my EGR lines here, so you may only have one of these.

Plug near throttle body
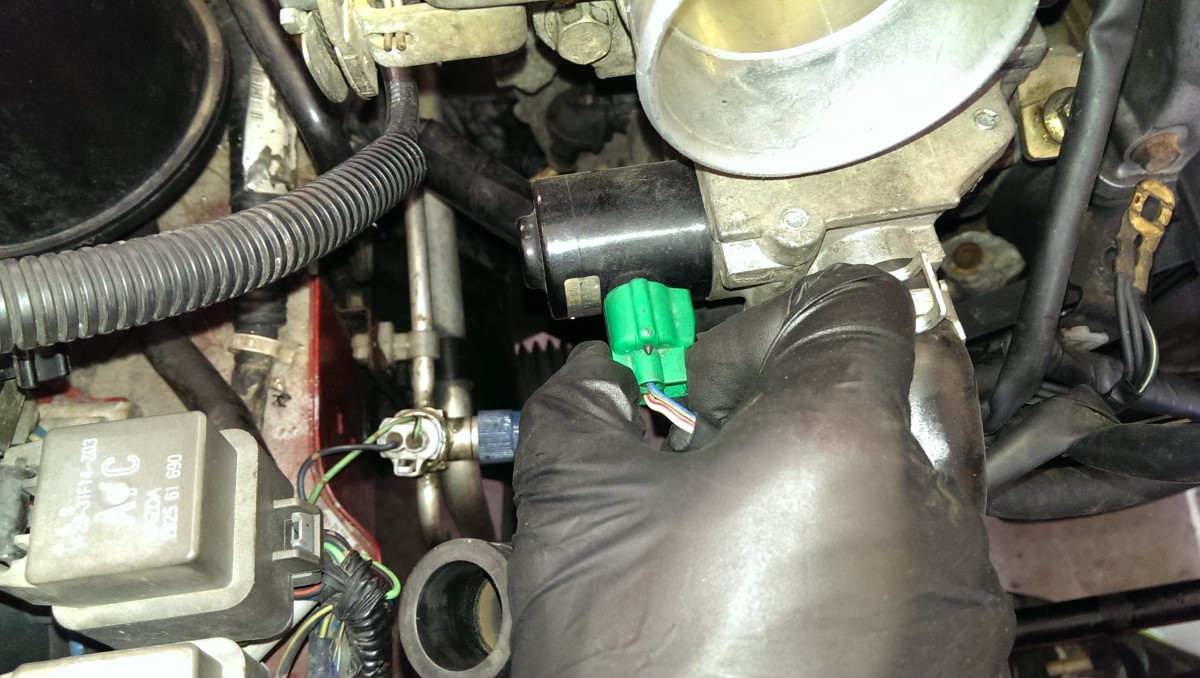
Idle air control plug
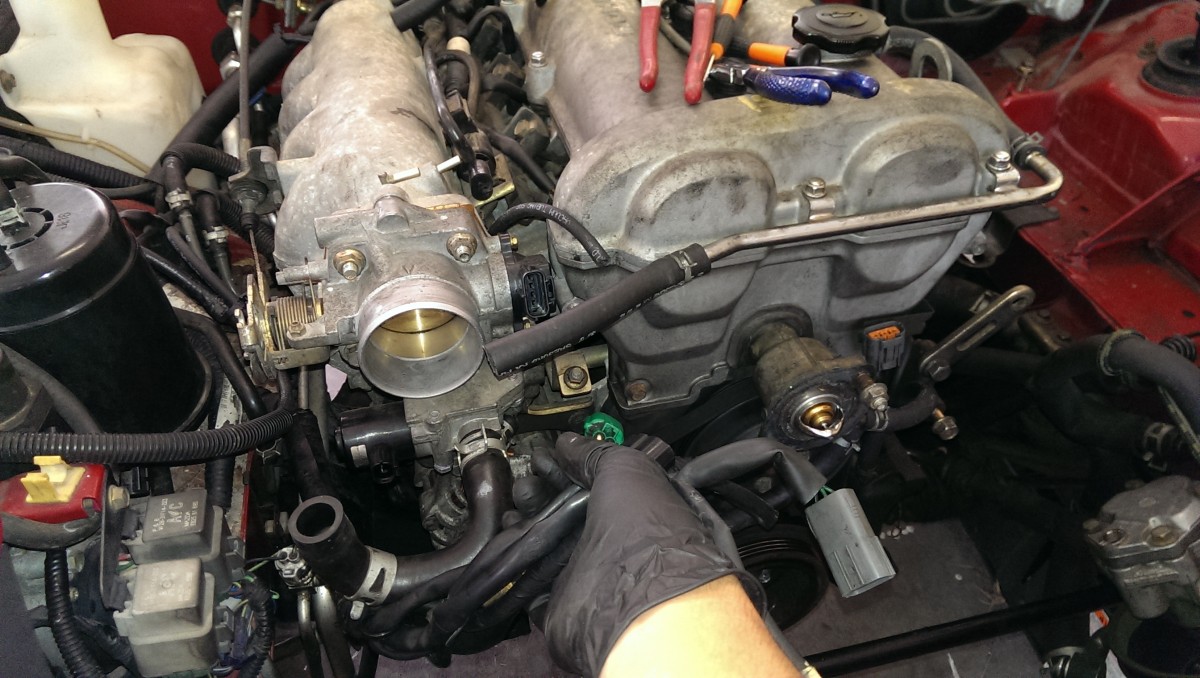
This harness is freed
Now this harness on front should be freed up.
Alternator Belt Removal
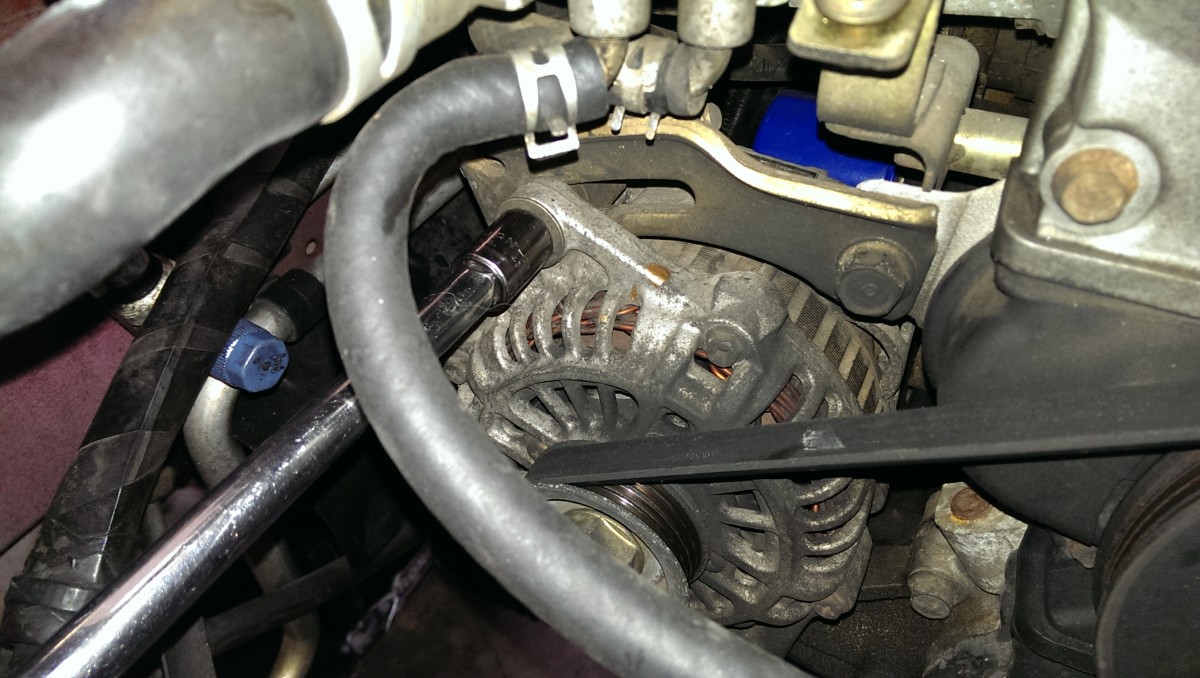
Alternator tension lock bolt
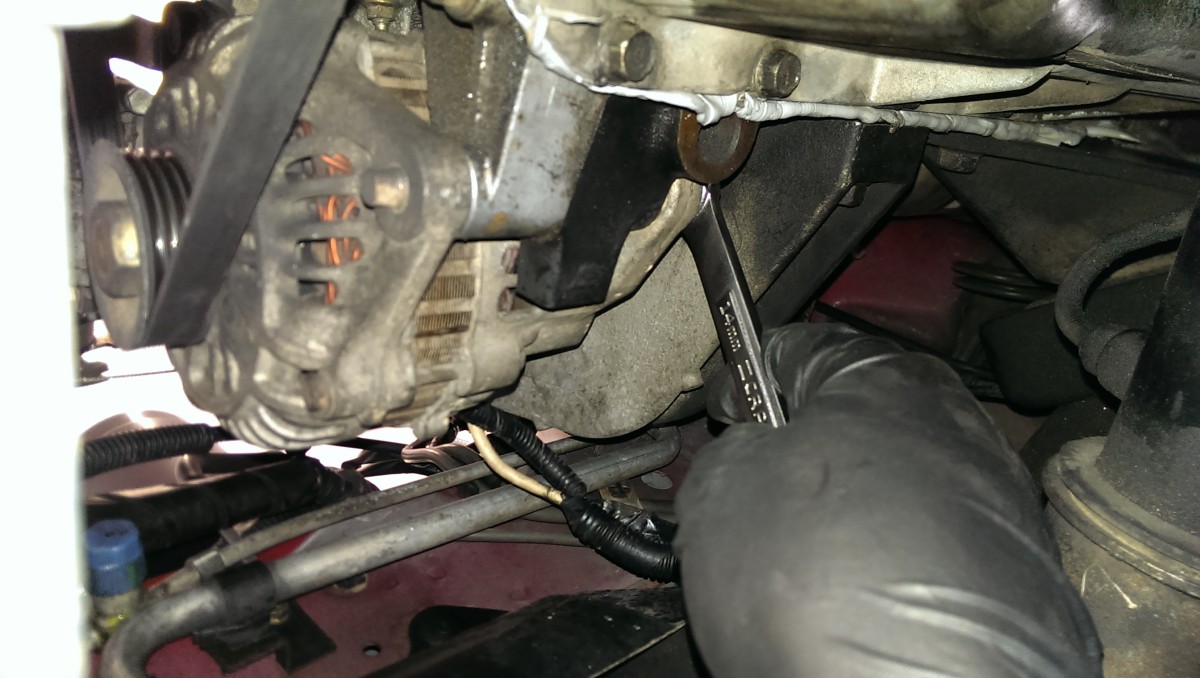
Lower mount bolt should be loosened, will remove later

Push on the alternator and the belt slips off
This is a really easy time to get to the alternator belt. The mechanism is very similar to the power steering belt. The first picture shows the wrench on the lock bolt, which needs to be loosened or removed. Then, if you get under the car, you can use a box wrench to loosen the lower mount bolt as in the second picture. As in the last picture, the belt can now be loosened and slipped off.
Intake Brace Removal
Upper intake brace bolts, socket extension helps

Lower intake brace bolt
Before the alternator will come out, there is a brace providing support between the intake and the engine block. This needs to be removed to be able to fully remove the lower alternator mounting bolt. It also provides more room in this area for the rest of the process. Removing this brace can also make it easier to get to a stuck oil filter during oil changes. There are two bolts on top and one on the bottom.
Alternator Removal

Alternator positive and negative wire – make sure the battery is unplugged!
It goes without saying, but make sure the battery is already unplugged before doing this part. There are two large wires for positive and ground connecting the alternator to the battery and the rest of the electrical system. It was difficult to get a picture of, but there are two wires that bolt onto the alternator itself that need to be removed.

Much more space now with the alternator gone
Once that is done, the lower alternator mounting bolt that was loosened earlier can be removed. If the lock bolt on top is also removed, the alternator can simply be pulled or pried off of the block. You can see I left the tensioning mechanism bolted to the block in the top of this picture. It does not have to be removed.
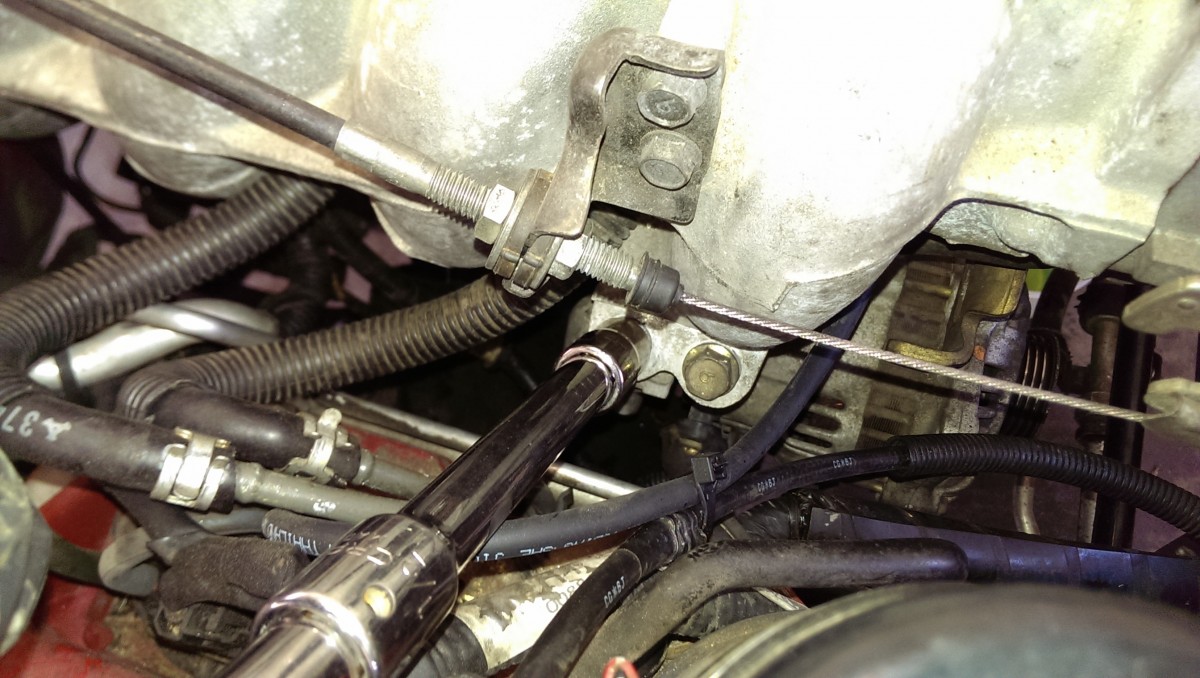
Accelerator Cable Removal
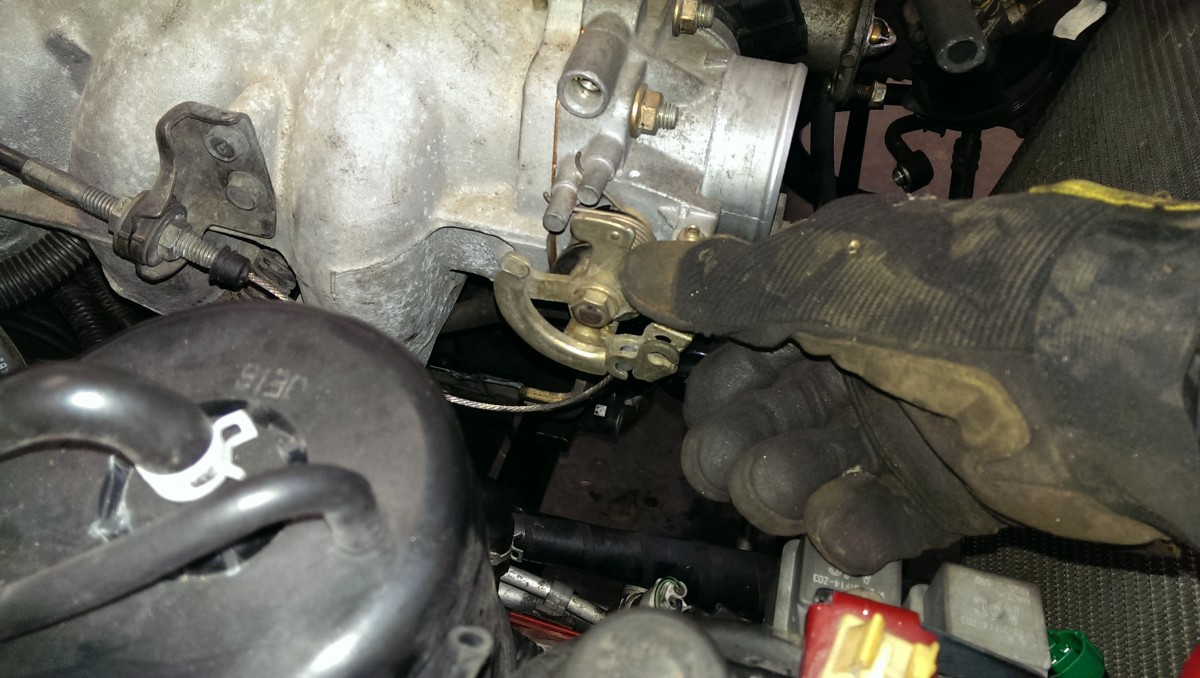
Push the accelerator down and slip the cable out

Unbolt the accelerator bracket
Miatas have a real accelerator cable connected to the throttle body, they are not throttle by wire. Simply manually depress the horseshoe-shaped place where the cable hooks in, and slip the cable out. Then, you can unbolt the bracket from the intake, and the cable will be free and can be moved aside. You could also instead undo the cable from the bracket, but then you have to readjust the throttle when the engine goes back in.
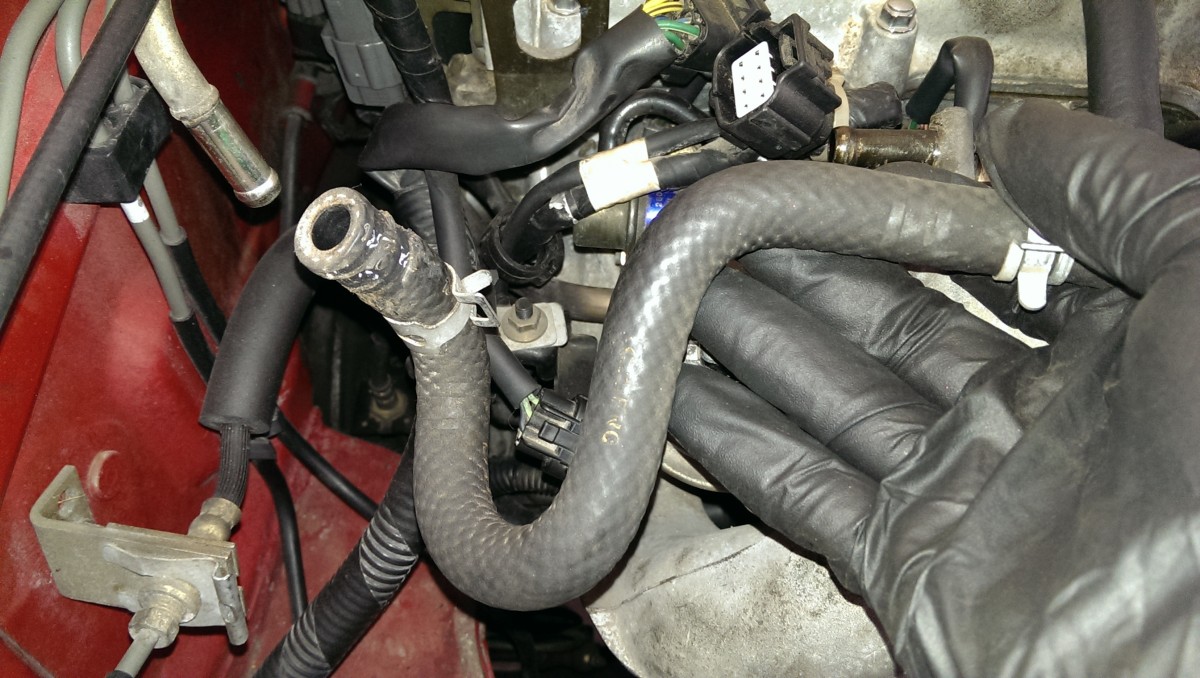
Misc Electric and Vacuum Connection Removal Part 2
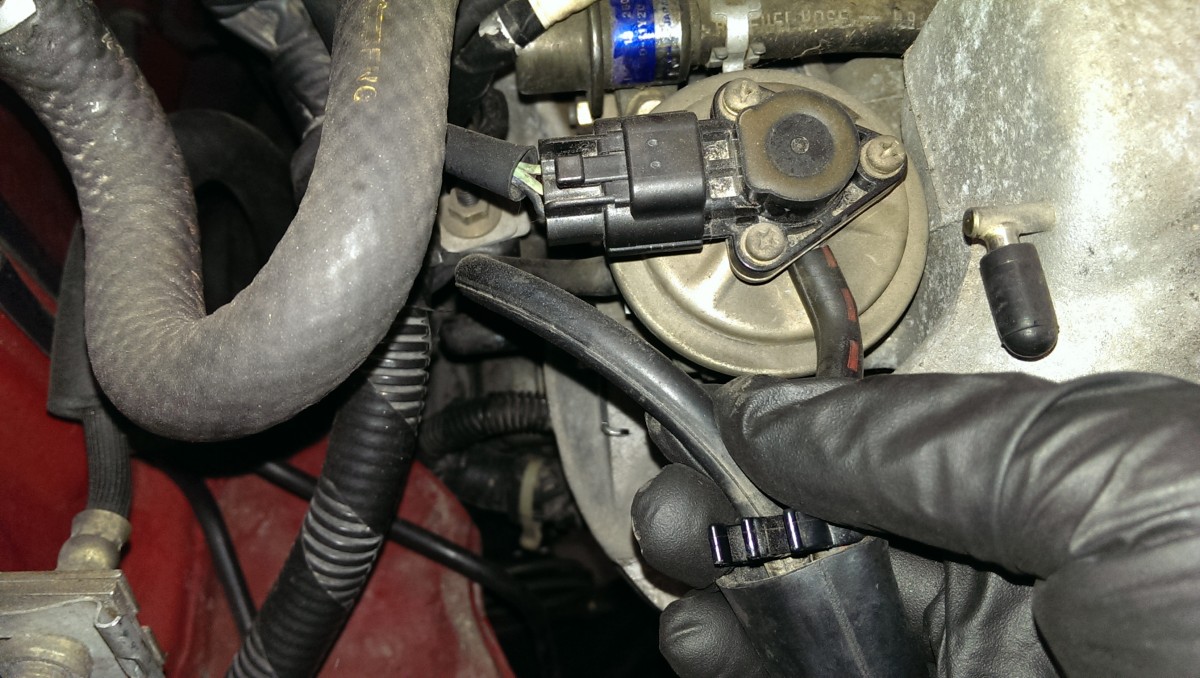
EGR valve has two vacuum lines
Lower EGR vacuum line with hose clamp removed
Now you can get the EGR valve connections out of the way. There are two vacuum lines going to it on a 96-97 car like this one. 90-93 shouldn’t have EGR, and the 94-95’s should only have the top line. I got a zoomed-in shot of the lower line, so you can see that it has a small hose clamp on it that needs to be removed.
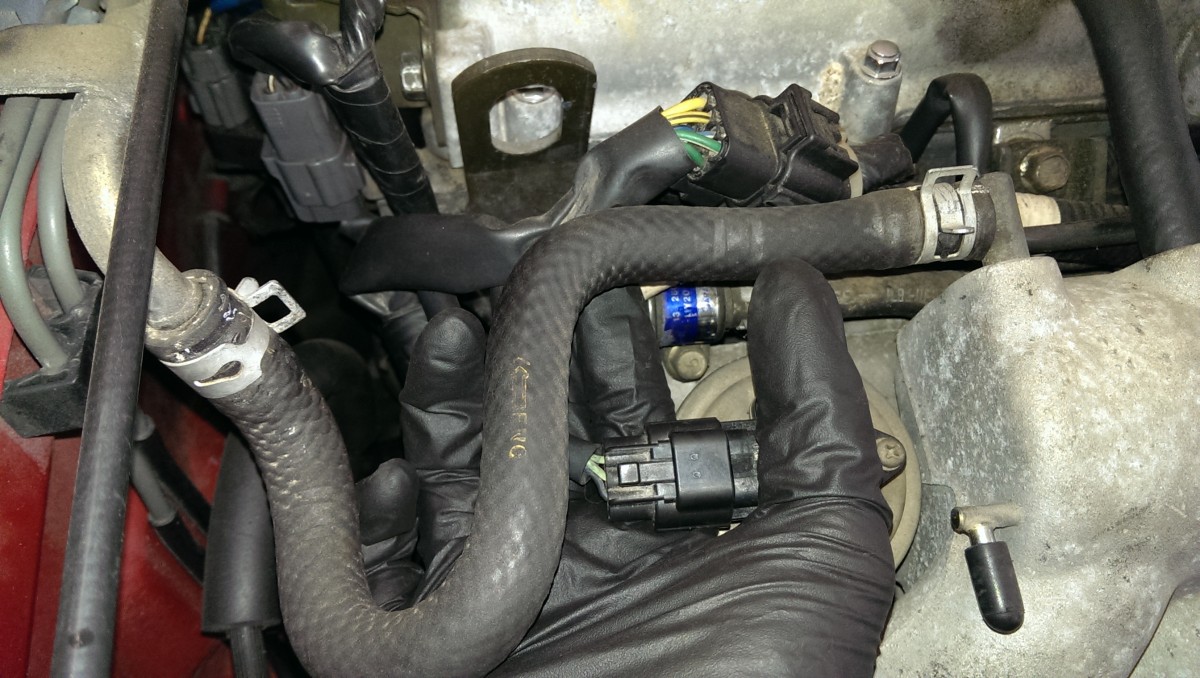
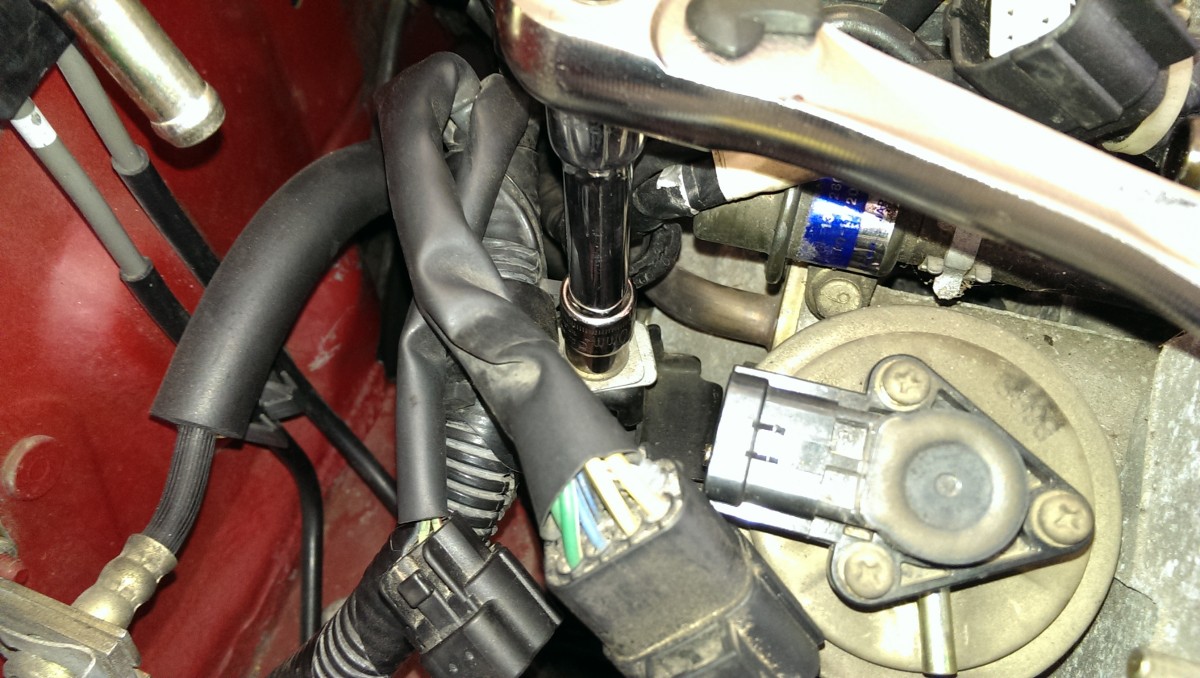
EGR wire plug
Vacuum line that blocks EGR removal
With the hose clamp out of the way, you can unplug the EGR electrical connection and also remove this large vacuum line that sits in the way of the rest of the wiring at the back of the engine. Note that the EGR valve itself doesn’t need to be removed.
Ground wire behind intake manifold
Next there is a ground wire behind the air intake that needs to be removed with a decent-length socket. You can see in the picture that I also disconnected the plug directly next to the EGR valve, above it in the picture.

Plug at back of head
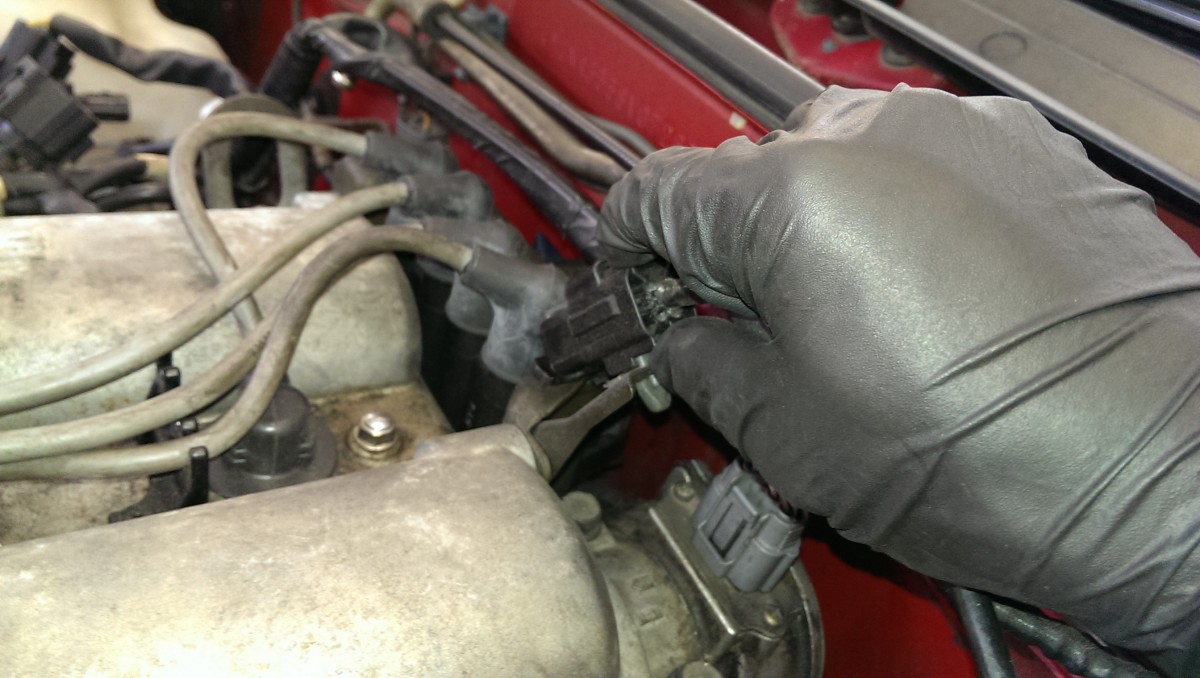
Front O2 sensor plug removal

Removing CAS plug
Then, a few connections need to be unplugged. Some plug at the back of the head between the coil pack and the EGR, etc needs to come out, as well as the cam angle sensor plug and the O2 sensor plug, all of which are pictured.

Harness for back of the head fully unplugged
At this point, the bundle of wires you have been unplugging should all come out as a unit. I usually tuck them over near the windshield washer bottle, but do whatever gets them out of the way.
Cam Angle Sensor and Coilpack Removal
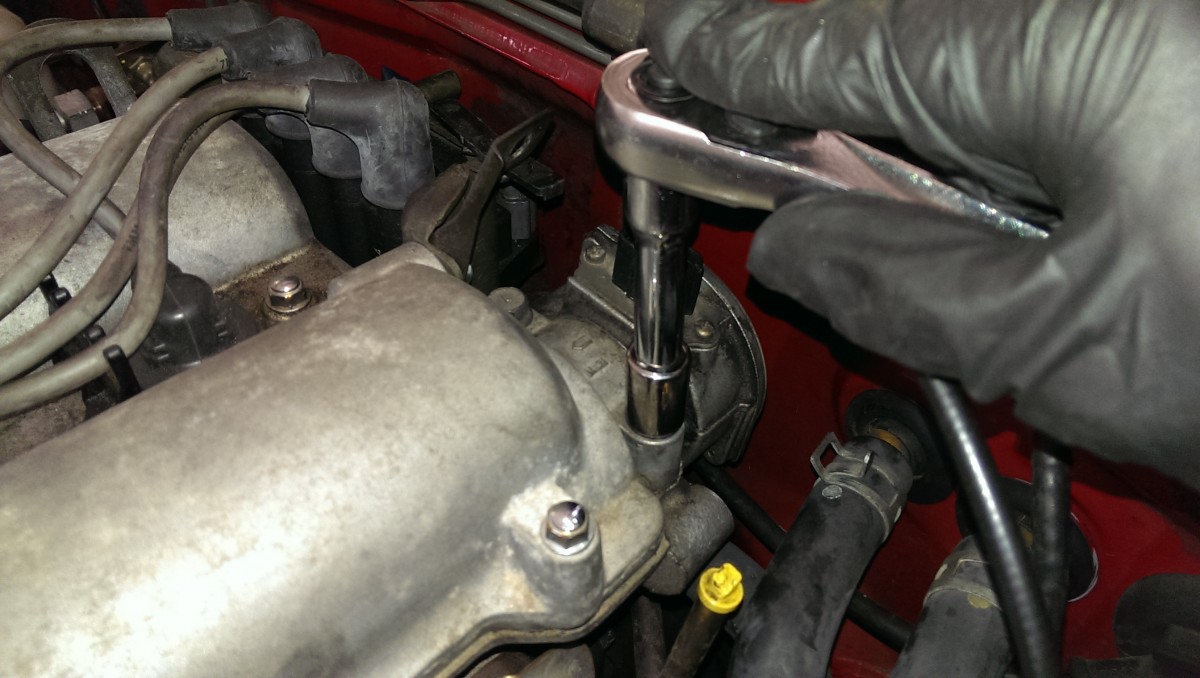
Cam angle sensor bolt, there are two to remove on top here
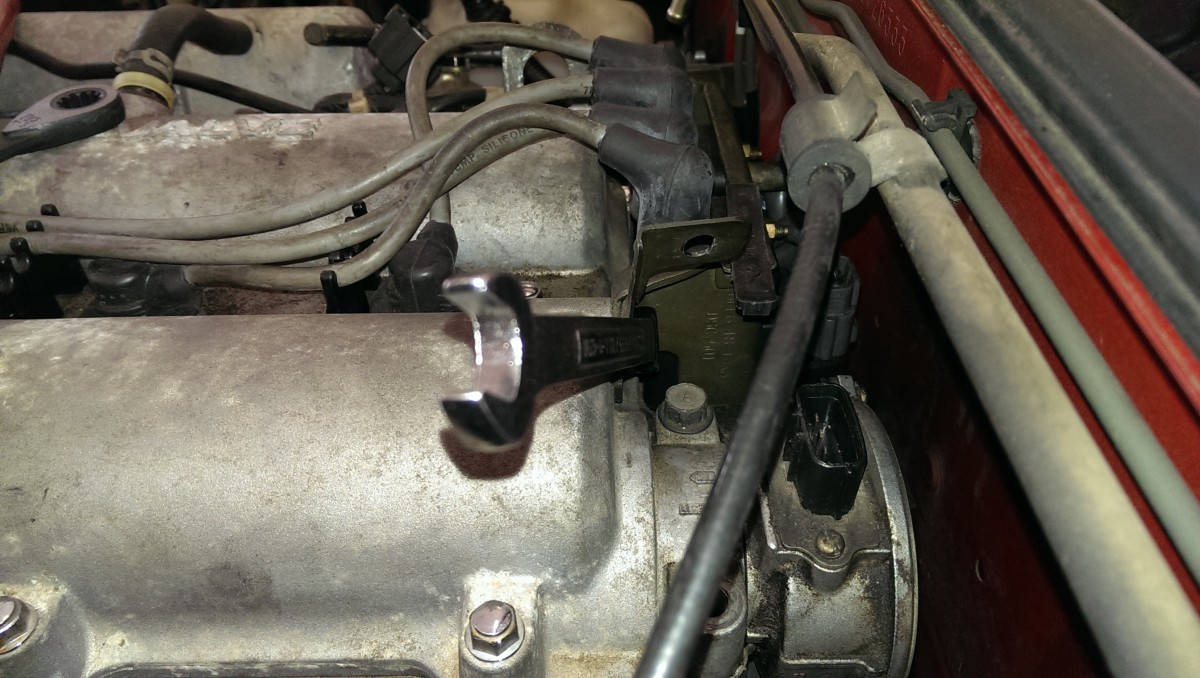
Driver’s side coil pack bolt
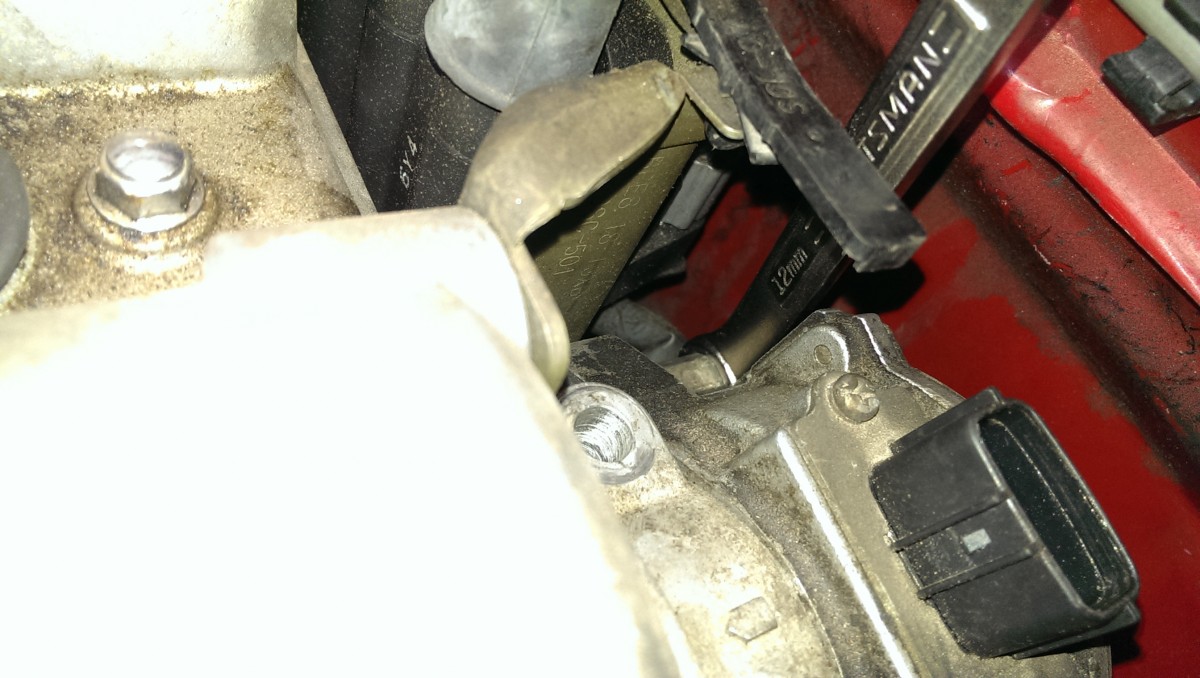
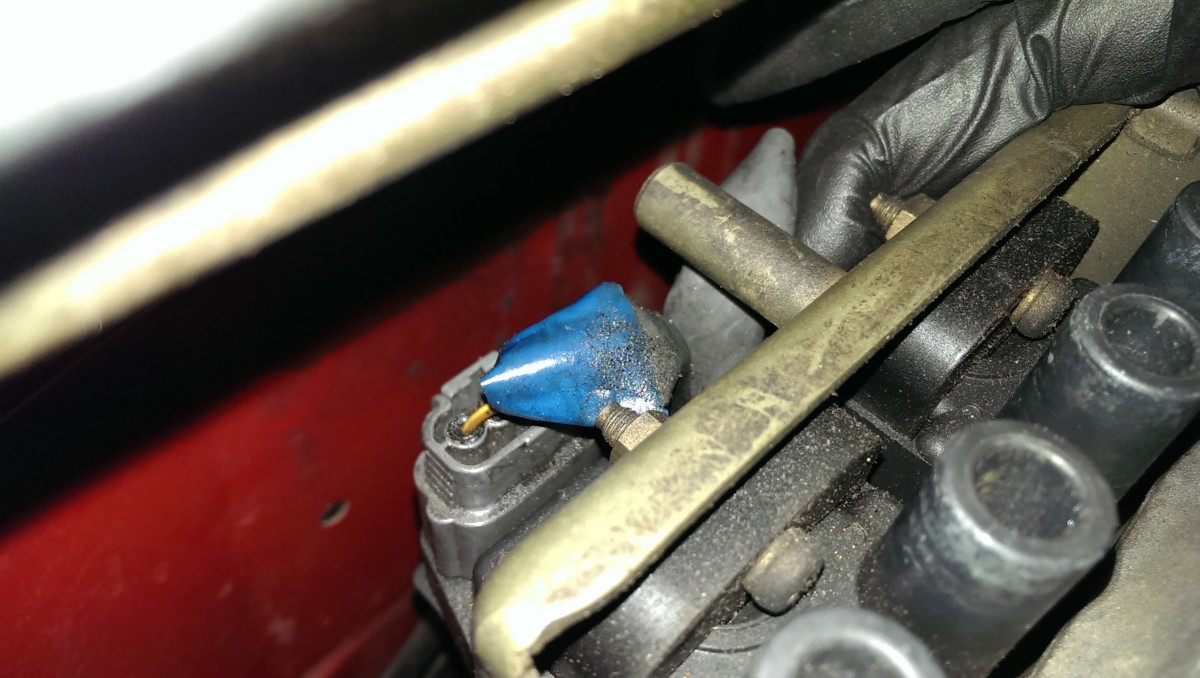
The CAS has one bolt used for adjustment at the back that has to be removed
The cam angle sensor (CAS) should be removed entirely, although technically you could probably pull the engine with it still mounted; it takes a couple of 12mm wrenches. You do not want it to bang on the firewall when you’re trying to get the engine in or out, as it can be damaged. The coilpack also must come out, as it will otherwise be in the way when you try to remove the engine.
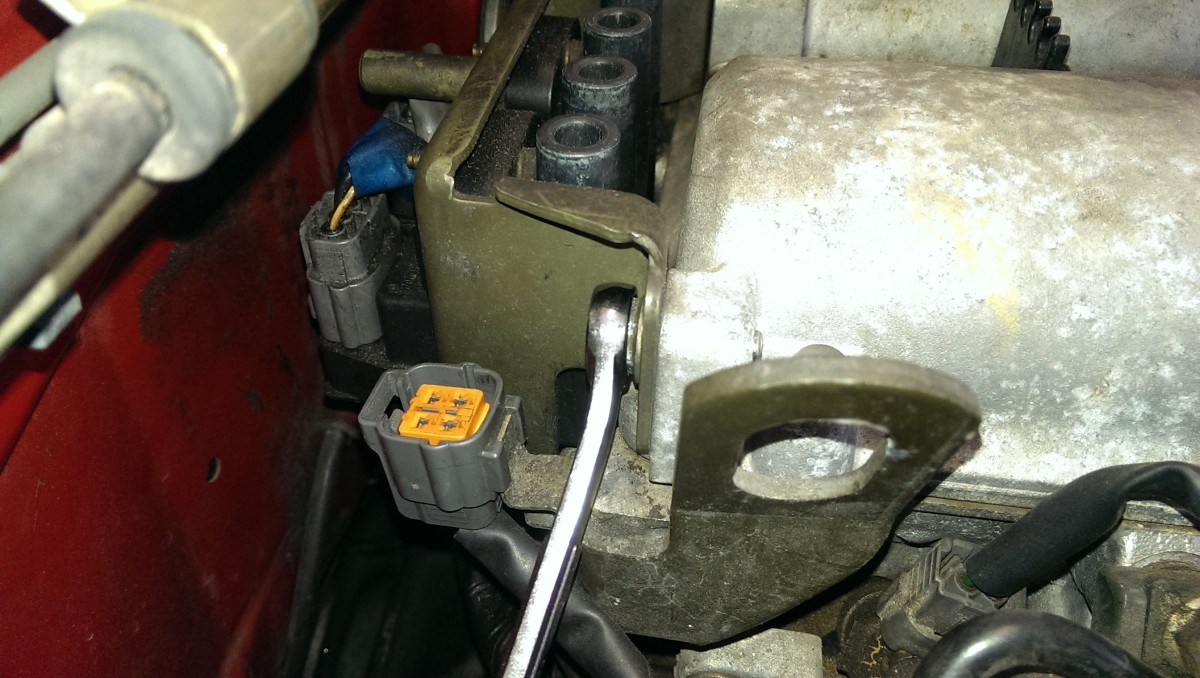
Coil pack mounting bolt on passenger side
Coil pack plugs
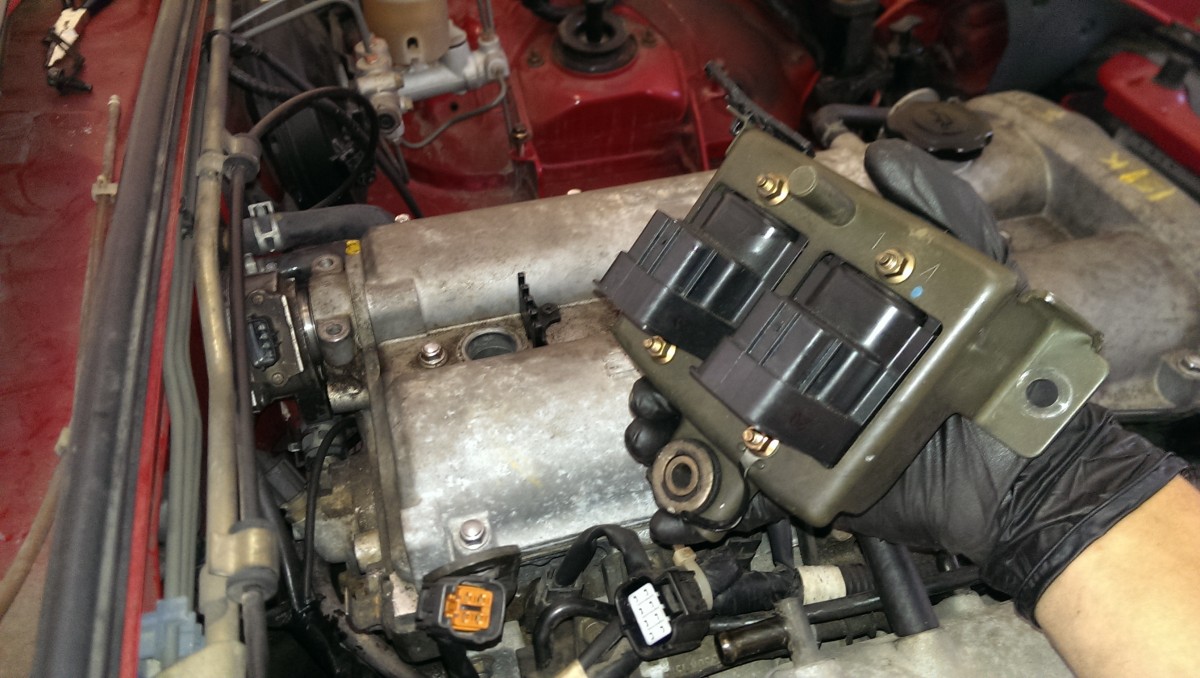
Coil pack after removal, note final bolt hole
Once you get the passenger side bolt out for the coil pack, you may be able to unplug the two plugs in the top of it and pull it out. I say may because I had already removed the coil pack in the past. In the picture with it removed, you can see a third bolt hole at the bottom. The stock configuration is to have 3 bolts, and this third one is a real pain to get to. It simply requires patience, small hands, and a box wrench. Once you get this out, many people opt to skip this third bolt to make removal easier in the future. With the coil pack out, the CAS can get pulled out as well fairly easily.
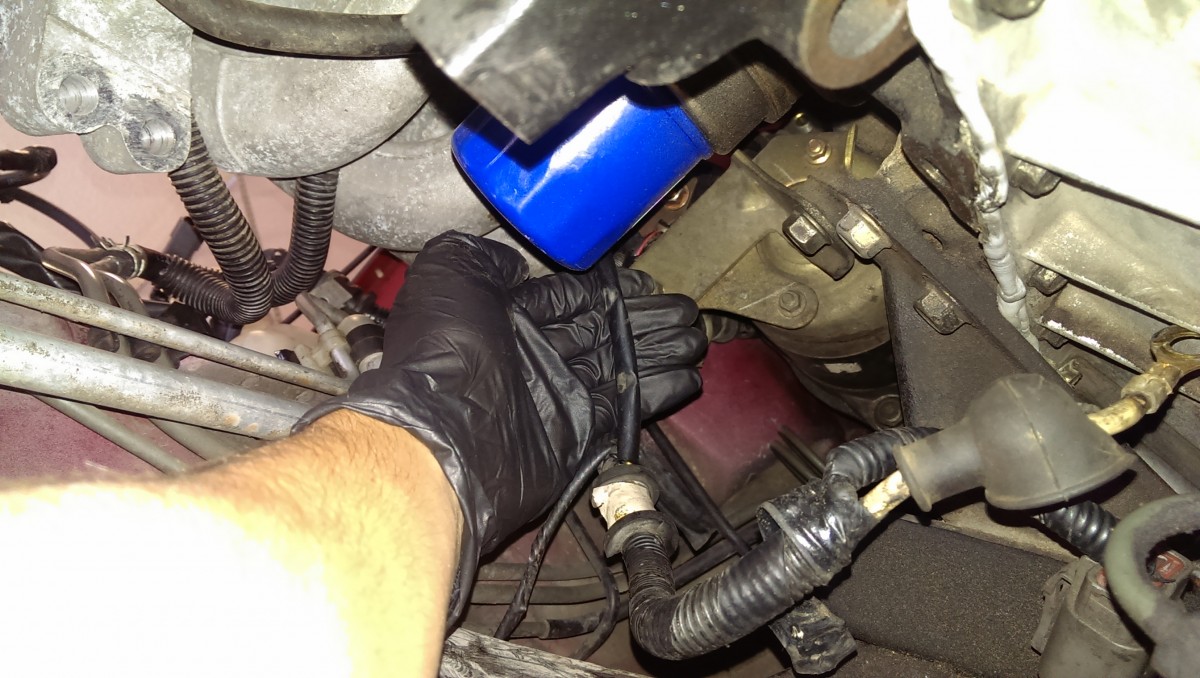
Misc Electric and Vacuum Connection Removal Part 3
Ground wire on driver’s side
This ground wire is quick to undo. It sits behind the exhaust underneath the CAS.
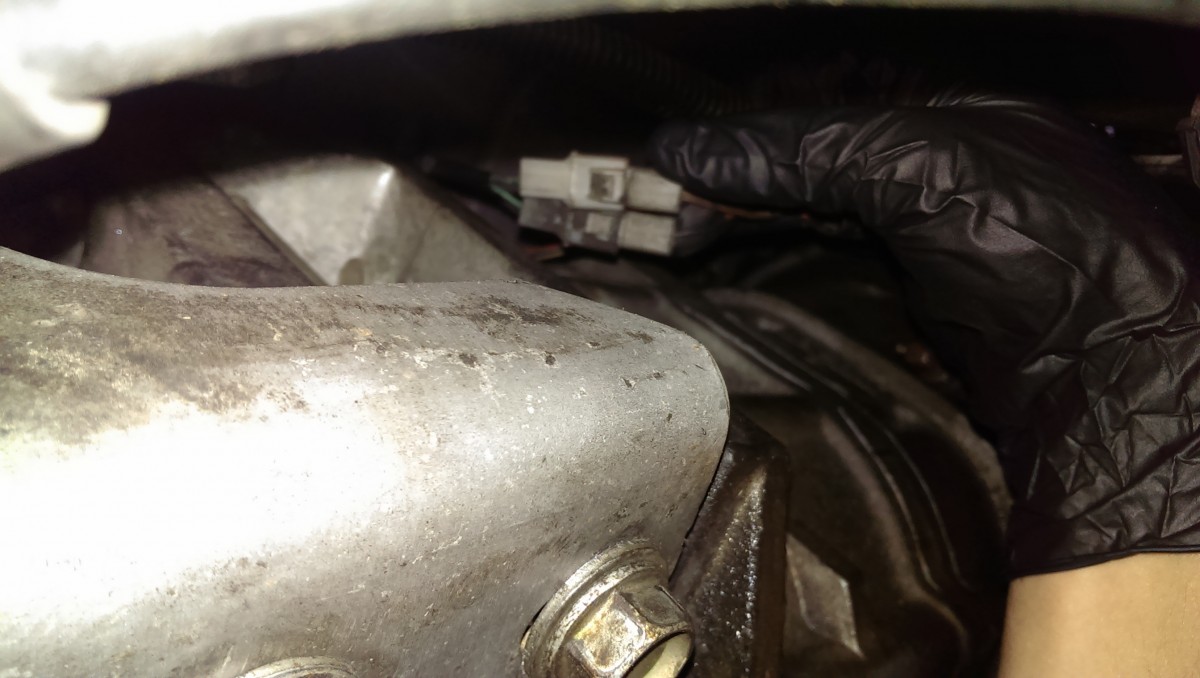
Started needs to be unplugged
Another view of the starter wires
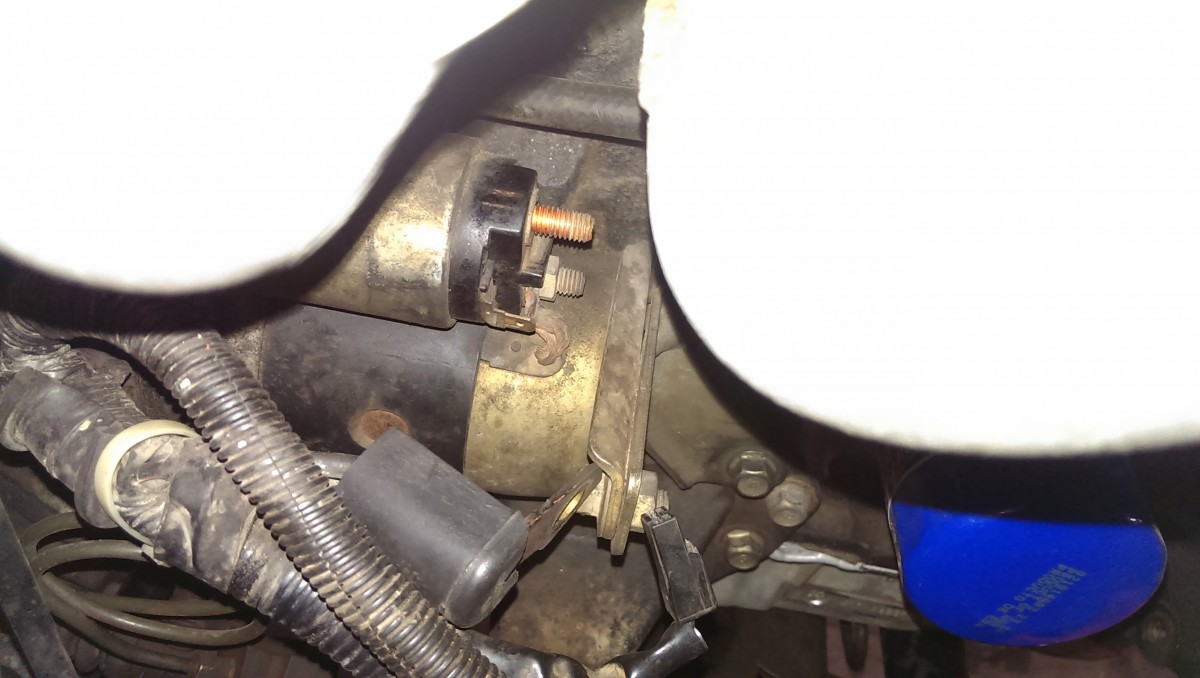
Starter wires after removal
The starter needs to be unplugged, but not removed. As long as it isn’t still plugged in, it can remain bolted to the motor and transmission. It’s much easier to take off with the engine out of the car. There are two wires. One is a large ground plug that needs to be unbolted, and the other is a small plug that you can pinch and pull.
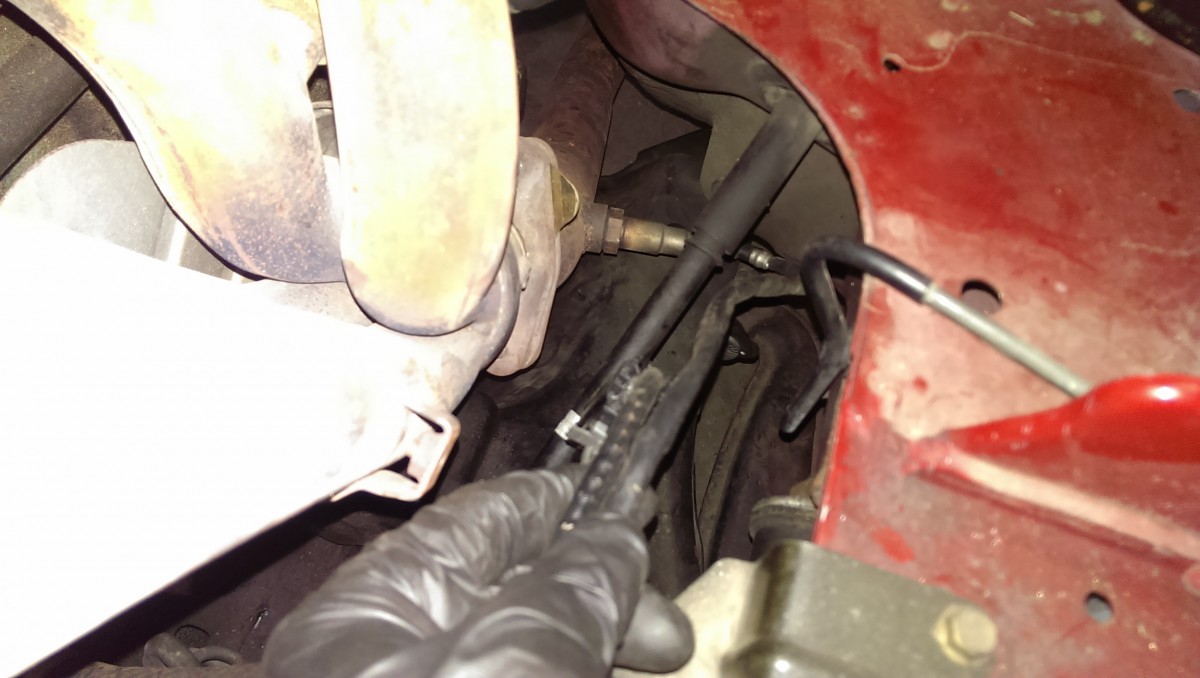
Clutch Line
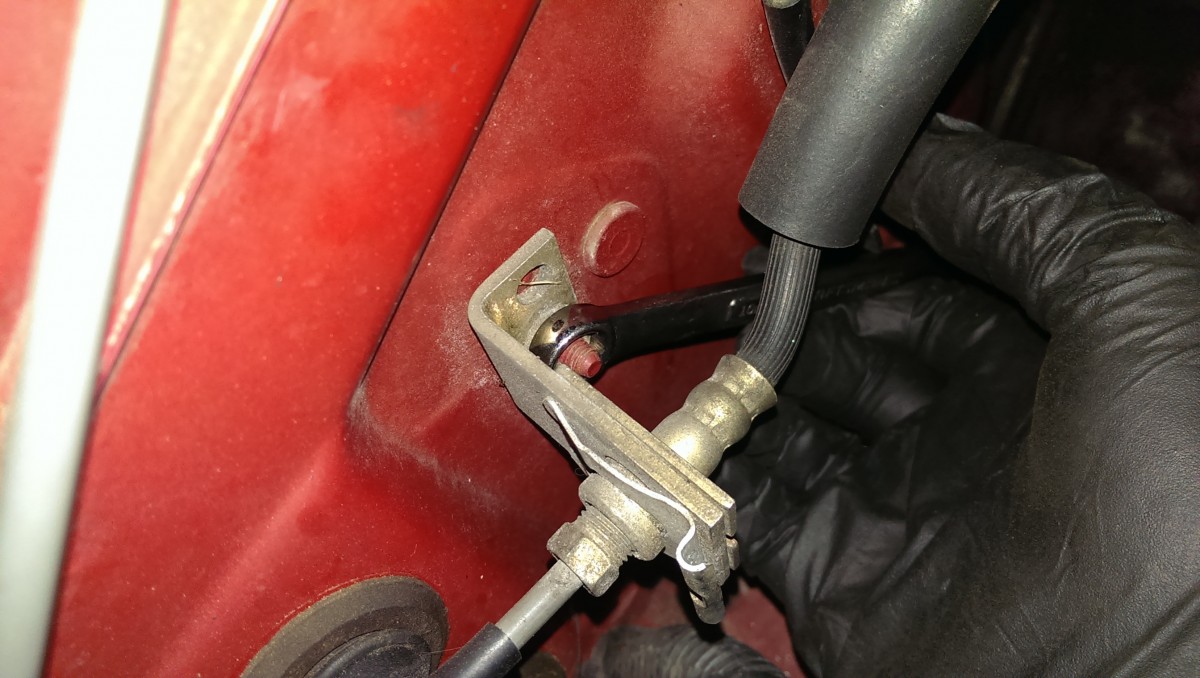
Clutch line bracket behind EGR valve / intake
The clutch slave cylinder and line need to be disconnected from the motor and transmission. There’s a bracket on the passenger side of the engine bay along the firewall that holds the line that comes out easily.
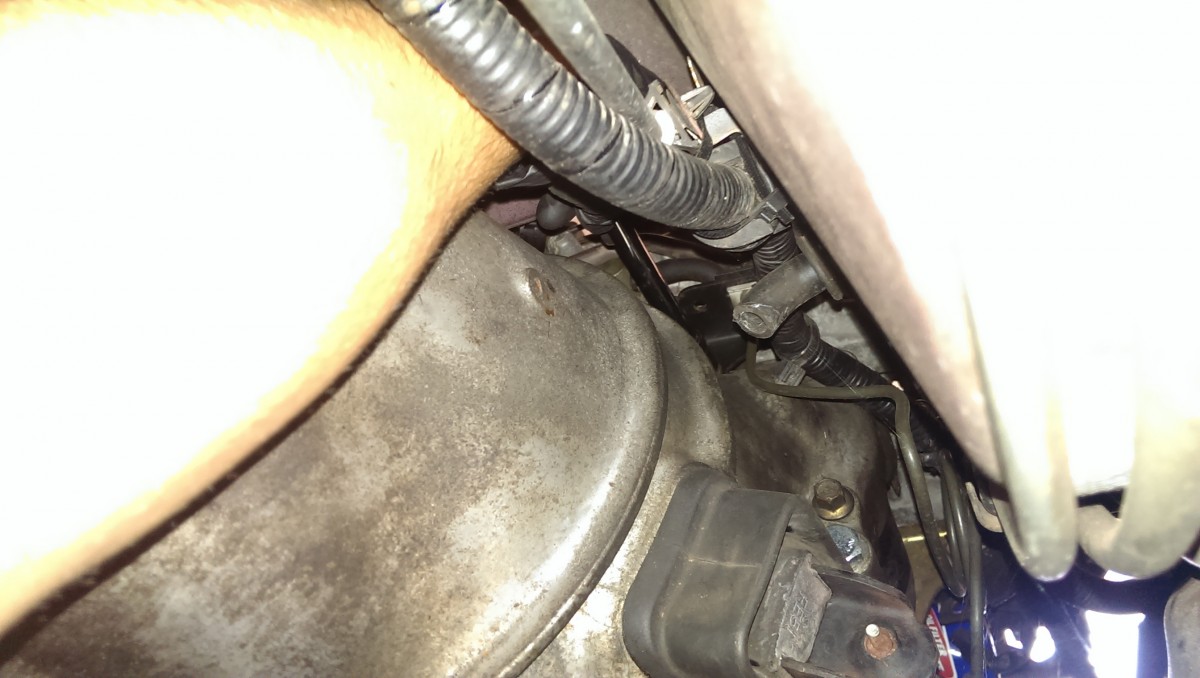
Upper clutch line bracket, can be tough to get to
There is another bracket as pictured up near the top of the transmission, where the transmission and engine meet. It can be a pain to get to.

Clutch slave cylinder has two bolts
Then, you can follow the clutch line down to the clutch slave cylinder. It hooks in where the boot on the transmission is; it’s fairly obvious. There are two bolts holding it down. You can undo them and pull it off, then tie the clutch line and slave cylinder out of the way.
When the engine is reinstalled, the clutch will probably have to be bled, since the cylinder will probably spring out and let in air. There is a bleeder screw on the slave cylinder for this purpose, it simply takes regular brake fluid. Also be sure to put some grease where the cylinder hits the transmission clutch fork upon reinstallation, or you’ll hear a noise like crickets when driving.
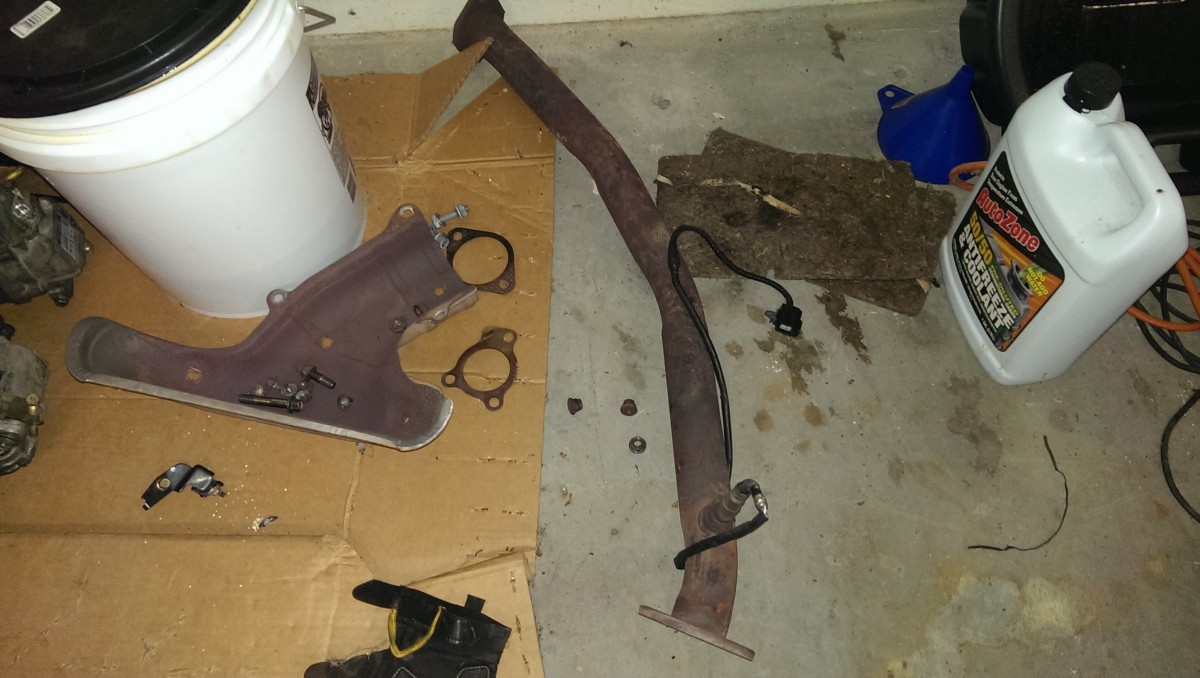
Downpipe Removal
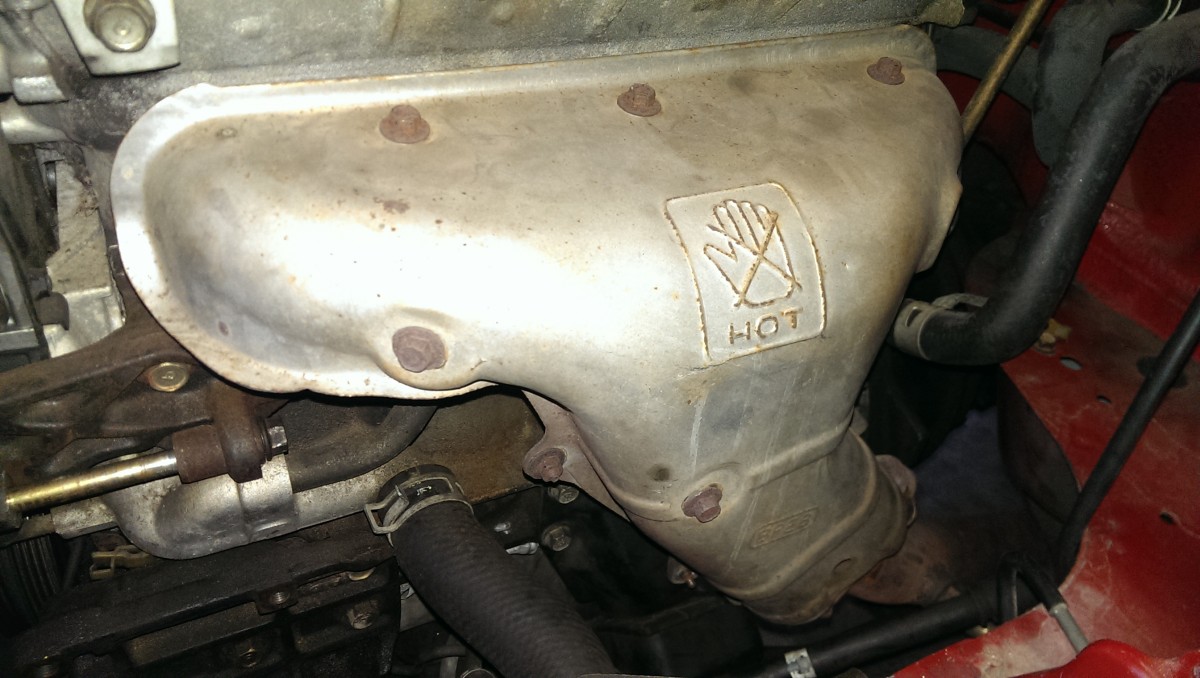
Removing the heat shield can make things easier

Upper downpipe bolts, two of three are pictured
The exhaust has to be dealt with. The exhaust manifold can stay on. The heatshield comes off really easily, though, and makes for a bit more room in this area; there are a bunch of small bolts and nuts to pull off to remove it, as pictured. The eventual goal will be to remove the exhaust downpipe, which is the pipe to the right in the second picture. It is held on with three nuts on studs. The shot is more to show what the goal is, I don’t remove it for another couple of steps.
At this point, once you start getting to the exhaust, the entire car needs to be in the air. My garage isn’t perfectly level, and so I can’t get the car on 4 jack stands and have it be level, which makes me extremely uncomfortable. What I do at this point is put the front wheels of the car on ramps, instead of the frame on jack stands. I use the floor jack for this, since of course the car is no longer driveable. At this point, be sure to chock the front tires. The parking brake does not work on the front tires. The front tires will roll. Chock them or otherwise ensure the front of the car cannot roll anywhere!Then, I put the rear of the car on jack stands and leave a floor jack under both the front crossmember and rear differential for extra safety. This way, the whole car is in the air, but half of the car is on its suspension, so it is nice and stable.
The expensive but safer and easier option is to get something like a QuickJack, assuming you intend to work on cars frequently.

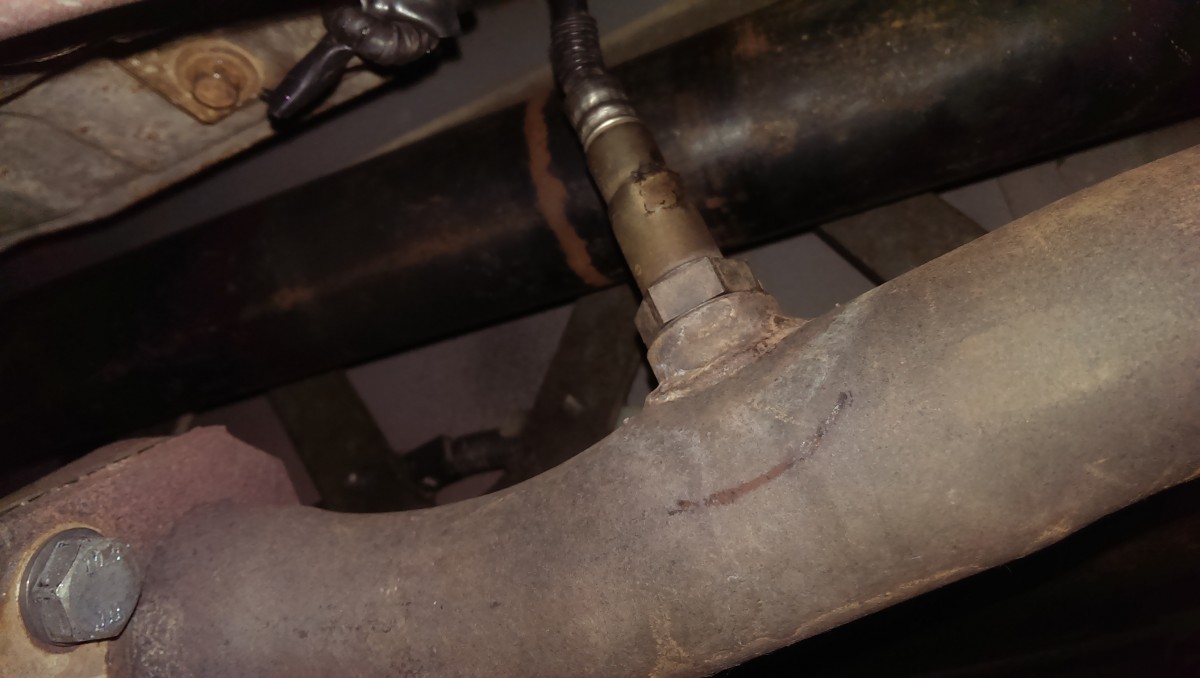
Downpipe to catalytic converter bolts
The downpipe connects to the catalytic converter with two bolts as pictured. The stock bolts are going to be extremely rusty. The last time I did this, I replaced them with new bolts, because when I reused the old bolts, they backed out and caused an exhaust leak. They should come free without too much effort. In between the downpipe and cat is a metal gasket. If it’s original or rusted out, you’ll probably need to replace it. They’re stocked at most autoparts stores, although advance and autozone each had one where I live. (You need two.)
O2 sensor wire should be unplugged already from earlier
Removing the downpipe bolts requires extensions and u-joint sockets
Downpipe removed
The front O2 sensor wire should already be unplugged from when the CAS and coil pack came out. It isn’t necessary to remove the sensor from the downpipe. However, as in the first picture, make sure that the wire is free and unsnagged so it can come out with the downpipe. Then, crawl under the engine and use some creative u-joint sockets and extensions as pictured to remove the 3 bolts.
From the factory, there is also a brace connecting the downpipe to the transmission. I didn’t choose to put it back in, because it’s annoying to deal with. If you still have this brace, you’ll have to undo the two transmission bolts first to release the downpipe from the transmission.
The last time I did this, my downpipe heat shield was also severely rusted out and making a buzzing noise around 3100rpm. This was extremely annoying, so I simply cut it all off. If yours looks different than the picture, that’s why.
Exhaust Removal
This PPF bolt is not coming out without a torch and welder
You actually have a choice here. A lot of people now will remove the Power Plant Frame (PPF), which is a brace connecting the rear differential to the transmission. The picture shows the rear two bolts that hold this in. However, while the rear one comes out easily on most cars, the front one is a different story. I cracked a 1/2″ socket using a 4′ cheater pipe over a breaker bar the last time I did this trying to get the bolt to turn. The bolt is now mangled and not coming out without either dropping the rear diff to get at it from above or welding something to the bolt.
The good news is that it’s stuck on there so well, it isn’t going anywhere. As a result, I decided to leave it alone. the issue is that the PPF gets in the way of dropping the transmission. However, if you drop the exhaust instead, you can swing the transmission around the PPF and get it out. I found this way to be much, much easier.
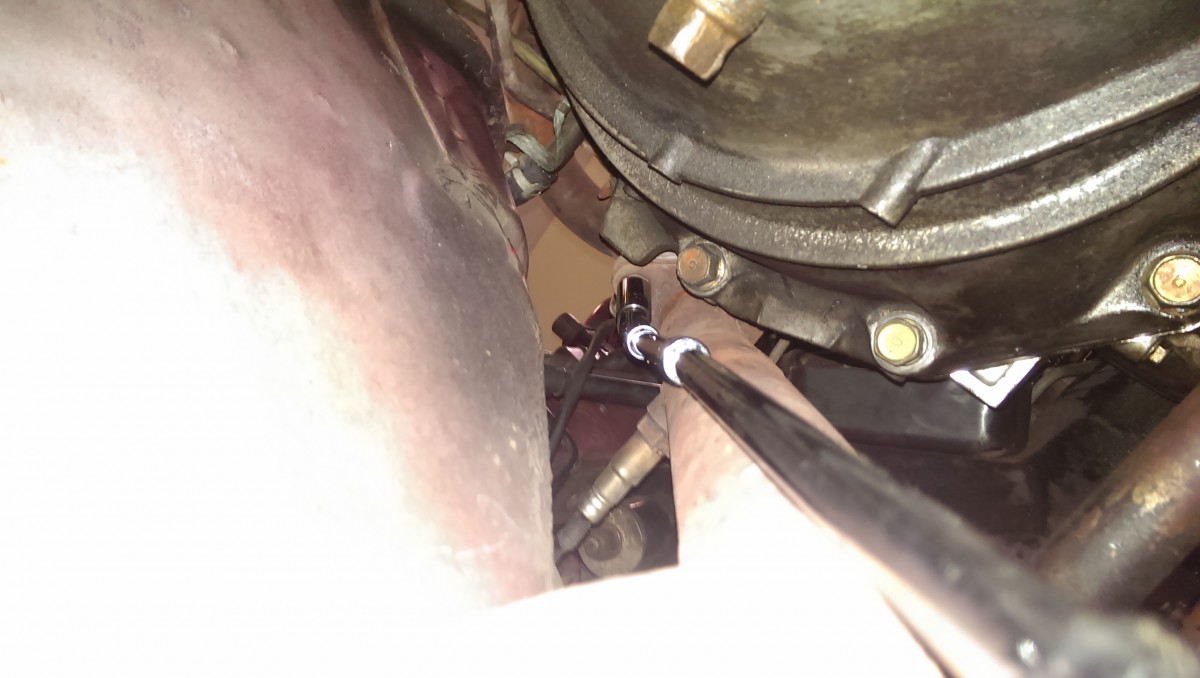
Rear O2 sensor
The catalytic converter can stay connected to the rest of the exhaust, but the rear O2 sensor needs to be removed or unplugged if there isn’t enough slack in the cable. In my case, I simply removed it with an O2 sensor socket, available at any auto parts store. The socket is offset from the wrench and has a slot for the cable to fit through; using a regular wrench on an O2 sensor can damage it.
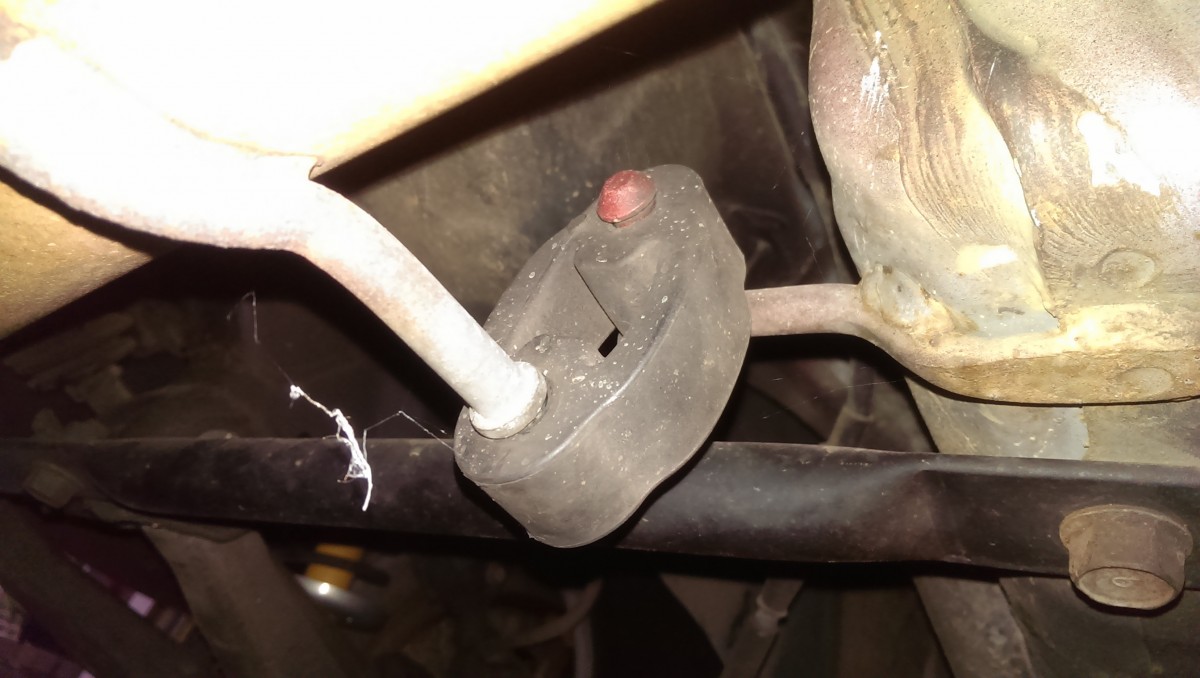
Exhaust hangers simply pull off
Then, there are 3-4 of these exhaust hangers holding the exhaust to the body of the car. They’re made of rubber and simply pull off. I found spraying them with silicone lubricant helped them slide off if they’ve been sitting awhile.
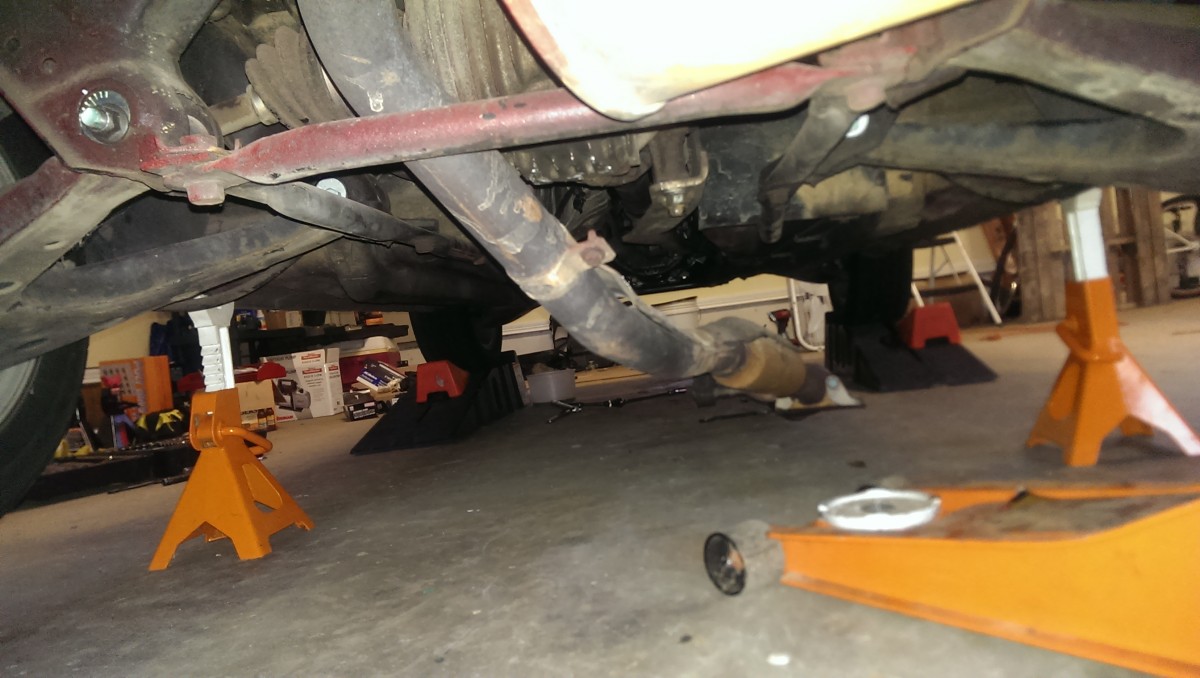
This is good enough
Then, the exhaust doesn’t even need to come out all of the way. I simply pushed it over to the right, underneath the PPF, so that the transmission can come down to the left (driver’s side) around it. Actually getting the muffler out, etc, is a pain, since this is one long piece.
Drain the Transmission

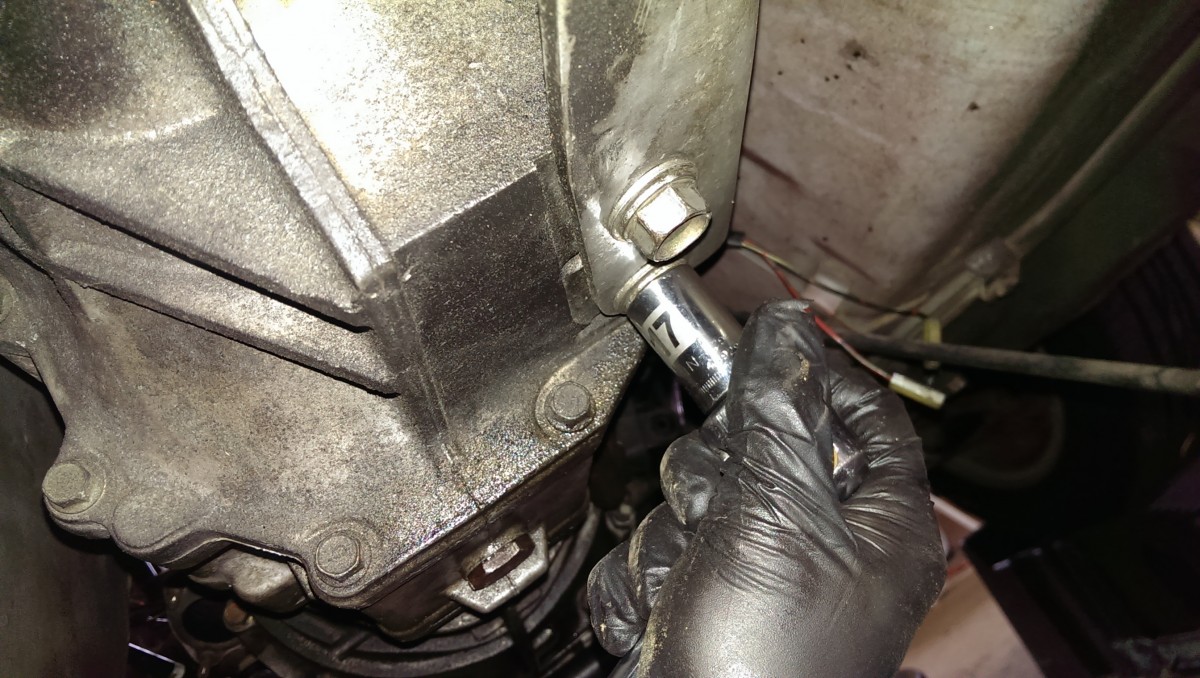
Transmission fill plug takes 9/16″ double square socket
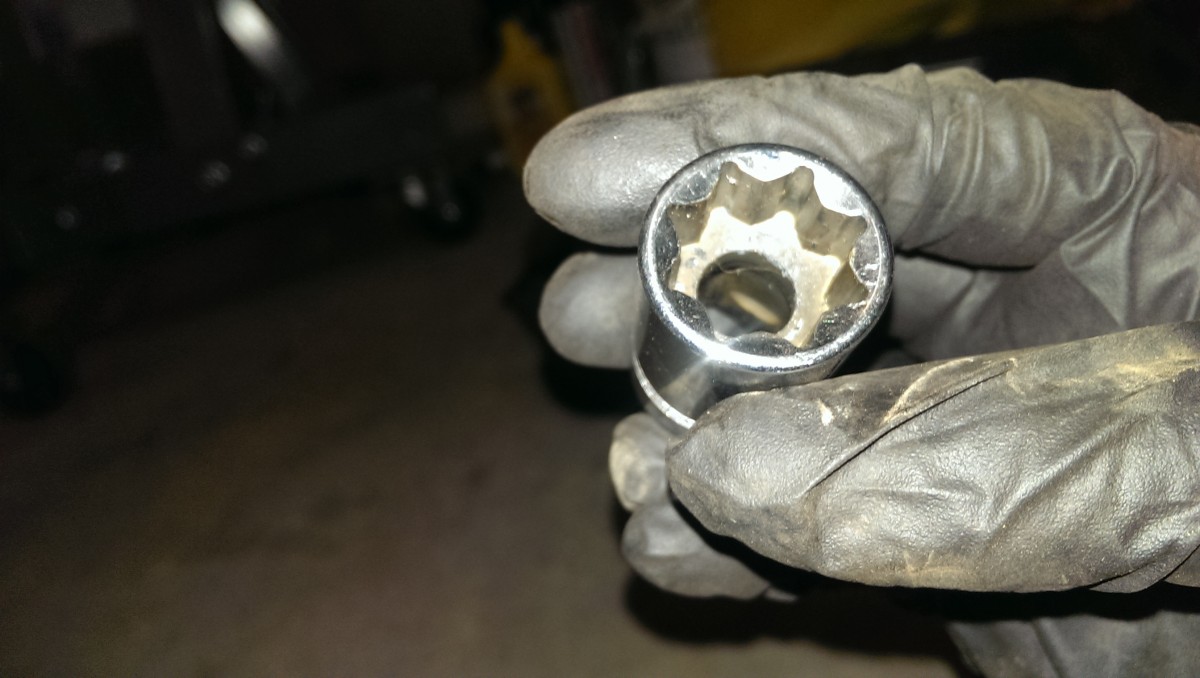
9/16″ double square socket for fill plug
If you were just changing transmission fluid, it would be critical to ensure you can remove the fill plug before draining the oil, so you could still drive the car if there were a problem. Since this is a tutorial on engine removal, presumably this is less of a concern. Technically, you could skip this step. However, I find it best to bust loose the fill plug, as the airflow helps the transmission drain faster. The correct socket is a 9/16″ double square. People use alternatives, but people also round off these bolts; I prefer to source the right one.

Transmission drain plug
With the fill plug removed, you can remove this plug to start the oil draining. Have a pan ready underneath to catch it. I believe it takes a 22mm socket, but it could be 21 or 23.
Shifter Removal
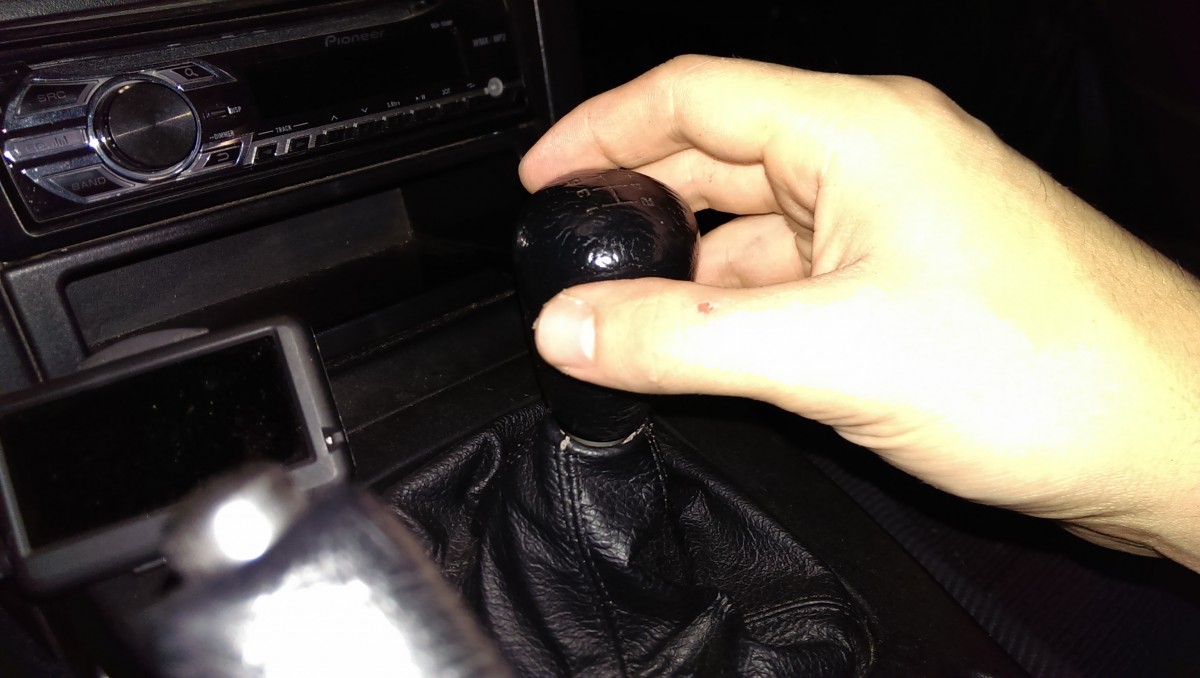
Shifter knob simply spins off, lefty loosey
The shifter needs to come entirely out. The knob simply spins off counter-clockwise, it’s threaded on.
There are 5 console screws like this

Pull console off around gas cap and trunk levers
The plastic console comes out by removing 5 screws, one of them is pictured. There are two more inside the compartment to the back at the bottom, and the final two on either side of the shifter. Once they come out, you can lift the console up off of the shifter in front, and then pull it towards the hood of the car, sliding the rubber grommet over the gas cap and trunk levers as pictured. There are two cable plugs to unplug as well.

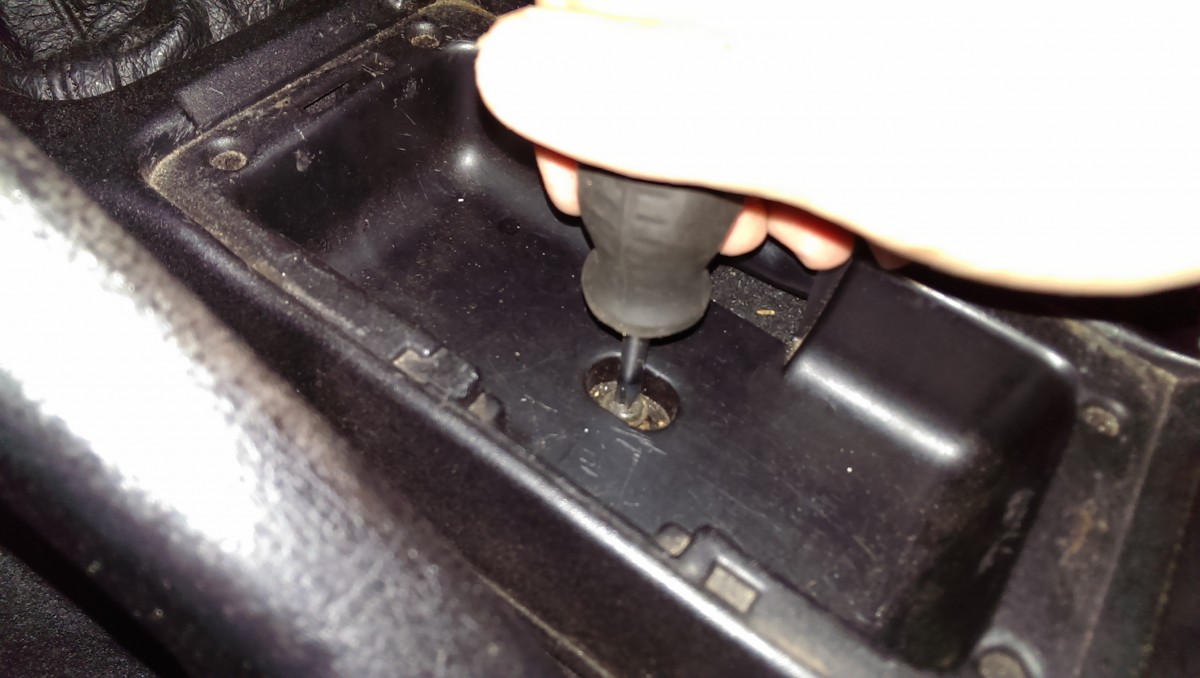
Upper shifter boot has four bolts

Lower shifter boot has 3 bolts
Next, the shifter boots need to come out. You may have dirty insulation in this area, I chucked mine a long time ago. If so, simply pull it off. Then, the upper shifter boot unbolts with 4 bolts, and lifts off. Then, unbolt the 3 bolts for the lower boot, and the entire shifter lifts out.
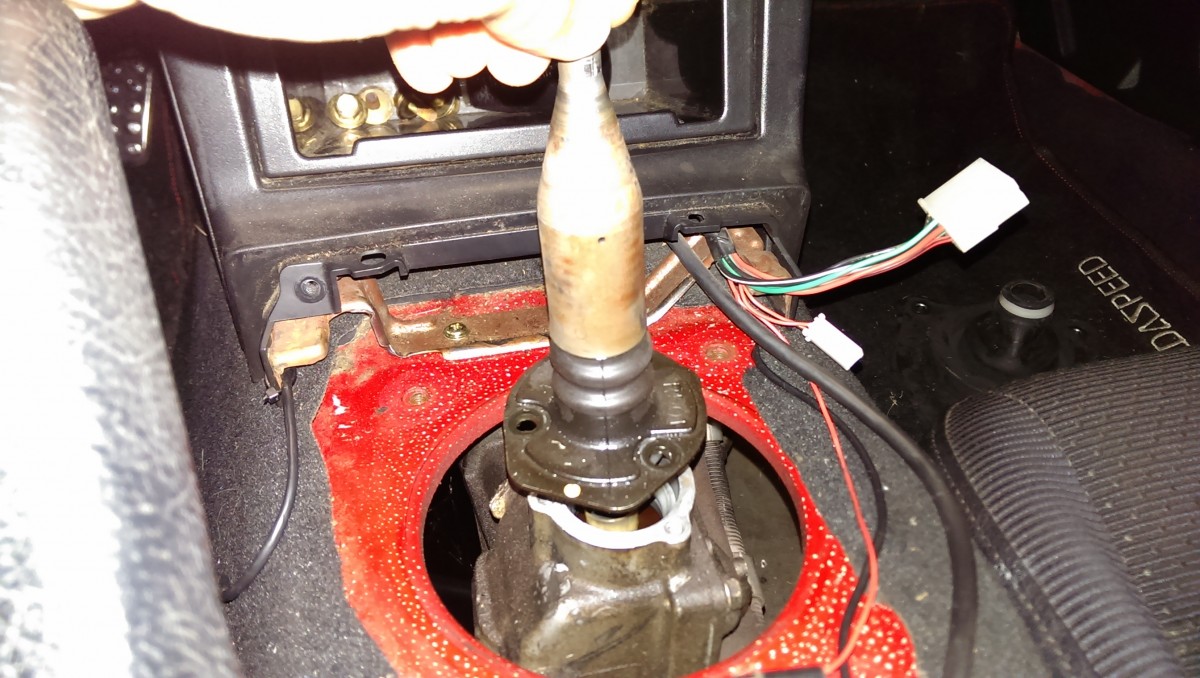
Shifter simply pulls up with the lower boot unbolted
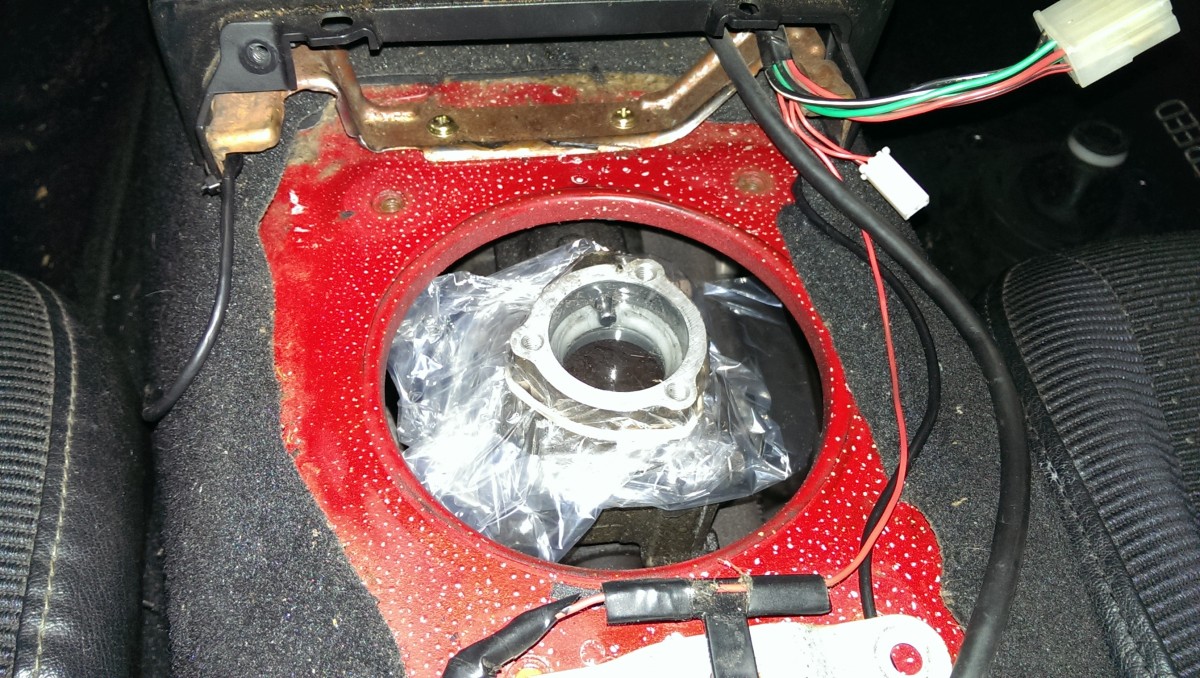
You can cover the shifter turret with plastic and a rubber band
With the lower boot unbolted, the shifter simply lifts up and out as pictured. Then, you can cover the turret with plastic wrap/bag and a rubber band to prevent dirt and grime from getting in it.
Freeing the Transmission

Speedometer cable unscrews and pulls off
By doing the exhaust removal method, most of the wiring clipped to the PPF can actually stay in place. Anything directly attached to the transmission, though, still has to come off. First is the speedometer cable. It simply has a threaded round nut-thing on the outside of it that unscrews, and it pulls out.
Reverse and neutral wires just unplug
There are also two signal wires for the reverse lights and neutral sensing on top of the transmission, and they simply unplug.
Front PPF bolts do have to come out
Even though we were able to skip removing the rear PPF bolts, the ones in front do have to come out to free up the transmission. Fortunately, these come out much more easily with an impact or a decent breaker bar. There are two at the very front.
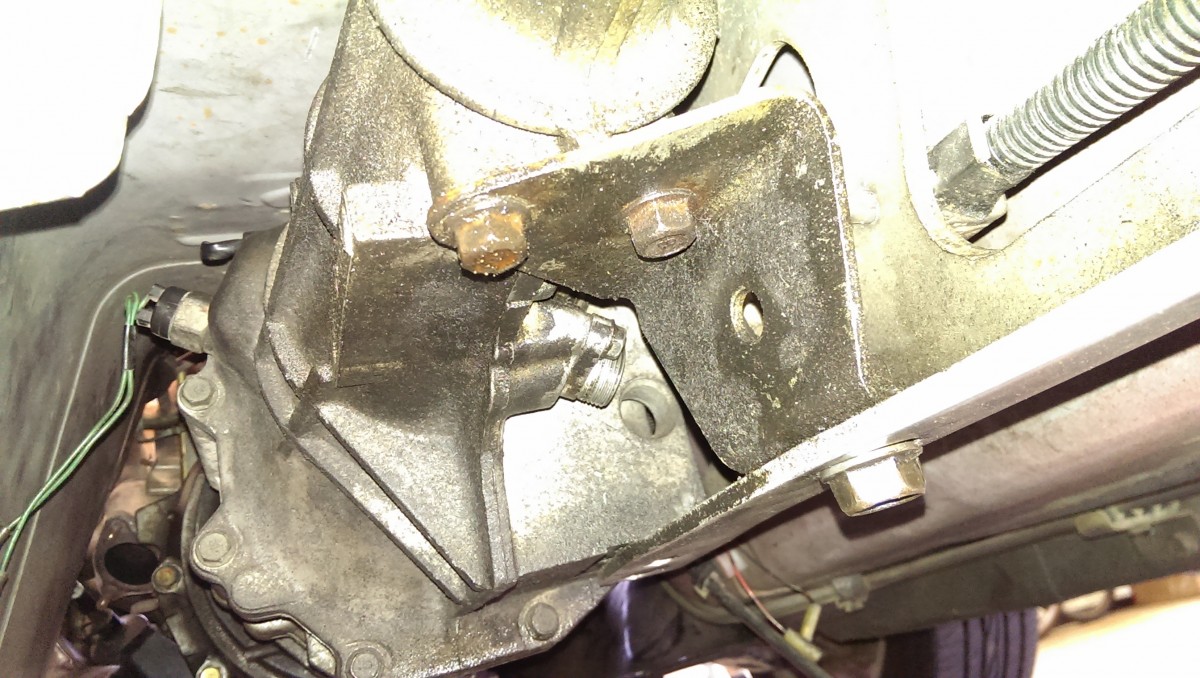
All 3 bolts can come out
A little further back, closer to the shifter, there is also this bracket. It’s easiest to undo all 3 bolts and pull the whole bracket aside.
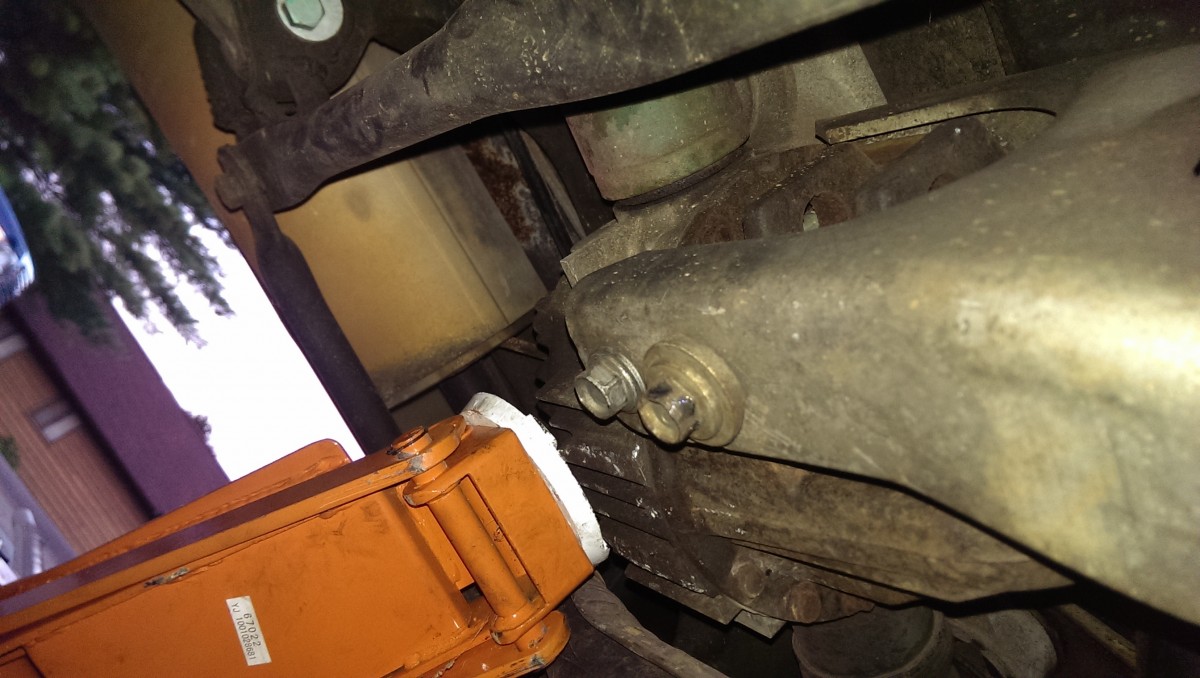
Dropping the Driveshaft
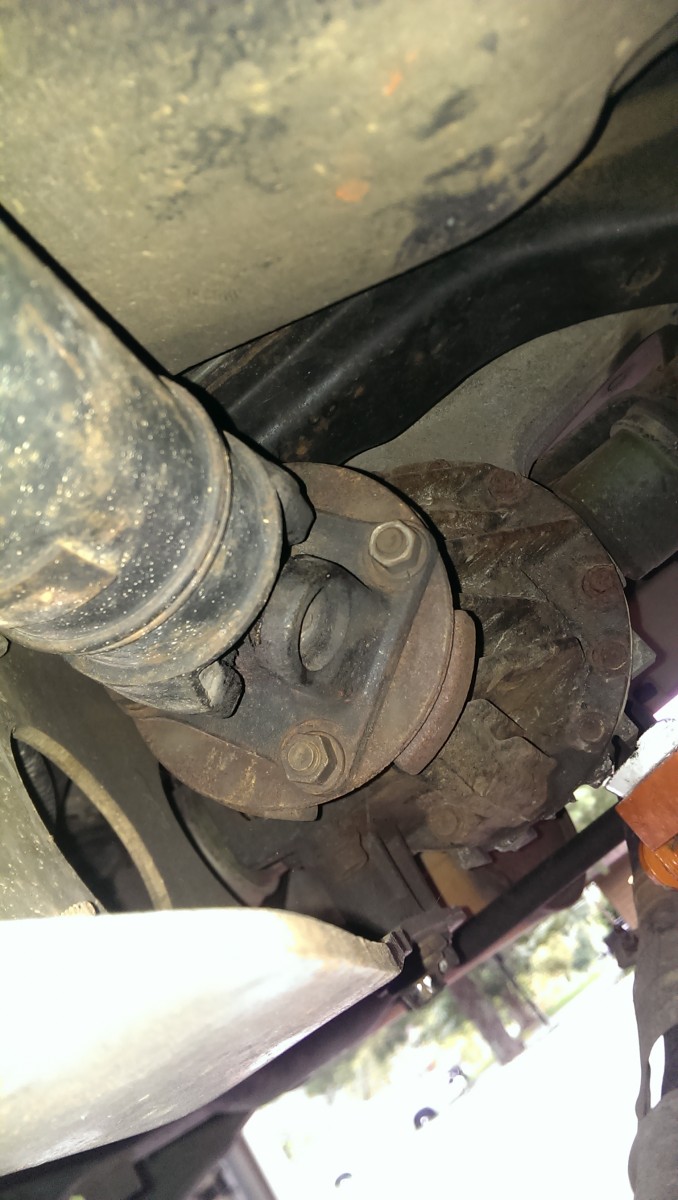
Use two wrenches to undo the bolts and studs
The driveshaft also must come out, but it’s fairly easy. There are 4 through-bolts with nuts on them. If the transmission is in neutral, you can freely spin the driveshaft to get at the less-accessible bolts. The haynes manual recommends using some paint to mark where the driveshaft connects to the rear differential before removing; it’s possible that putting it in with a different orientation later could introduce vibration. I’ve never done this and never had a problem.
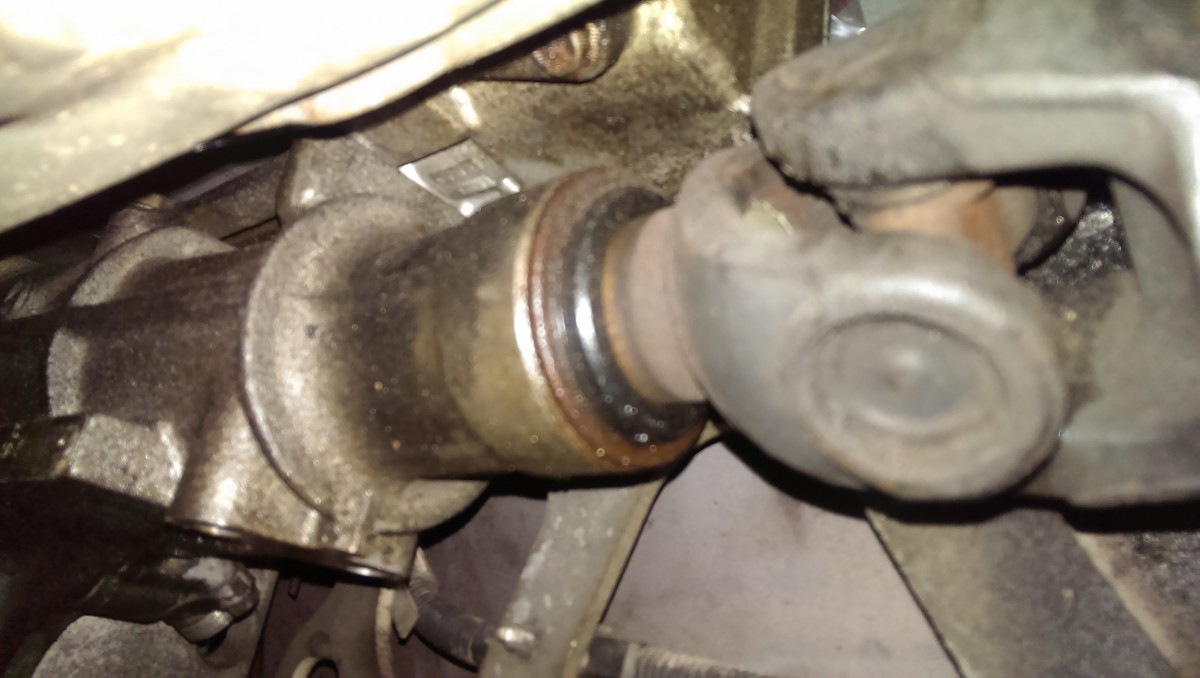
The front of the driveshaft simply slides off

Plastic bag and rubber band over rear of transmission prevents dripping
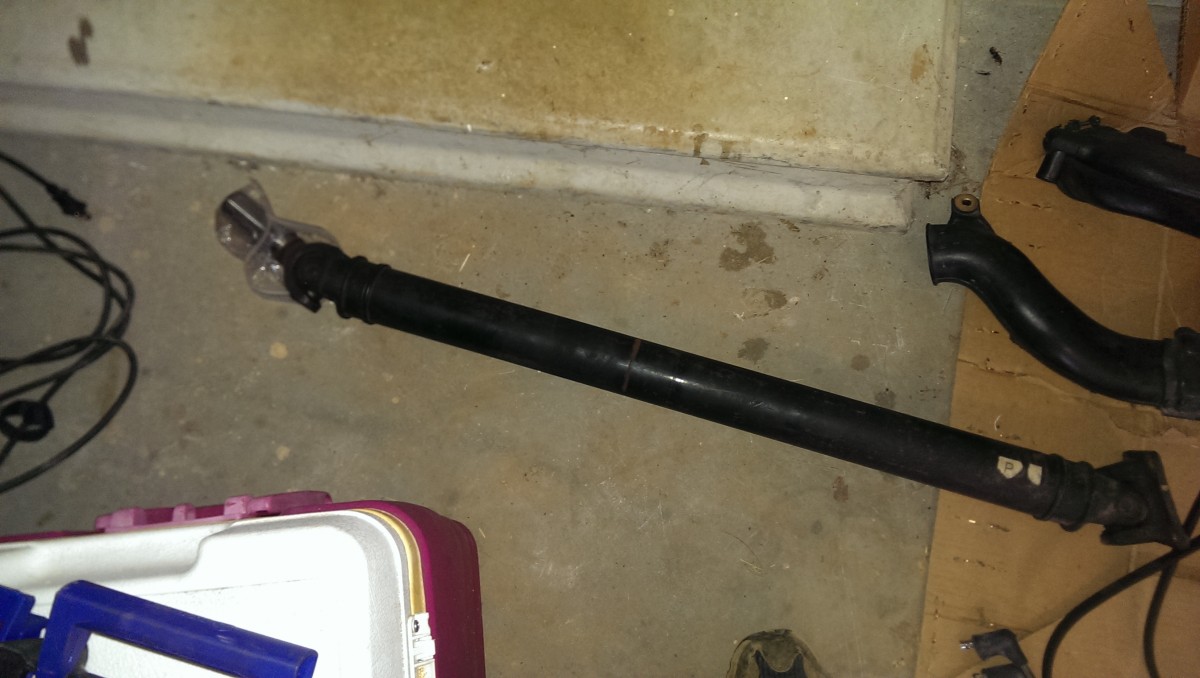
Driveshaft after removal
Once the rear is unbolted, the driveshaft can slide forward and back. It is build to be able to slide forward about an inch, so that the rear can drop down below the differential, and then slide back again to come out. Once it’s out, you can put a bag and rubber band over the rear of the transmission. This keeps contamination out as well as preventing it from dripping all over the floor during removal. You should also bag the end of the driveshaft and set it down carefully, to prevent it from getting scratched or gunked up.
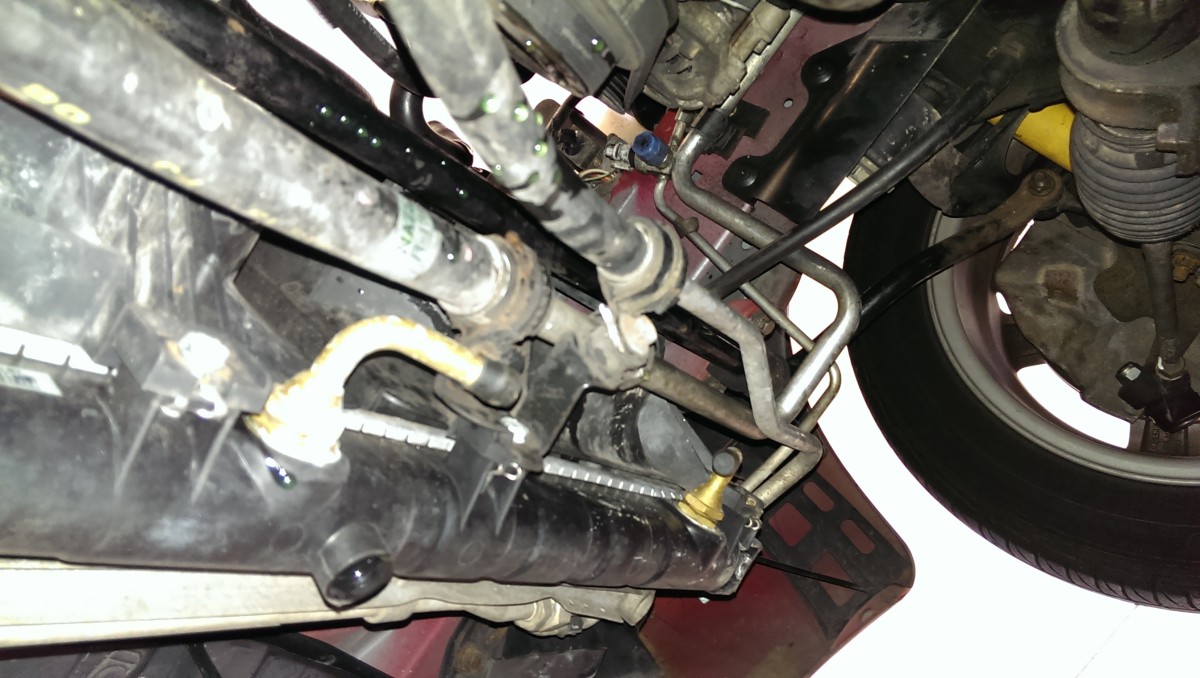
Fuel Line Removal

Both fuel lines need removing
Hopefully, you unplugged the fuel pump and let the car die as described earlier. This part can be hazardous, as gas fumes are extremely flammable. It’s a good idea to keep a fire extinguisher around. As with anything on this website, this is done at your own risk. Also, do this in a well-ventilated area: I open the garage doors and use a box fan, it helps get rid of the gas fumes.
The fuel supply and return lines go from hard lines to rubber on the passenger side by the intake. First, it’s not a bad idea to mark which one is which – they actually connect opposite from what you would think. Then, using some pliers, you can undo the hose clamps and carefully pull the lines off. Generally, the old rubber in the fuel lines has hardened and can make this difficult. Worst case, you could cut the lines off and replace; fuel line is cheap at autozone. Once unplugged, you can put plastic and rubber bands over the hard lines to prevent any further accumulation of fumes. If you’ve got a ventilated workspace and properly ran the lines out of fuel, it should hardly smell of gas and should go away quickly.
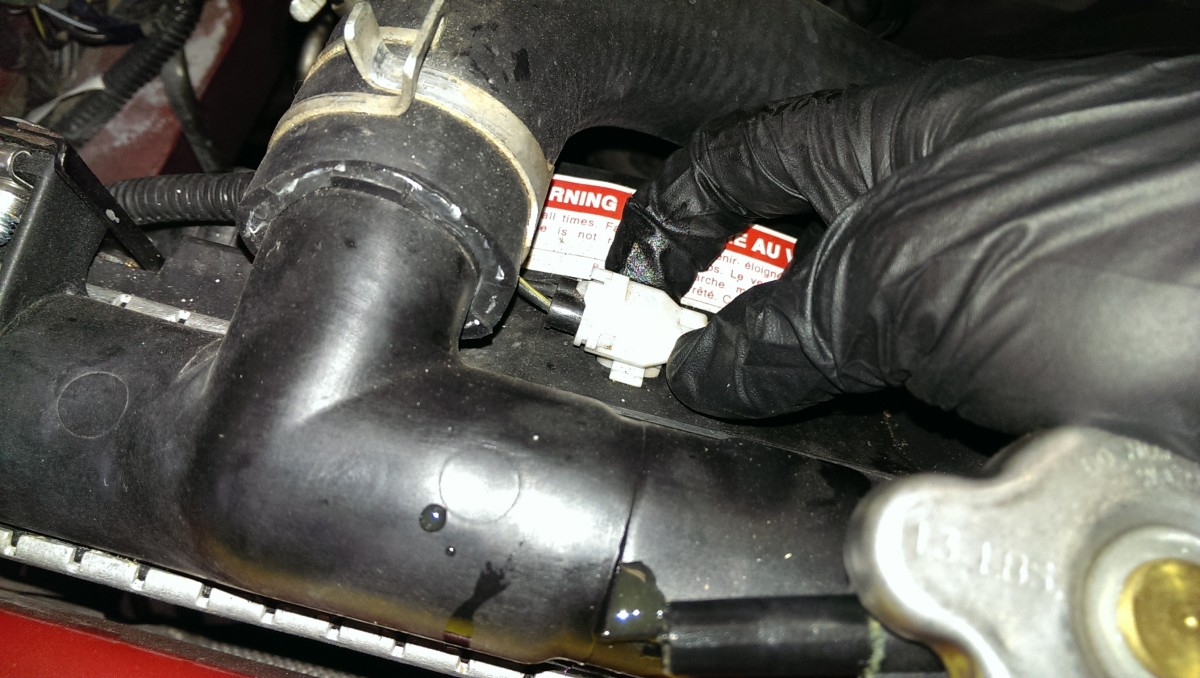
Heater Core Lines
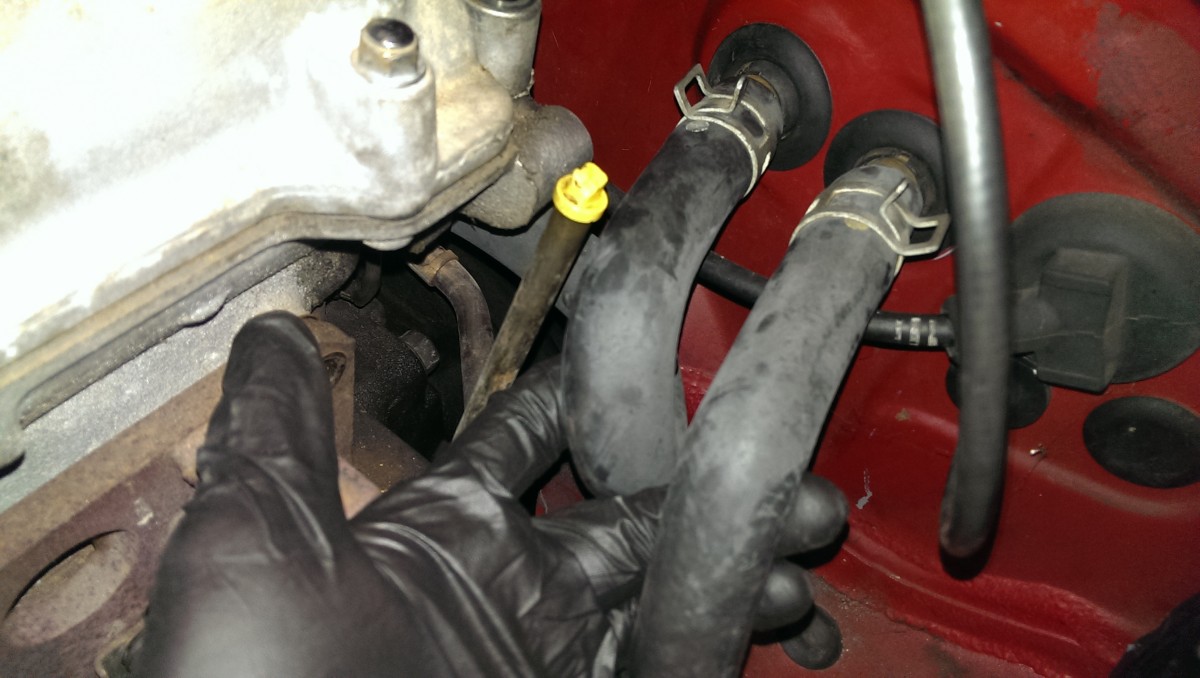
Heater core lines need to be removed very carefully
There are two coolant lines that go to the heater core. The heater core is inside the dash behind the firewall, and it’s a pain to get to. The copper lines going to it are also very delicate. To add insult to injury, these rubber lines will be hardened on if they’re the originals the car came with.
The easiest thing to do is to cut them off carefully. Original rubber lines are simply going to be next to impossible to remove, and it isn’t worth the risk of damaging the heater core and leaking coolant inside the cabin. Fortunately, if you have to deal with this a second time, new rubber doesn’t have the same problem. The first time I did this, I cut the lines off. The ones pictured are replacements, and they slid off fairly easily.
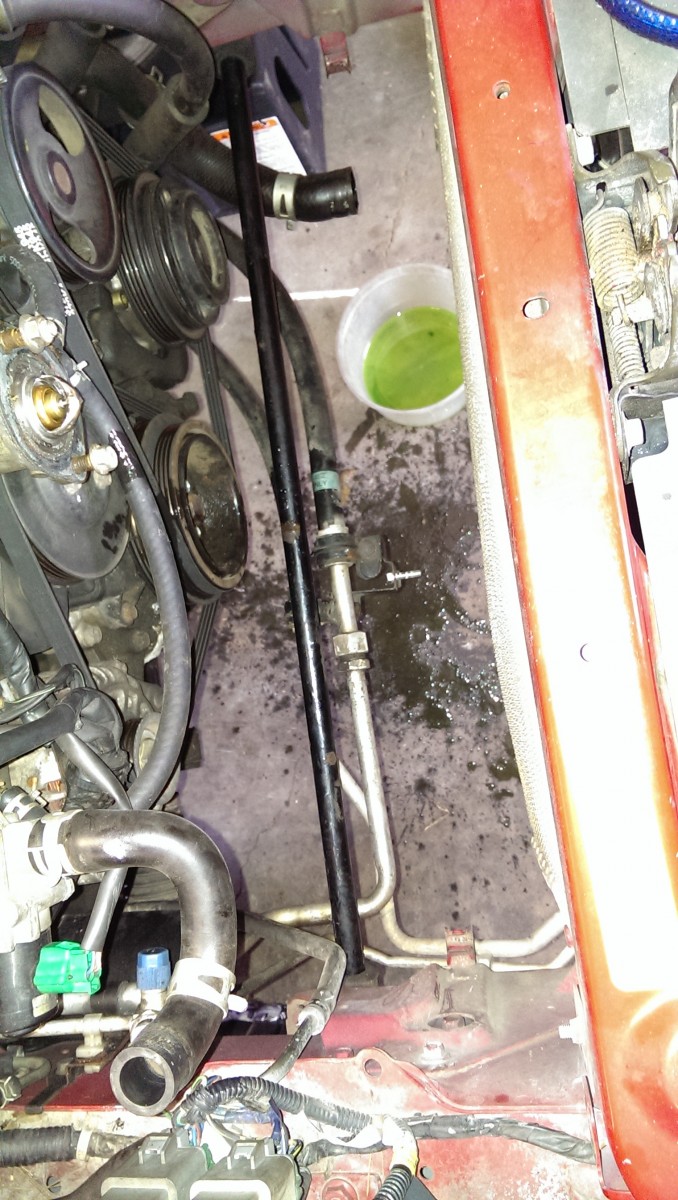
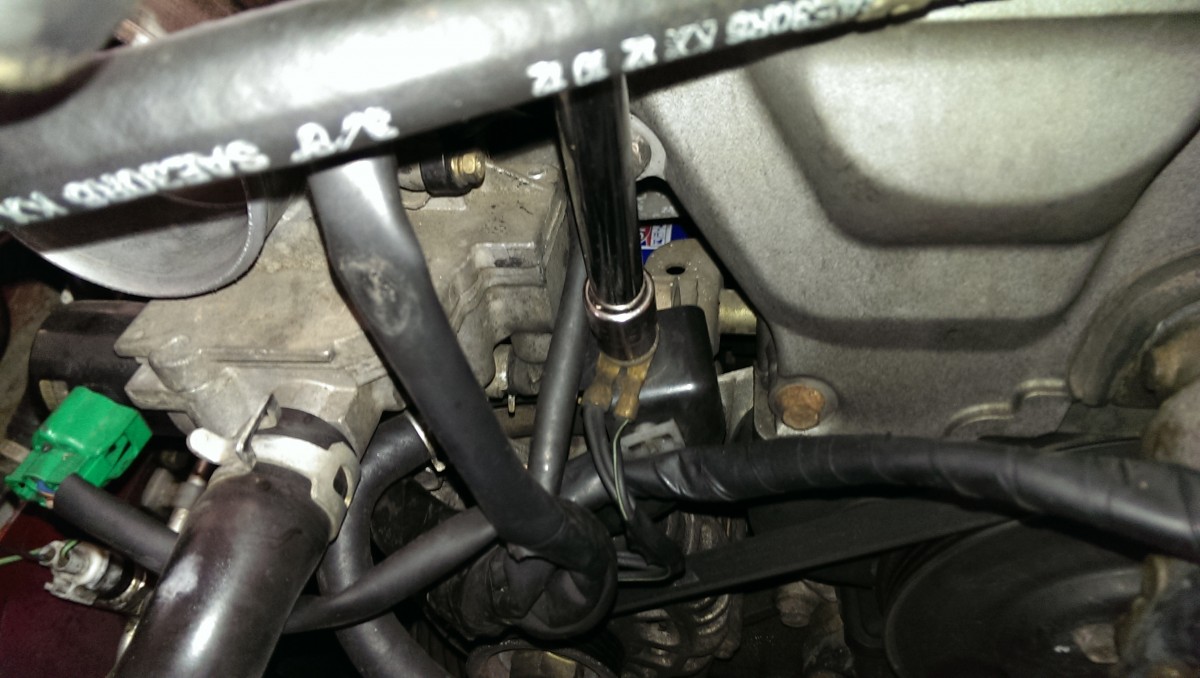
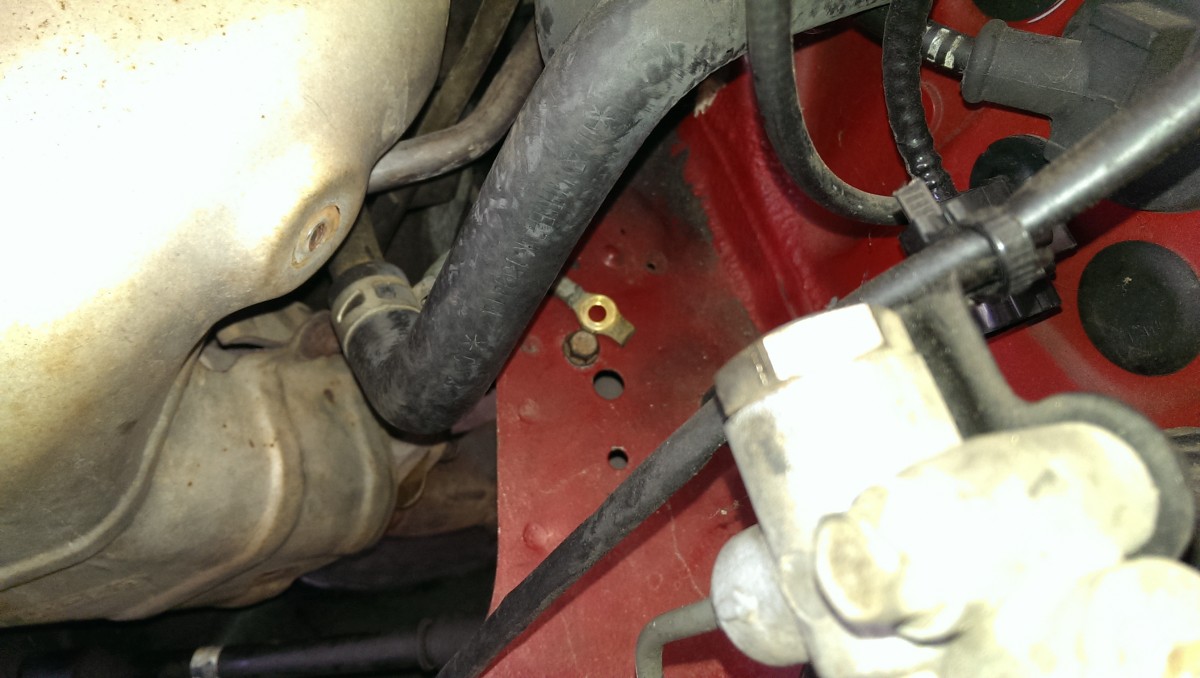
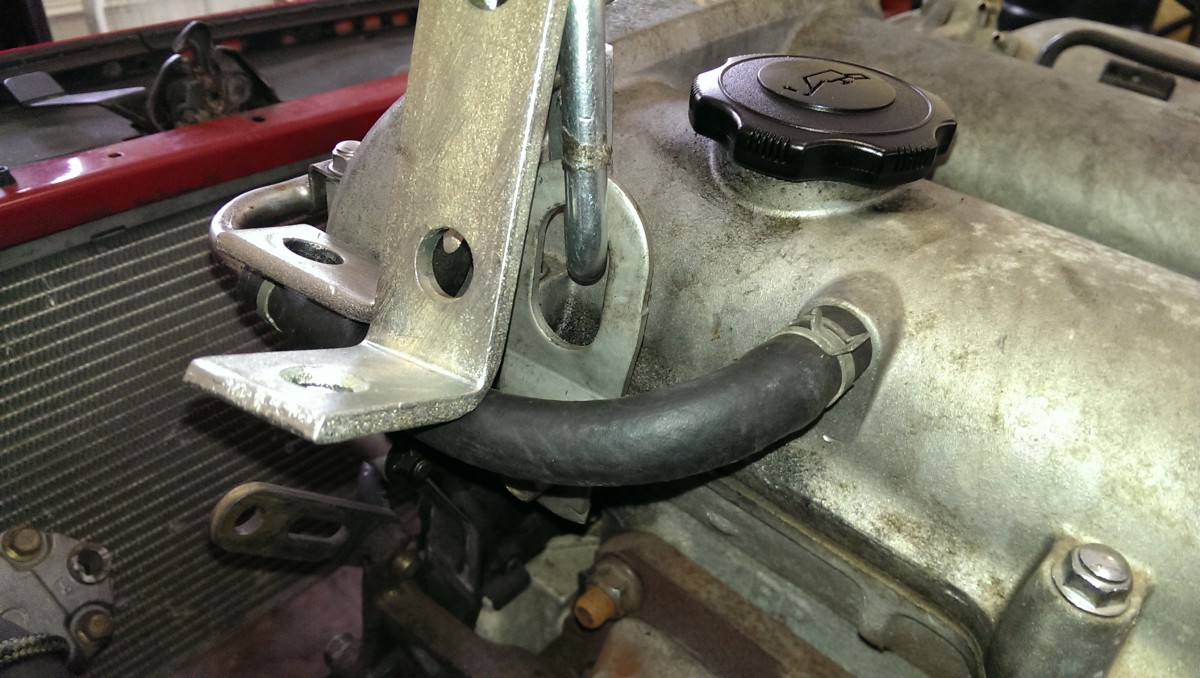
Final Hose to Engine and Double-Check
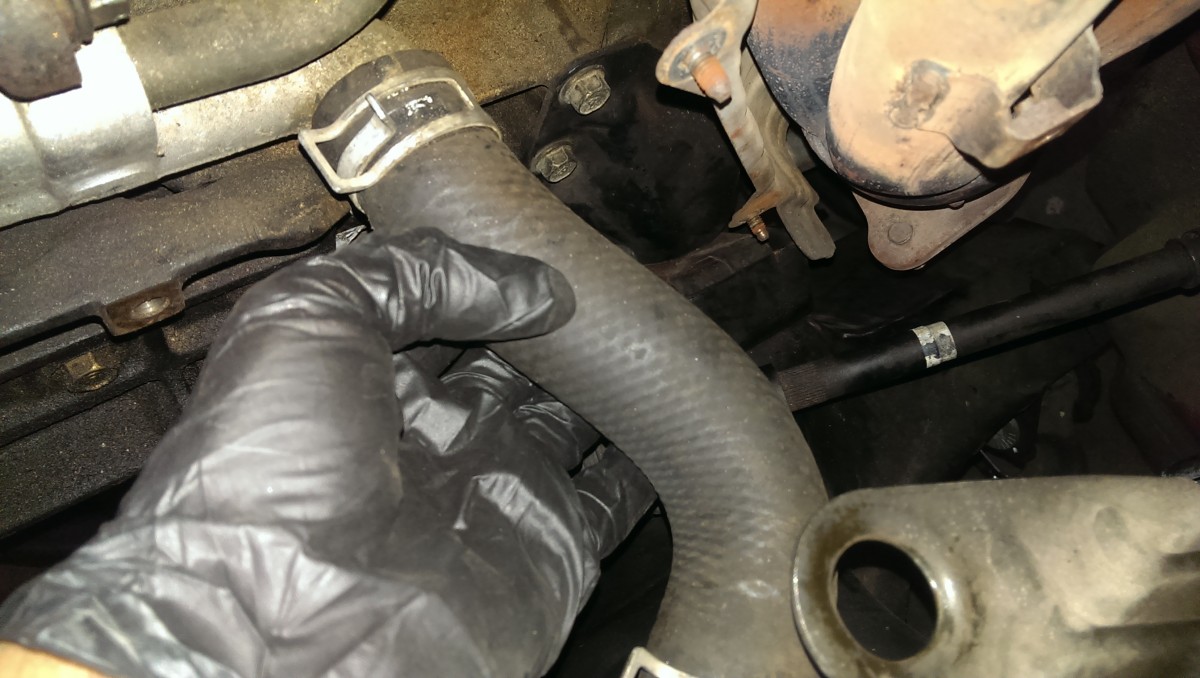
Final coolant line
This remaining coolant line needs to be removed, lastly. I generally stuff a rag into the opening, since it tends to drip coolant even after you’ve drained everything. After this is done, check around the car and make sure the engine and transmission have nothing else connecting them to the body, including electrical wires, hoses, etc. The motor mounts should still be installed at this point.
Removal Process
Readying Hoist

Getting hoist ready to hold engine, but not really lifting yet
At this point, everything should be undone that connects the motor and transmission to the rest of the car, except for the motor mounts. Be sure to double-check this: you do not want to rip something out. Put the load leveler on the hoist, and attach it to the lift points on the engine.
Rear passenger lift point
Front driver lift point
I like to use quicklinks instead of a bolt, they mate up nicely to the stock hoist points on the engine. If a previous owner removed these, other people have bolted the little plates on the end of the leveler to the block. I’ve never done this, though, so I don’t know anything about it. With everything attached, you can lift the hoist until it just has a bit of tension.
Unbolt Motor Mounts
Motor mount up close

Motor mount perspective further back
As stated, make sure the hoist has a little bit of tension here, not enough to lift anything but enough to hold it where it is before the mounts get undone. They probably will be stuck in there pretty solidly and won’t move anywhere, but you don’t want to find out by wearing the engine on your face like a mask. Once the engine has some support from the hoist, get under the car and unbolt the motor mounts.
The motor mounts themselves will stay attached to the engine. It’s only necessary to remove the small bolt holding the mount to the subframe.
And Pull It Out
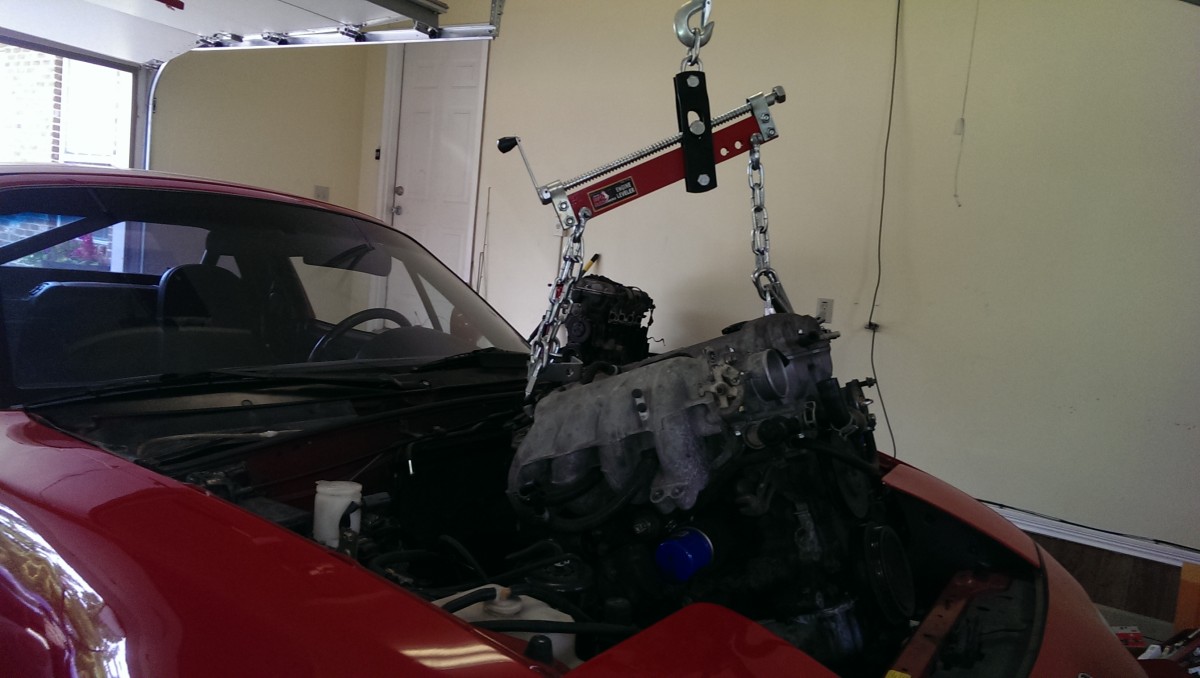
The load lever is super helpful angling it properly
Now the motor is finally ready to come out. You’re probably going to want a helper for this. One person needs to raise the hoist while the other person checks to make sure the engine and transmission don’t bang on anything and operate the load leveler. The motor and transmission come out in stages: you lift it up, pull it forward, reorient the leveler, and repeat until it’s out.
Be extremely careful not to bang the engine on the heater core copper pipes, as they’re pretty fragile. There’s a bit of space between the back of the head and the heater core if you removed the cam angle sensor, fortunately.
Sorry for all the light
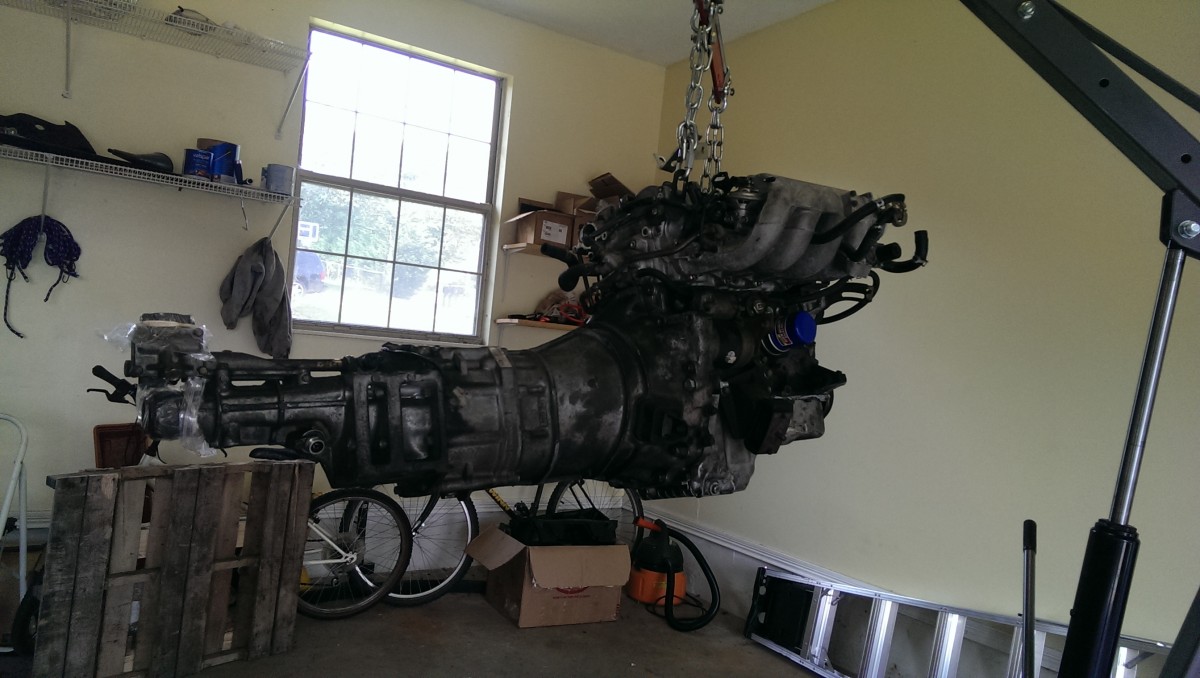
And done.
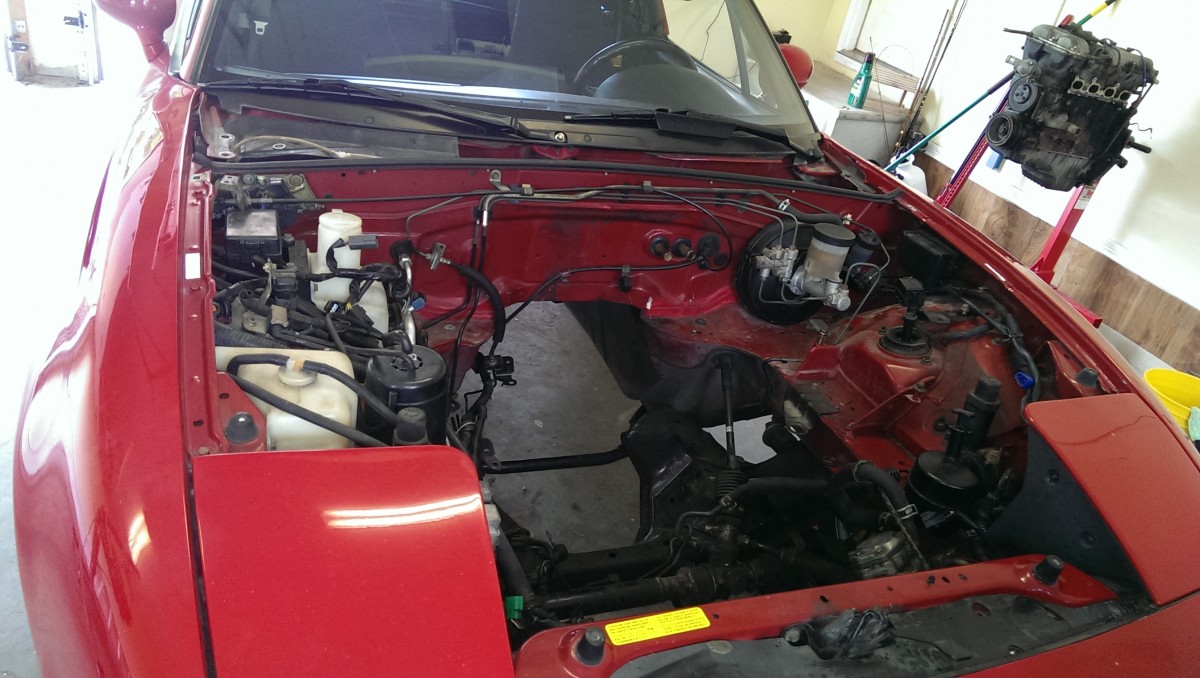
Empty engine bay after removal
Addendum: Getting it on a stand
This whole part is pretty easy. Once the motor is out, you probably want to do something with it. I’ve left it on the hoist and lowered the oil pan into a tire to give it some support before. Probably, though, you removed it for a reason and so you want it on a stand. This is easy and quick, but it requires taking off the transmission and starter. You do NOT want to just set the motor straight on the floor, as the oil pan is not designed to support the weight.

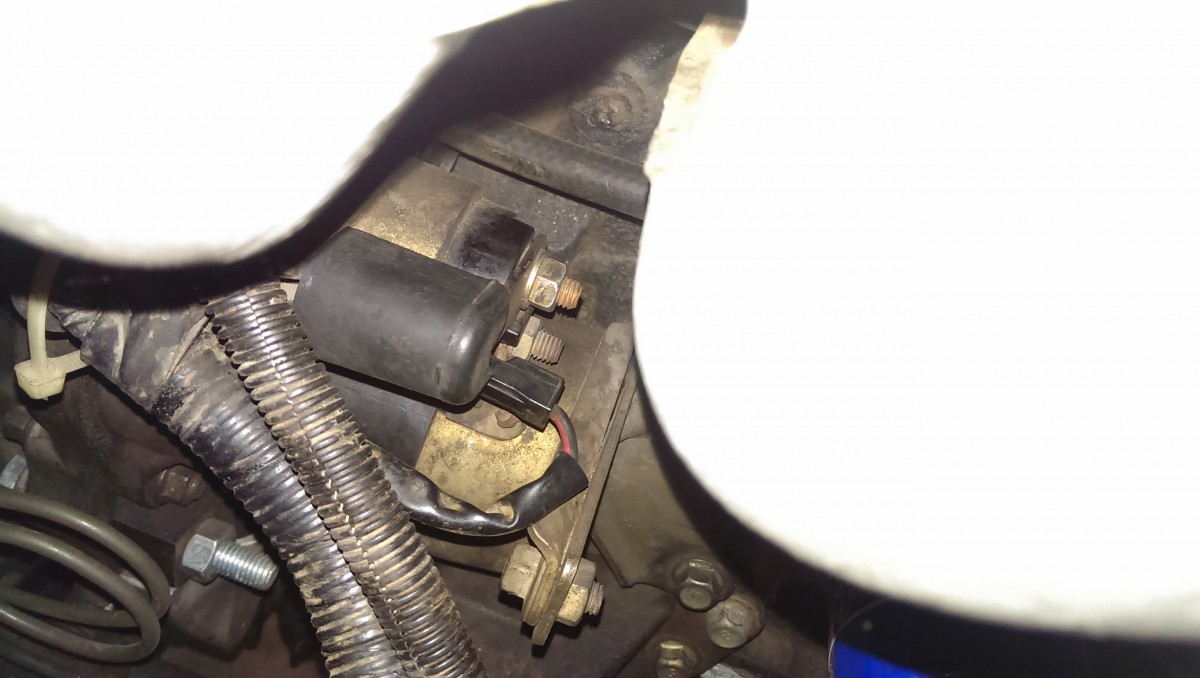
Starter has 3 bolts
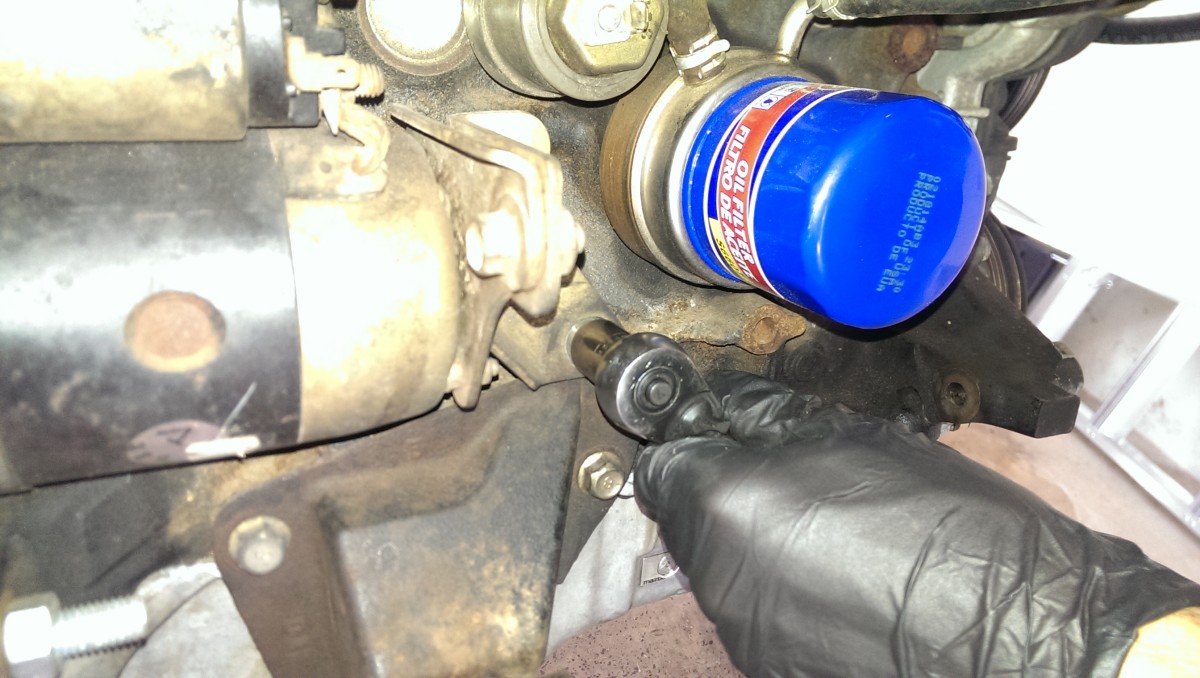
And a brace at the back
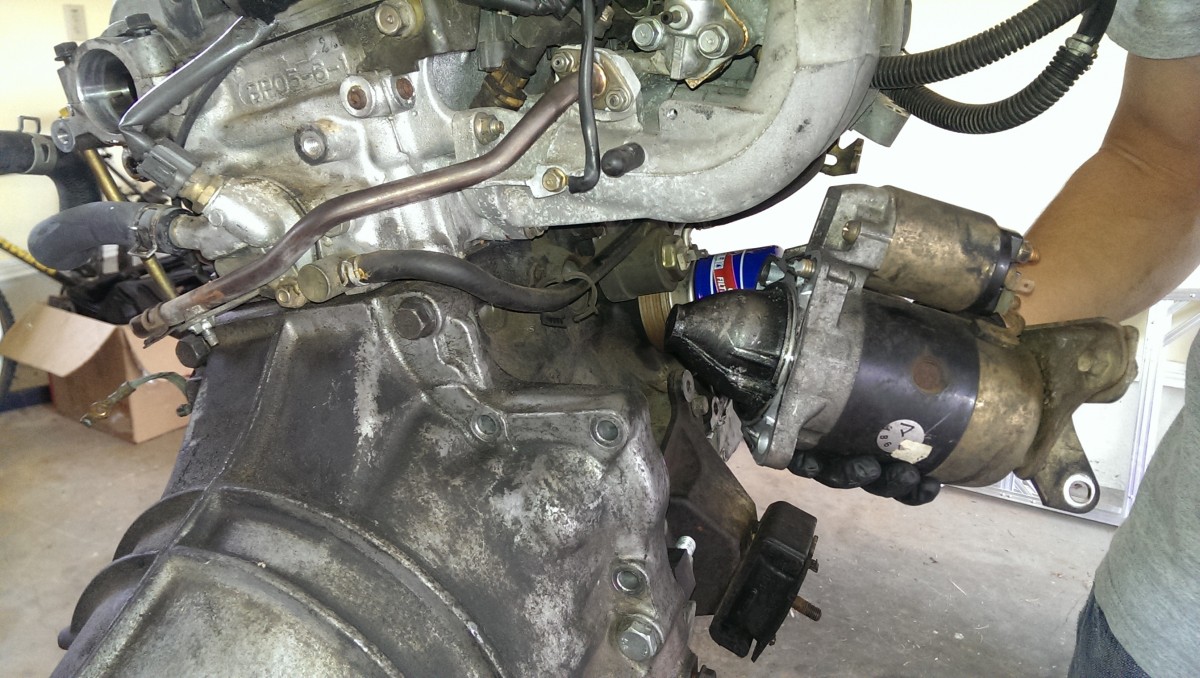
And pull out
The starter has 3 bolts near the transmission and one brace in the back. Once those are undone, it simply lifts out. Then, the 17mm (I think) bell housing bolts around the transmission can be undone, and the transmission will pull off.

Pretty handy and cheap to build
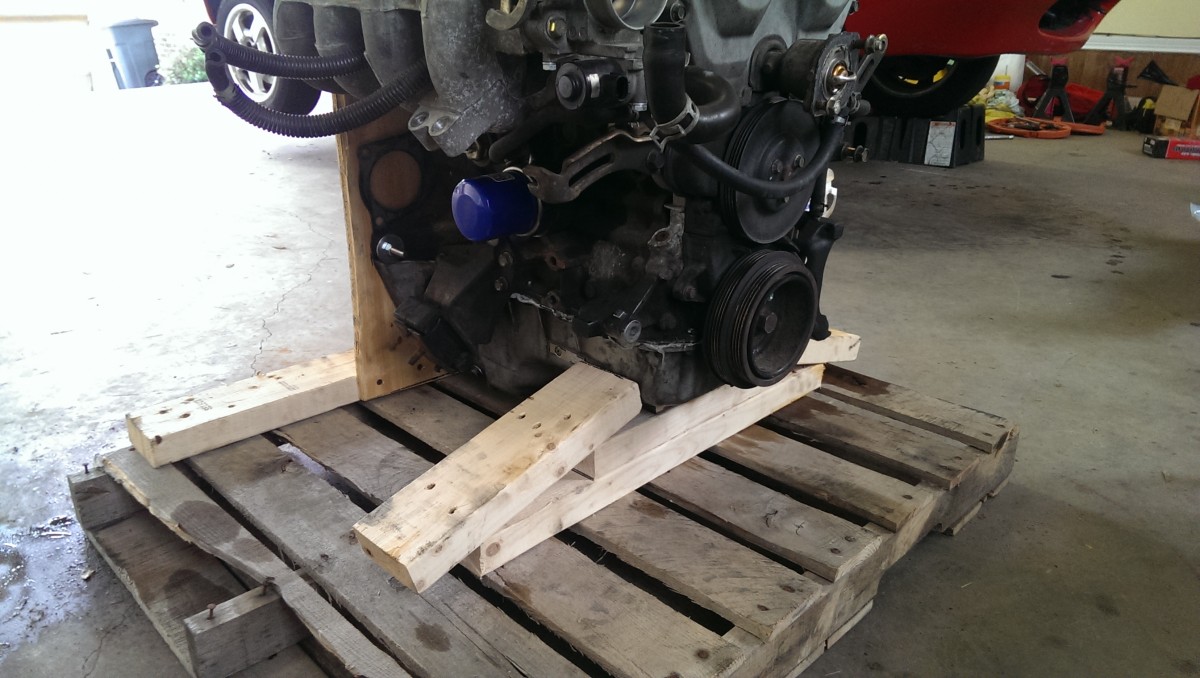
Front shot
I have an actual engine stand that I use, but my new engine was on it. However, Planet Miata shipped me the replacement engine on this nifty pallet stand, and I thought I’d show a couple of pictures of it. It’s just a pallet, a couple of pieces of 2×4, some plywood, and 2 bolts, but it supports the engine by two bolt holes and the block, rather than letting the oil pan get damaged. I chose to keep this around because it’s also handy for transporting a motor in my truck bed without any tie downs.
Reinstallation Tips
As the Haynes manual would say, “Reinstallation is the reverse of removal.” That’s generally true, although I learned a few things after doing this twice.
Clean out gummed up bolt holes
I was the only person I’ve heard of this happening to, but even with a proper torque wrench I managed to crack two separate bellhousing bolts (attaching the transmission to the engine) in half during my first reinstall. This is my I recommended the metric thread chaser set above. The big bellhousing bolts are m12x1.5. The second time, I used the chasers to clean out the threads in the block and oil pan as much as possible.
Fresh bellhousing bolts
If you’re tightening those bolts and feel them suddenly get easier to turn, STOP. Your bolt is about to crack if you go any further. I also chose to buy new bolts. They are hard to get in the correct length, being Japanese spec. The problem with grade 10.9 bolts from the hardware store is that they’ll either be fully threaded or have the partial thread end too late, and either way, they won’t work the way they should. I could not find these things anywhere online, but Rosenthal Mazda was able to source them for me. The part numbers are 99796-1260 (need 6 of them), 99796-1275 (need 2). You can also buy their nut if you’d like for the one through-bolt (99940-1201). There are also three M10 bolts for the alternator, if you wanted to replace those while you’re at it.
Again, I’m the only one I know of to break these things, but after trying to dig two half-bolts out of an engine block, I didn’t take the chance a second time.
Aligning the motor mounts

Persuading with a 2×4
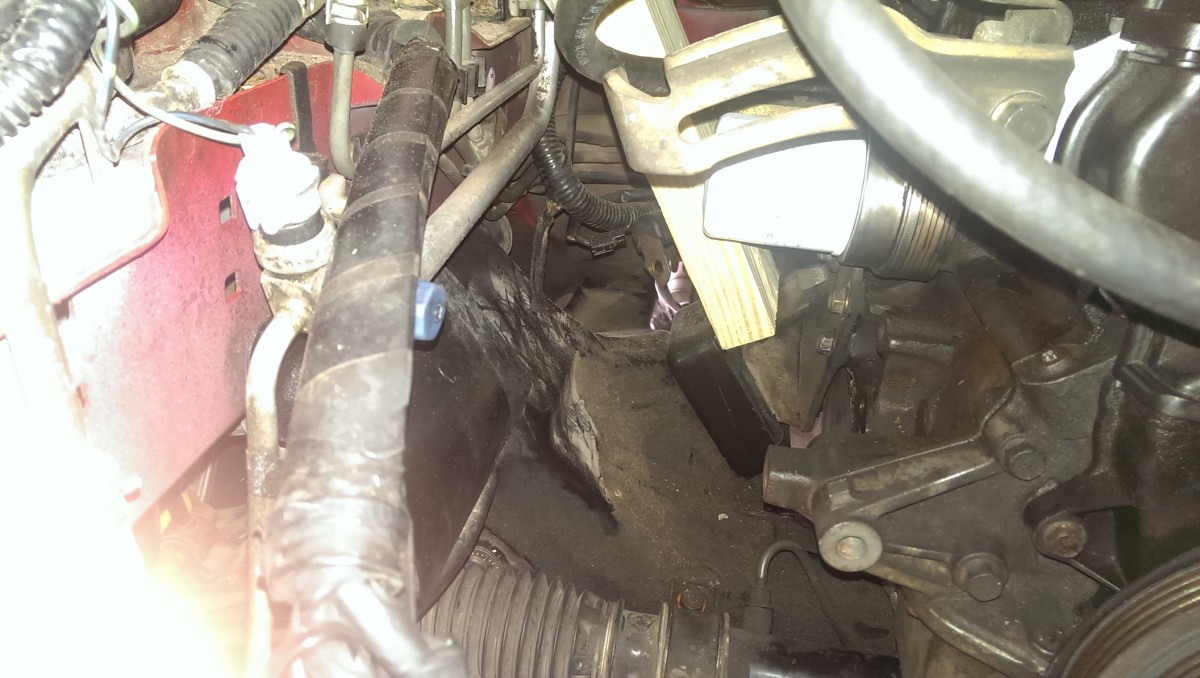
2×4 pushes against mount like this
Getting the engine to settle on the motor mounts can be a pain. The driver’s side needs to slide straight in, but the passenger’s side has a slot. This means that if you can use the hoist and a helper to guide the driver’s side into place, you can drop the passengers side into the slot with a bit of room for error. The problem I had both times is that the passenger side was sitting up to high, and so the transmission wasn’t lining up. I also had issues finding a good way to rotate the engine clockwise looking at it from the driver’s seat, to get things settled right.
The quickest solution is pictured above. I grabbed a scrap length of 2×4, pushed it against the mount, and went to town with a hammer. This forced the engine to settle in where it belonged in short order.
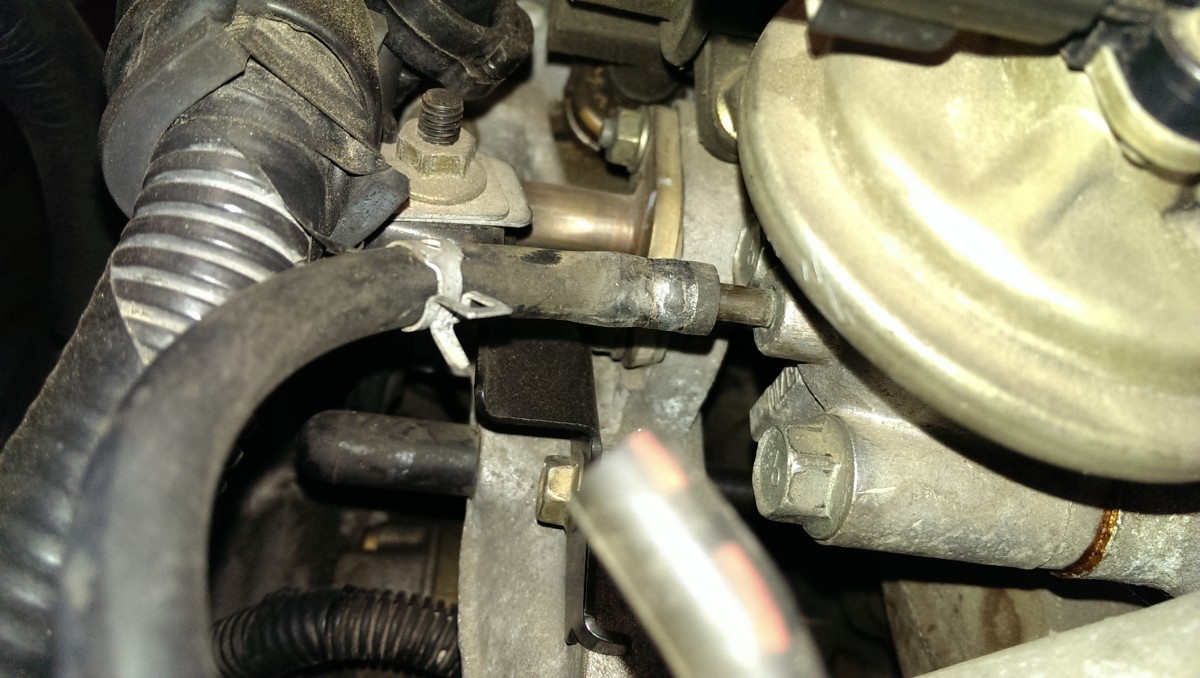
Tightening the EGR at the header

Crow foot wrench

Tightening EGR tube on header side
You may have to undo and redo the EGR valve where it meets the header. In my case, I put a little antiseize on to make it easier to remove when I do a turbo, and it came undone. It is nearly impossible to get a regular crescent wrench in there – you can touch that bolt, but there’s no room to turn it. The solution is to just stop being cheap and buy a crow foot set. They allowed me to tighten it down appropriately.
Be sure to remove the cam angle sensor
When reinstalling, be sure to leave the cam angle sensor off! It gives you more room to maneuver, and the sensor itself is fairly fragile. Worse than all of that, the sensor lines up almost perfectly with the heater core pipes. These pipes are extremely fragile. If you bang them hard enough and cause them to leak, you’ll have coolant all over the driver’s side floor when you start the car. Replacing the heater core is itself a massive pain, since it’s tucked up under the dash behind the steering wheel.
Related Articles
Miata Timing Belt, Water Pump, and Seals
Miata Clutch, Transmission, and Rear Crank Seals
Installing an M-Tuned Coolant Reroute
[…] I found a couple of writeups on engine removal, and the haynes manual of course, but they all glossed over some things, especially wire and vacuum line locations. I wrote up my second engine removal and took as many pictures as I could. I know it's old hat for a lot of guys on this forum, but should still help some people out. Removing a Miata Engine – Did It Myself […]
[…] I had the engine out, per the removal instructions in another article, I decided to also do a coolant reroute. For those not aware, the Miata 1.8L engine is shared with […]
[…] followed this guide Removing a Miata Engine – Did It Myself being very careful not to cut into any wires …. engine is out took a bit longer than i would […]
Hello! Thanks you for this! This is the best write up I’ve seen to pull an engine out of a Miata 🙂 I’ll be pulling mine out this weekend to change all the gaskets, get the head freshened up, and install a new clutch and flywheel.
Glad it will help, that’s what it’s here for! It’s really a pretty easy job compared to more complicated cars.
This is so fantastic! You don’t happen to have pictures of where all the grounds are do you? I’m in the process of reinstalling mine and just want to make sure I get all of them taken care of before I install my motor
Thanks, glad it’s useful!
I took care to make sure I was taking a picture every time I unplugged a wire. If you work backwards through the vacuum & electrical subsections, it should cover everything you need to bolt back up.
Very well done!
I’ve taken my engine/transmission out twice and agree with everything you said and the only thing I can think to add is pointing out the fuel lines should be labeled as they are counterintuitive – they look swapped when installed correctly, the Clutch Cable header could be renamed Clutch Line, lastly I like to cover the front of the radiator and back of the A/C heat exchanger with cardboard. Nitpicking for sure – this is a great write up!
I appreciate the input! I will go go back and make some edits when I get a chance. Duh, of course it’s a hydraulic clutch, dunno why I said cable. I like the cardboard idea, hadn’t thought about it but I probably would have protected the fins on my condenser and radiator that way.
As all car work gets easier with experience, how long did it take you the first time vs the second? I’m curious.
Definitely true! The first time, pulling the engine took probably 20
hours spread out over a week or so.
The second time was more like 4 hours to pull and about the same to put the replacement in.
Would these steps be basically the same for a 2006 NC miata?
And did you take out the transmission as well because it was necessary, or because it was easier than disconnecting/
Thanks
These steps will match up almost identically to an NA and an NB. I haven’t seen an NC under the hood, so unfortunately I don’t know. The same general components need to be removed in a lot of cars including the NC (drain and remove radiator, disconnect accessories, disconnect fuel lines, remove any electrical and vacuum connections between the body and the engine, lift out.)
And yep, it’s far more of a pain to try to unbolt the transmission and drop it from under the car than to just pull the whole thing as a unit.
Thanks.
But why drop the transmission at all when doing this.
And what is the skill level for this? I’m used to removing, rebuilding, and replacing engine parts, have had to build large portions of my house to repair tenant damage, and built a 16×16 hothouse from scratch. (and doesn’t even seem top need any welding . . .)
This seems largely attach and unattach, and watch the torque on reassembly
I supposed I’d have to tow it to a dealer to get the keys programmed, though? Or does that piece of intelligence in the Miata stay in another computer that doesn’t get replaced (I’d be dropping a 2014 into a 2006)
The transmission is a lot lighter than the engine, it relies on the engine to support its nose, and its input shaft slides into the engine. As a result, it’d be very difficult to leave the transmission in place and try to slide the engine out – simply getting it out that way would be tough, and then the transmission would be resting on the PPF and the driveshaft, which wouldn’t be good.
So in short, either the engine and transmission need to come out together or the transmission has to drop first simply because of the logistics of freeing it from the engine so the engine can come out.
From the sounds of it, you should be fine. Doing a matching engine swap (where everything just bolts up) is indeed not too bad of a job. All you really need is a way to jack the car up, an engine hoist, wrenches, and time.
The biggest gotchas with this job are removing rusty or stuck bolts in sometimes difficult-to-access areas, remembering which vacuum lines go where (since they can be easily mis-installed), and making sure everything goes back together how it came out. Photos during removal help a lot with the last one. Otherwise, you’re right, it’s really not bad.
It’s also the kind of job where after you do it once, it goes much faster the second time – half the work is figuring out how parts are supposed to come out. That’s part of why I wrote this writeup!
I believe the keys are probably matched to the ECU, not the engine, so you actually shouldn’t have an issue there. That said, you should try to find out if there’s any theft-prevention stuff that would detect unplugging the battery and disconnecting the wiring – if there is, the dealer usually can reset it after you’re done. I don’t have much experience with NCs, so I’m not a whole lot of help with that.
Also, when you get this done, I’d be really interested to hear how it differed from doing this on an NA/NB!
In the picture thats captioned “and a brace at the back”. Do you know what the part is that has one wire that runs to it, near the upper left of the oil filter. Mine is making a strange humming like a blown capacitor would sound and I cannot find it in any of the manuals.
Yep, that is the oil pressure sender. It relays to the oil pressure gauge on your dash. Partsgroup.com has used ones for cheap, although you need a very large socket (30mm?) to remove it. You could also just unplug to test if it’s the issue.
I owe you a massive thanks, I pulled my first engine/transmission, replaced seals and clutch, and reinstalled on a clapped out 95′ NA. I’m otherwise relatively inexperienced with car mechanics and your guide was probably the only thing that got me through it.
The only massive issue I had was the the first engine crane I bought was a harbour freight 1ton, and the boom proved to be far to short. The engine in the Miata is further back than you think. I bought the 2ton after that (with a leveller) and it was fantastic. It’s also worth mentioning to anyone reading this that the majority of the nuts and bolts you take of anywhere will probably need replacing and it should be expected. All the advise on this guide should be followed, especially the impact wrench which proved itself worth the expense ten times over.
The only other advise I’ll give to anyone thinking doing this is to read up on the various guides to do with the engines CAS before moving it. Once removed the engine has to be re-timed (and it can be a bugger to put back in) if it’s original position isn’t marked.
So a massive thanks again, I honestly don’t believe I could of done it with out the effort you went through in making this guide.
Glad it helped, and glad your car is running again. That’s what it’s there for.
Thanks for the comment about hoists, I use a 2-ton as well. I’ve never tried the 1-ton, it’s good to be able to confirm that it simply won’t work. I’ll update the info in the writeup.
I’ve just used this guide to pull my engine and got it out 10 minutes ago.
I used a 1-ton crane but took the bumper off which gave me sufficient reach.
Hey,
Question on the hoist. Did you try the 1 ton with the bumper removed? I just realized that I have borrowed a 1 ton HF hoist! I am wondering with the bumper removed if it might work? thanks
I have heard of people doing that. If you already have the one ton for free, you can always give it a shot. The problem will be that you can’t reach the motor to begin with, so you’ll know immediately.
Great post thanks very helpful
I just finished putting everything together on a new engine and this write-up it was so, so, so helpful. Thank you so much for going into such great detail. I am very green with mechanics but with this write-up and the Lord’s help I was able to get it in and it runs!
Glad to hear it!
Appreciate the tips.
Just finished doing this with my nb today. Translated very well and had no major problems at all throughout. Can’t thank you enough. Very comprehensive and well explained. God bless you kind sir.
Thanks for this.It helped a lot. Before putting the engine back in,put the CAS in and mark where the tangs are,then take it out again.When the engine is back in,install the CAS before the coilpack.
One thing that deserves revision is where you suggest putting the front wheels on ramps and jacking the rear. You don’t mention blocking the front wheels. When I started jacking the rear, I noticed my car was rolling backwards! My chocks don’t really fit behind the front wheels on the plastic ramps but I jury-rigged a solution. Anyway, this could be *extremely* dangerous if someone were under their car and it somehow rolled off the ramps and took the jack stands with it. In hindsight this is obvious but somehow I didn’t realize until it happened. Even though I’m always very careful when putting my car in the air.
Other than that, thanks for putting this online! I followed it almost exclusively without many other resources for my first-ever engine removal. No Haynes manual. There were a couple minor differences with my NB1 but nothing that was a big deal (no speedometer cable, no CAS, etc.)
Happy to help, glad everything turned out OK, and thanks for the feedback! I’ll update the writeup with a specific note about this.