Setting Bluetooth GPS Receiver to 10hz
If you build a 10hz Bluetooth GPS receiver, as described in my other article, it will default to 1hz. This is of course useless, since the whole point is to get more frequent GPS updates. Here’s how to configure the unit for 10hz.
These instructions apply any GPS modules that use a U-Blox submodule. This includes the Reyax RYN725AI referenced in the kit. It also works with the cheaper Reyax RYN25AI, but the 10hz setting won’t be permanently saved unless you add an EEPROM later.
There are three different ways to do this, in order of easiest to most annoying.
Using the Android App
I wrote up a quick Android app to perform set the unit to 10hz and save the config. If you’re planning to run Harry’s Lap Timer or RaceChrono on Android, this is the easiest method.
The app is available for free in the Google Play Store.
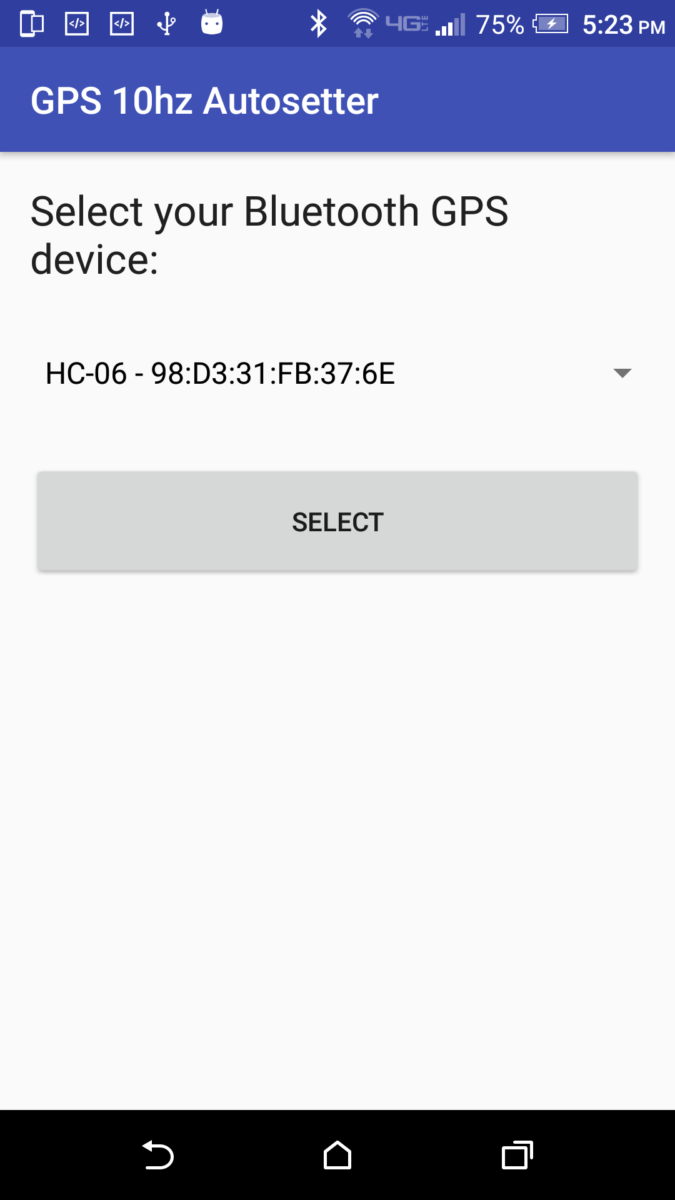
Pair the receiver with your phone for use with Harry’s or RaceChrono. Then, simply run the GPS 10hz Autosetter.
Pick out your bluetooth device from the list and hit Select. Then, hit “Set GPS to 10hz”. That’s it. It will display its progress and let you know if there were any issues. The app will also read the current setting, to ensure it was set correctly.
The app will remember which GPS device you chose the next time you run it. You can use the triple-dot menu in the top right to select a different device.
Select your new GPS receiver from the list
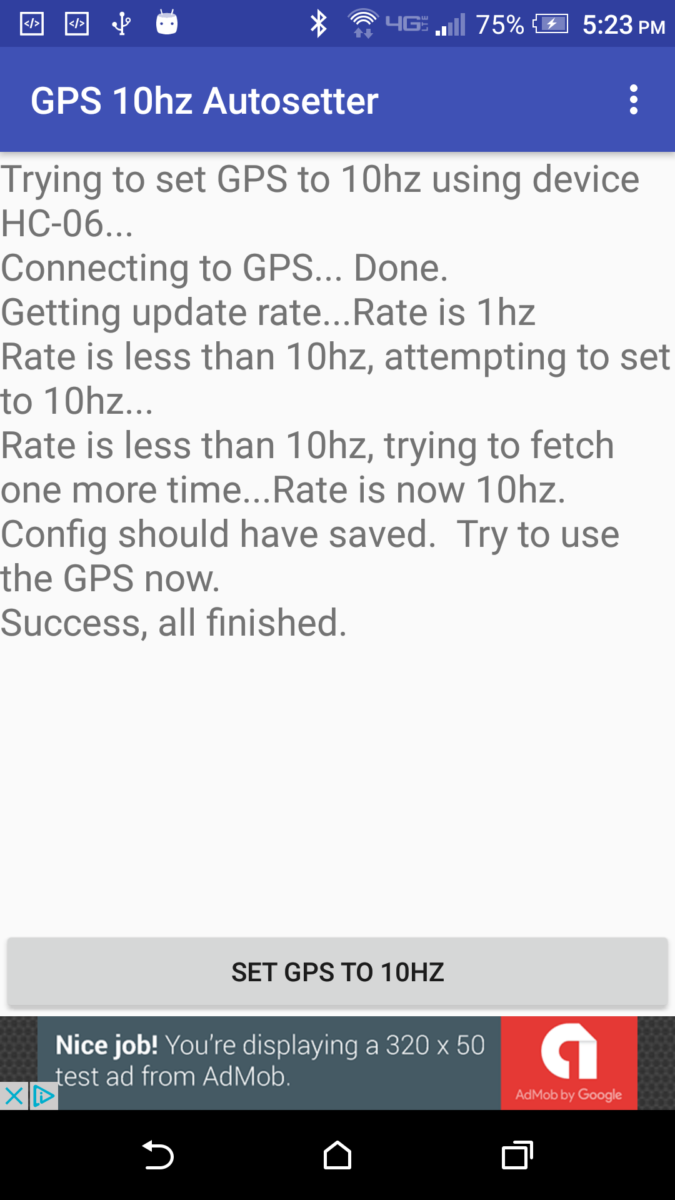
Then, hit “Set GPS to 10hz” and let the app do its thing
Setting the GPS module rate with Windows
Note: Apparently Windows doesn’t support bluetooth serial ports very well. I had weird issues with this. Long story short, I figured out what u-center is sending and wrote up a python script that uses pyserial to do the same thing. The script is in the next section.
The GPS module unfortunately defaults to a 1hz sample rate, meaning it reports the GPS location once per second. It’s capable of 10hz, however, which is the whole point of this. It can be permanently set to 10hz with a one-time software change using a Windows laptop over Bluetooth.
The first thing to do is power up the fully assembled device. The GPS module will blink as it acquires signal. The bluetooth module will blink red meaning it isn’t connected to anything. On a Windows computer with bluetooth, add a new bluetooth device. Doing this depends on your version of windows, just google it. If you search for devices, you should see HC-06 in the menu. Go ahead and add it. Once you’re done, you may get a pop-up in the system trya that a new com port was added. This is a good thing.
Now you need u-blox u-center: https://www.u-blox.com/en/product/u-center-windows It is free to use.
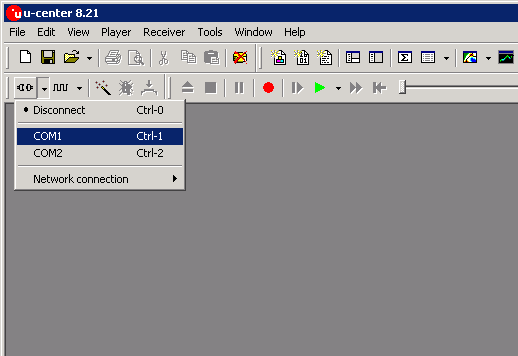
Connect to a com port
Once it loads, click the dropdown to connect a com port. This should be whatever com port you saw added in the last step. If you didn’t see that, try any com port.
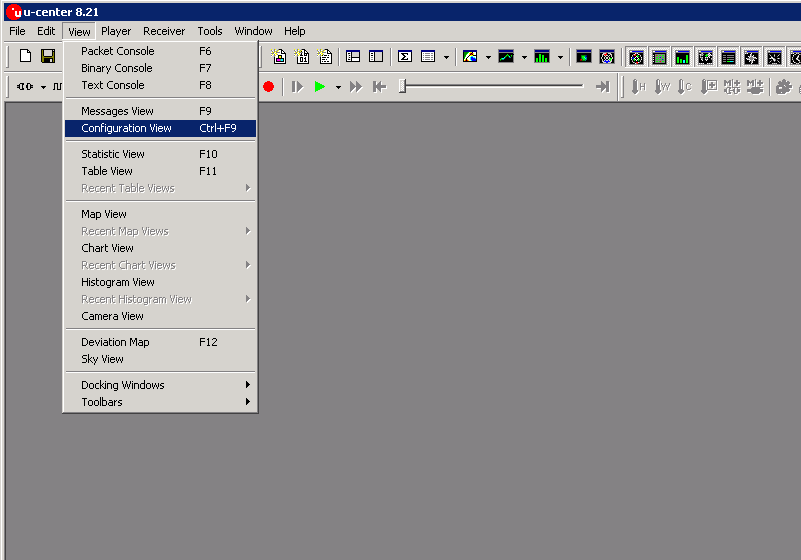
View configuration to see the configuration window
If it connects, the box should turn green. (Like in the next picture.) You can then go to View -> Configuration View to pop up the configuration window.

Set “Measurement Period” to 100ms
In u-center, go to “RATE” in the left-hand box. Then, change “Measurement Period” from 1000 to 100. This will sample every tenth of a second rather than every second, giving us our 10hz or ten-times-per-second rate. Click Send to push this to the GPS receiver.
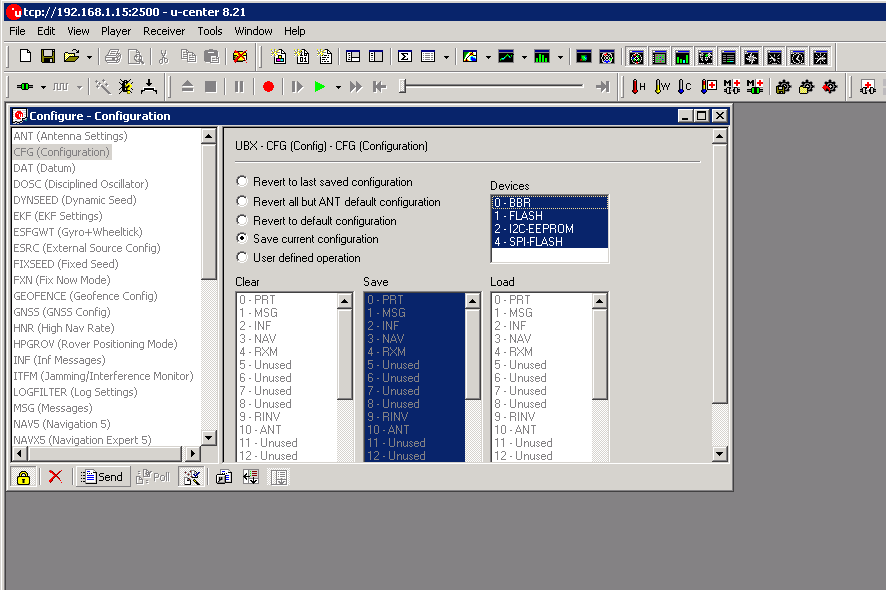
Click “send” to save the config, ensuring you’re saving to all possible devices
The above set the new rate temporarily, but we want to save it to EEPROM or flash, and battery-backed RAM so it stays this way permanently. It’s really saving to EEPROM or flash that matters. Which one depends on your chip, but you should be able to select all 4 options, and it should work either way. Scroll up in the left hand pane to “CFG (Configuration)”. Make sure the radio button is on “Save current configuration” and all the Devices are selected as pictured. Then click Send. You should now be ready to hook it up to your phone.
Using the Python script to set it to 10hz
As I mentioned, I was having problems getting windows to connect properly. I went back in Ubuntu and used socat to proxy the serial port to TCP, then used a Windows VM with u-center on it to connect with TCP and make the change. This all annoyed me though, so I recorded what was sent and came up with a script to set the GPS to 10hz and save it. It *appears* to work, but obviously use this code at your own risk. I have tested with exactly two units. It will attempt to save the configuration to Battery Backed Ram, EEPROM, and Flash, so it should work with any of the possible chip setups.
The script is designed to run on Linux with a serial port at /dev/something. If you open the right port, it should work on OSX or Windows also. Also, you really just need to set the bytes in the file in the order presented, so it should be easy to adapt to something else. You need the “pyserial” module as well, available in pip.
#!/usr/bin/python

# Written by James Spadaro
# Copyright Spadaro Technology, LLC 2016
#
# u-blox provides documentation on their protocol that is used below

import serial
import struct
import sys

serialName = raw_input("What serial device? (Example: /dev/rfcomm0): ")
ser = serial.Serial(serialName, timeout=1.0)

# Function to return the current refresh rate
def getRate():
    # Poll the GPS unit for navigation rate settings
    # by sending an empty "poll rate settings" message
    # General format of this message:
    # \xb5\x62 = sync chars
    # \x06 = class CFG
    # \x08 = ID for CFG-RATE message
    # Next two bytes are length of message
    # Message has no contents (because we're polling for rate)
    # Final two bytes are checksums
    print "Sending request to check rate..."
    ser.write("\xb5\x62\x06\x08\x00\x00\x0e\x30")

    # Look for the result to see what the rate is
    # It will be formatted just like above, except with message contents
    # The key message contents are the first two bytes, which are the measure rate
    # in milliseconds
    found = False
    attempts = 0
    while not found:
        if attempts > 10:
            # Try sending the request again every 10 seconds
            print "No response yet, resending request..."
            ser.write("\xb5\x62\x06\x08\x00\x00\x0e\x30")
            attempts = 0

        result = ser.read(4096)
        try:
            responseIndex = result.index("\xb5\x62\x06\x08")
            length = struct.unpack("<H", result[responseIndex+4:responseIndex+6])[0]
            if length != 6:
                print("Got a weird response length: {0}".format(length))
                print("Quitting...")
                sys.exit(1)

            contents = result[responseIndex+6:responseIndex+6+6]
            updatePeriod = struct.unpack("<H", contents[0:2])[0]
            rate = int((1.0/(float(updatePeriod)/1000.0)))
            return rate
        except ValueError:
            # No response yet
            attempts += 1
            pass

try:
    ser.read(4096)
    rate = getRate()

    if rate < 10:
        print("Update rate is {0}hz.  Going to try to fix that...".format(rate))
    else:
        print("Update rate is already {0}hz.  The GPS should already be good to go, not doing anything else.".format(rate))
        ser.close()
        sys.exit(0)

    # Send commands to set to 10hz if necessary
    print("Attempting to set 10hz...")
    ser.write("\xb5\x62\x06\x08\x06\x00\x64\x00\x01\x00\x01\x00\x7a\x12")
    ser.read(4096)
    # Save to EEPROM, both types of flash, and BBR
    print("Sending save config...")
    ser.write("\xb5\x62\x06\x09\x0d\x00\x00\x00\x00\x00\xff\xff\x00\x00\x00\x00\x00\x00\x17\x31\xbf")
    ser.read(4096)

    newRate = getRate()
    if newRate < 10:
        print("New rate is now 10hz, all set.")
    else:
        print("The new rate is only {0}hz, not sure what went wrong?".format(rate))
finally:
    ser.close()
Conclusion
And that’s it. The Windows application allows you to make other configuration changes and get more debug output, but i found it a much bigger pain to use.
[…] Once the GPS receiver is ready, it still needs to be set to run at 10hz. By default, the module only does 1hz, which is no better than the average phone. I wrote up how to do this in a separate article. […]
Hi James, very nice article! One questions: After set the gps to work as 10hz, this process need to be repeated every time that i’ll use the module? Or it is necessary just one time?
Thanks!
Hi Leandro, thanks for the feedback. As long as you use a module with EEPROM or Flash support, it should be permanently set.
Some of the cheaper modules use battery-backed RAM, and these will lose the setting when the battery runs out, which is a matter of minutes or hours.
Hello James,
Nice tutorial! I have a few issues though, I used an HC-06 and a Reyax RY8253F GPS Module, but it does not connect to any sattelite using RaceChrono (and gnss led is off).
Also when I try to set it to 10Hz i get an error:
https://www.photobox.co.uk/my/photo/full?photo_id=502140862664
Is there something to do that I could have missed?
I could set it to 10Hz using u-blox u-center but then when I turn it ON the HC-06 does not turn ON, I need to disconnect the TX/RX for it to turn ON.
Thank you!
Hi, thank you. I can’t see that picture on photobox – I get redirected to the main photobox site. What is the error when you try to set it to 10hz?
The bit about disconnecting TX/RX makes me wonder if it’s wired correctly?
Yes it looks like a communication issue but I cannot see why, TX is on RX and RX on TX.
And the desktop software managed to read and update the frequency.
I tried with another GPS module and HC-06 board, but the issue is the same.
I will try to connect the GPS module to a computer to check its configuration.
The GPS 10Hz setter message was:
Trying to set GPS to 10hz using device HC-06…
Connecting to GPS… Done.
Getting update rate…
Rate is 1 hz Rate is less than 10hz, attempting to set to 10hz…
java.lang.RuntimeException: Got a bad message from the device, try again. (Position is 5 but length is 10) Errors occurred, stopping now.
Thank you for the quick answer!
Ah, OK. So it looks like the GPS 10hz app is successfully connecting, but maybe the newer GPS units have a slightly different message format. Thanks for the tip, that’s something I can fix separately.
If you already used the ublox desktop software, you don’t need the 10hz app anyway. Setting it to 10 (Or I think the new module supports 17hz?) is a one-time deal.
So the question is really why racechrono isn’t working. It’s troubling that you have to disconnect tx/rx. You said those connections are swizzled (tx -> rx and rx -> tx)… There’s not a lot that can go wrong here, so this is puzzling. Maybe something is up with the bluetooth stack on your phone or something? Do you have an old one or one you can borrow to confirm it’s not your phone?
The GPS module board shows v1.1.
When connecting using ubox, do you also access all the other settings and get the details of the GPS signals as shown in the datasheet?
http://reyax.com/wp-content/uploads/2017/09/RY825xx.pdf
Thanks
If the desktop software works and your phone doesn’t, I’d try another phone first
The desktop software did not work properly neither, but I think I got it fixed, the issue seemed to came from the USB breakout board I was using, when using another power supply the GPS manages to output a signal. I will confirm tomorrow.
Ahh, OK. In that case, that makes a lot of sense. Hopefully that fixes it. Good luck!
So that was not it.
After several test it looks like the system is only working properly in its default configuration at 1Hz.
When setting the rate to 5Hz, bluetooth is working but the data in RaceChrono are incomplete and not updating properly.
When using 10Hz or more, the bluetooth board does not turn ON.
The GPS though is always working properly. It looks like a communication issue between the two modules.
I checked baud rates and tried an higher rate, I tried another power supply, 3 HC-06 board and 2 different GPS receiver (but same spec) but the issue remains.
Have you already use a Reyax RY8253F?
Thanks
Weird. I have not tried an RY8253F yet, although I have had one on my bench to try out for months. The feedback on my article about building it makes me think it should work, though.
You’ve got sufficient power to both modules as well, right?
One idea based on feedback from the article – looks like the HC06 defaults to 9600 baud rate. Have you tried bumping both the HC06 and the GPS to 115200?
Edit: Sorry, I see that you did try a higher baud rate.
Bluetooth module not turning on makes me wonder if you’re providing insufficient amperage to the modules. Maybe try giving them each separate USB power and make sure they both have sufficient amperage?
Looks like the HC06 requires 150mA. The Reyax says “GNSS Current” of 40mA – not sure if that’s total power draw. Anyway, how much power are you giving it?
Yes I tried using a stabilized power supply but with the same result.
But if I join the TX/RX pin I can get it ON but in an error state I think (Impossible to connect to the bluetooth)
Something that could help is to check the NMEA protocol configuration, if you have time to send me a screeshot of what you have in u-center/UBX/CFG/NMEA, MSG and PRT. Maybe the default configuration is different on this GPS.
Thanks!
Unfortunately, I haven’t actually installed or used the ublox software in years (since this was written). I don’t think I have any other ideas. Not much I can do without seeing it. Sorry I couldn’t be more help!
I have what it looks the same issue.
I also use an HC-06 and a Reyax RY8253F GPS Module, but it does not connect to any sattelite using RaceChrono (and gnss led is off).
Connected the two board as a sandwich so TX/RX RX/TX is right.
Have no been able to connect via pc and U-Center.
Any suggestions what to do?
Have established connection with U-Center and can communicate via bluetooth module.
I don´t se any satellites at all, I don´t get any GPS time.
Maybe the RY8253F is broken?
Any suggestion what to do?
It’s a good sign that you’re able to communicate with the module. Sometimes a small GPS module like this won’t be able to lock on any satellites indoors. Have you tried it outside?
Now I got it to fix on satellites.
But I have problems when setting the GPS rate to higher then 5hz.
Maybe I have to set higher Baudrate than standard 9600?
Good deal! Yes, I would try a higher baud rate for sure. I’d try 115200. Be aware both the bluetooth and GPS modules need to be changed.
I have same problem, when rx/tx is connected HC06 won’t turn for about 10s, then it is randomly flashing. If I disconnect one pin I could connect to it
u-center is very powerful and allows way more than just setting the update rate. I just run it with wine on Linux. Works really well.
Hi James! I built a receiver using your instructions, consisting of a RY8253F and an HC-05. I initially had the issue that others described where the 10Hz app would throw an error. I tried u-center but could never get it to connect, and u-center would freeze. I tried the 10Hz app again, and it reported back that the device was now set to 10Hz. I fired up RaceChrono and walked around my backyard. The update rate varies widely between 0.1Hz and 10Hz, with an average of about 2Hz. This was using my OnePlus 6. I tried it again on an old Galaxy S4, with the same result. I ran the receiver with RaceChrono on the S4 as a backup at the track and got the same result. The graph of update rate shows it cycling between lows of 0.1 and highs of about 6. I was curious to see if the average rate would be sufficient to be an improvement over the internal GPS. Unfortunately, sometimes the receiver will drop out at 0.1Hz and stay there for many seconds. This makes the data completely unusable. I still can’t get any connection with u-center, it’s still freezing. Any suggestions?
James, I built a second receiver in case I had a hardware issue. I also tested both of them with a third Android phone. I still get the same results. Upon initial connection, RaceChrono will show 10Hz, but shortly there after, update rate will turn into a saw tooth with lows around 0.7Hz and highs around 4Hz. It will also, on occasion, completely drop to 0.1Hz and stay there for about 20 seconds. I tried installing a 10 uF capacitor between the Vdd and GND pins, per the RY825xx data sheet. That didn’t seem to have any effect. I’m hoping you’re still checking this message board. Thanks!