Making a Cutting Board with a Twist
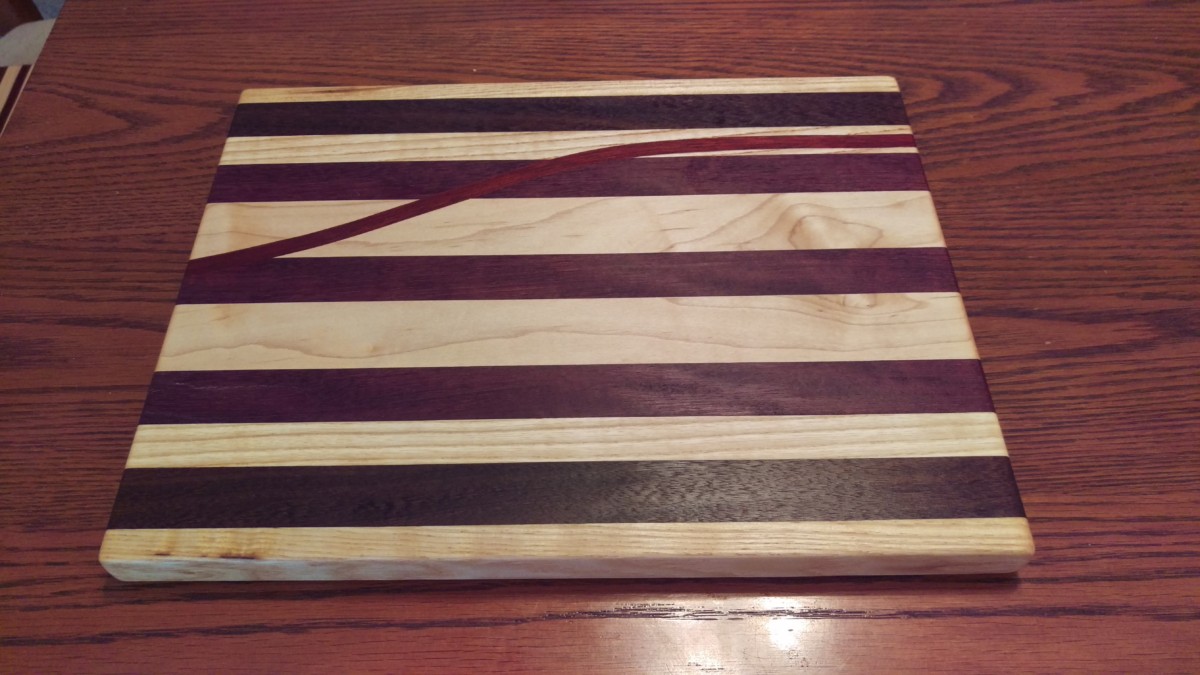
One of the final boards
This year for Christmas, I decided to make a few of the gifts. In particular, I knew a few members of my family who liked to cook would appreciate some cutting boards. This is a fairly standard woodworking gift, of course. I want to note here that I didn’t make this method up myself: here’s a youtube video discussing it. I’m guessing Art Mulder didn’t originally invent this idea either. But it looks really cool, and I want to give credit where it’s due.
There are two main types of cutting boards: end grain and long grain (or edge grain). End grain cutting boards are easier on your knives. However, I find long grain cutting boards to look nicer and work just as well, practically speaking. Additionally, they’re easier to plane to a finish: you should never run end grain through a power planer, the results can be explosive if the planer catches the grain!
Selecting the Wood
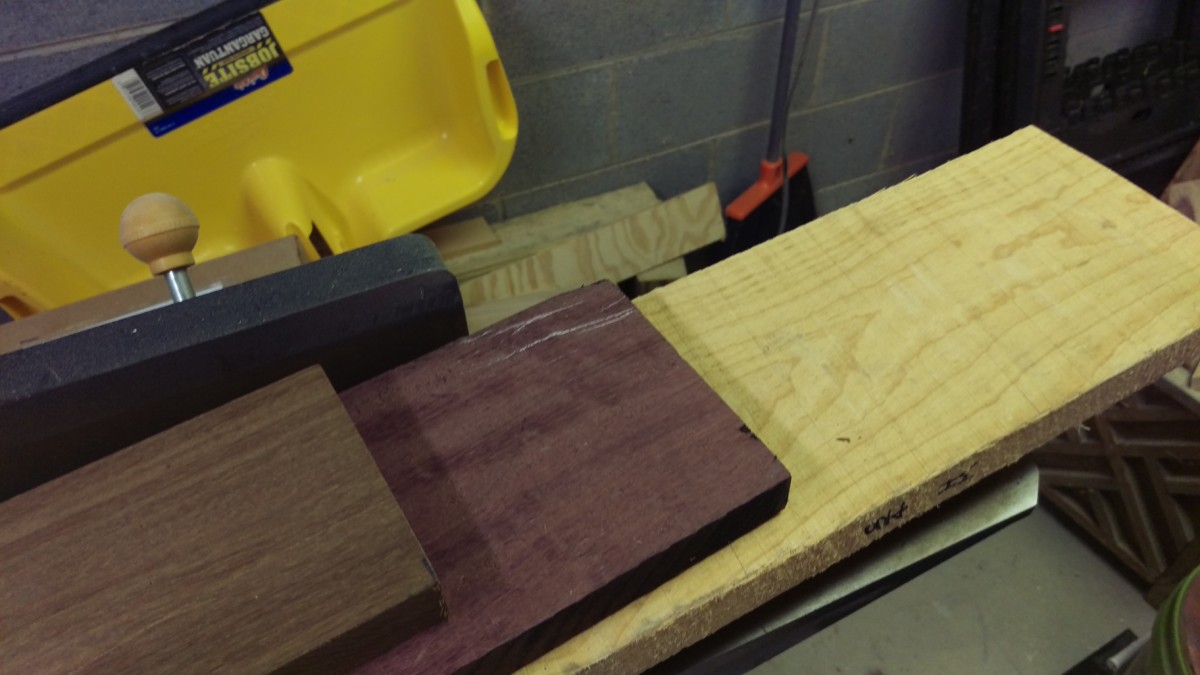
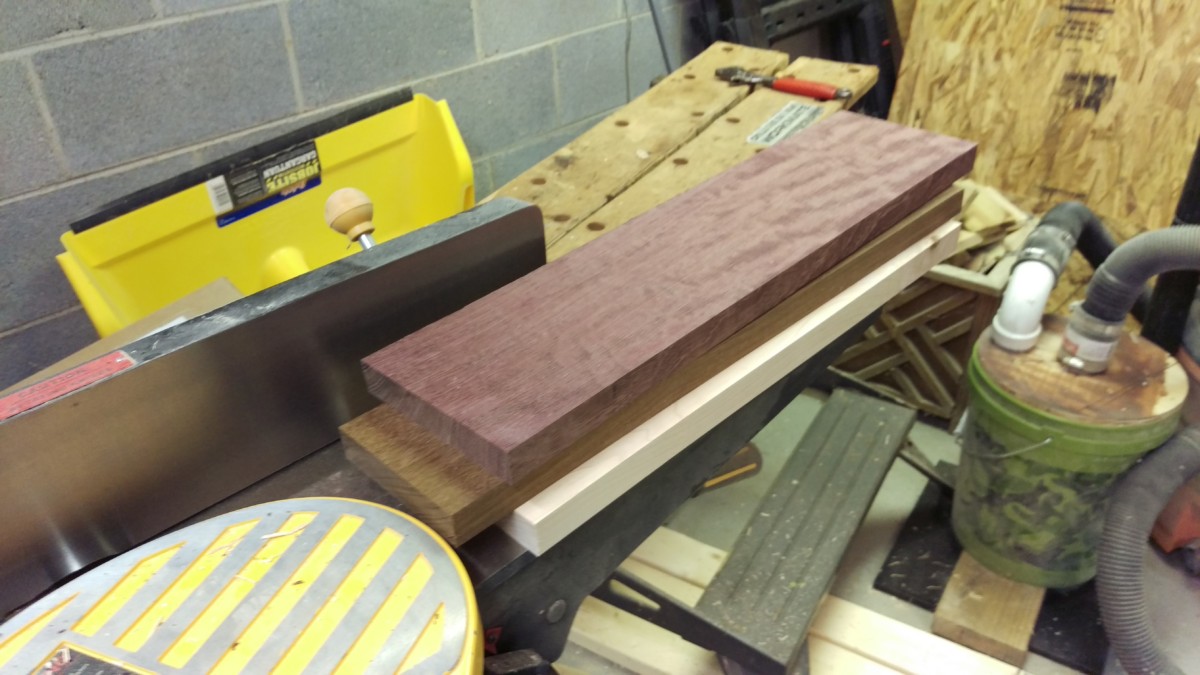
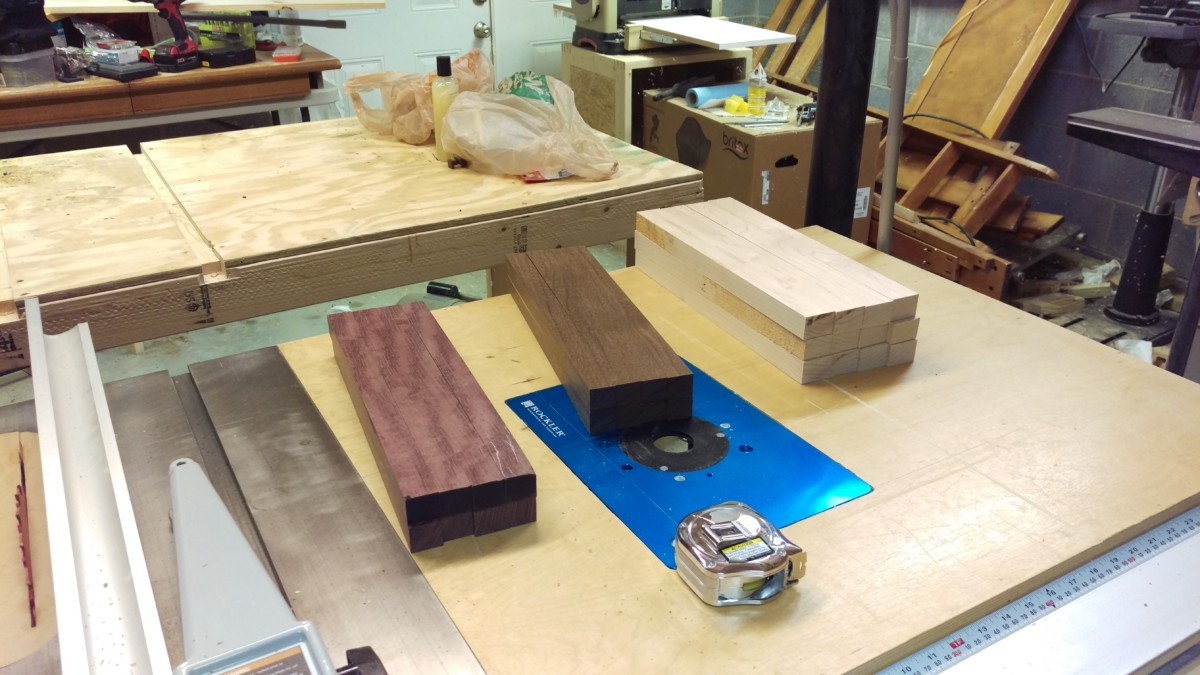
Louro Preto, Purpleheart, and Hard Maple
The first step is to select appropriate wood for the board. You ideally want a dense hardwood with tight grain for this purpose. This gives the board a nice weight and resistance to cutting, as well as helping to limit warpage and water absorption.
I ended up making three boards: one for my mother-in-law, my wife, and my dad, all of whom like to cook. For the first two boards, I picked out some very vibrant purpleheart. For my dad’s board, I picked out the dark brown louro preto. These are both exotic south american hardwoods. For those in the Knoxville, TN area, Jeffries Woodworks is absolutely the best place to buy this kind of lumber.
I also got about 4′ of 4/4 hard maple. This provides a nice contrast to either of the other two woods, has a nice figure, and is easy to work with. I also got a small amount of some more exotic hardwood for the curves. For my dads, I grabbed some dark cocobolo. I got some very dark red bloodwood to use with all 3 boards.
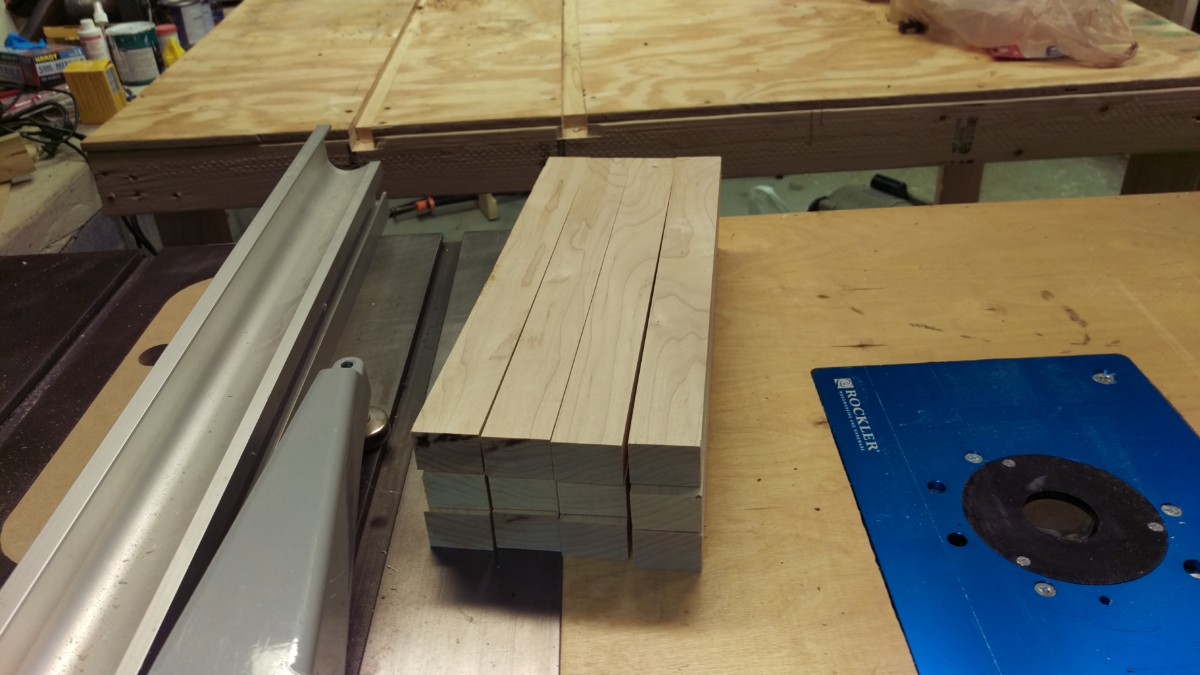
Milling the Lumber
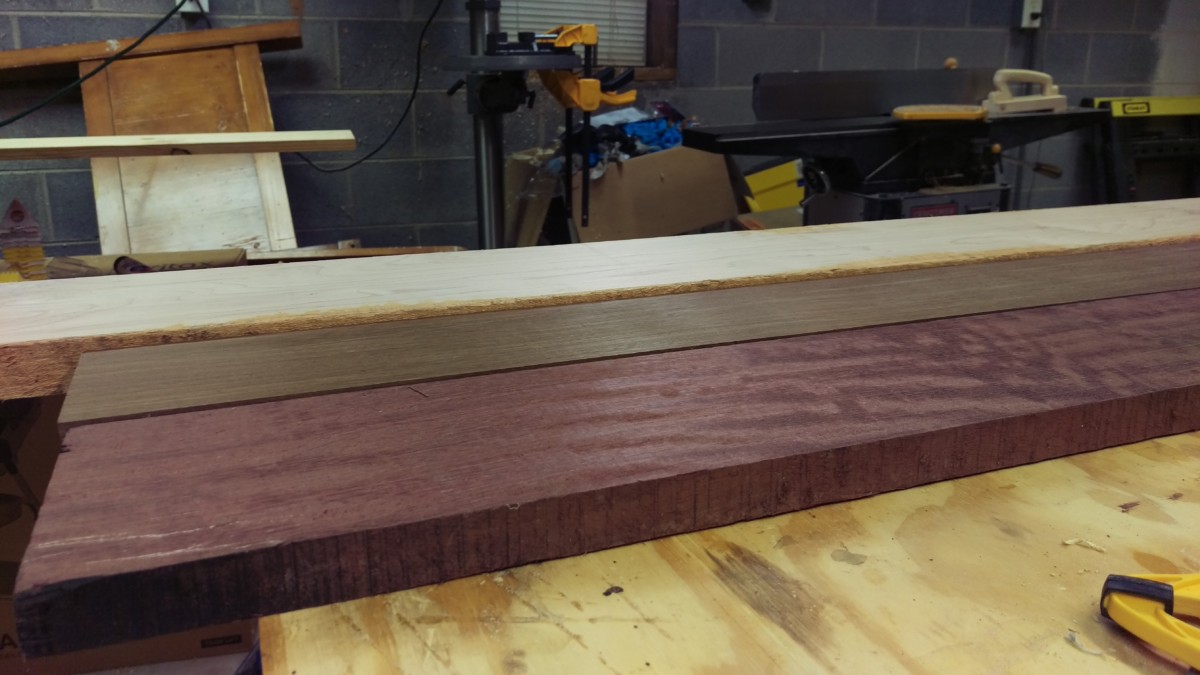
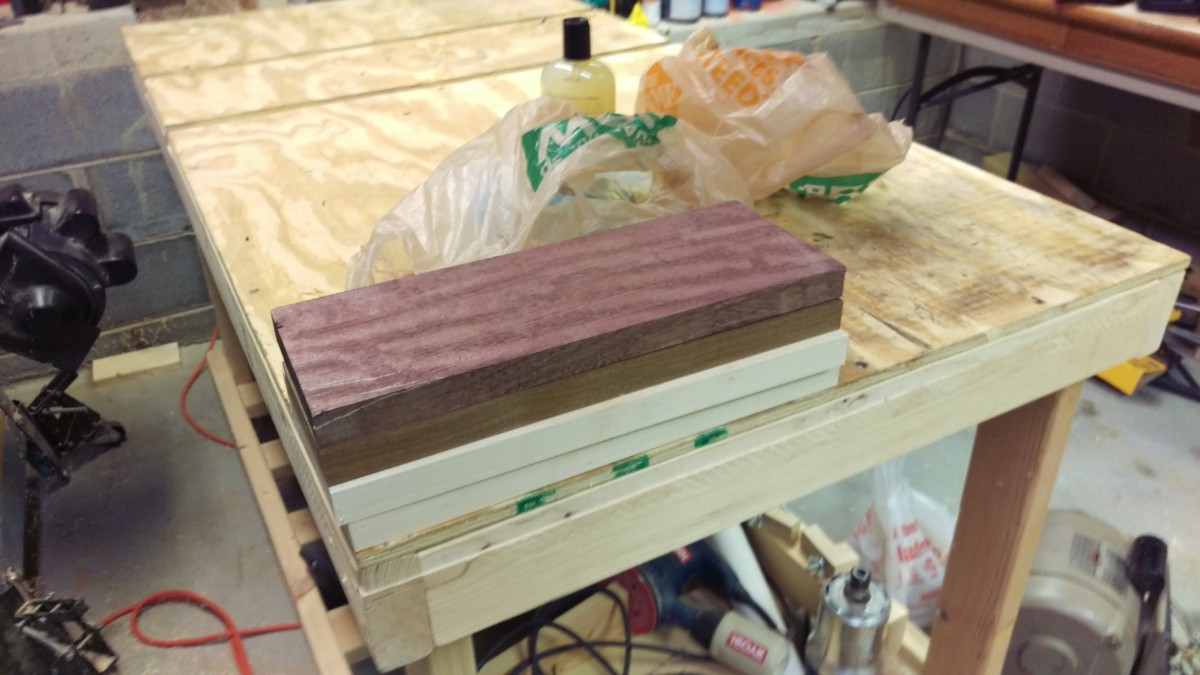
The louro preto and purpleheart are already mostly milled
As you can see from the last picture, the purpleheart and louro preto were already planed on both sides. I wanted the cutting board to be as thick as possible, so I chose not to mill either piece of wood any further. Once the cutting board is glued up, it will have to be planed again anyway, so fairly flat S4S (4-side surfaced) wood was good enough.
The hard maple, on the other hand, was rough lumber. I jointed and planed it using my jointer and planer. The picture above is after milling the lumber. As you can see, the faces are now flat and smooth, but I still did further planing to make all 3 boards almost the same thickness. This makes things easier later on. I also jointed one of the edges on each board to have a reference surface for ripping them later on.
All 3 boards planed to same height, ready to cut up
Here are the boards ready to cut to length. I’ll note here that the hard maple is still just a bit thicker than the other two. I was concerned to take it too thin and then regret it. In reality, it ended up being about 1/8″ thicker. In retrospect, this was a big mistake because it caused problems with the glue up. It’s hardly to get a consistently flat panel glue up with pieces of different thicknesses. If you’re doing this, make sure you plane all of your wood to almost exactly the same thickness!
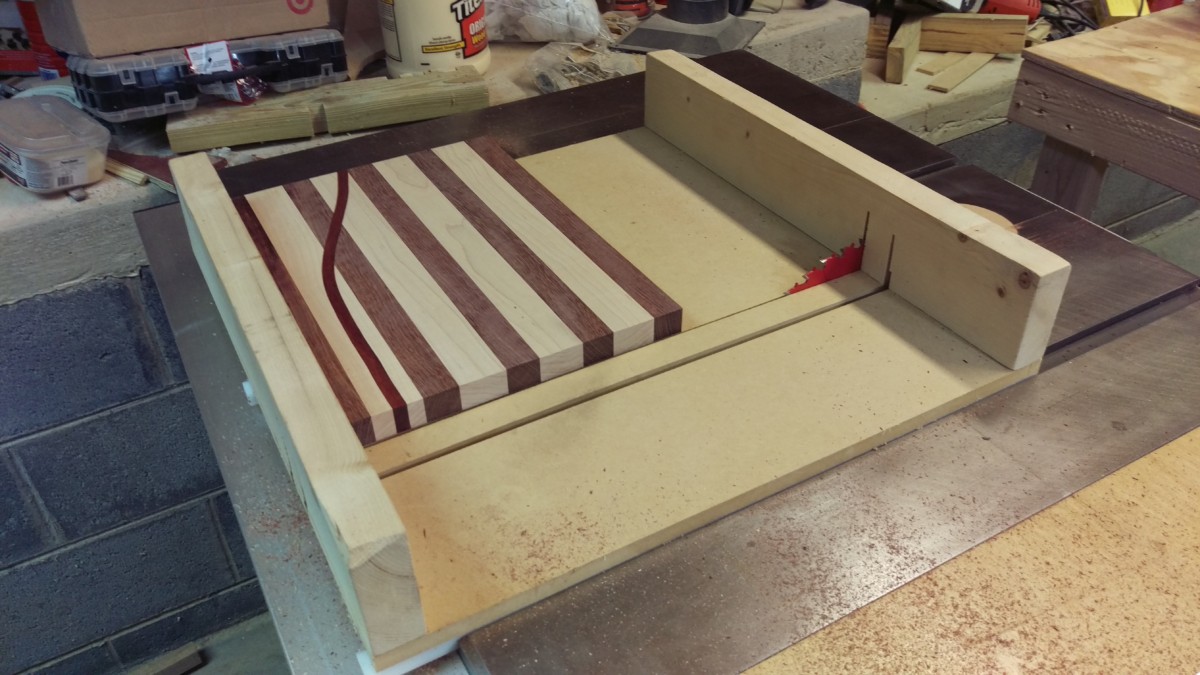
Cutting the Boards Down
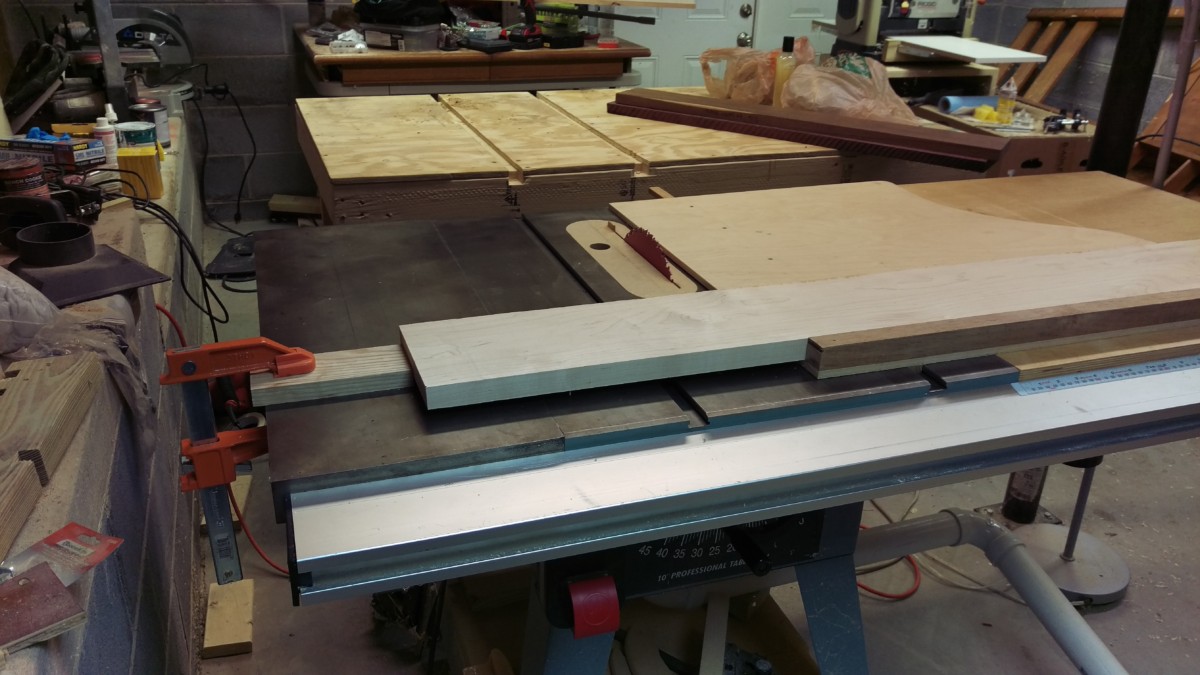
I used my big table saw sled for the longer pieces
I cut them down a little longer than necessary to allow room for trimming later on. The end goal was a 14.5″ board, so these were all cut in 15″-16″ sections. This big table saw sled was great for the longer pieces of wood. A stop block got them all to the same length, although precision isn’t really necessary here. This could be done with a miter saw.

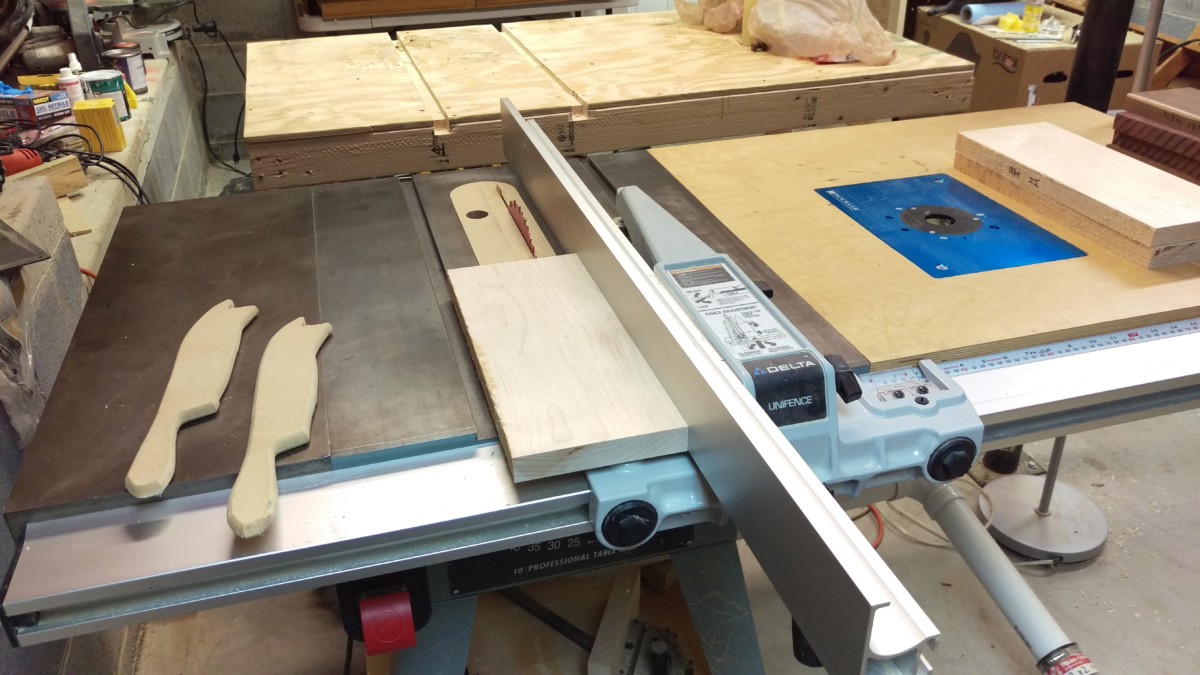
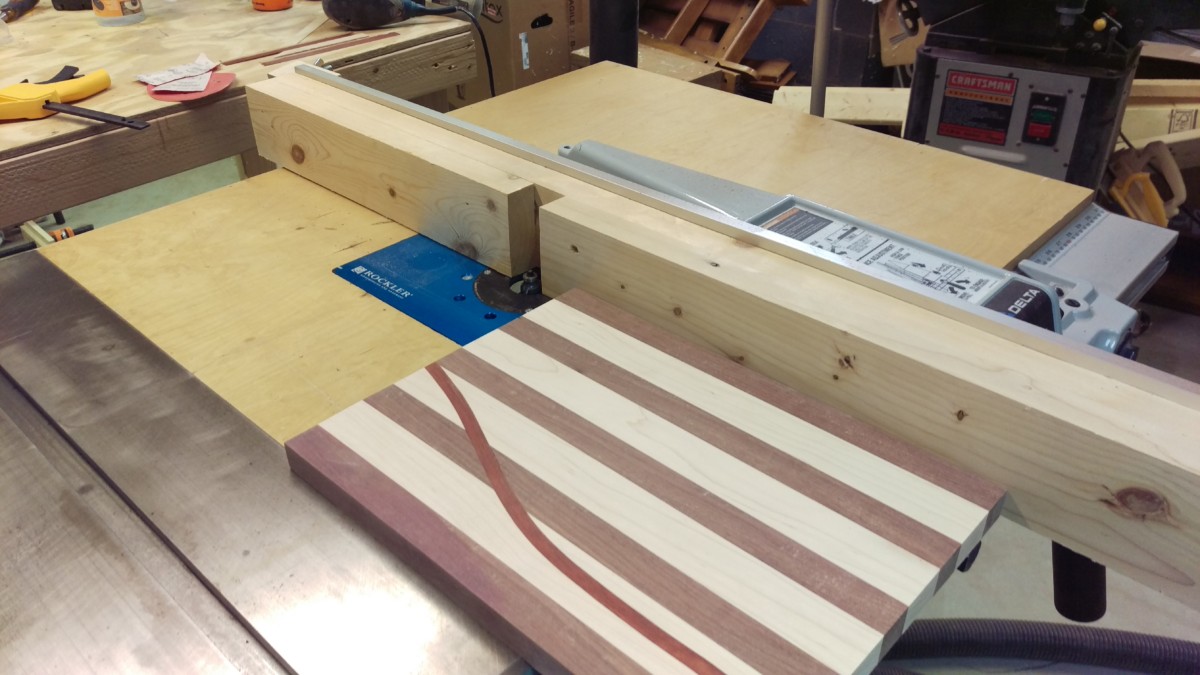
I used my smaller sled afterwards
For the final cut on each board, I switched over to my small sled. I simply kept the stop block where it was. Again, this cut could be done with a miter saw as well. Note that the stop block is well behind the blade so that it doesn’t cause anything to pinch or bind.
Large rough pieces ready for ripping
Second batch of rough pieces
Here are my piles of rough cut pieces. They’re all about 15.5 or 16″ long and ready to rip into lengths for glue up.
Ripping the Sections
Literally ready to rip
Once I had my sections cut to length, it was time to rip them into smaller pieces for glue up. I set my fence to the desired width. Anywhere between 3/4″ and 2″ should work here. I simply went with what was both aesthetically pleasing and would make efficient use of the lumber without too much waste.
Note that I’m using push sticks for this operation. Additionally, you really want to use a good rip blade for this cut. I’m using a relatively inexpensive Freud Diablo rip blade
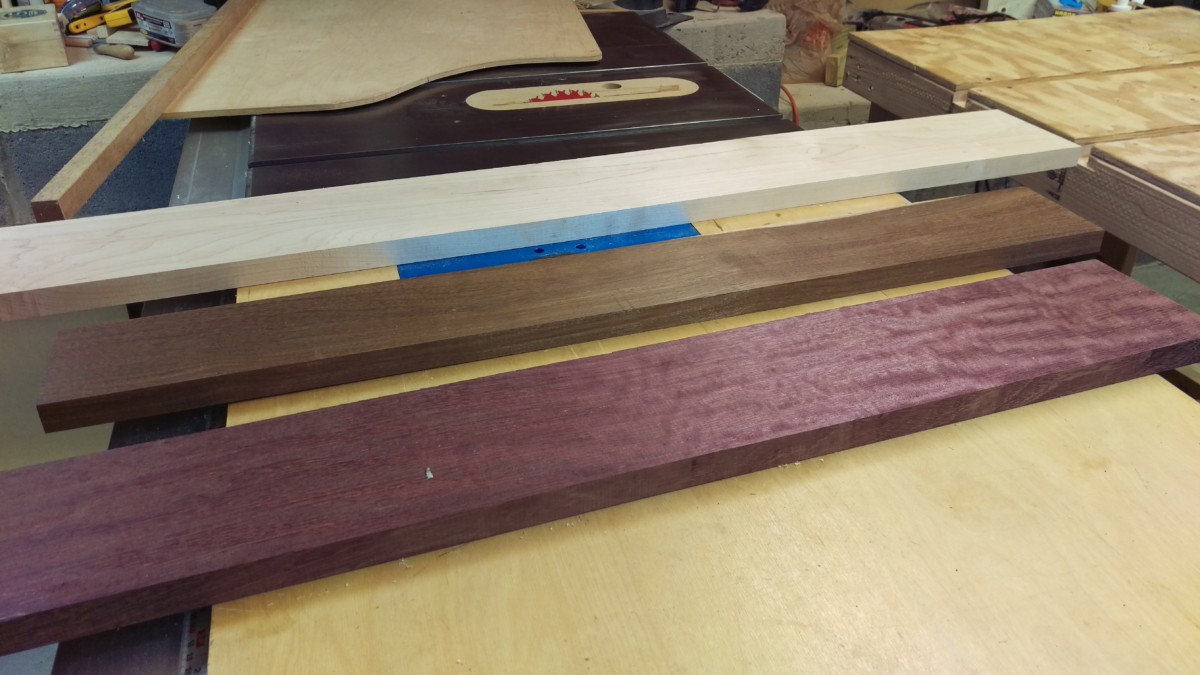
The maple after ripping
All of the lumber ripped to pieces
The maple ended up being a half inch thicker than the other two types of wood. The aesthetic is pleasing, and this made more efficient use of the lumber I had. If you stack the lumber in the same order you rip it, as I did here, you can maintain grain lines between pieces on the board in glue up later on.
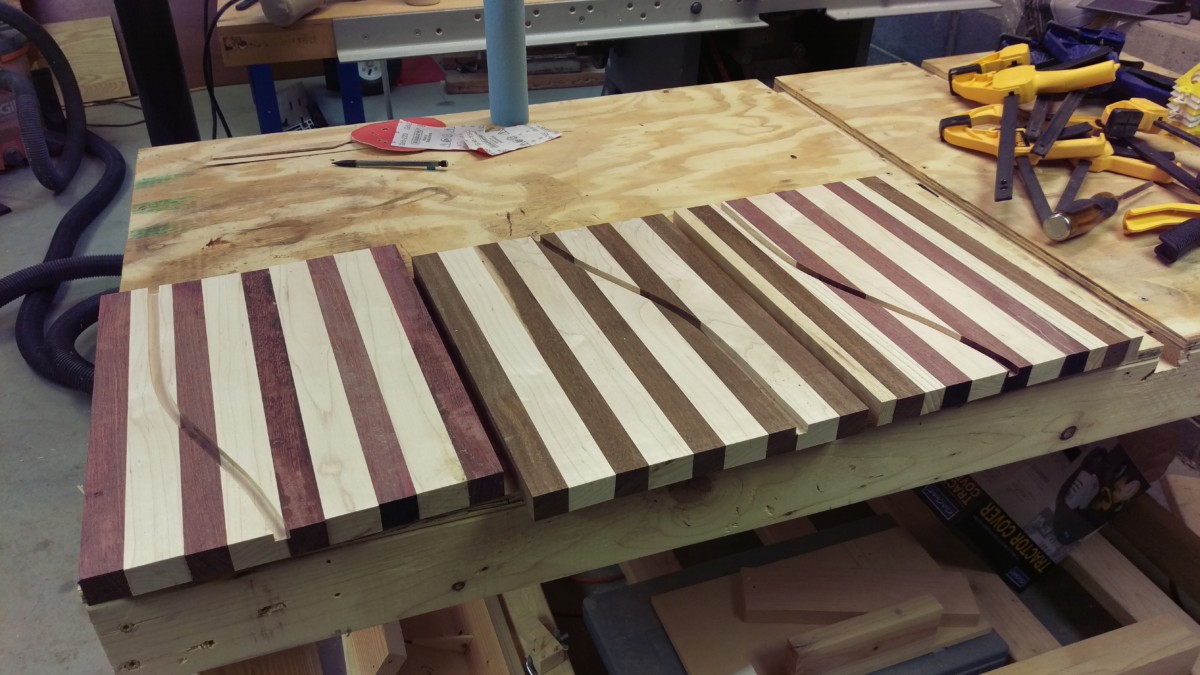
First Glue Up

Laying out the boards in the desired order

I’m using Titebond III
The pieces are now ready to be arranged and glued up for the first time. This process results in two glue ups. This first one makes the panel, and the second, easier one adds the curve. There was enough wood, by supplementing some ash from the lumber used for my daughter’s crib, to make a third board for my wife.
I used Titebond III specifically because it’s the most waterproof Titebond formula. It’s like that any wood glue should work, but I didn’t want to run any risks.

Using cauls and a lot of clamps
Another view
Final view
Once you’re ready, you can apply the glue and clamp up the panels. If you have fancy panel clamps, they should work very well. If you’re like me and do not, you can make do with some homemade cauls. It probably would have been better to make some fancy cauls out of fine woodworking or something, but I just used some laminated MDF and pieces of varnished lumber I had lying around. Just about anything that is flat should work.
The goal is to keep the pieces aligned vertically with the cauls while you force the pieces together with the clamps on the side. If you just try to squish the sides together, the wood will tend to push up or down as you apply pressure.
Cleaning Up After Glue
Cleaning up with a card scraper AKA cabinet scraper
After letting the three boards dry overnight, I came back the next day to work on them. Squeezeout can be tough to deal with while the glue is wet, since the cauls get in the way. Since you’re going to have to re-flatten the cutting board anyway, though, the extra glue is really no big deal. I simply ignored it, and then attacked it with my cabinet scraper once dry.
A good chisel can help get rid of any really thick chunks of glue. The cabinet scraper is ideal for further removal, as it can get rid of glue without removing as much material as the power planer. It also has no risk of tearout. You could also use a sander, but that has a greater tendency to make the surface uneven.
If desired, the board could be cleaned up and finished right now. If that were the case, I would go ahead and plane both sides flat again. Since I’m putting the curve in though, I held off to avoid thinning the boards any more than necessary.
Planning the Curve
Cutting a curve on the bandsaw to use as a template
The next step is to make a template for the curve. This can really be out of any good, flat wood. Some 3/4″ plywood or MDF would be perfect. Unfortunately, I only have 1/4″ and 1/2″ MDF, so that’s what I used. I glued a piece of 1/2″ to a piece of 1/4″, and then cut the curve out on the bandsaw. After that, a bit of hand sanding smoothed it out to a pleasing final curve.
Routing Along the Template
Clamp the template to the board where you want the curve
The next step is to use the template to route out a channel in the board. This is most easily done with a plunge router


Router ready to go
Put the bushing sub-base, an appropriate sized bushing, and an appropriate straight router bit in the router. Any straight bit can do. The important thing is that it is the same size as the desired width of your curve. In my case, I went with a 3/8″ bit.
Channel cut out with router in multiple passes
The next step is to begin cutting. Since I’m using a router in really dense hardwood, I took multiple light passes, plunging a bit further each time. Simply move the router along the template to cut out a channel in the wood. Be aware, of course, that the bushing will offset the bit slightly from the edge of the template, as is visible in the picture.
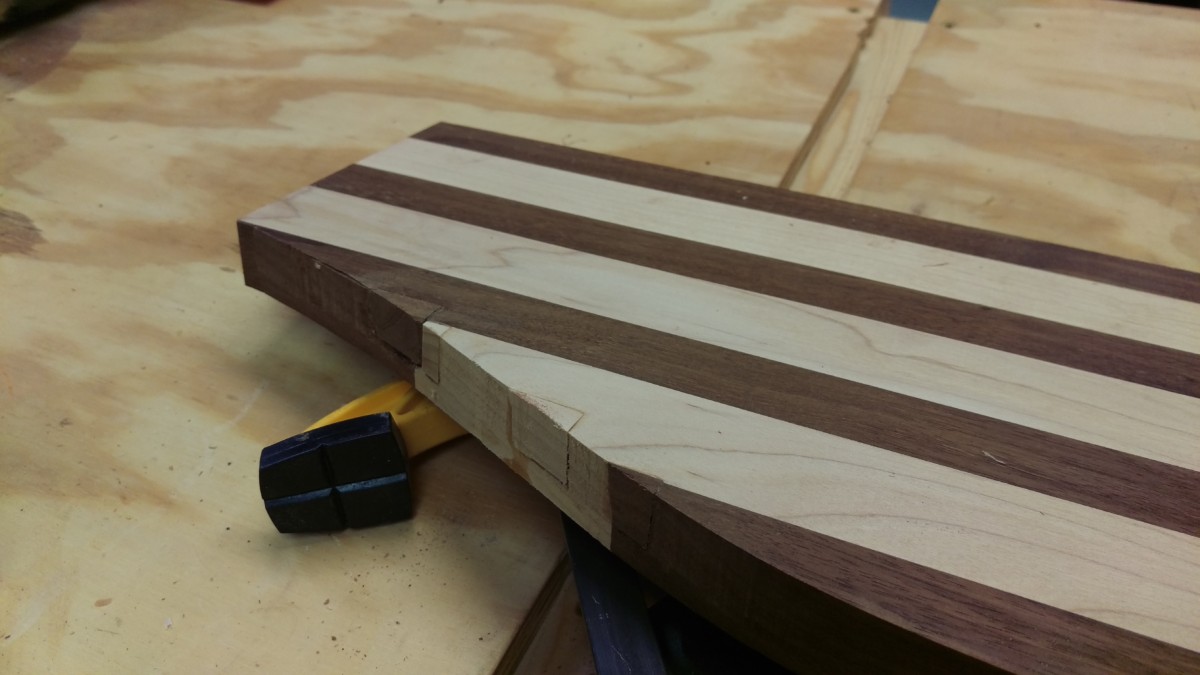
Cutting the Board Apart
The boards all have a channel routed out
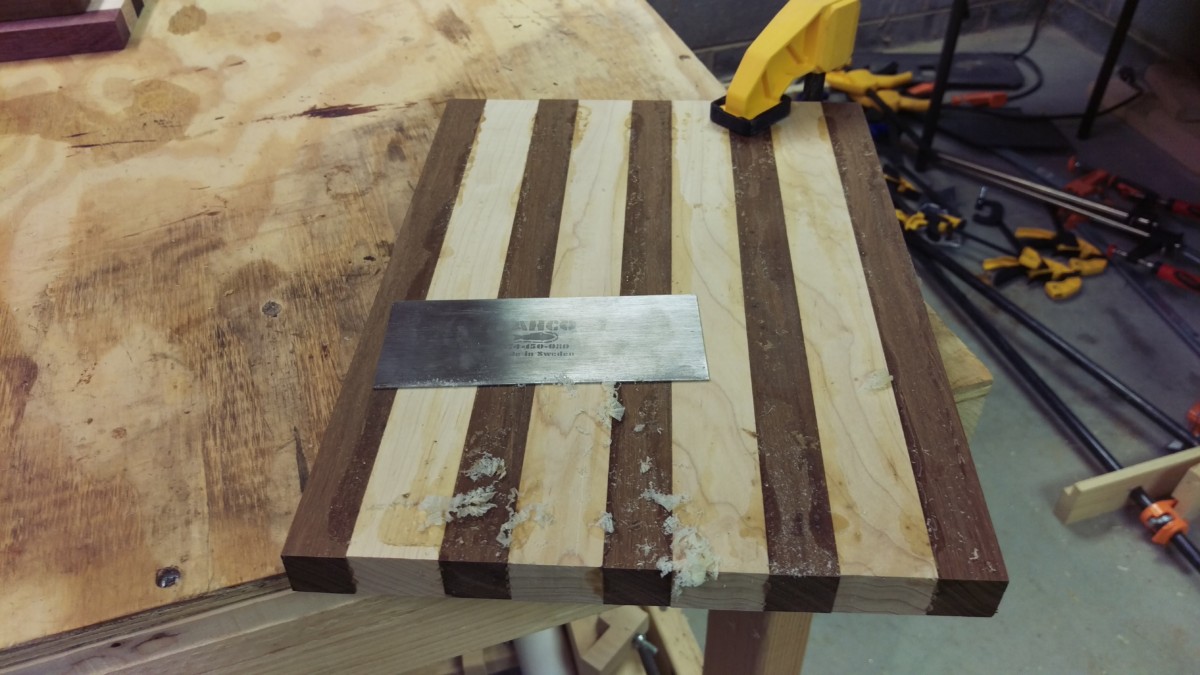
At this point, all the boards have a channel routed out. The next step is to cut the boards in half along this channel. The best tool for this is a bandsaw. I suppose it might be possible to use a jigsaw instead, but I think it would be easy to screw up and cut outside the channel. A good scroll saw would likely do the trick, just more slowly.

Cut apart
The 1/4″ blade I already had installed made short work of this. The board was easily divided in half roughly in the middle.

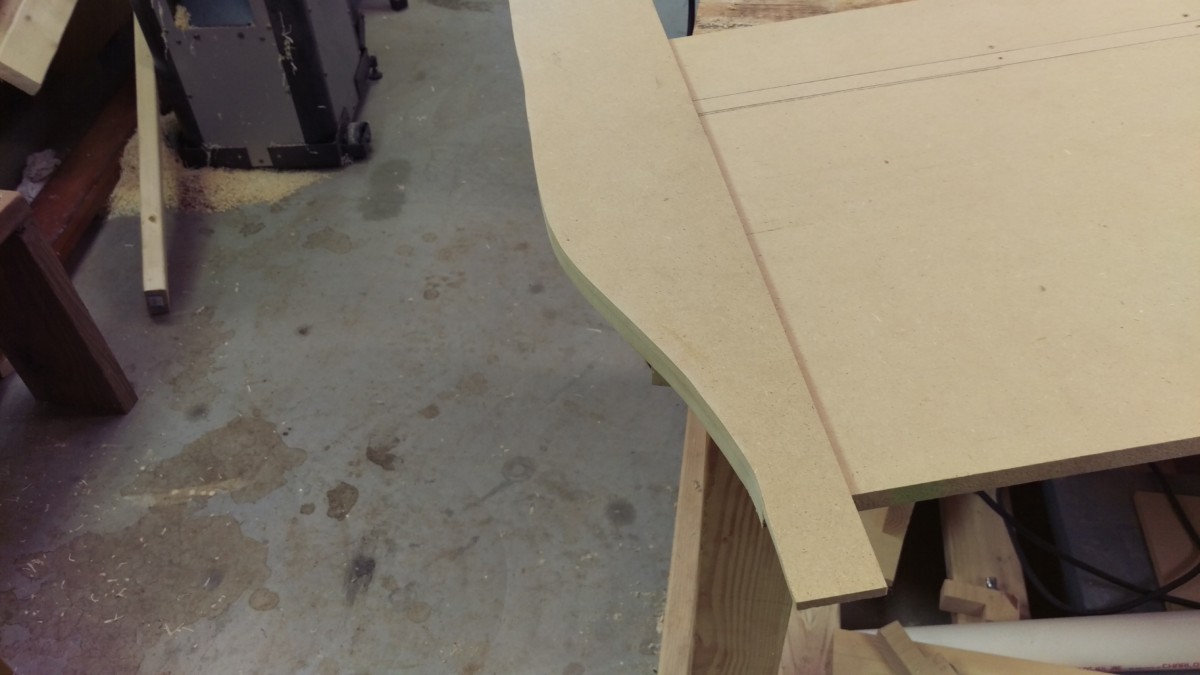
Go back with the bandsaw until the board looks more like this, THEN router
Pro tip: I directly took this board to the router. You do not want to do this. Instead, continue to hog out as much material from the edges of the board as you can with the bandsaw. This will make the router work much easier and much less prone to tearout. As you can see in the picture, there’s hardly any material left for the router to remove. If you do screw it up, you can read the section below on how I repaired my problem.

A flush trim bit takes care of the rest

Another view of the flush trim bit
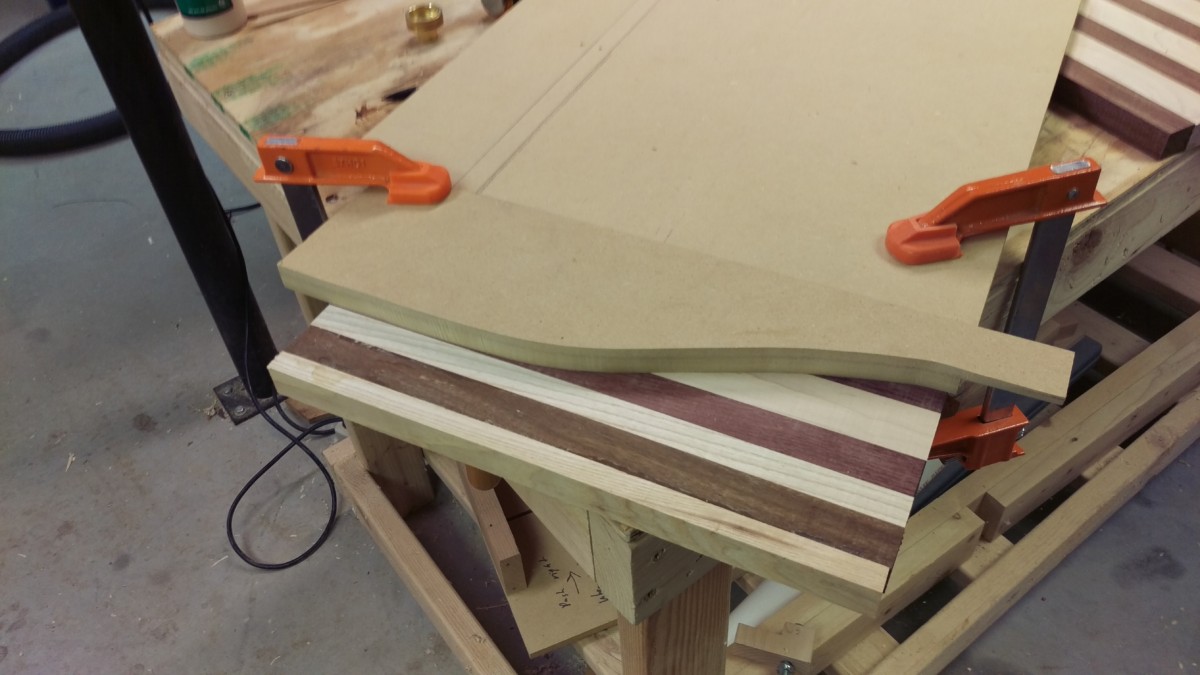
Once the board is split apart, you can use a flush trim bit
Flush trimmed
Once you do this correctly, you’ll have a nice smooth edge as shown. The remaining extra wood has been removed, and the two halves of the board have a 3/8″ channel between them where we can add our decorative curve.
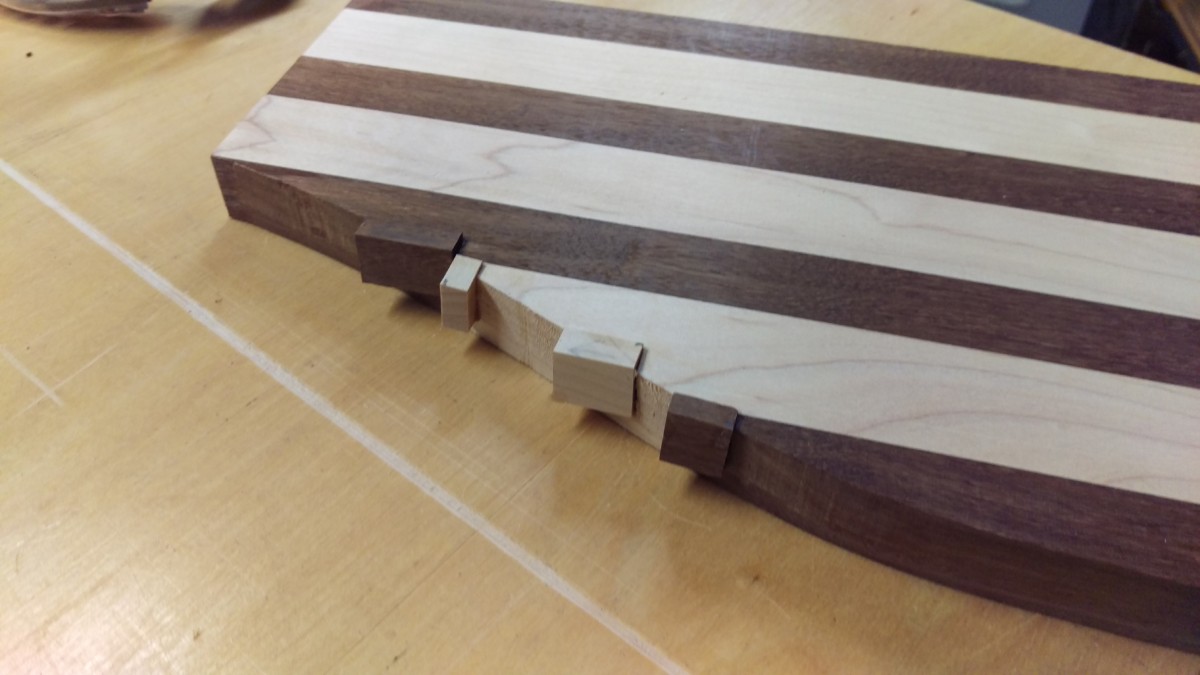
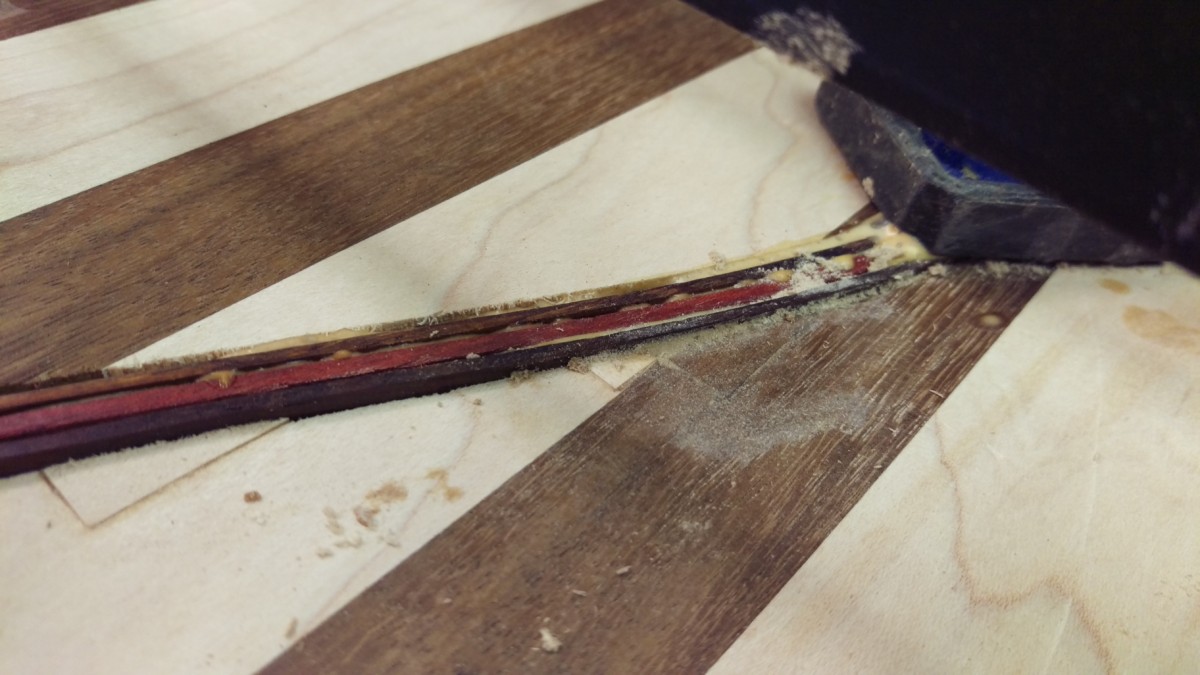
Fixing Router Tearout
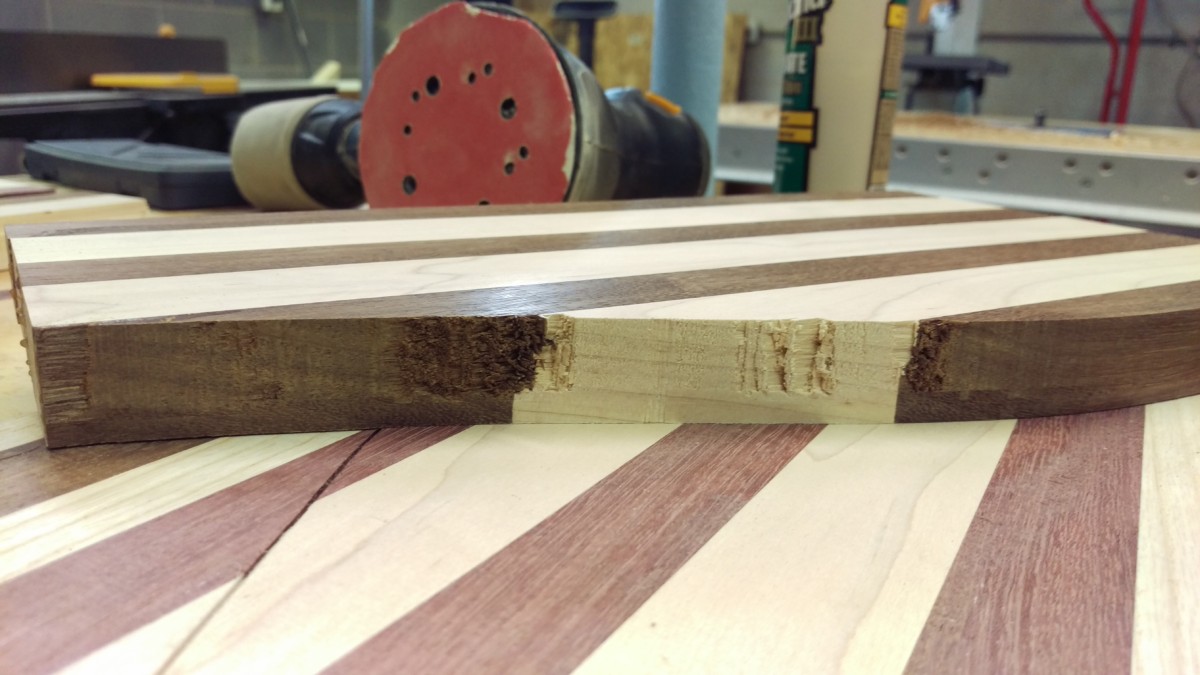
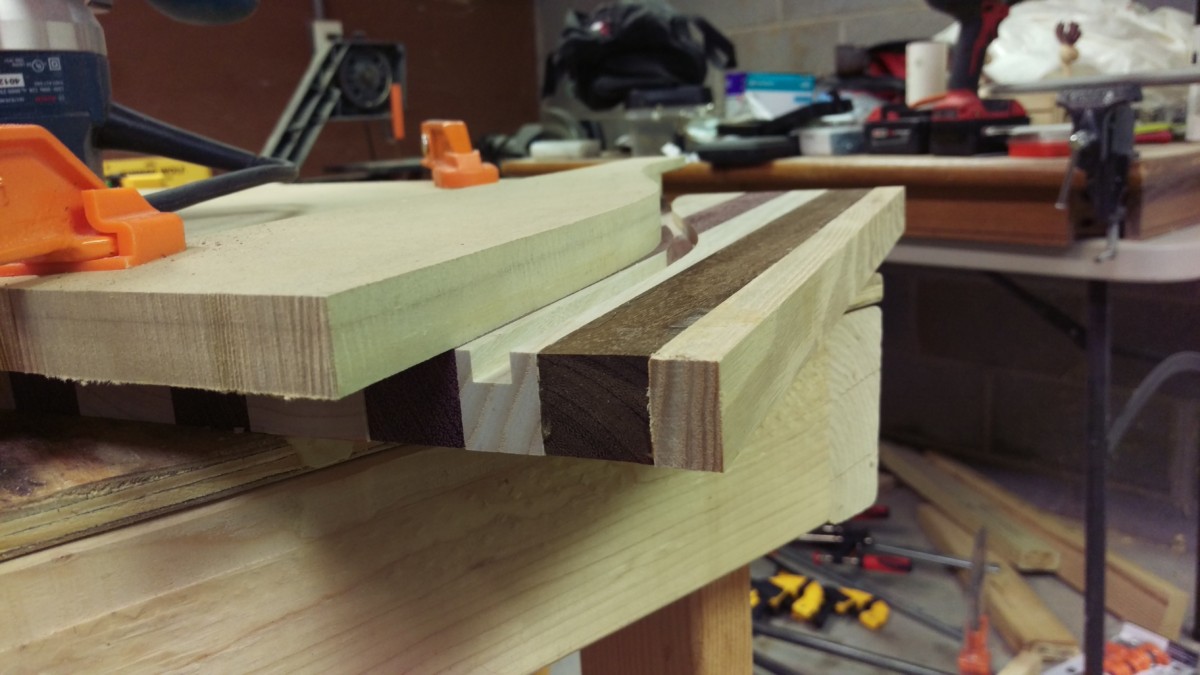
Whoopsie
So, as I said above, at first I was cutting the boards in half and directly routed them. This worked surprisingly fine in the purpleheart and maple, but the louro preto seems really prone to tearout. The flush trim bit grabbed onto the wood and tore it fairly severely.
As stated above, I went back and hogged out more material with the bandsaw for the other half, which solved the issue. Unfortunately, this half needed to be salvaged.

The initial damage
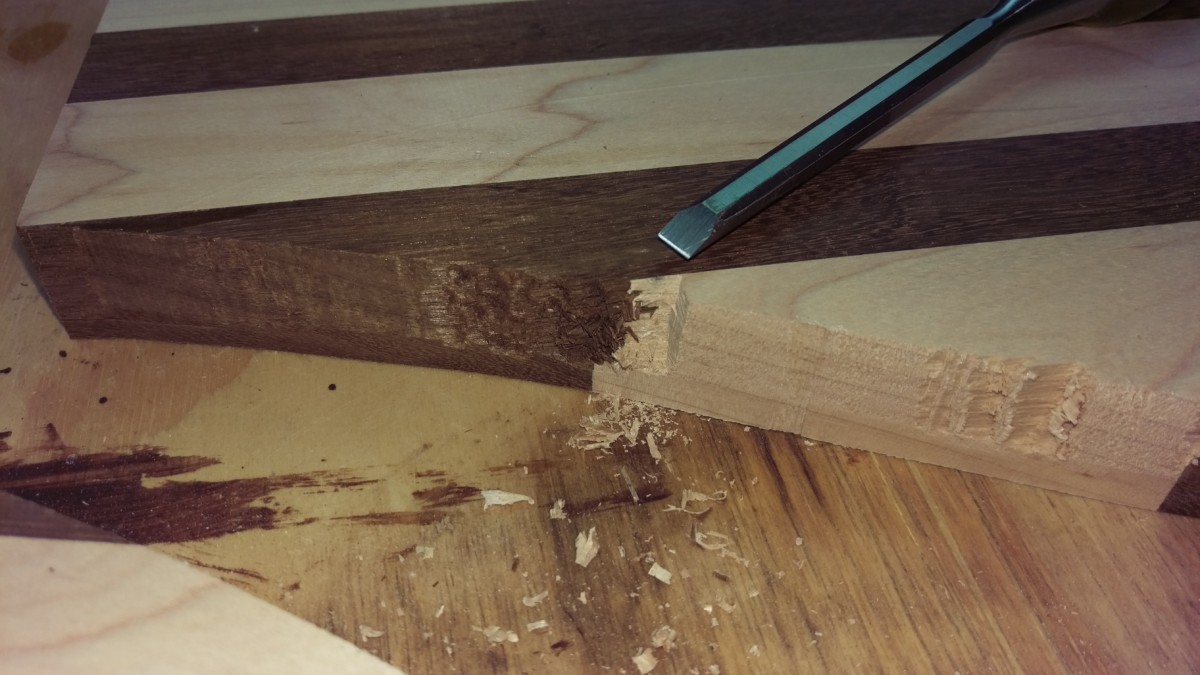
Chiseling the damaged areas square
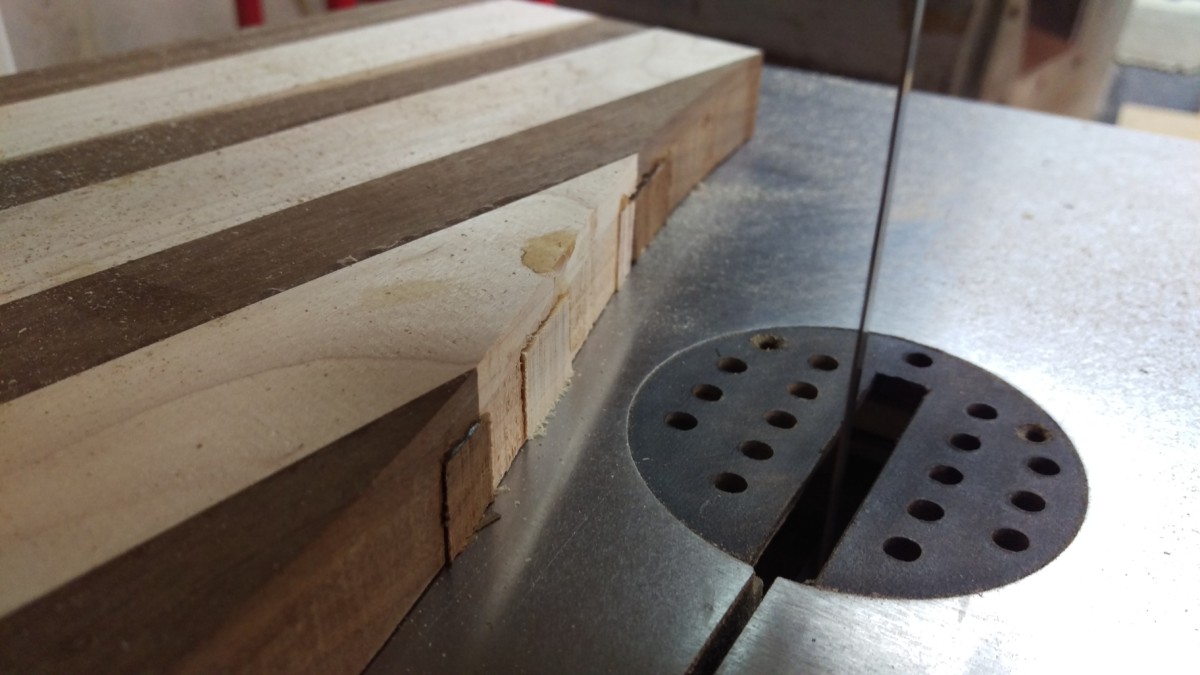
The good news is that the other side where the channel had been cut was still perfectly smooth. All I had to do was replace the torn sections on one side. I started by using a chisel to cut out material from the torn areas until they were more or less square.

Gluing blocks of new wood
It was fairly straightforward to cut small blocks of wood from scrap I had for each type using my small table saw sled. I sized them so that they fit into the sections I had cut out, standing just proud of the surface. They were then glued and clamped in place.
After glue drying
Once the glue dried, I was left with this. The new blocks are firmly glued to the chiseled sections, and oversized.
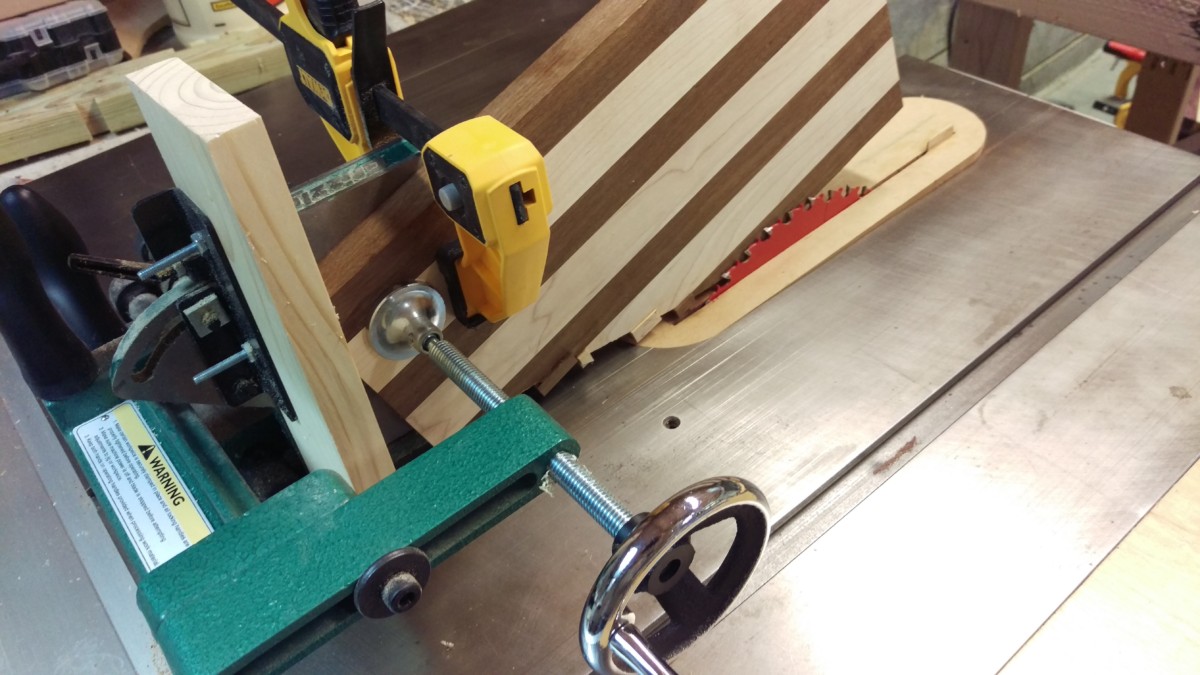
The tenon jig let me flush trim these
My Grizzly Tenon Jig
The blocks are now smooth to the edge
Here you can see the repair blocks smoothed to the edge. There is a bit of a gap between the blocks and the board, but that is the result of my poor chisel work and not the fault of the table saw or tenoning jig.
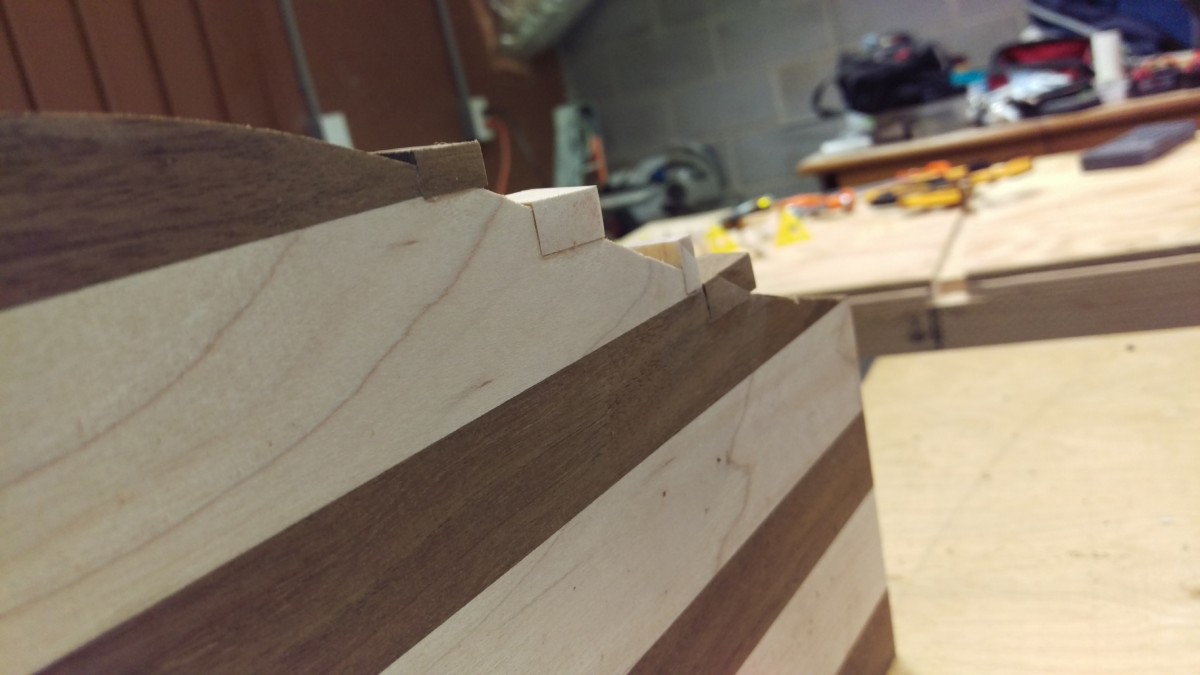
Flush cutting with the bandsaw
Repaired
At this point, I trimmed the blocks with the bandsaw and used the flush trim bit as before. You can see the repair from this side, but it doesn’t look too shabby.
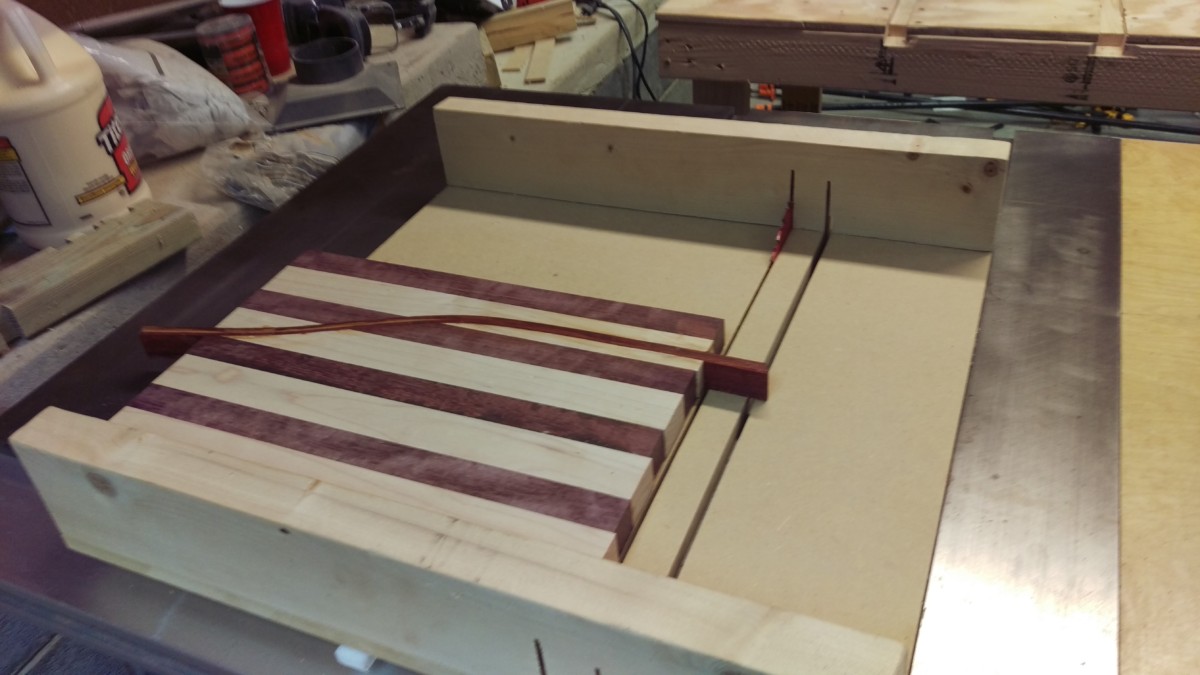
Adding the Curve
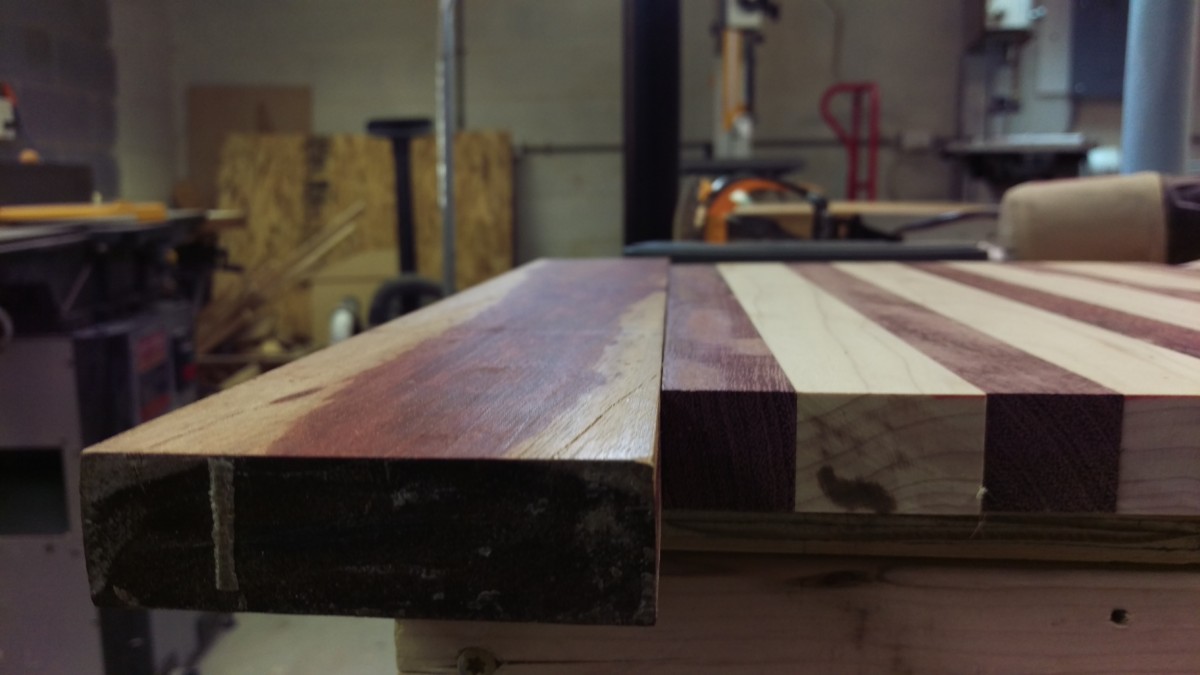
The bloodwood was already the same thickness as the board
With both halves cut apart and smoothed flush, it’s time to cut the wood to go in the middle. The first step is to thickness it if necessary. This piece of bloodwood was already the same thickness as the cutting board it would be going in, so I left it alone. The same went for the piece of cocobolo, which I didn’t take a picture of.
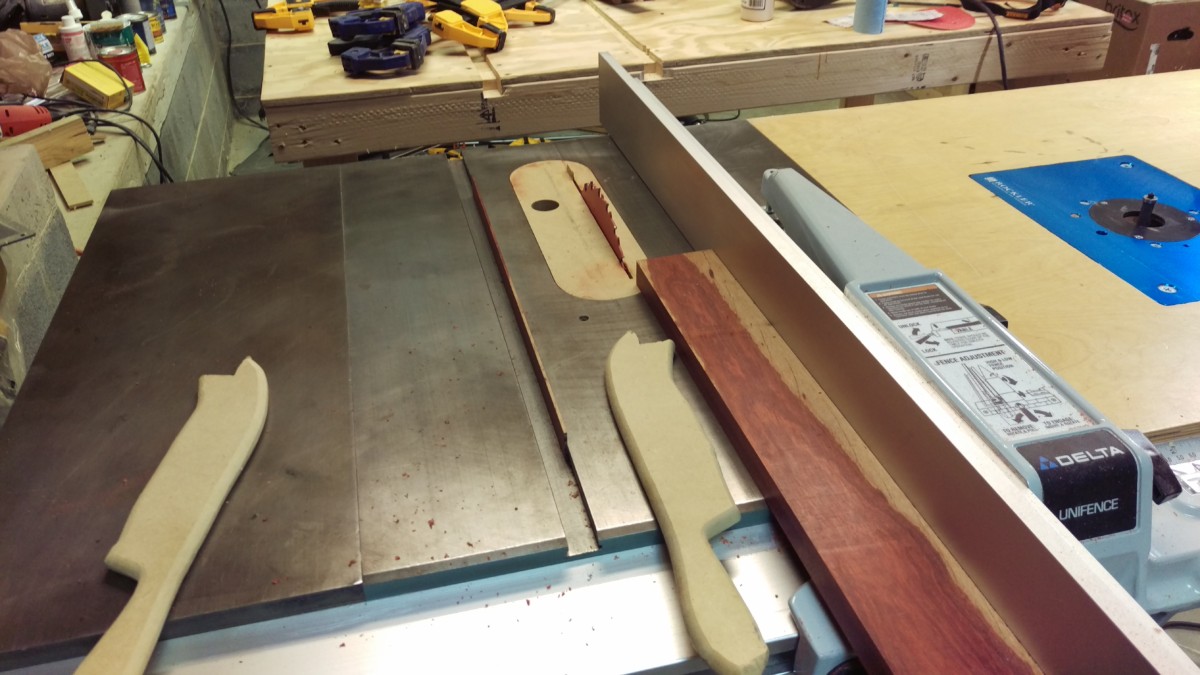
Rip it to thin 1/16″ to 1/8″ strips
The next step is to rip the wood to thin strips. They need to be thin enough to bend easily, between 1/16″ and 1/8″. The harder the wood, the closer you want to go towards 1/16″. Thinner pieces are more flexible and will also clamp more easily later on.
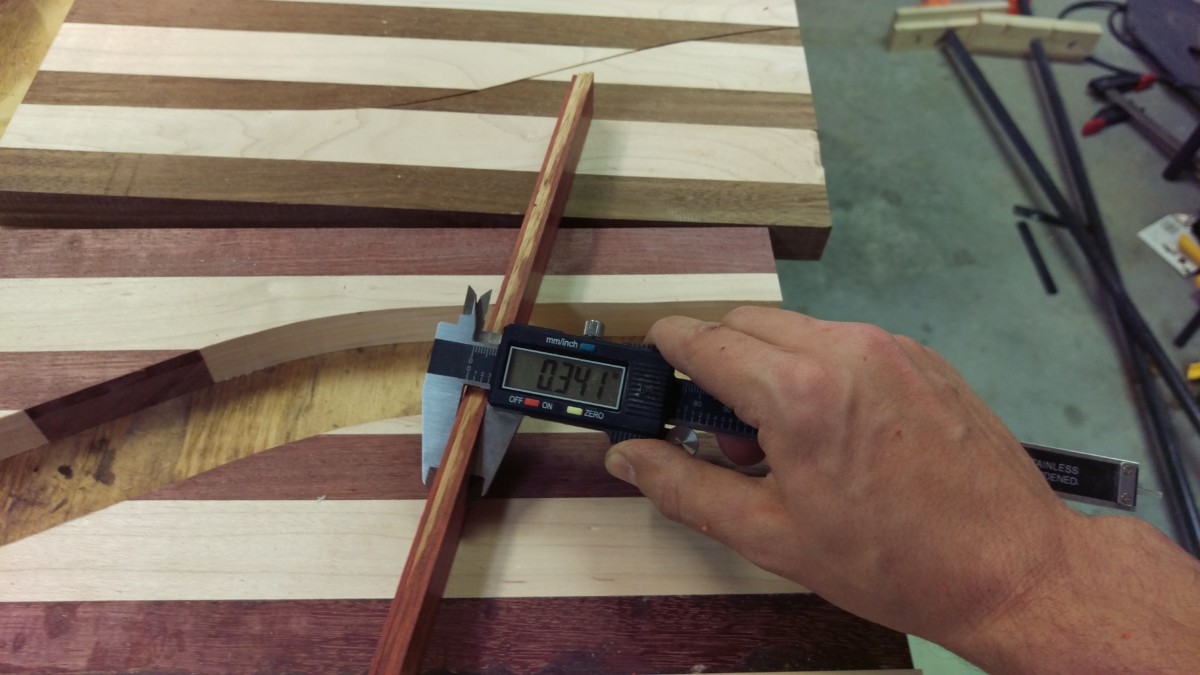
Cut strips until you have 3/8″ total
For each board, you need to cut enough strips that they are as thick as the channel you cut earlier when stacked together. In my case, I used a 3/8″ router bit, so I cut enough bloodwood for a 3/8″ or 0.375″ stack.
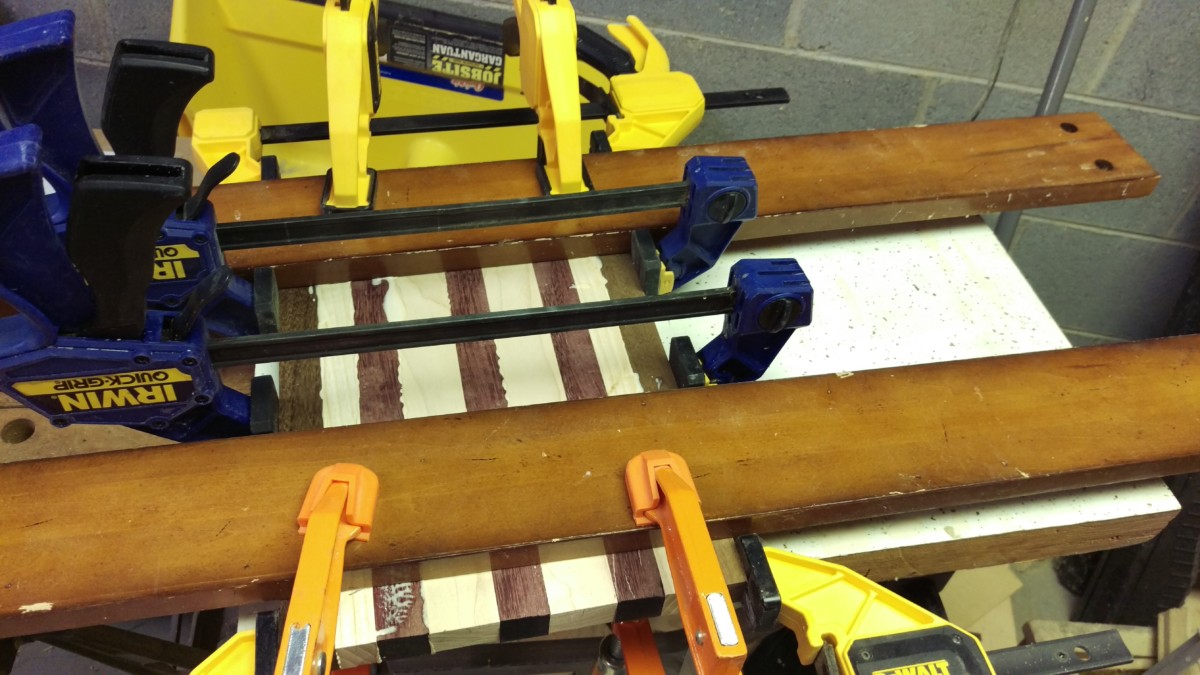
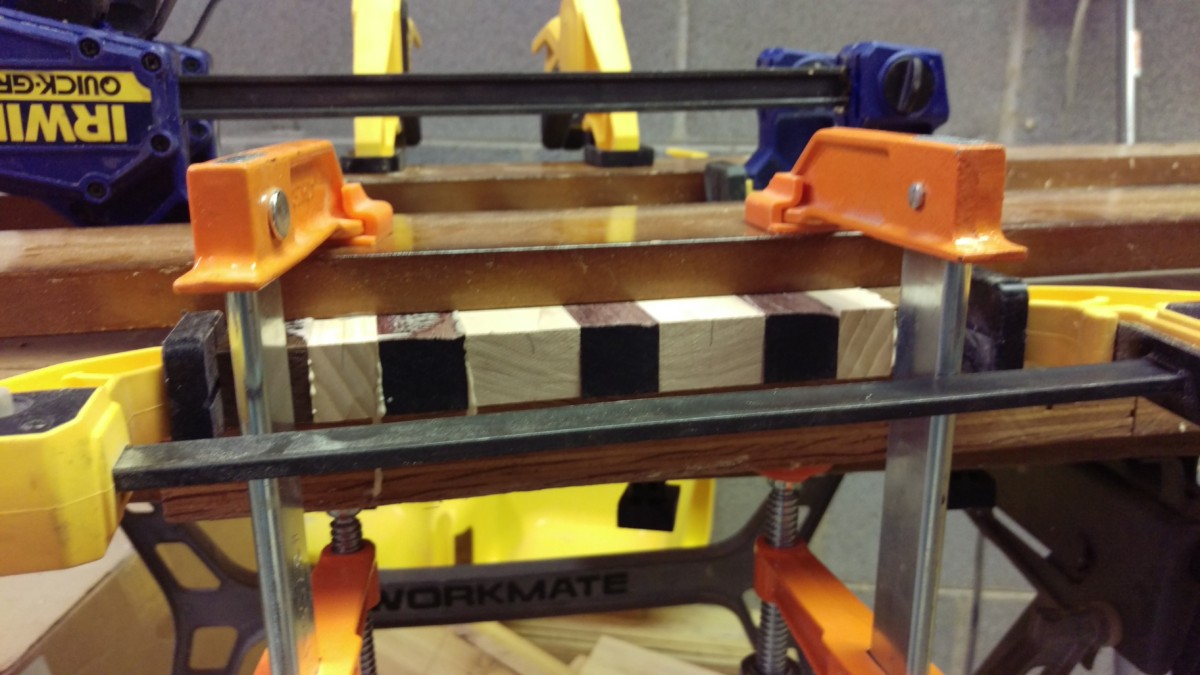
Second and Final Glue Up
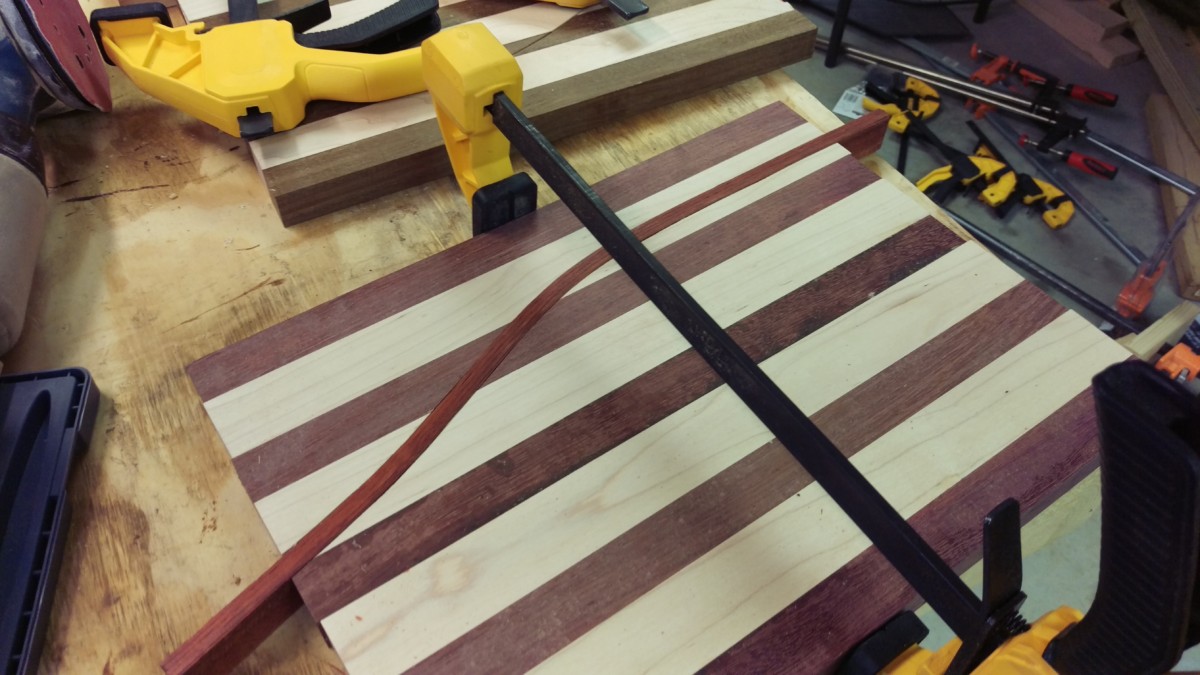
Test fitting the curve to see how it looks
Once you have you strips ready, you can do a test fit with a clamp to see how it will look. This lets you make sure that the stripes on the cutting board will line up properly. It also confirms that the strips you’ve chosen are flexible enough to clamp in the curve. Doing this before adding glue helps prevent a messy disaster.
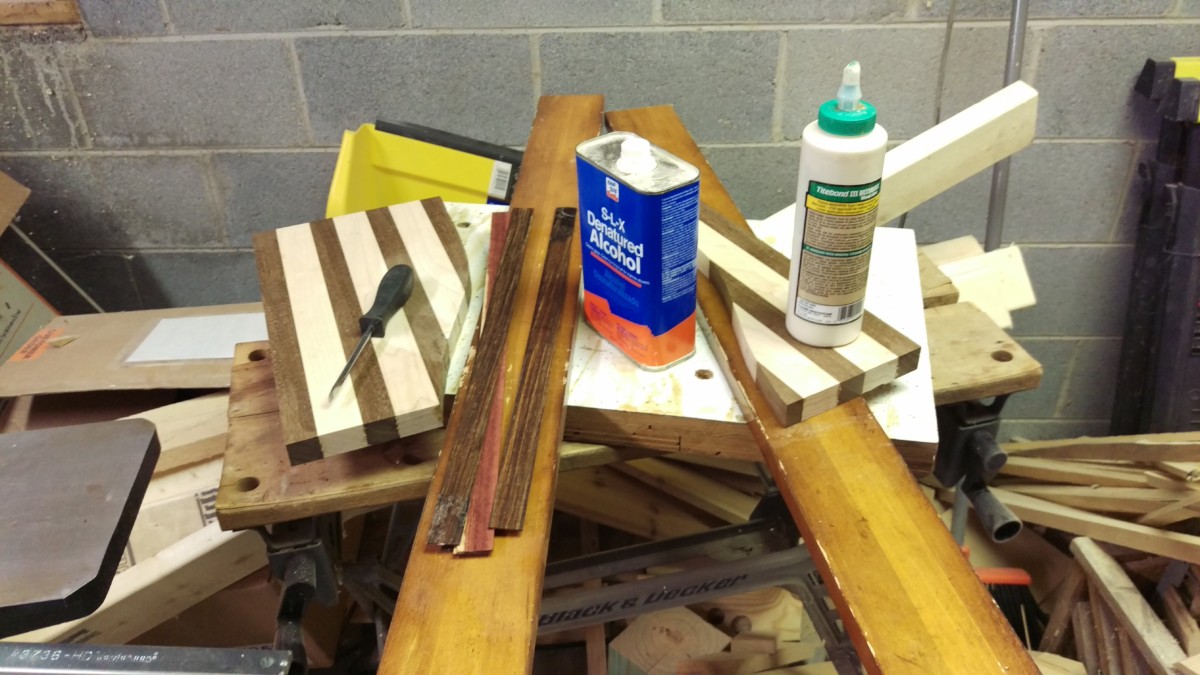
Wipe with a solvent like denatured alcohol for oily woods like cocobolo
If you’re working with a really oily wood, like the strips of cocobolo in the picture, you should wipe the strips down with some kind of solvent just before gluing. In my case, I used denatured alcohol that I had handy. Cocobolo is particularly notorious for the oil in the wood causing problems with glue adhesion, but the same treatment will help ensure a good glue bond with other oily exotics as well.

Roughly the same as the first glue up, with more force
Once you’re sure that your curve is how you want it and you’ve wiped down any oily wood with a solvent, go ahead and glue. The glue up is fairly straightforward, with only a couple of gotchas. The first is that a really good, strong clamp is required for the main clamping force squeezing the curve into shape. I ended up using the screw-style bar clamps in the picture rather than the quick clamps I had been using. The reason is that weaker clamps simply can’t apply enough force to fully close the joint and ensure you don’t have any gaps around the curve. Even so, it can be difficult to eliminate all gaps if the strips you cut are too wide to flex.
The second gotcha is that, depending on the curve you’ve chosen, the boards will have a tendency to slide around. I ended up using longitudinal clamps to pull the board back into alignment. Even so, the two halves were a little bit offset, although not enough to be noticeable.
The final bit of advice is to lightly clamp the curve into shape, then apply clamps to the top and bottom holding the halves aligned vertically, then align it and apply full clamping force. You have to kind of trial and error your way to getting everything straight.
Final Gap Filling
I generated some sanding dust to match the wood
Unfortunately, I didn’t find out that I needed to use really strong bar clamps until too late. Couple that with my tearout problem in the louro preto, and there were a few gaps that needed to be filled. Since you have the advantage of all my infinite wisdom (not), you may be fortunate enough to get to skip this section. I actually did this after cutting and rounding the boards below, but I would suggest doing it before if possible.
You really don’t want gaps in a cutting board because it can supposedly harbor bacteria and murder your whole family. I say supposedly because there’s an awful lot of fearmongering on the internet, and I’m pretty suspicious about this particular bit of lore. In any case, gaps don’t look or feel very nice and may contribute to the board splitting later on.
To fill them, I started by obtaining a good amount of sanding dust. The most expedient way for me is to use sanding dust. When I want to get a proper match, I empty my random orbit sander’s dust collection thing, grab a piece of scrap, and sand it with 100 grit until I get enough to work with.
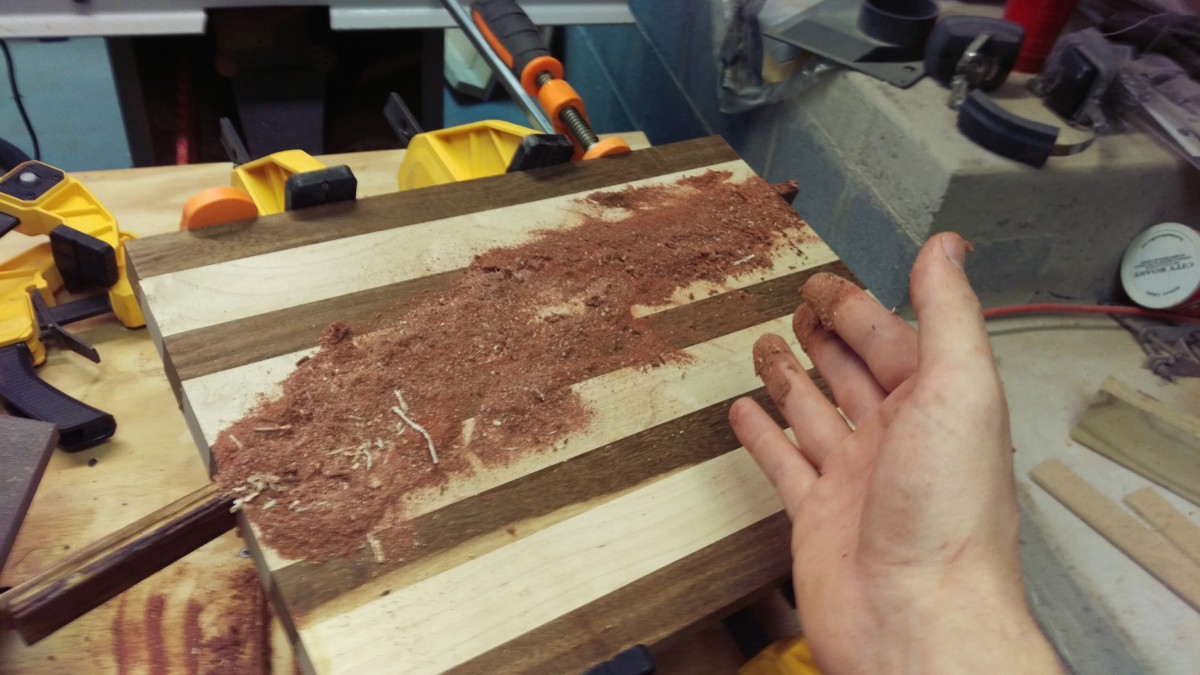
Put glue in the cracks and rub in sawdust
Some folks combine the glue and sawdust into some sort of paste that they put in the cracks. This never yielded good results for me, so I took the easy approach. Instead, I just dabbed a decent amount of wood glue in the gaps and covered all the glue in a good coating of sawdust. Finally, I rub the sawdust in pretty aggressively. This seems to do a good job forcing a glue/dust mixture down into the gaps.
The gaps after filling
After the glue dries, the initial result looks pretty ugly thanks to all the buildup.

Gaps fixed
However, once you do a little scraping and sanding, it becomes a lot more polished.
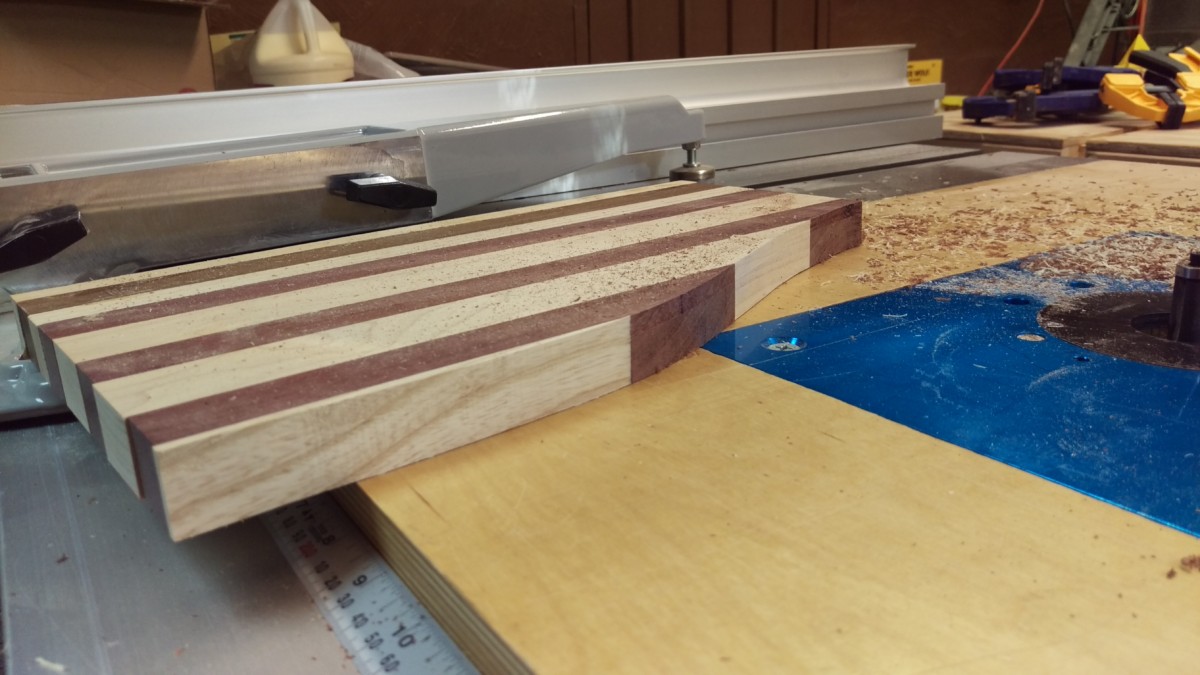
Cutting and Rounding the Board
Quickly cutting the curve wood ends
Once the glue dried overnight, it’s time to finish up the piece. I started by using my table saw sled to lop off the bloodwood sticking out past the end of the board. I left the ends uncut to give as much slack as possible for possible snipe with the planer later on. If you’re planning to flatten the boards by hand or with a drum sander, you could go ahead and cut these flush right now.
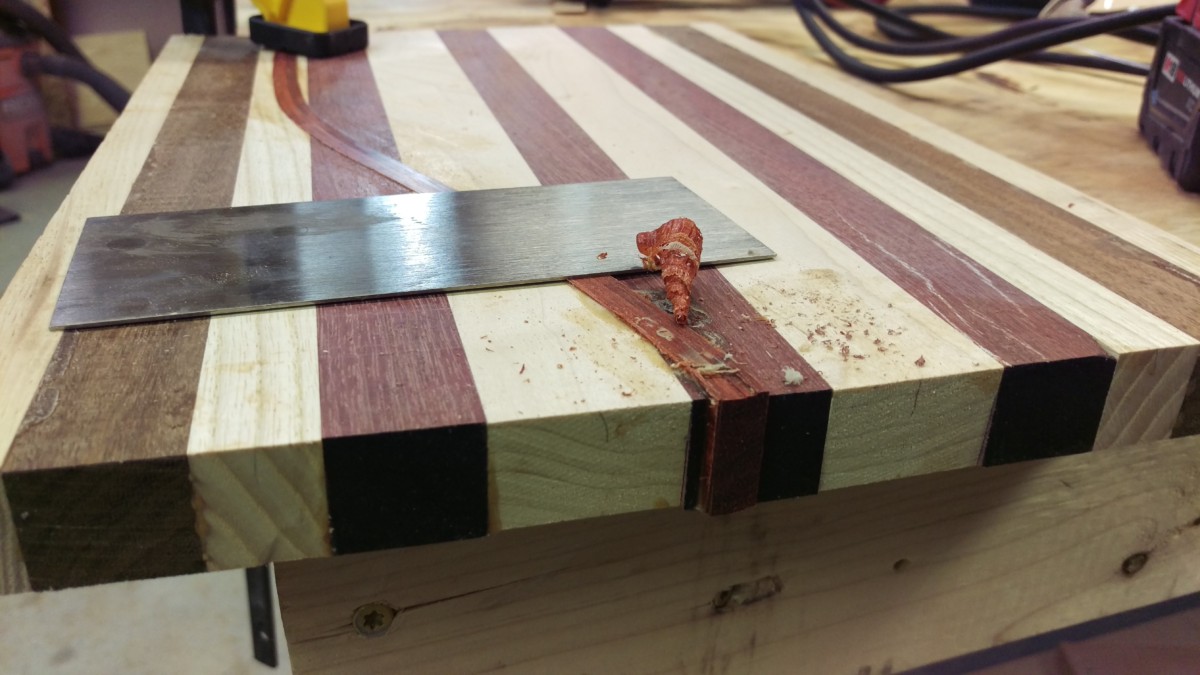
As before, removing the bulk of the glue with a scraper
As before, I removed the bulk of the glue with a cabinet scraper.
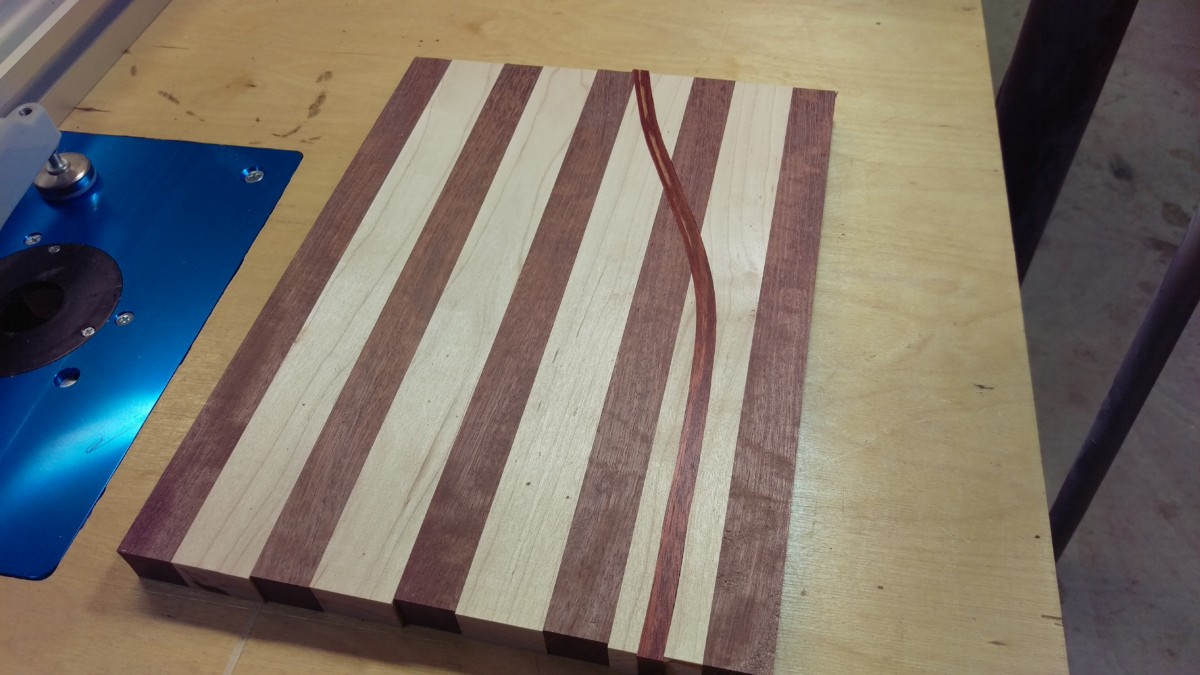
Run through the planer very carefully
I then carefully gave each side a pass or two through the planer, taking off only 1/64″ or less each time. Prior to this, it wasn’t worth worrying about getting the board to a final flat surface because of all the cutting and gluing going on. At this point, however, this is going to be the final surface.
As an alternative to a planer, a hand plane would do a good job here. The best tool would probably be a drum sander, if one is available, to guard against potential tearout.
Flush cutting the sides on the sled
Finally, I cut the sides flush. This involved taking enough material off each side so that they’re nice, flat, and square.
I used an 1/8″ roundover bit in the router table
With that done, I took the boards to the router table. An 1/8″ roundover bit gave a nice soft edge while still leaving the board square. The louro preto, again being prone to tearout, required slightly special handling. I rounded over the end grain first, then jointed the sides of the board to remove any tearout, and then rounded the long grain.
Final Sanding
There weren’t any pictures of this, but I did the final finishing with my random orbit sander and by hand. A good edge sander would have been nice to have. Either way, I simply sanded the entire board along the grain, moving from 100 grit to 150 grit to 220 grit. I also used sandpaper by hand to remove the edge on the corners, which the router bit couldn’t touch very easily.

Close up of the repair
Here is a closeup of the tearout repair from earlier after all was said and done. The glue/sawdust mixture did a decent job blending the repair pieces into the surrounding wood. If I had wanted to get fancy, I should have tried to only use maple dust near the maple, since that kind of highlights the maple repair pieces. Unfortunately, there wasn’t really time to fool with that. It still came out looking pretty good, all things considered. Defects are how you know it’s hand made, right?
Finishing
The finishing process the best part of these boards. After they’re fully sanded, wipe the boards down with something to remove the dust. I usually use denatured alcohol, but that drew color out of the bloodwood and cocobolo and started to stain the boards. Instead, I found that simply blowing them off with compressed air and wiping them with a dry cloth seemed sufficient. I gave them a final wipe with a barely-damp paper towel to avoid raising the grain.
Then you should apply a few coats of some kind of wax or oil. My boards were coated with the Howard Butcher Block Conditioner

Of course, a cutting board like this should never be put through the dishwasher. It can be lightly hand washed with soap and water. If the knife marks become too bad, the board can be sanded down, with a new finish applied afterwards.
Conclusion

Board #1
Board #2

Board #1 being used

Board #3
Board #3 being used
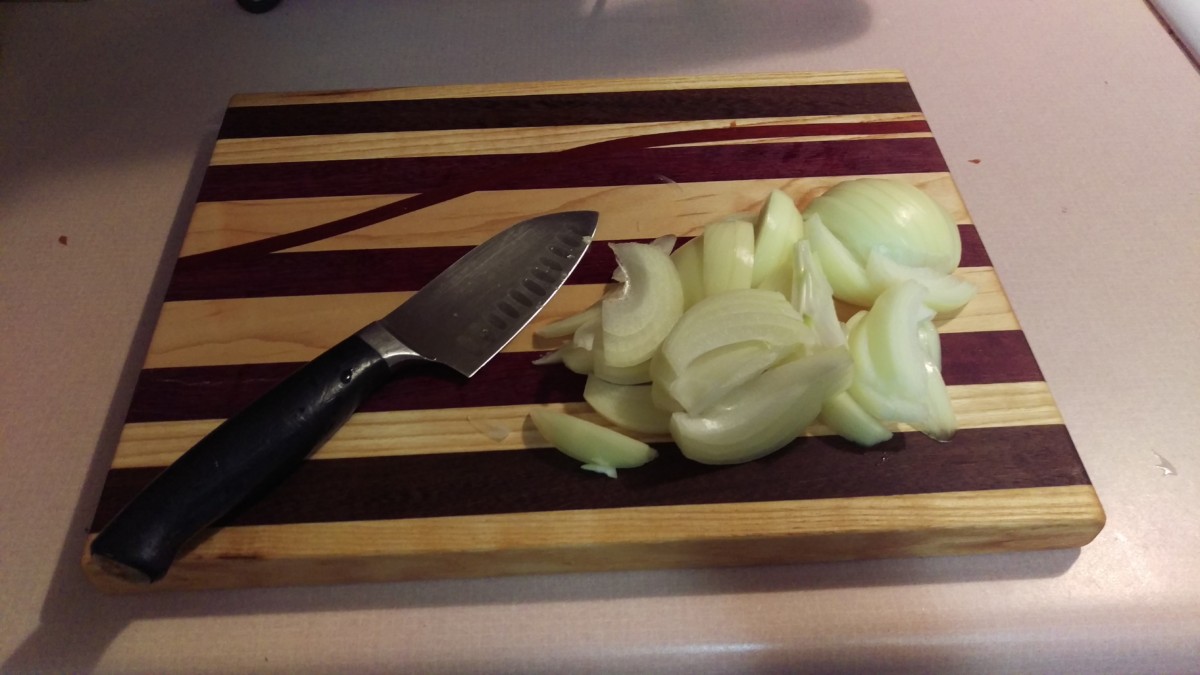
These cutting boards are pretty easy to make, and they turned out quite well. These were gifts, after all, and they seemed to go over really well. The only issue with boards like this is convincing somebody to use a knife and cut into them!
Additionally, you can save quite a bit of money making something like this yourself. Similar boards from Williams Sonoma, for example, can easily range from $100-$200, whereas each board cost me around $15 in wood.
[…] need of a bandsaw to finish a couple of Christmas presents (The two-color reindeer ornament and some cutting boards). A bandsaw had been on my list for quite awhile. Ordinarily, it’d be preferable to wait for […]