Miata O2 Sensor Replacement
At some point, the O2 sensors in your car may go out. Fortunately, Miata O2 sensor replacement is fairly straightforward, especially if you get a direct-fit O2 sensor. I had both my front and rear sensors go bad.
You do want to diagnose the issue to ensure you really do need an O2 sensor. There are a lot of check engine light codes for which the O2 sensor is one possibility, particularly emissions-related codes, but that isn’t necessarily the problem. Be sure to confirm the issue isn’t related to exhaust leaks, the exhaust gas recirculation (EGR) system, vacuum leaks, the MAF sensor, etc prior to replacing the O2 sensor.
Tools Required
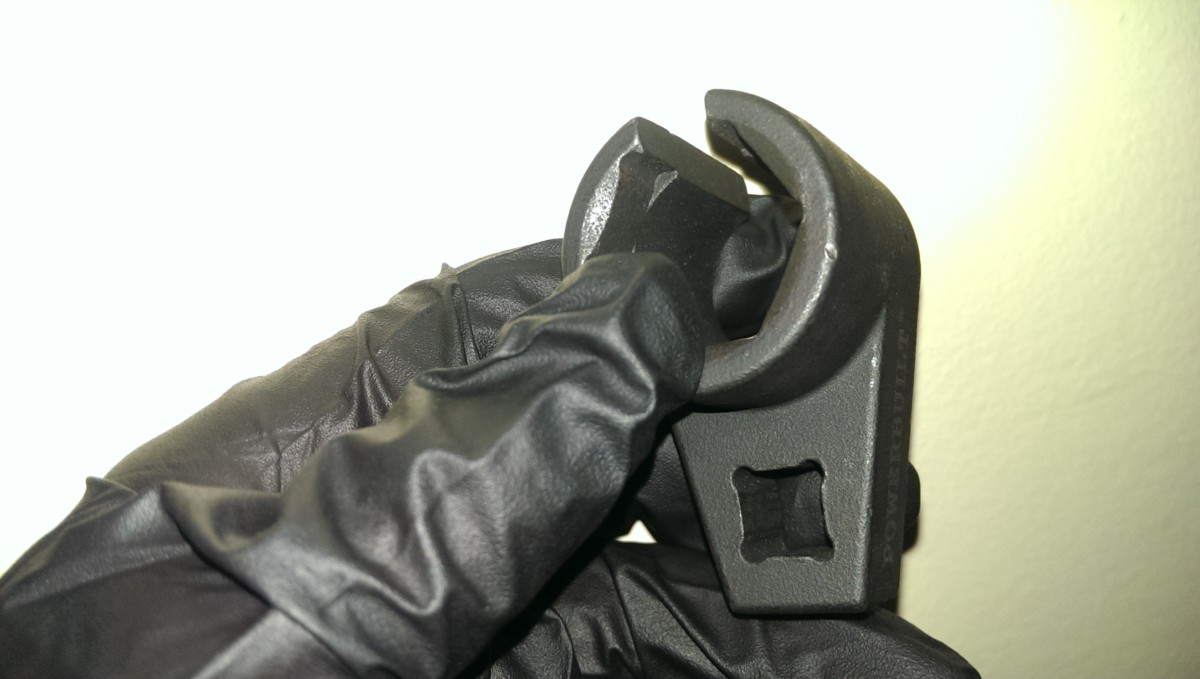
O2 Socket
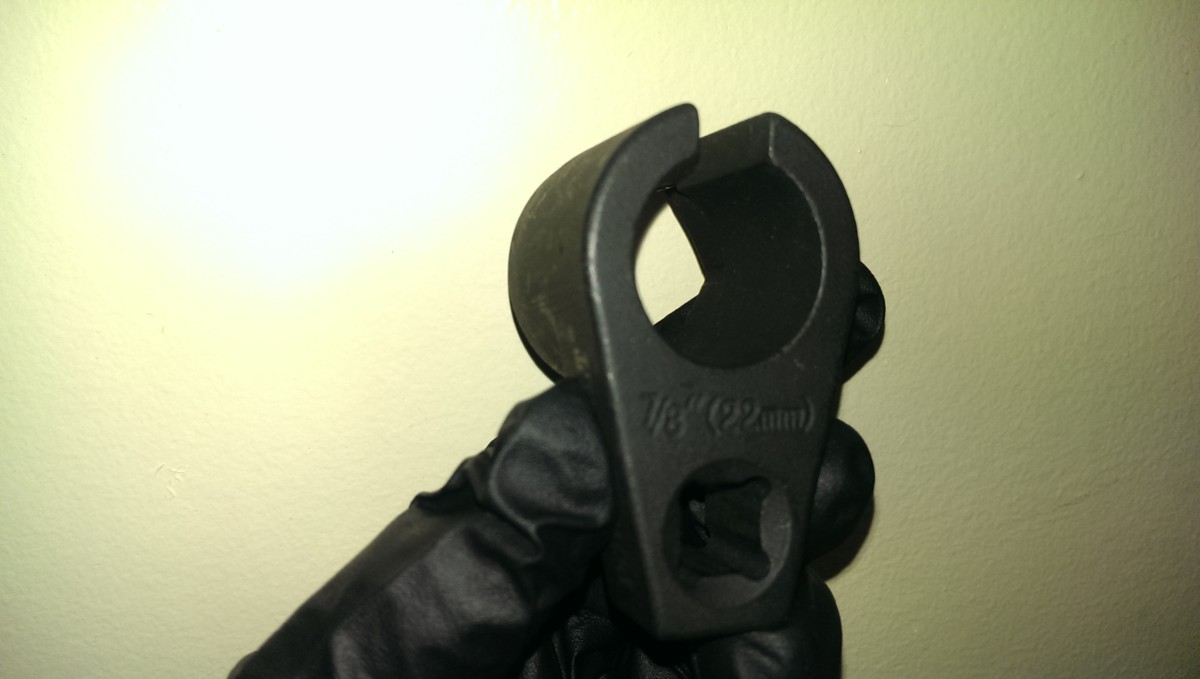
O2 Socket
The only tools required for this job are a decently long socket extension, a 3/8″ socket wrench, and one of these O2 sensor sockets. The proper O2 sensor socket for this car is 7/8″ AKA 22mm. As you can see, they’re specially designed to offset the socket from the ratchet and provide a slot to get around the O2 sensor wire. Don’t use an open-ended wrench for an o2 sensor, as you’ll likely damage it.
Direct Fit vs Universal
Bosch 15330 Direct Fit: Had two of these fail
You’ll notice when shopping for a replacement sensor that there are both direct-fit and universal sensors. All direct fit means is that it comes with the plastic plug on the end. Universal sensors, on the other hand, need to be spliced into the plug from your existing sensor. Obviously direct fit is a little bit easier to install.
That said, I would beware the Bosch 15330. This was the first one I ordered, and it was bad on arrival. I returned it for a replacement, assuming I’d just gotten a dud, and it was bad too. I ended up deciding to stick with universal sensors for this car after that experience. Personally, I solder the wires and wrap them with heat-shrink tubing like I do with all automotive wiring I do. There are only four wires, and it can be done outside of the car, so it’s pretty straightforward.
Replacing the Front O2 Sensor
Unplug the O2 sensor near the back of the motor
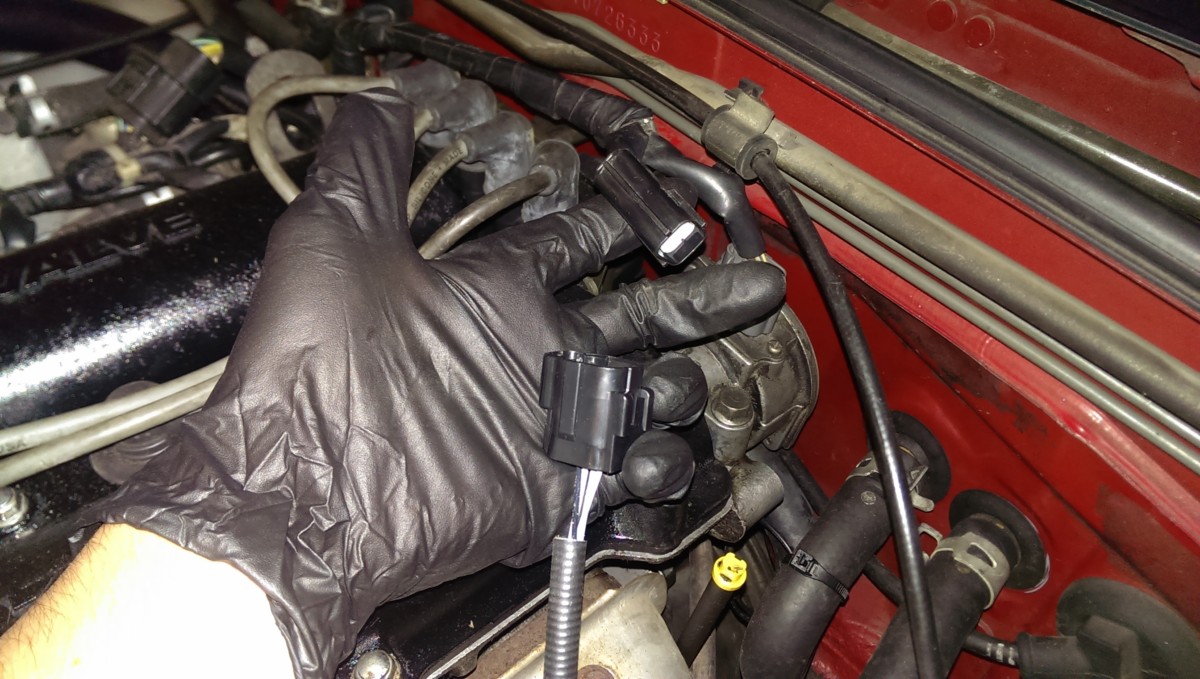
Kind of fiddly, but it will come out
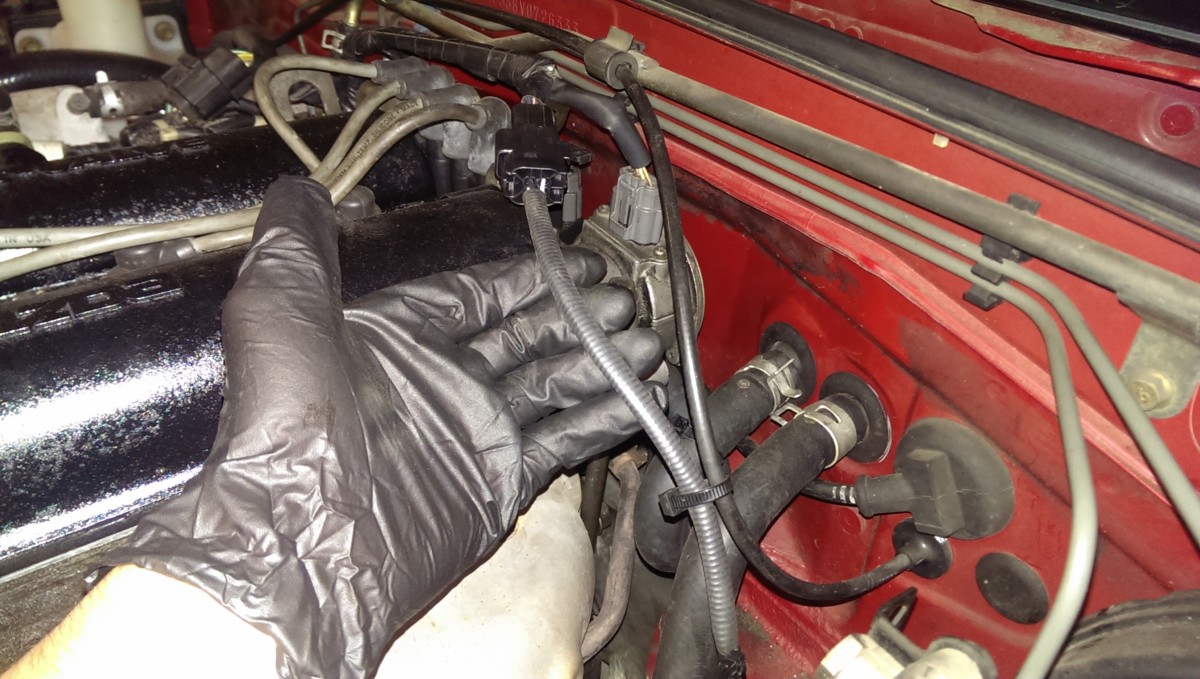
The first step is to unplug the O2 sensor. It connects to the wiring harness near the cam angle sensor on the back of the motor’s head. It has a little clip you push in, then pull it out. It can stick fairly tight if it has never been removed, but shouldn’t be a big deal.

Feed the wire down to the sensor, pictured
Once the wiring is out, you can feed it down to where the sensor itself is. This will be on the downpipe, just follow the wire. It is shown in the picture, you can see it from above.
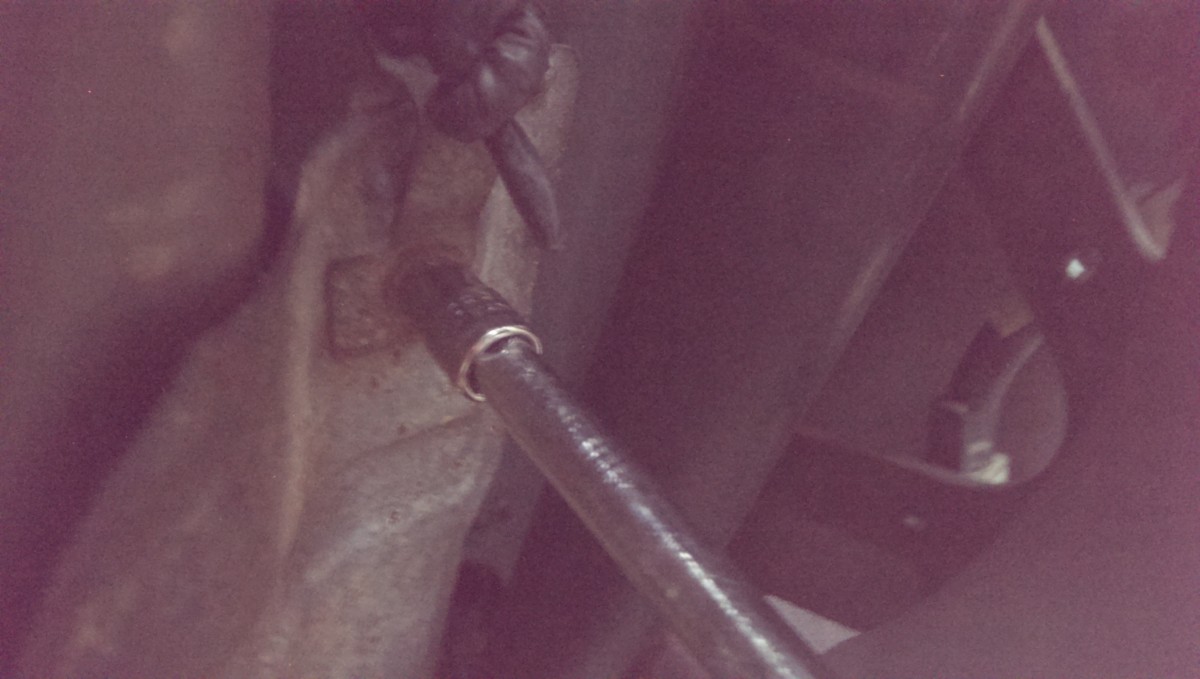
Far away view of sensor
Close up view of removal
I found my longest extension made it easy to get the O2 sensor socket on the sensor. It’s easy to see, but a bit tricky to get a wrench on, because most of the car gets in the way. I think the easiest is to just lift the car and remove the driver’s side tire, coming in through the driver’s fender well.
Once you you break the sensor loose with the wrench, it’s often easier to simply twist it out the rest of the way by hand. I try to avoid twisting the wires any more than necessary. Installation of the new sensor is the same procedure in reverse.
Replacing the Rear O2 Sensor
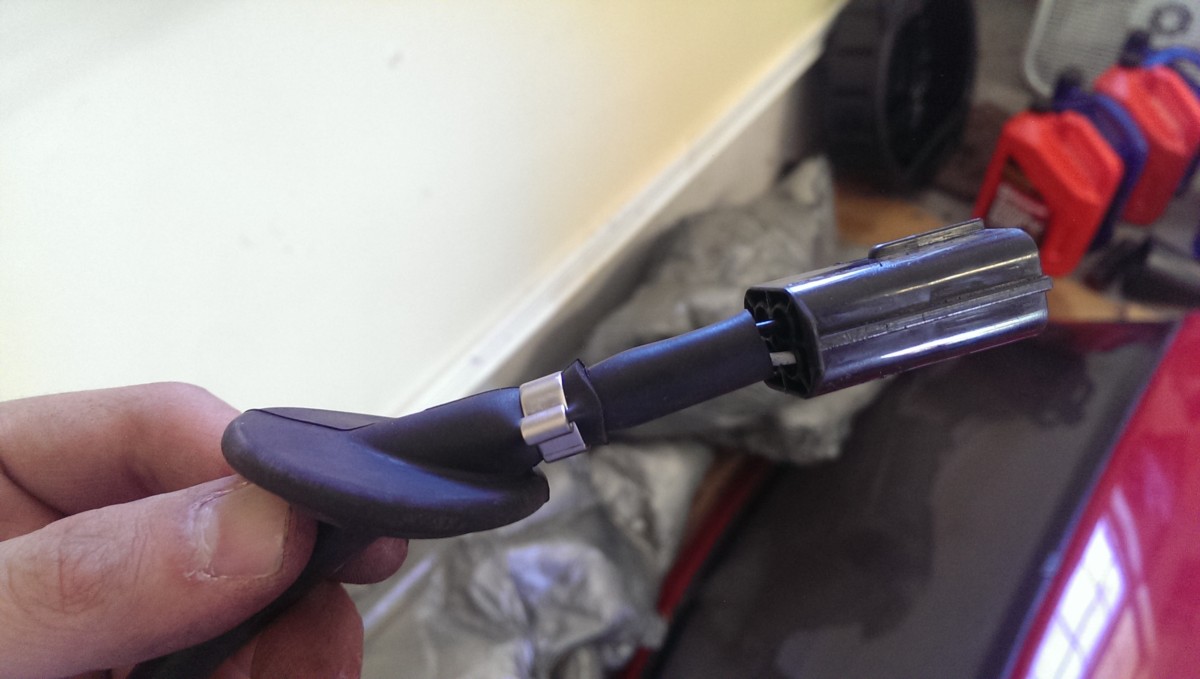
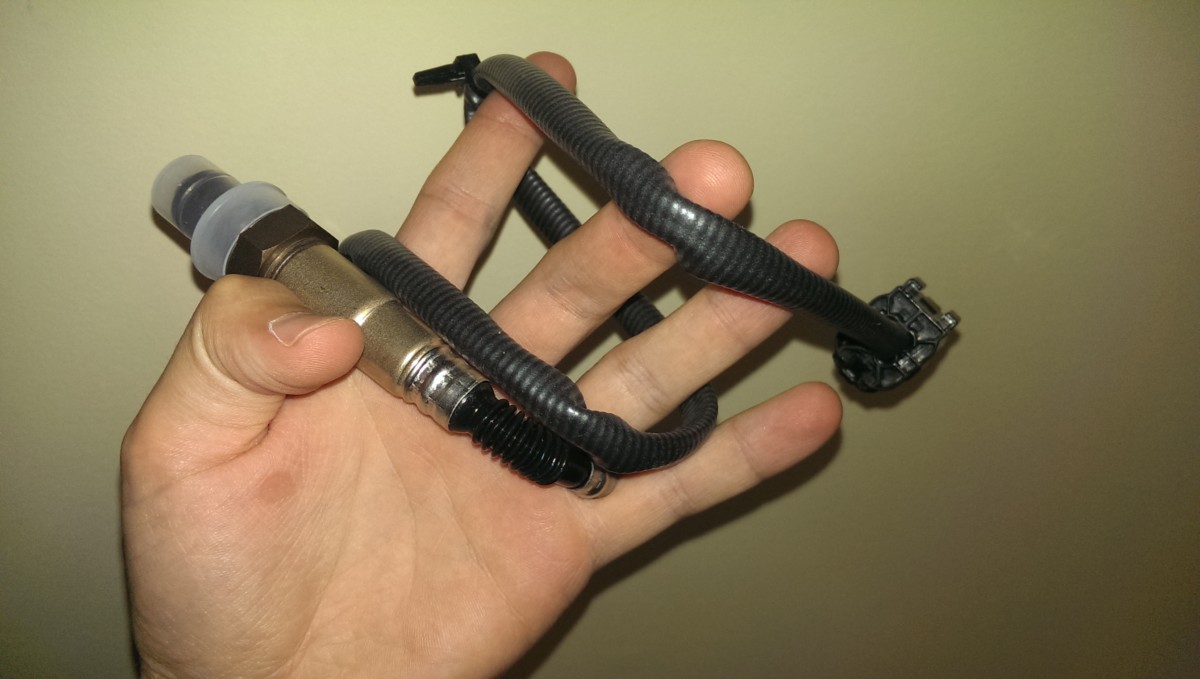
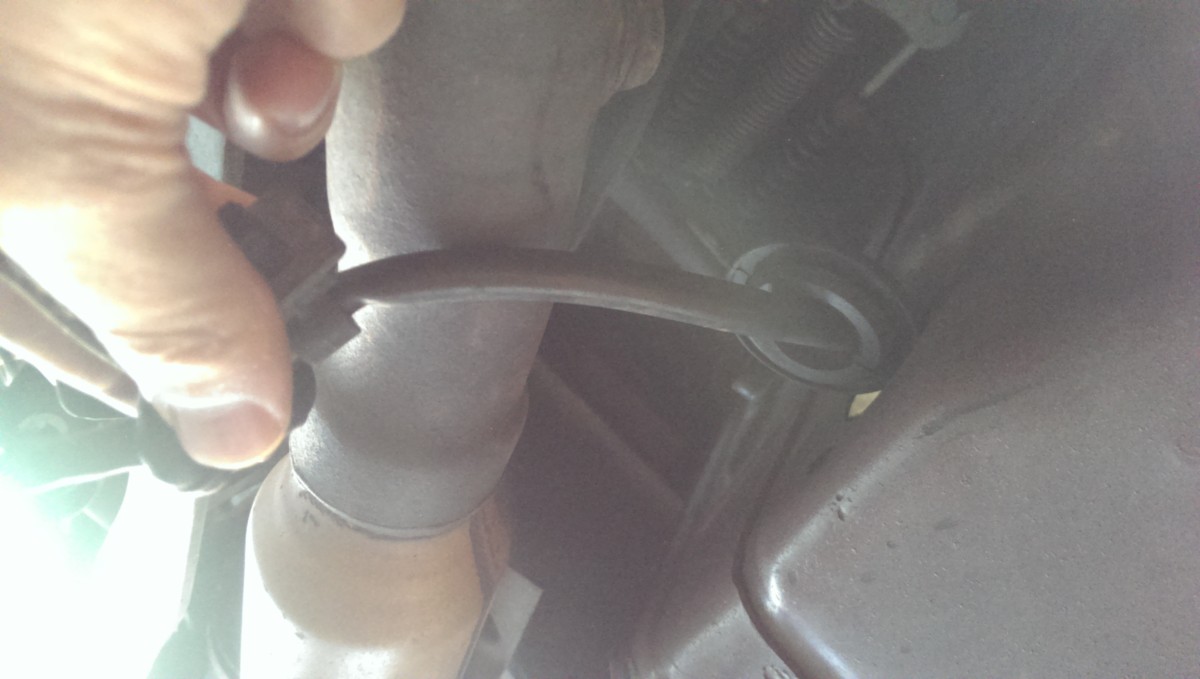
The rear o2 sensor, including the grommet
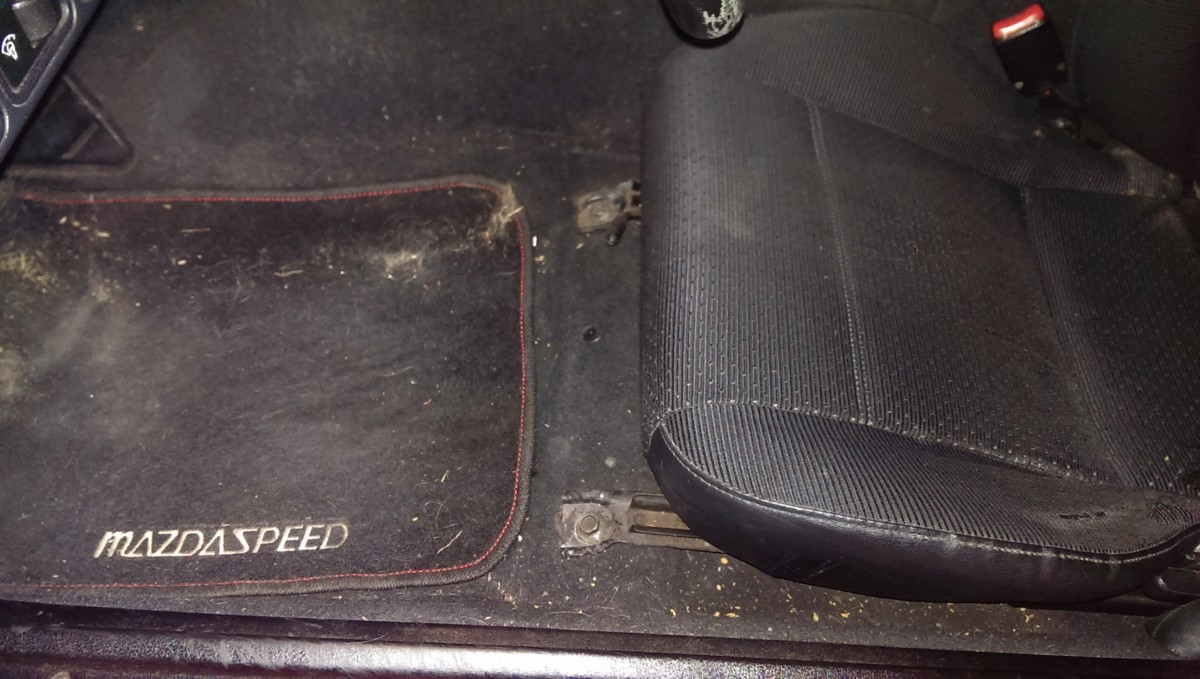
The rear sensor is a little bit trickier than the front, because the plug for it is under the driver’s seat carpet. The previous owner of my car decided to splice in a new universal rear sensor under the car, without bothering to unplug it. This meant he had way too much wire afterwards, and it was all balled up in a mess. I don’t recommend this: pulling the seat and fishing under the carpet isn’t that hard, it’s not worth doing such a bad job.
As you can see, if you do get a universal sensor, you’ll have to be sure to cut off the plug below the rubber grommet pictured. Since the wiring for the rear O2 sensor runs through the floor pan, the grommet keeps water out.
Front 2 seat bolts need to come out
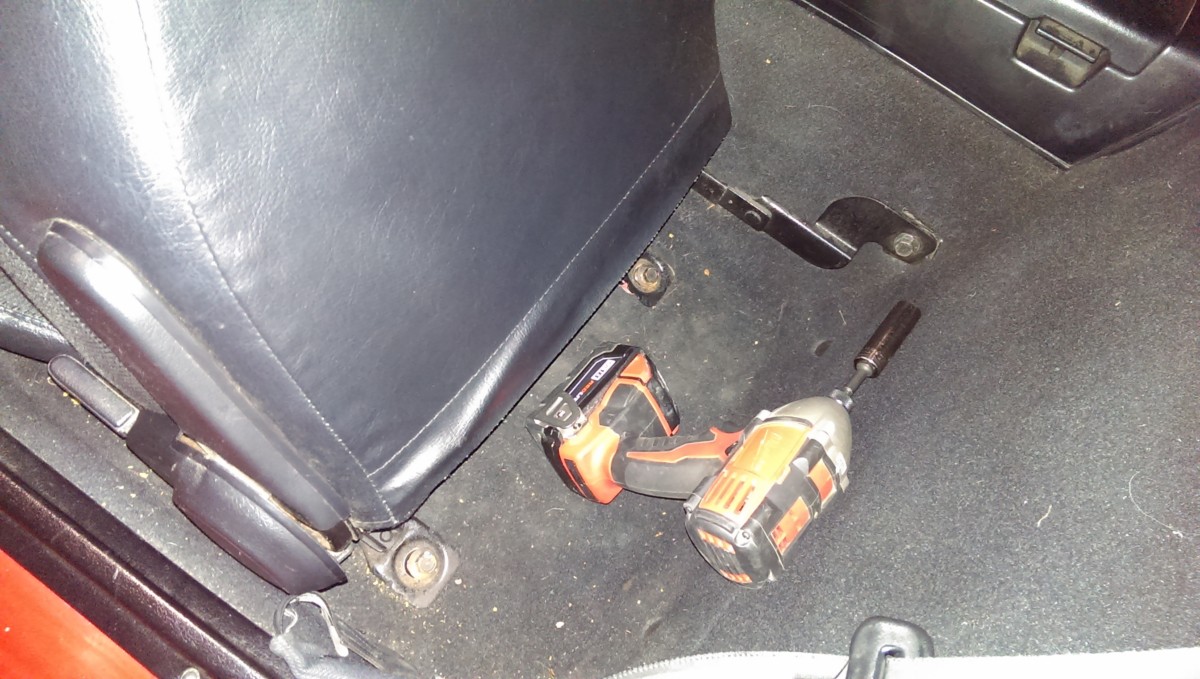
Rear 2 seat bolts plus the seatbelt bolt if necessary, I used an impact driver
To pull the seat, there are four bolts for the seat itself. Push the seat all the way back, and you’ll see the front two. Then, push the seat all the way forward to access the rear two. On some model years, like my 97, you also need to undo the bolt against the transmission tunnel for the seatbelt, if it is attached to the seat on your car. Finally, the seat just lifts out. It’s easiest to pull out with the top down. I use a small impact driver with a 14mm 6-point socket to pull the bolts, it goes very fast.
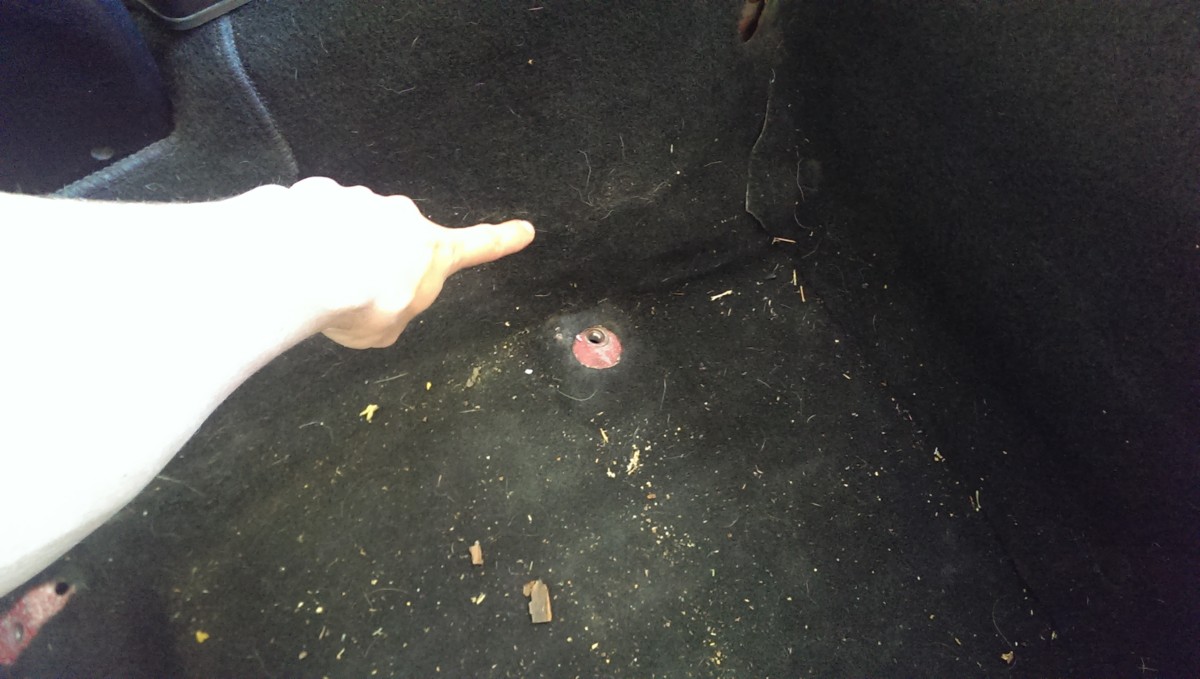
Location of the wiring harness, under the carpet
I’m pointing to the location of the wiring harness. I tried to photograph the next step, but it was nearly impossible. I found that if I pulled the center console, I could get my hand down between the carpet and the transmission tunnel to reach the harness, and disconnect it by feel. This is a lot simpler than it sounds. The center console comes out with 5 screws: two near the shifter, one under the ashtray/cupholder, and two in the rear compartment.
You could also try to remove a bunch of carpet to get to this harness, but I think that’s a lot of work. This was mildly annoying, but no big deal. On the plus side, unlike the connectors in the engine bay, this one has generally been protected from heat and weather and doesn’t seem to stick too badly.
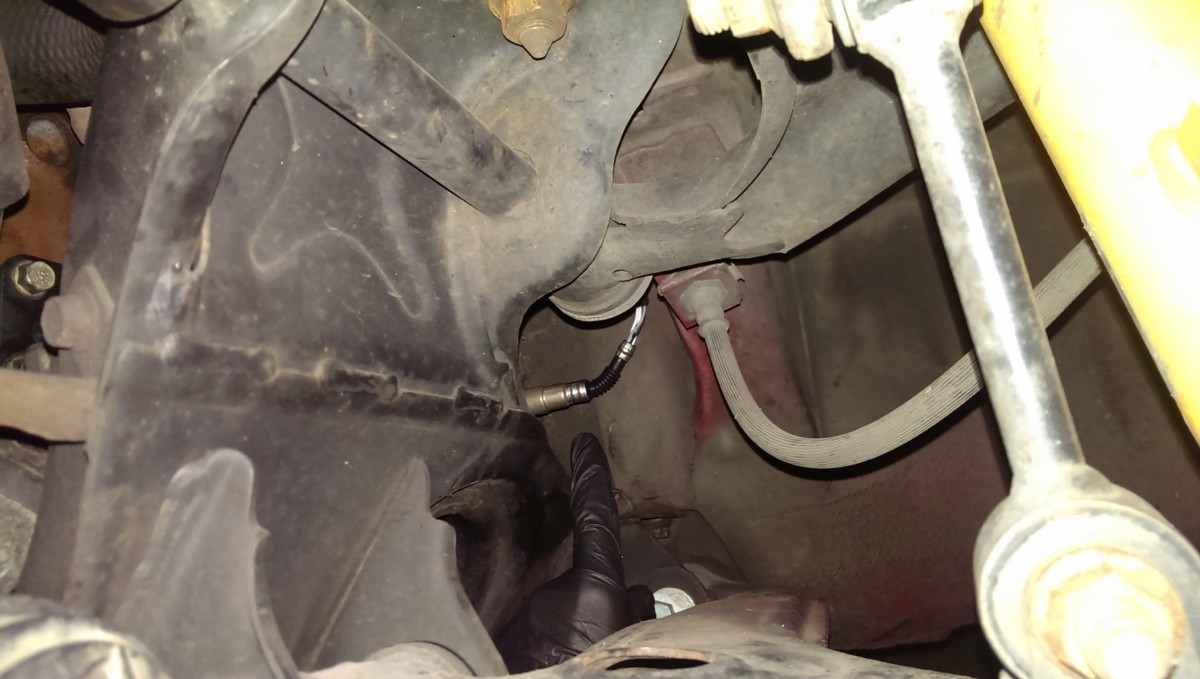
Location of the rear o2 sensor
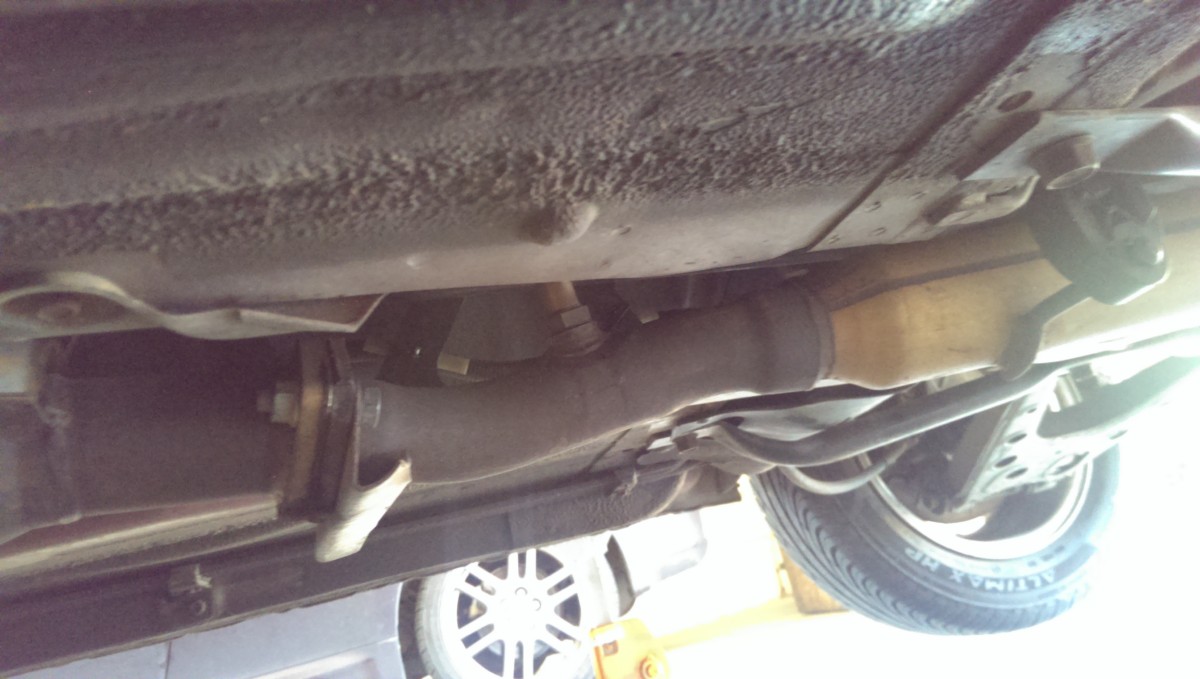
The next part requires getting under the car. I generally put the front on ramps, and then put the rear of the car on jack stands. This gives me plenty of clearance in the middle to slide under with a creeper. The picture shows the rear O2 sensor’s location. It’s on the exhaust pipe right after the catalytic converter.

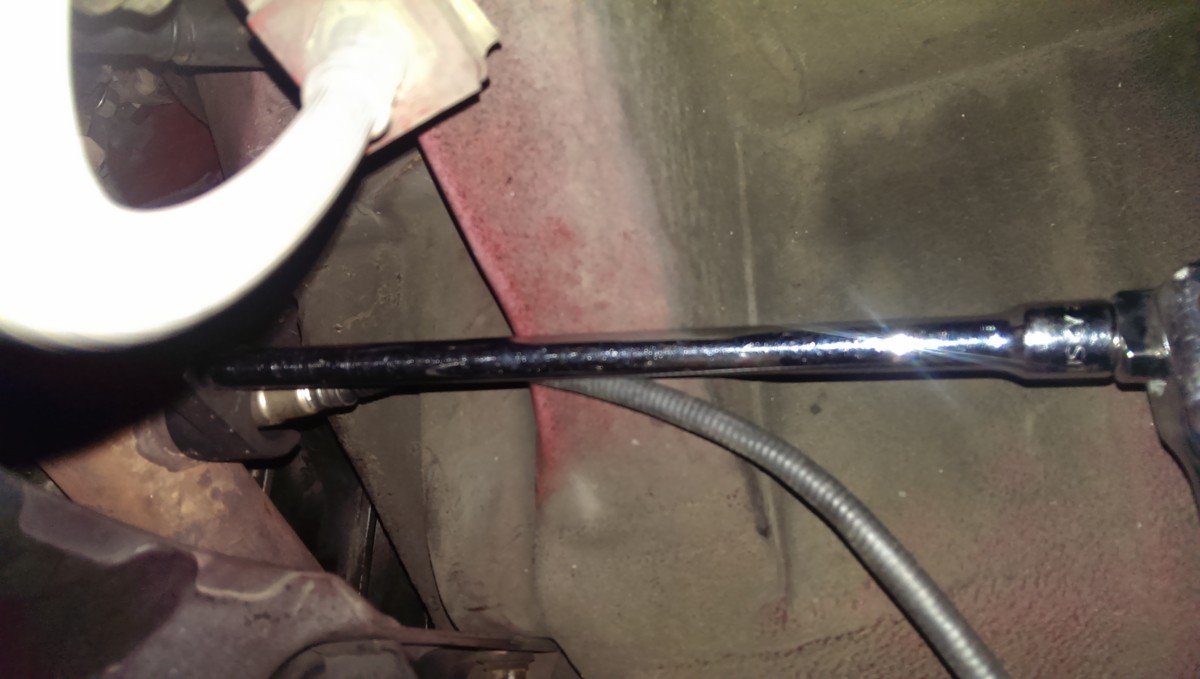
Loosening the rear O2 sensor
Sorry that the next two shots look like they’re from a Prince video, my smartphone was on its way out and has since been replaced. I used the O2 sensor socket to break the rear sensor loose.
Removing bolt holding wire mount
There’s also this bolt attached to a bracket that keeps the sensor wire from rubbing the catalytic converter. The wire on my old sensor had been extended to such a length that this was totally ineffective.
Pull grommet out
At this point, you should have unclipped the wiring harness under the driver’s seat carpet. You should have also loosened and removed the O2 sensor from the exhaust and undone the wire-holding bracket. The last step is to pinch the rubber grommet and pull the wiring connector out through the hole in the floor pan. As before, reinstallation is the reverse of removal.
This was a great write-up! For anyone who’s following along as I was, after you remove the driver’s seat you can peel up the carpet that was behind the back of the seat (it just velcro’s down), then lift the back of the floor portion of the carpet. On my 2002 at least that took all of 15 seconds and lets you get right at the wiring harness with lots of visibility and access.
Thanks for the tip, glad it was helpful!
Are the O2 sensors both the same part or is there a difference between the pre and post converter sensors? thanks!
They have the same plug and the actual sensor is the same, but the front sensor has a longer cable, while the rear sensor (if Mazda OEM) has the grommet crimped on. (The image with the caption “The rear o2 sensor, including the grommet”)
As far as I know, you can buy a “universal” o2 sensor for either location and solder the wiring yourself if you’d like, as well.
Does the bad rear O2 sensor result to bad fuel consumption ?
It shouldn’t. The primary/front O2 sensor is used for adjusting fuel mixture. The rear O2 sensor should only be used to determine if the emissions controls are working (like the catalytic converter).
Just FYI: This description does not work for the California Miata models. The 1999 CA Miata model has two catalytic converters, and the rear sensor sits behind the pre-cat in the engine compartment. It also has a different plug.
James, I know your post was a long while ago but it was very helpful and just in case you are still on line…
I changed the rear oxygen sensor on my Mk3 MX5 3 months ago and have an O2 socket.
I was going to change the front sensor as well but I found it impossible to get to as my car has a quite small, thin metal heat shield between the manifold and the body work (not the shield underneath). I couldn’t get sockets or spanners onto the bolts holding the front of the shield, even with the front tyre and the wheel arch inspection hatch removed. Eventually I gave up and now wish I hadn’t.
Did you have any problems with a heat shield when accessing the front sensor?
Thanks Chris
Hi Chris, No worries – I’m still running this blog. I assume “mk3” translates to what we call an NC in the US, in which case unfortunately I don’t have any experience working on them. On the NA (mk1) I have, you can see that the exhaust manifold is still attached, but it did not block access to the O2 sensor.
I don’t have a good answer for you, except that in cases like yours, universal joint sockets and crow foot sockets.
James,
Thanks.
Yes this is a UK Mark 3 which seems to be slightly different from US model. I guess I need ‘Mr Gadget’ arms and fingers! I am about to have another go later this week – If I find a workable method i will post. Chris
Hey, not sure if this is different in the US but I have a Jap import miata (eunos) in the UK.
I was told the rear sensor is simply a “heat sensor” and doesn’t actually feed back any fuel trimming or anything to the ECU. Mine was simply detached when I got the car.
Do you know if this is true?
That is correct. The rear O2 sensor is only used to determine if the catalytic converter is working correctly.